2021 CHEVROLET MALIBU headlamp
[x] Cancel search: headlampPage 228 of 351
Chevrolet Malibu Owner Manual (GMNA-Localizing-U.S./Canada-
14584249) - 2021 - CRC - 11/9/20
Vehicle Care 227
Vehicle Care
General Information
General Information . . . . . . . . . . . . . . . . . . . 228
California Proposition 65 Warning . . . . . 228
California Perchlorate MaterialsRequirements . . . . . . . . . . . . . . . . . . . . . . . . 228
Accessories and Modifications . . . . . . . . . 229
Vehicle Checks
Doing Your Own Service Work . . . . . . . . 229
Hood . . . . . . . . . . . . . . . . . . . . . . . . . . . . . . . . . . 229
Engine Compartment Overview . . . . . . . . 231
Engine Oil . . . . . . . . . . . . . . . . . . . . . . . . . . . . . 234
Engine Oil Life System . . . . . . . . . . . . . . . . 236
Automatic Transmission Fluid . . . . . . . . . 236
Engine Air Filter Life System . . . . . . . . . . . 237
Engine Air Cleaner/Filter . . . . . . . . . . . . . . . 237
Cooling System . . . . . . . . . . . . . . . . . . . . . . . . 238
Engine Overheating . . . . . . . . . . . . . . . . . . . . 241
Washer Fluid . . . . . . . . . . . . . . . . . . . . . . . . . . 242
Brakes . . . . . . . . . . . . . . . . . . . . . . . . . . . . . . . . . 243
Brake Fluid . . . . . . . . . . . . . . . . . . . . . . . . . . . . 243
Battery - North America . . . . . . . . . . . . . . . 244
Automatic Transmission Shift Lock Control Function Check . . . . . . . . . . . . . . 247
Park Brake and P (Park) Mechanism Check . . . . . . . . . . . . . . . . . . . . . . . . . . . . . . . . 247
Wiper Blade Replacement . . . . . . . . . . . . . 247
Windshield Replacement . . . . . . . . . . . . . . 248 Gas Strut(s) . . . . . . . . . . . . . . . . . . . . . . . . . . . 248
Headlamp Aiming
Front Headlamp Aiming . . . . . . . . . . . . . . . 249
Bulb Replacement
Bulb Replacement . . . . . . . . . . . . . . . . . . . . . 249
Halogen Bulbs . . . . . . . . . . . . . . . . . . . . . . . . . 249
LED Lighting . . . . . . . . . . . . . . . . . . . . . . . . . . . 249
Headlamps, Front Turn Signal,
Sidemarker, and Parking Lamps . . . . . . 250
Taillamps, Turn Signal, Stoplamps, and Back-Up Lamps (LS and LT) . . . . . . . . . . 250
Taillamps, Turn Signal, Stoplamps, and Back-Up Lamps (LT and Premier) . . . . . 251
License Plate Lamp . . . . . . . . . . . . . . . . . . . . 252
Electrical System
High Voltage Devices and Wiring . . . . . . 253
Electrical System Overload . . . . . . . . . . . . . 253
Fuses and Circuit Breakers . . . . . . . . . . . . . 253
Engine Compartment Fuse Block . . . . . . 254
Instrument Panel Fuse Block . . . . . . . . . . . 258
Wheels and Tires
Tires . . . . . . . . . . . . . . . . . . . . . . . . . . . . . . . . . . 259
All-Season Tires . . . . . . . . . . . . . . . . . . . . . . . 260
Winter Tires . . . . . . . . . . . . . . . . . . . . . . . . . . 260
Low-Profile Tires . . . . . . . . . . . . . . . . . . . . . . . 261
Tire Sidewall Labeling . . . . . . . . . . . . . . . . . 261
Tire Designations . . . . . . . . . . . . . . . . . . . . . . 263 Tire Terminology and Definitions . . . . . . 263
Tire Pressure . . . . . . . . . . . . . . . . . . . . . . . . . . 266
Tire Pressure for High-Speed
Operation . . . . . . . . . . . . . . . . . . . . . . . . . . . 267
Tire Pressure Monitor System . . . . . . . . . 268
Tire Pressure Monitor Operation . . . . . . 269
Tire Inspection . . . . . . . . . . . . . . . . . . . . . . . . . 272
Tire Rotation . . . . . . . . . . . . . . . . . . . . . . . . . . 272
When It Is Time for New Tires . . . . . . . . 273
Buying New Tires . . . . . . . . . . . . . . . . . . . . . 274
Different Size Tires and Wheels . . . . . . . . 275
Uniform Tire Quality Grading . . . . . . . . . . 275
Wheel Alignment and Tire Balance . . . . 276
Wheel Replacement . . . . . . . . . . . . . . . . . . . 276
Tire Chains . . . . . . . . . . . . . . . . . . . . . . . . . . . . 277
If a Tire Goes Flat . . . . . . . . . . . . . . . . . . . . . 278
Tire Sealant and Compressor Kit . . . . . . . 279
Storing the Tire Sealant and
Compressor Kit . . . . . . . . . . . . . . . . . . . . . . 284
Tire Changing . . . . . . . . . . . . . . . . . . . . . . . . . 285
Compact Spare Tire . . . . . . . . . . . . . . . . . . . 289
Jump Starting
Jump Starting - North America . . . . . . . . 290
Towing the Vehicle
Towing the Vehicle . . . . . . . . . . . . . . . . . . . . 292
Recreational Vehicle Towing . . . . . . . . . . . 293
Page 250 of 351
Chevrolet Malibu Owner Manual (GMNA-Localizing-U.S./Canada-
14584249) - 2021 - CRC - 11/9/20
Vehicle Care 249
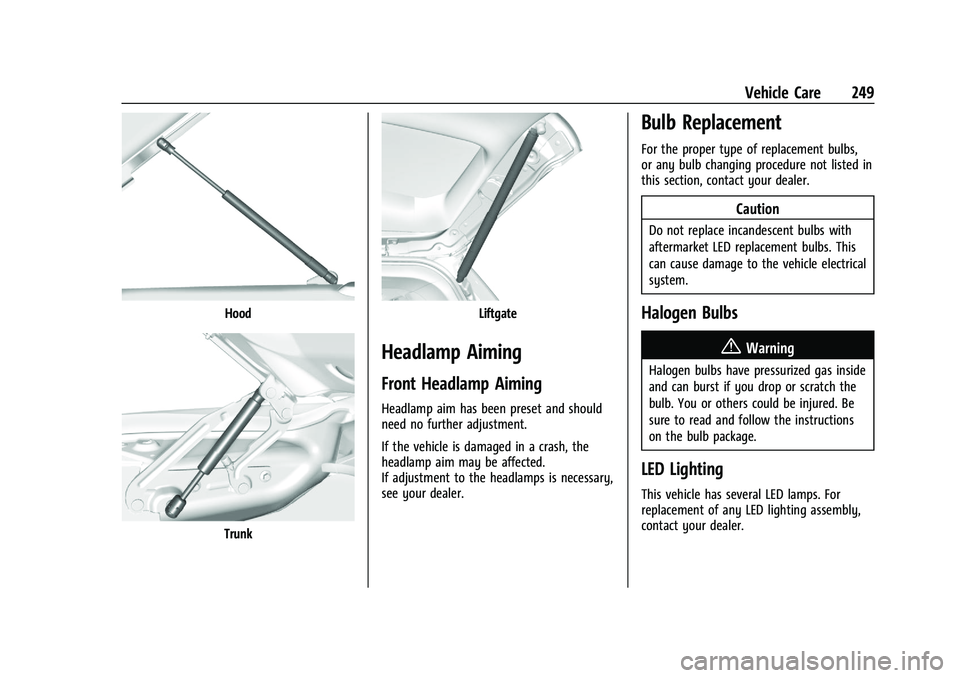
Hood
Trunk
Liftgate
Headlamp Aiming
Front Headlamp Aiming
Headlamp aim has been preset and should
need no further adjustment.
If the vehicle is damaged in a crash, the
headlamp aim may be affected.
If adjustment to the headlamps is necessary,
see your dealer.
Bulb Replacement
For the proper type of replacement bulbs,
or any bulb changing procedure not listed in
this section, contact your dealer.
Caution
Do not replace incandescent bulbs with
aftermarket LED replacement bulbs. This
can cause damage to the vehicle electrical
system.
Halogen Bulbs
{Warning
Halogen bulbs have pressurized gas inside
and can burst if you drop or scratch the
bulb. You or others could be injured. Be
sure to read and follow the instructions
on the bulb package.
LED Lighting
This vehicle has several LED lamps. For
replacement of any LED lighting assembly,
contact your dealer.
Page 251 of 351
Chevrolet Malibu Owner Manual (GMNA-Localizing-U.S./Canada-
14584249) - 2021 - CRC - 11/9/20
250 Vehicle Care
Headlamps, Front Turn Signal,
Sidemarker, and Parking Lamps
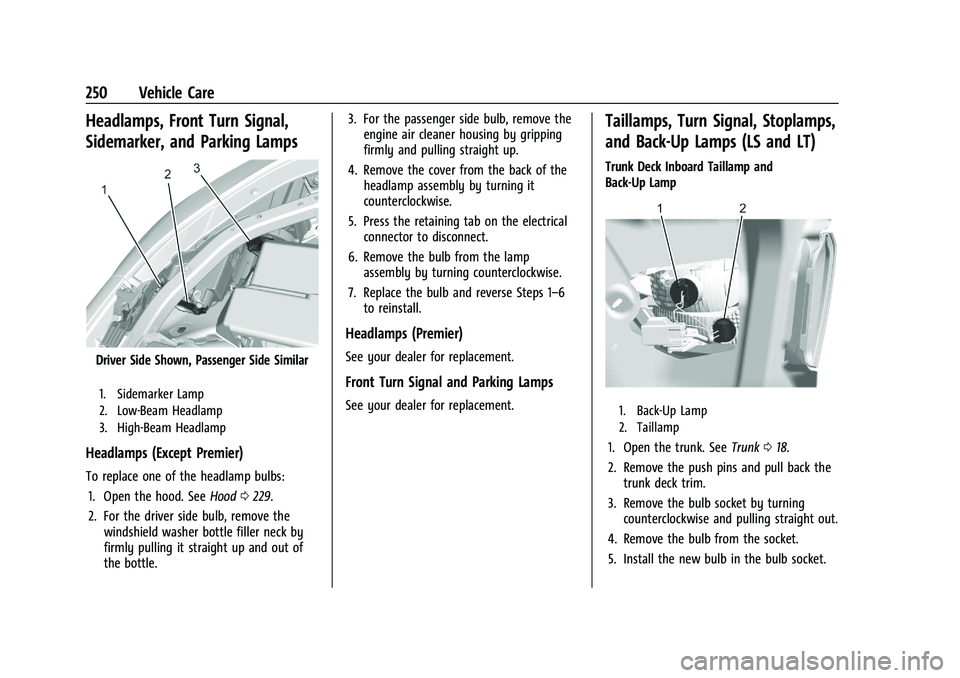
Driver Side Shown, Passenger Side Similar
1. Sidemarker Lamp
2. Low-Beam Headlamp
3. High-Beam Headlamp
Headlamps (Except Premier)
To replace one of the headlamp bulbs:1. Open the hood. See Hood0229.
2. For the driver side bulb, remove the windshield washer bottle filler neck by
firmly pulling it straight up and out of
the bottle. 3. For the passenger side bulb, remove the
engine air cleaner housing by gripping
firmly and pulling straight up.
4. Remove the cover from the back of the headlamp assembly by turning it
counterclockwise.
5. Press the retaining tab on the electrical connector to disconnect.
6. Remove the bulb from the lamp assembly by turning counterclockwise.
7. Replace the bulb and reverse Steps 1–6 to reinstall.
Headlamps (Premier)
See your dealer for replacement.
Front Turn Signal and Parking Lamps
See your dealer for replacement.
Taillamps, Turn Signal, Stoplamps,
and Back-Up Lamps (LS and LT)
Trunk Deck Inboard Taillamp and
Back-Up Lamp
1. Back-Up Lamp
2. Taillamp
1. Open the trunk. See Trunk018.
2. Remove the push pins and pull back the trunk deck trim.
3. Remove the bulb socket by turning counterclockwise and pulling straight out.
4. Remove the bulb from the socket.
5. Install the new bulb in the bulb socket.
Page 254 of 351
Chevrolet Malibu Owner Manual (GMNA-Localizing-U.S./Canada-
14584249) - 2021 - CRC - 11/9/20
Vehicle Care 253
Electrical System
High Voltage Devices and Wiring
{Warning
Exposure to high voltage can cause shock,
burns, and even death. The high voltage
components in the vehicle can only be
serviced by technicians with special
training.
High voltage components are identified
by labels. Do not remove, open, take
apart, or modify these components. High
voltage cable or wiring has orange
covering or labels. Do not probe, tamper
with, cut, or modify high voltage cable or
wiring.
Electrical System Overload
The vehicle has fuses and circuit breakers to
protect against an electrical system
overload.
Fuses and circuit breakers protect power
devices in the vehicle.
Replace a bad fuse with a new one of the
identical size and rating.When a circuit breaker is used to protect a
circuit and the electrical current load is too
heavy, the circuit breaker will open to
protect the circuit until the electrical current
returns to normal or the problem is fixed.
Once the electrical current returns to normal
or the problem is fixed the circuit breaker
will close.
If there is a problem on the road and a fuse
needs to be replaced, the same amperage
fuse can be borrowed. Choose some feature
of the vehicle that is not needed and replace
it as soon as possible.
Headlamp Wiring
An electrical overload may cause the lamps
to go on and off, or in some cases to
remain off. Have the headlamp wiring
checked right away.
Windshield Wipers
If the wiper motor overheats due to heavy
snow or ice, the windshield wipers will stop
until the motor cools and will then restart.
Although the circuit is protected from
electrical overload, overload due to heavy
snow or ice may cause wiper linkage
damage. Always clear ice and heavy snow
from the windshield before using the
windshield wipers.
If the overload is caused by an electrical
problem and not snow or ice, be sure to get
it fixed.
Fuses and Circuit Breakers
The wiring circuits in the vehicle are
protected from short circuits by a
combination of fuses and circuit breakers.
This greatly reduces the chance of damage
caused by electrical problems.
{Danger
Fuses and circuit breakers are marked
with their ampere rating. Do not exceed
the specified amperage rating when
replacing fuses and circuit breakers. Use
of an oversized fuse or circuit breaker can
result in a vehicle fire. You and others
could be seriously injured or killed.
Page 257 of 351

Chevrolet Malibu Owner Manual (GMNA-Localizing-U.S./Canada-
14584249) - 2021 - CRC - 11/9/20
256 Vehicle Care
The vehicle may not be equipped with all of
the fuses, relays, and features shown.Fuses Usage
1 –
2 –
3 Antilock brake system pump/Electric brake
booster
5 –
6 Rear closure 7 –
8 Memory seat module
9 –
10 –
11 DC DC converter 1
12 Rear window defogger
13 Heated mirrors
14 –
15 Passive entry/Passive start
16 Front wiper 17 Passenger power seat Fuses
Usage
18 Antilock brake system valve
19 Driver power seat 21 Sunroof
22 Parking lamp
23 Automatic headlamp leveling/Adaptive forward
lighting
24 –
26 Transmission control module/Ignition
27 Instrument panel/Body/ Ignition
28 –
29 Rear vision camera/ Ventilated seats
30 Malfunction indicator lamp/Ignition
32 Canister vent solenoid/Evap leak check module
33 Front heated seat
34 – Fuses
Usage
35 Body control module 6/ Body control module 7
36 Fuel module
38 –
39 –
40 Steering column lock 41 –
43 Heated steering wheel
44 Headlamp leveling 45 –
46 Engine control module/ Ignition
47 –
48 –
49 DC DC converter 2 50 –
51 –
52 –
53 –
54 –
Page 258 of 351

Chevrolet Malibu Owner Manual (GMNA-Localizing-U.S./Canada-
14584249) - 2021 - CRC - 11/9/20
Vehicle Care 257
FusesUsage
55 –
56 Starter motor 57 –
58 –
59 High-beam headlamps Left/ Right
60 Cooling fan 61 –
62 –
63 –
65 Air conditioning
67 –
68 –
69 –
70 –
72 Starter pinion
74 –
75 Engine control module main
76 Engine control module sense Fuses
Usage
78 Horn
79 Washer pump 81 Transmission control module/Engine control
module
82 –
83 Ignition coil
84 Powertrain on engine 85 Shunt
86 Shunt 87 –
88 Aeroshutter
89 –
91 –
92 –
93 Automatic headlamp leveling
95 –
96 –
97 –
99 Coolant pump Relays
Usage
4 –
20 Rear window defogger 25 Front wiper control31 Run/Crank
37 Front wiper speed
42 –
64 Starter motor
66 Powertrain 71 –
73 Air conditioning
80 Starter pinion
90 –
94 –
98 –
Page 278 of 351
Chevrolet Malibu Owner Manual (GMNA-Localizing-U.S./Canada-
14584249) - 2021 - CRC - 11/9/20
Vehicle Care 277
Your dealer will know the kind of wheel that
is needed.
Each new wheel should have the same
load-carrying capacity, diameter, width,
offset, and be mounted the same way as
the one it replaces.
Replace wheels, wheel bolts, wheel nuts,
or Tire Pressure Monitor System (TPMS)
sensors with new GM original equipment
parts.
{Warning
Using the wrong replacement wheels,
wheel bolts, or wheel nuts can be
dangerous. It could affect the braking and
handling of the vehicle. Tires can lose air,
and cause loss of control, causing a crash.
Always use the correct wheel, wheel
bolts, and wheel nuts for replacement.
Caution
The wrong wheel can also cause
problems with bearing life, brake cooling,
speedometer or odometer calibration,
headlamp aim, bumper height, vehicle
ground clearance, and tire or tire chain
clearance to the body and chassis.
Used Replacement Wheels
{Warning
Replacing a wheel with a used one is
dangerous. How it has been used or how
far it has been driven may be unknown.
It could fail suddenly and cause a crash.
When replacing wheels, use a new GM
original equipment wheel.
Tire Chains
{Warning
If the vehicle has 245/45R18 or 245/40R19
size tires, do not use tire chains. There is
not enough clearance. Tire chains used on
a vehicle without the proper amount of
clearance can cause damage to the
brakes, suspension, or other vehicle parts.
The area damaged by the tire chains
could cause loss of control and a crash.
Use another type of traction device only
if its manufacturer recommends it for the
vehicle's tire size combination and road
conditions. Follow that manufacturer's
instructions. To avoid vehicle damage,
drive slow and readjust or remove the(Continued)
Warning (Continued)
traction device if it contacts the vehicle.
Do not spin the wheels. If traction
devices are used, install them on the
front tires.
Caution
If the vehicle is equipped with a tire size
other than 245/45R18 or 245/40R19, use
tire chains only where legal and only
when necessary. Use low profile chains
that add no more than 12 mm thickness
to the tire tread and inner sidewall. Use
chains that are the proper size for the
tires. Install them on the tires of the
front axle. Do not use chains on the tires
of the rear axle. Tighten them as tightly
as possible with the ends securely
fastened. Drive slowly and follow the
chain manufacturer's instructions. If the
chains contact the vehicle, stop and
retighten them. If the contact continues,
slow down until it stops. Driving too fast
or spinning the wheels with chains on
will damage the vehicle.
Page 311 of 351
Chevrolet Malibu Owner Manual (GMNA-Localizing-U.S./Canada-
14584249) - 2021 - CRC - 11/9/20
310 Service and Maintenance
Brakes
Brakes stop the vehicle and are crucial to
safe driving.
.Signs of brake wear may include chirping,
grinding, or squealing noises, or difficulty
stopping.
.Trained dealer technicians have access to
tools and equipment to inspect the brakes
and recommend quality parts engineered
for the vehicle.
Fluids
Proper fluid levels and approved fluids
protect the vehicle’s systems and
components. See Recommended Fluids and
Lubricants 0312 for GM approved fluids.
.Engine oil and windshield washer fluid
levels should be checked at every fuel fill.
.Instrument cluster lights may come on to
indicate that fluids may be low and need
to be filled. Hoses
Hoses transport fluids and should be
regularly inspected to ensure that there are
no cracks or leaks. With a multi-point
inspection, your dealer can inspect the hoses
and advise if replacement is needed.
Lamps
Properly working headlamps, taillamps, and
brake lamps are important to see and be
seen on the road.
.Signs that the headlamps need attention
include dimming, failure to light, cracking,
or damage. The brake lamps need to be
checked periodically to ensure that they
light when braking.
.With a multi-point inspection, your dealer
can check the lamps and note any
concerns.
Shocks and Struts
Shocks and struts help aid in control for a
smoother ride.
.Signs of wear may include steering wheel
vibration, bounce/sway while braking,
longer stopping distance, or uneven
tire wear.
.As part of the multi-point inspection,
trained dealer technicians can visually
inspect the shocks and struts for signs of
leaking, blown seals, or damage, and can
advise when service is needed.
Tires
Tires need to be properly inflated, rotated,
and balanced. Maintaining the tires can save
money and fuel, and can reduce the risk of
tire failure.
.Signs that the tires need to be replaced
include three or more visible treadwear
indicators; cord or fabric showing through
the rubber; cracks or cuts in the tread or
sidewall; or a bulge or split in the tire.
.Trained dealer technicians can inspect and
recommend the right tires. Your dealer
can also provide tire/wheel balancing
services to ensure smooth vehicle
operation at all speeds. Your dealer sells
and services name brand tires.