2021 CHEVROLET MALIBU trunk lock
[x] Cancel search: trunk lockPage 21 of 351
Chevrolet Malibu Owner Manual (GMNA-Localizing-U.S./Canada-
14584249) - 2021 - CRC - 11/9/20
20 Keys, Doors, and Windows
.Use the Keyless Access system,
if equipped.
.With a door open, press the
inside
Q.
3. After 30 seconds the alarm system will arm, and the indicator light will begin to
slowly flash indicating the alarm system
is operating. Pressing
Qon the RKE
transmitter a second time will bypass
the 30-second delay and immediately
arm the alarm system.
The vehicle alarm system will not arm if the
doors are locked with the key.
If the driver door is opened without first
unlocking with the RKE transmitter, the horn
will chirp and the lights will flash to indicate
pre-alarm. If the vehicle is not started,
or the door is not unlocked by pressing
K
on the RKE transmitter during the 10-second
pre-alarm, the alarm will be activated.
If a door, the hood, or the trunk is opened
without first disarming the system, the turn
signals will flash and the horn will sound for
about 30 seconds. The alarm system will
then re-arm to monitor for the next
unauthorized event.
Disarming the Alarm System
Do one of the following to disarm the alarm
system or turn off the alarm if it has been
activated:
.PressKon the RKE transmitter.
.Unlock the vehicle using the Keyless
Access system, if equipped.
.Start the vehicle.
To avoid setting off the alarm by accident:
.Lock the vehicle after all occupants have
left the vehicle and all doors are closed.
.Always unlock a door with the RKE
transmitter or use the Keyless Access
system, if equipped.
Unlocking the driver door with the key will
not disarm the system or turn off the alarm.
How to Detect a Tamper Condition
IfKis pressed on the RKE transmitter and
the horn chirps and the lights flash three
times, an alarm occurred previously while
the alarm system was armed.
If the alarm has been activated, a message
will appear on the Driver Information
Center (DIC).
Immobilizer
See Radio Frequency Statement 0328.
Immobilizer Operation
This vehicle has a passive theft-deterrent
system.
The system does not have to be manually
armed or disarmed.
The vehicle is automatically immobilized
when the transmitter leaves the vehicle.
The immobilization system is disarmed
when the ignition button is pushed in and a
valid transmitter is in the vehicle.
The security light on the instrument cluster
comes on when there is a problem with
arming or disarming the theft-deterrent
system.
The system has one or more transmitters
matched to an immobilizer control unit in
the vehicle. Only a correctly matched
Page 251 of 351
Chevrolet Malibu Owner Manual (GMNA-Localizing-U.S./Canada-
14584249) - 2021 - CRC - 11/9/20
250 Vehicle Care
Headlamps, Front Turn Signal,
Sidemarker, and Parking Lamps
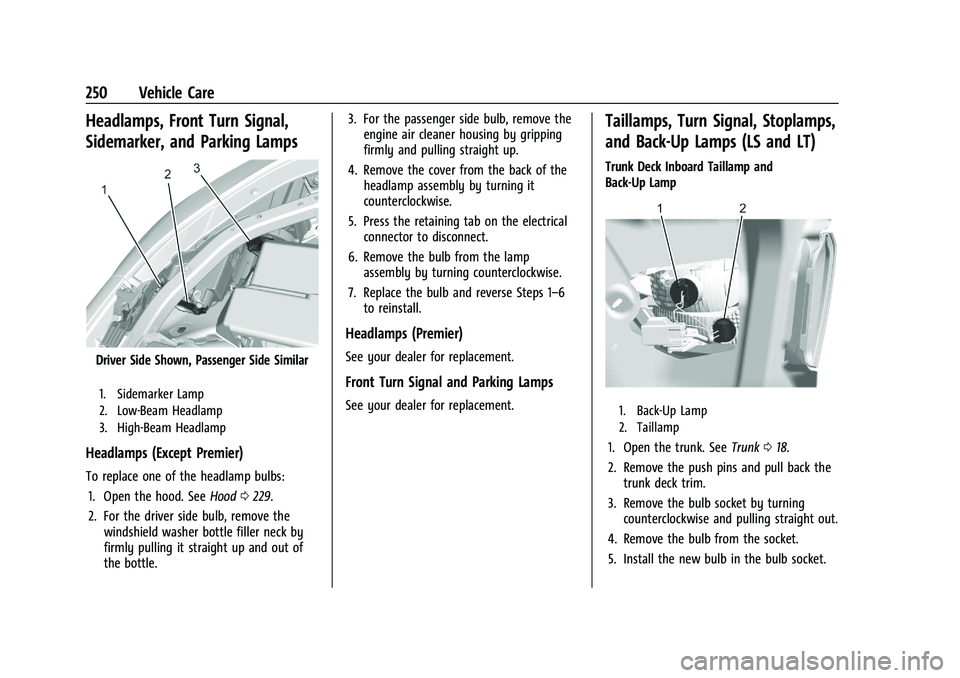
Driver Side Shown, Passenger Side Similar
1. Sidemarker Lamp
2. Low-Beam Headlamp
3. High-Beam Headlamp
Headlamps (Except Premier)
To replace one of the headlamp bulbs:1. Open the hood. See Hood0229.
2. For the driver side bulb, remove the windshield washer bottle filler neck by
firmly pulling it straight up and out of
the bottle. 3. For the passenger side bulb, remove the
engine air cleaner housing by gripping
firmly and pulling straight up.
4. Remove the cover from the back of the headlamp assembly by turning it
counterclockwise.
5. Press the retaining tab on the electrical connector to disconnect.
6. Remove the bulb from the lamp assembly by turning counterclockwise.
7. Replace the bulb and reverse Steps 1–6 to reinstall.
Headlamps (Premier)
See your dealer for replacement.
Front Turn Signal and Parking Lamps
See your dealer for replacement.
Taillamps, Turn Signal, Stoplamps,
and Back-Up Lamps (LS and LT)
Trunk Deck Inboard Taillamp and
Back-Up Lamp
1. Back-Up Lamp
2. Taillamp
1. Open the trunk. See Trunk018.
2. Remove the push pins and pull back the trunk deck trim.
3. Remove the bulb socket by turning counterclockwise and pulling straight out.
4. Remove the bulb from the socket.
5. Install the new bulb in the bulb socket.
Page 252 of 351
Chevrolet Malibu Owner Manual (GMNA-Localizing-U.S./Canada-
14584249) - 2021 - CRC - 11/9/20
Vehicle Care 251
6. Install the bulb socket by turningclockwise.
7. Install the trunk deck trim.
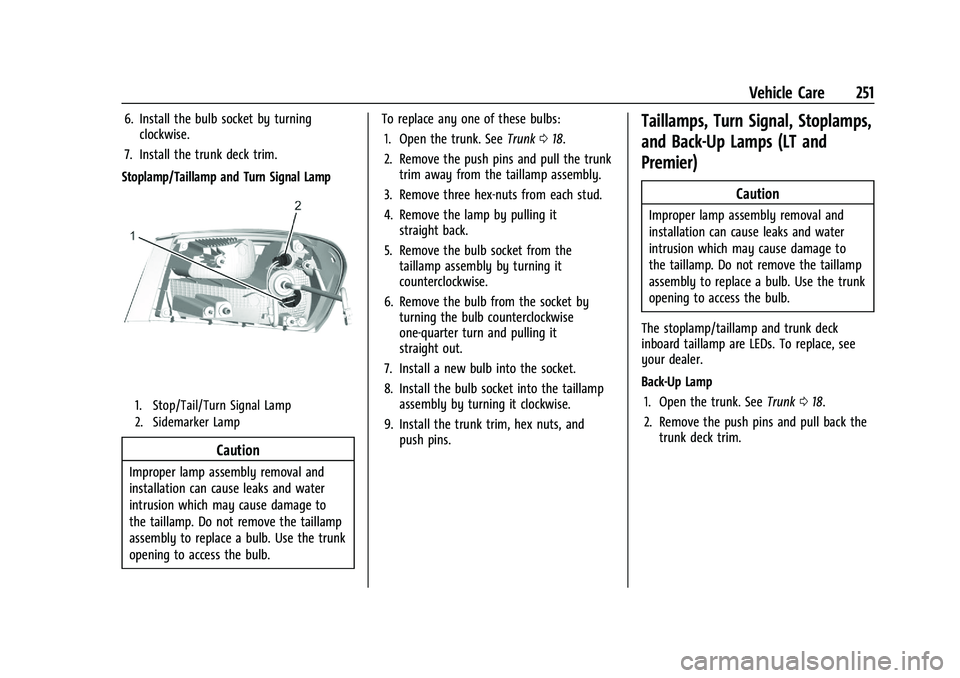
Stoplamp/Taillamp and Turn Signal Lamp
1. Stop/Tail/Turn Signal Lamp
2. Sidemarker Lamp
Caution
Improper lamp assembly removal and
installation can cause leaks and water
intrusion which may cause damage to
the taillamp. Do not remove the taillamp
assembly to replace a bulb. Use the trunk
opening to access the bulb. To replace any one of these bulbs:
1. Open the trunk. See Trunk018.
2. Remove the push pins and pull the trunk trim away from the taillamp assembly.
3. Remove three hex-nuts from each stud.
4. Remove the lamp by pulling it straight back.
5. Remove the bulb socket from the taillamp assembly by turning it
counterclockwise.
6. Remove the bulb from the socket by turning the bulb counterclockwise
one-quarter turn and pulling it
straight out.
7. Install a new bulb into the socket.
8. Install the bulb socket into the taillamp assembly by turning it clockwise.
9. Install the trunk trim, hex nuts, and push pins.
Taillamps, Turn Signal, Stoplamps,
and Back-Up Lamps (LT and
Premier)
Caution
Improper lamp assembly removal and
installation can cause leaks and water
intrusion which may cause damage to
the taillamp. Do not remove the taillamp
assembly to replace a bulb. Use the trunk
opening to access the bulb.
The stoplamp/taillamp and trunk deck
inboard taillamp are LEDs. To replace, see
your dealer.
Back-Up Lamp 1. Open the trunk. See Trunk018.
2. Remove the push pins and pull back the trunk deck trim.
Page 253 of 351
Chevrolet Malibu Owner Manual (GMNA-Localizing-U.S./Canada-
14584249) - 2021 - CRC - 11/9/20
252 Vehicle Care
3. Remove the bulb socket by turningcounterclockwise and pulling straight out.
4. Remove the bulb from the socket.
5. Install the new bulb in the bulb socket.
6. Install the bulb socket by turning clockwise.
7. Install the trunk deck trim.
License Plate Lamp
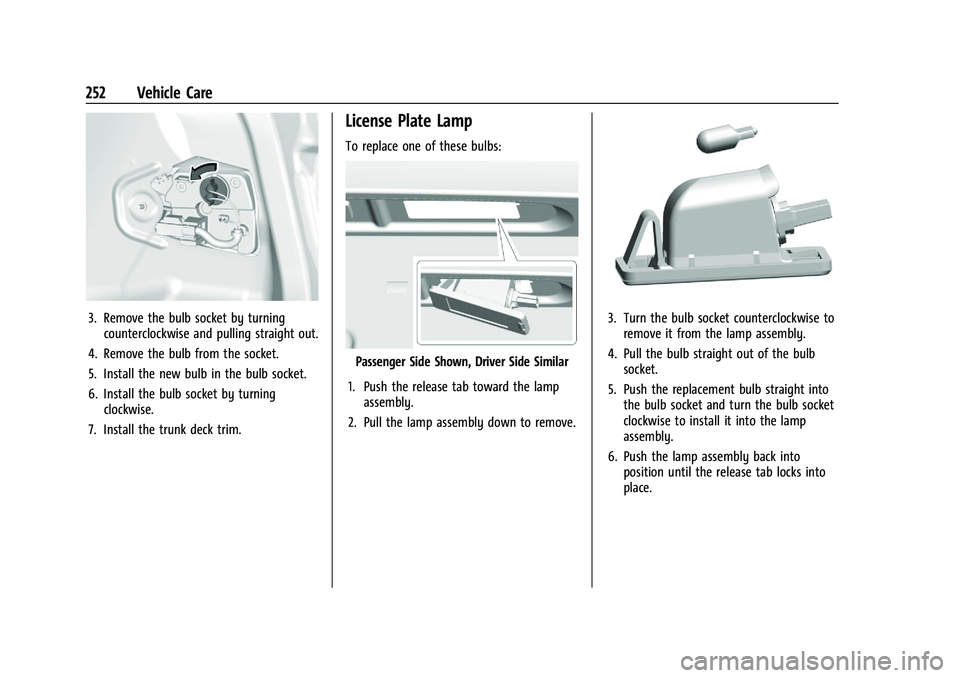
To replace one of these bulbs:
Passenger Side Shown, Driver Side Similar
1. Push the release tab toward the lamp assembly.
2. Pull the lamp assembly down to remove.
3. Turn the bulb socket counterclockwise to remove it from the lamp assembly.
4. Pull the bulb straight out of the bulb socket.
5. Push the replacement bulb straight into the bulb socket and turn the bulb socket
clockwise to install it into the lamp
assembly.
6. Push the lamp assembly back into position until the release tab locks into
place.
Page 285 of 351
Chevrolet Malibu Owner Manual (GMNA-Localizing-U.S./Canada-
14584249) - 2021 - CRC - 11/9/20
284 Vehicle Care
7. Start the vehicle. The vehicle must berunning while using the air compressor.
8. Press the on/off button (5) to turn the tire sealant and compressor kit on.
The compressor will inflate the tire with
air only.
9. Inflate the tire to the recommended inflation pressure using the pressure
gauge (8). The recommended inflation
pressure can be found on the Tire and
Loading Information label. See Tire
Pressure 0266.
The pressure gauge (8) may read higher
than the actual tire pressure while the
compressor is on. Turn the compressor
off to get an accurate pressure reading.
The compressor may be turned on/off
until the correct pressure is reached.
Caution
If the recommended pressure cannot be
reached after approximately 25 minutes,
the vehicle should not be driven farther.
The tire is too severely damaged and the
tire sealant and compressor kit cannot
inflate the tire. Remove the power plug
from the accessory power outlet and
(Continued)
Caution (Continued)
unscrew the inflating hose from the tire
valve. See Roadside Assistance Program
0 323.
10. Press the on/off button (5) to turn the tire sealant and compressor kit off.
Be careful while handling the compressor
as it could be warm after usage.
11. Unplug the power plug (9) from the accessory power outlet in the vehicle.
12. Turn the air only hose (10) counterclockwise to remove it from the
tire valve stem.
13. Replace the tire valve stem cap.
14. Return the air only hose (10) and power plug (9) back to their original storage
location.
15. Return the equipment to its original storage location in the vehicle.
The tire sealant and compressor kit has
accessory adapters located in a
compartment on the bottom of its housing
that can be used to inflate air mattresses,
balls, etc.
Storing the Tire Sealant and
Compressor Kit
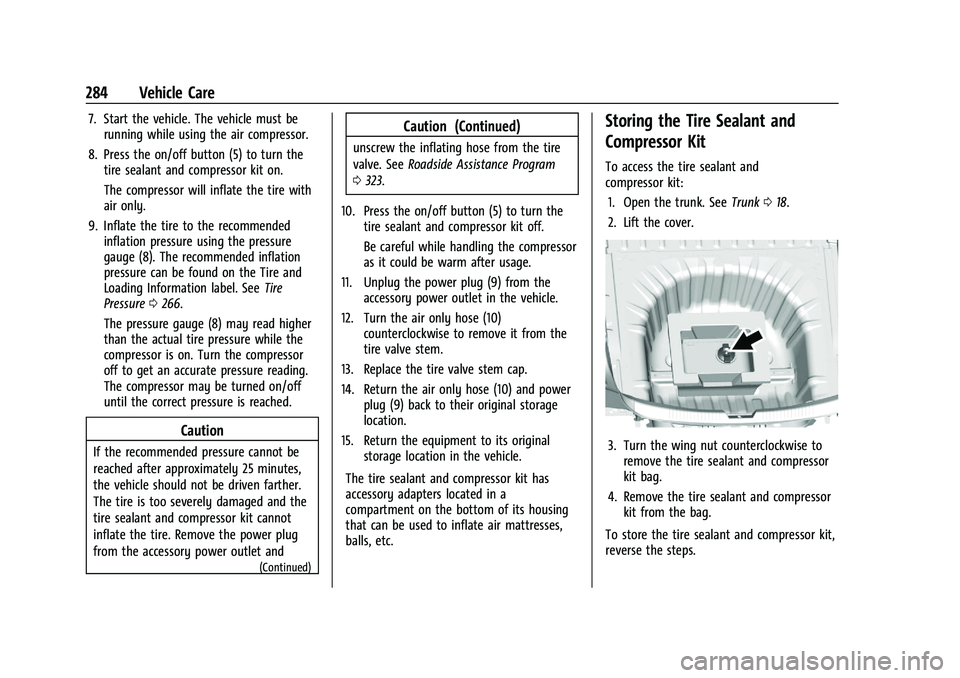
To access the tire sealant and
compressor kit: 1. Open the trunk. See Trunk018.
2. Lift the cover.
3. Turn the wing nut counterclockwise to remove the tire sealant and compressor
kit bag.
4. Remove the tire sealant and compressor kit from the bag.
To store the tire sealant and compressor kit,
reverse the steps.
Page 286 of 351
Chevrolet Malibu Owner Manual (GMNA-Localizing-U.S./Canada-
14584249) - 2021 - CRC - 11/9/20
Vehicle Care 285
Tire Changing
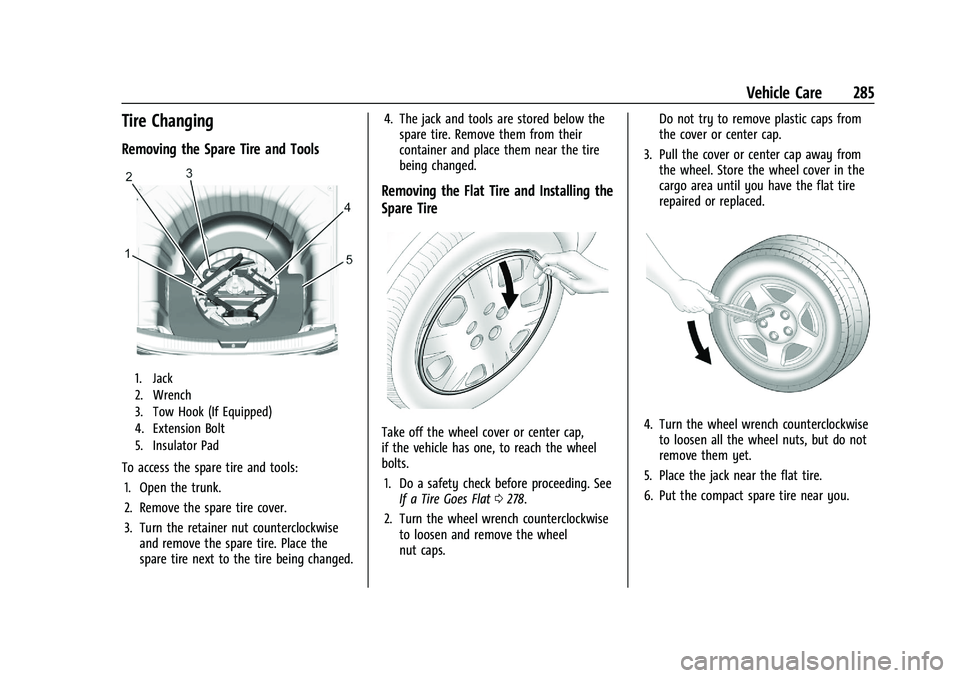
Removing the Spare Tire and Tools
1. Jack
2. Wrench
3. Tow Hook (If Equipped)
4. Extension Bolt
5. Insulator Pad
To access the spare tire and tools:1. Open the trunk.
2. Remove the spare tire cover.
3. Turn the retainer nut counterclockwise and remove the spare tire. Place the
spare tire next to the tire being changed. 4. The jack and tools are stored below the
spare tire. Remove them from their
container and place them near the tire
being changed.
Removing the Flat Tire and Installing the
Spare Tire
Take off the wheel cover or center cap,
if the vehicle has one, to reach the wheel
bolts.
1. Do a safety check before proceeding. See If a Tire Goes Flat 0278.
2. Turn the wheel wrench counterclockwise to loosen and remove the wheel
nut caps. Do not try to remove plastic caps from
the cover or center cap.
3. Pull the cover or center cap away from the wheel. Store the wheel cover in the
cargo area until you have the flat tire
repaired or replaced.4. Turn the wheel wrench counterclockwiseto loosen all the wheel nuts, but do not
remove them yet.
5. Place the jack near the flat tire.
6. Put the compact spare tire near you.
Page 341 of 351
Chevrolet Malibu Owner Manual (GMNA-Localizing-U.S./Canada-
14584249) - 2021 - CRC - 11/9/20
340 Index
AudioBluetooth . . . . . . . . . . . . . . . . . . . . . . . . . . . . . . 123
Auto Stop Stop/Start System . . . . . . . . . . . . . . . . . . . . . 184
Automatic Door Locks . . . . . . . . . . . . . . . . . . . . . . . . . . . . . . . 17
Emergency Braking (AEB) . . . . . . . . . . . . . . . 211
Headlamp System . . . . . . . . . . . . . . . . . . . . . 106
Transmission . . . . . . . . . . . . . . . . . . . . . . . . . . . 188
Transmission Fluid . . . . . . . . . . . . . . . . . . . . . 236
Automatic Transmission
Manual Mode . . . . . . . . . . . . . . . . . . . . . . . . . 190
Shift Lock Control Function Check . . . . . . 247
Auxiliary Jack . . . . . . . . . . . . . . . . . . . . . . . . . . . . . 123
Avoiding Untrusted Media Devices . . . . . . . 120
B
Backglass Antenna . . . . . . . . . . . . . . . . . . . . . . . . 119
Battery Exterior Lighting Battery Saver . . . . . . . . 109
Load Management . . . . . . . . . . . . . . . . . . . . . 109
Power Protection . . . . . . . . . . . . . . . . . . . . . . 109
Battery - North America . . . . . . . . . . . . 244, 290
Blade Replacement, Wiper . . . . . . . . . . . . . . . 247
Bluetooth Overview . . . . . . . . . . . . . . . . . . . . . . . . . . 141, 142
Bluetooth Audio . . . . . . . . . . . . . . . . . . . . . . . . . . 123 Brake
Parking, Electric . . . . . . . . . . . . . . . . . . . . . . . . 192
System Warning Light . . . . . . . . . . . . . . . . . . 88
Brakes . . . . . . . . . . . . . . . . . . . . . . . . . . . . . . . . . . . 243 Antilock . . . . . . . . . . . . . . . . . . . . . . . . . . . . . . . . . 191
Assist . . . . . . . . . . . . . . . . . . . . . . . . . . . . . . . . . . 193
Fluid . . . . . . . . . . . . . . . . . . . . . . . . . . . . . . . . . . . 243
Parking . . . . . . . . . . . . . . . . . . . . . . . . . . . . . . . . . 191
Braking . . . . . . . . . . . . . . . . . . . . . . . . . . . . . . . . . . .174 Automatic Emergency (AEB) . . . . . . . . . . . . 211
Braking System
Front Pedestrian (FPB) . . . . . . . . . . . . . . . . . 212
Break-In, New Vehicle . . . . . . . . . . . . . . . . . . . . .182
Buckle To Drive . . . . . . . . . . . . . . . . . . . . . . . . . . . 39
Bulb Replacement Halogen Bulbs . . . . . . . . . . . . . . . . . . . . . . . . . 249
Headlamp Aiming . . . . . . . . . . . . . . . . . . . . . . 249
Headlamps . . . . . . . . . . . . . . . . . . . . . . . . . . . . 249
Headlamps, Front Turn Signal,
Sidemarker, and Parking Lamps . . . . . . 250
License Plate Lamps . . . . . . . . . . . . . . . . . . . 252
Taillamps, Turn Signal,
Stoplamps, and Back-up
Lamps . . . . . . . . . . . . . . . . . . . . . . . . . . . 250, 251
Buying New Tires . . . . . . . . . . . . . . . . . . . . . . . . 274
C
California
Perchlorate Materials Requirements . . . 228
California Proposition 65 Warning . . . . . . . . . . . . . . . . . .228, 244, 290,
Back Cover
Canadian Vehicle Owners . . . . . . . . . . . . . . . . . . . 1
Capacities and Specifications . . . . . . . . . . . . . . 317
Carbon Monoxide Engine Exhaust . . . . . . . . . . . . . . . . . . . . . . . . 188
Trunk . . . . . . . . . . . . . . . . . . . . . . . . . . . . . . . . . . . 18
Winter Driving . . . . . . . . . . . . . . . . . . . . . . . . . . 177
Cargo Tie-Downs . . . . . . . . . . . . . . . . . . . . . . . . . . . . . . 73
Caution, Danger, and Warning . . . . . . . . . . . . . .2
Center Console Storage . . . . . . . . . . . . . . . . . . . .72
Chains, Tire . . . . . . . . . . . . . . . . . . . . . . . . . . . . . . 277
Charging Wireless . . . . . . . . . . . . . . . . . . . . . . . . . . . . . . . . 78
Charging System Light . . . . . . . . . . . . . . . . . . . . 86
Check Engine Light (Malfunction Indicator) . . . . 87
Child Restraints Infants and Young Children . . . . . . . . . . . . . 56
Lower Anchors and Tethers for
Children . . . . . . . . . . . . . . . . . . . . . . . . . . . . . . . 61
Older Children . . . . . . . . . . . . . . . . . . . . . . . . . . 55
Securing . . . . . . . . . . . . . . . . . . . . . . . . . . . . 67, 68