2021 CHEVROLET MALIBU remove seats
[x] Cancel search: remove seatsPage 69 of 351

Chevrolet Malibu Owner Manual (GMNA-Localizing-U.S./Canada-
14584249) - 2021 - CRC - 11/9/20
68 Seats and Restraints
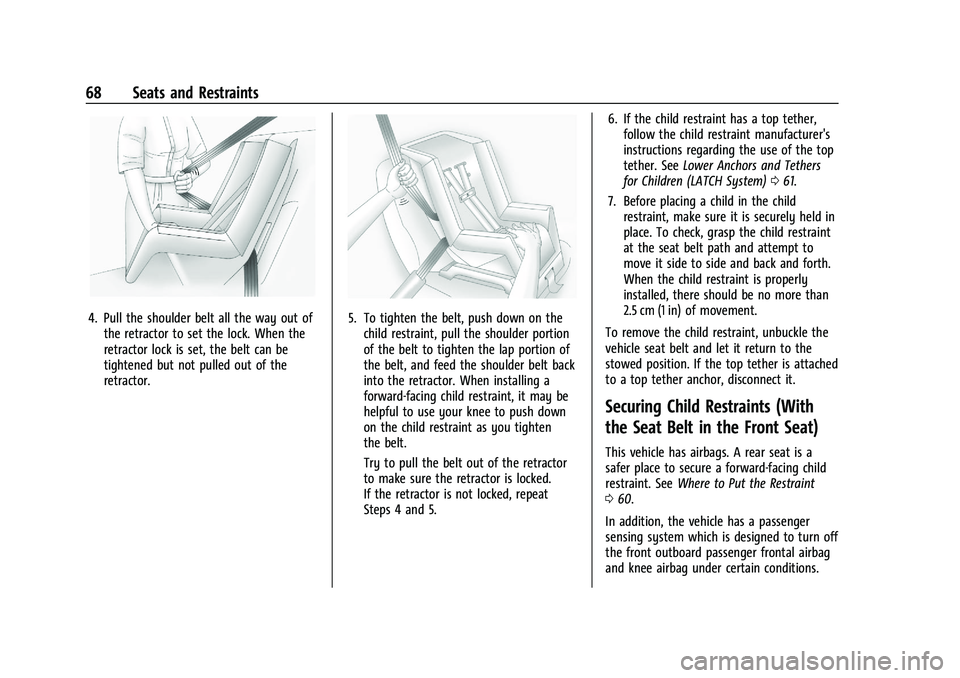
4. Pull the shoulder belt all the way out ofthe retractor to set the lock. When the
retractor lock is set, the belt can be
tightened but not pulled out of the
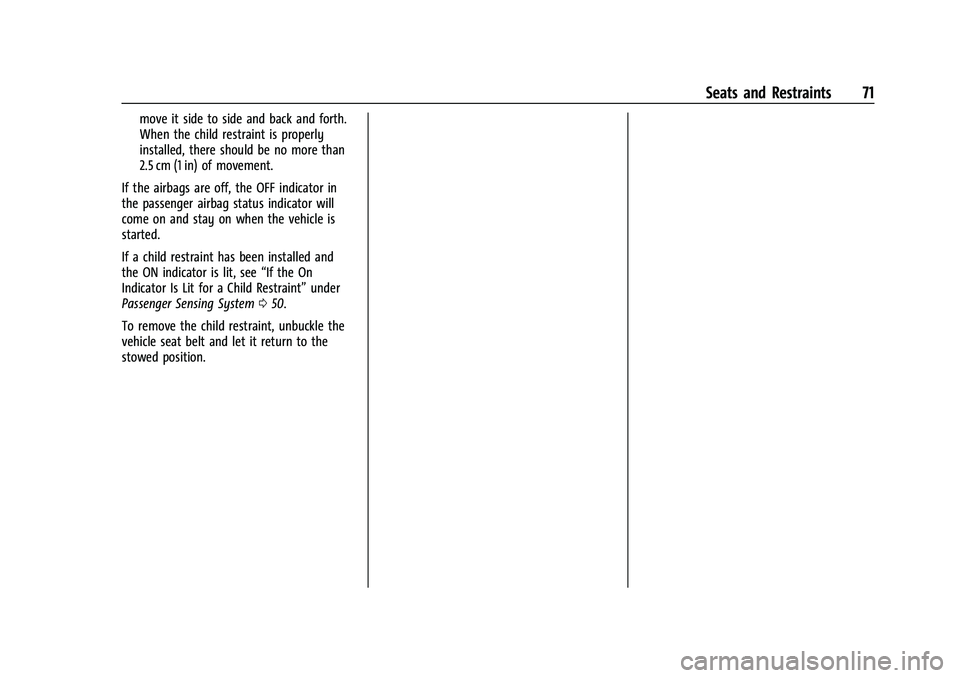
retractor.5. To tighten the belt, push down on thechild restraint, pull the shoulder portion
of the belt to tighten the lap portion of
the belt, and feed the shoulder belt back
into the retractor. When installing a
forward-facing child restraint, it may be
helpful to use your knee to push down
on the child restraint as you tighten
the belt.
Try to pull the belt out of the retractor
to make sure the retractor is locked.
If the retractor is not locked, repeat
Steps 4 and 5. 6. If the child restraint has a top tether,
follow the child restraint manufacturer's
instructions regarding the use of the top
tether. See Lower Anchors and Tethers
for Children (LATCH System) 061.
7. Before placing a child in the child restraint, make sure it is securely held in
place. To check, grasp the child restraint
at the seat belt path and attempt to
move it side to side and back and forth.
When the child restraint is properly
installed, there should be no more than
2.5 cm (1 in) of movement.
To remove the child restraint, unbuckle the
vehicle seat belt and let it return to the
stowed position. If the top tether is attached
to a top tether anchor, disconnect it.
Securing Child Restraints (With
the Seat Belt in the Front Seat)
This vehicle has airbags. A rear seat is a
safer place to secure a forward-facing child
restraint. See Where to Put the Restraint
0 60.
In addition, the vehicle has a passenger
sensing system which is designed to turn off
the front outboard passenger frontal airbag
and knee airbag under certain conditions.
Page 72 of 351

Chevrolet Malibu Owner Manual (GMNA-Localizing-U.S./Canada-
14584249) - 2021 - CRC - 11/9/20
Seats and Restraints 71
move it side to side and back and forth.
When the child restraint is properly
installed, there should be no more than
2.5 cm (1 in) of movement.
If the airbags are off, the OFF indicator in
the passenger airbag status indicator will
come on and stay on when the vehicle is
started.
If a child restraint has been installed and
the ON indicator is lit, see “If the On
Indicator Is Lit for a Child Restraint” under
Passenger Sensing System 050.
To remove the child restraint, unbuckle the
vehicle seat belt and let it return to the
stowed position.
Page 166 of 351

Chevrolet Malibu Owner Manual (GMNA-Localizing-U.S./Canada-
14584249) - 2021 - CRC - 11/9/20
Climate Controls 165
0:Clears the windows of fog or moisture.
Air is directed to the windshield.
{: Air is directed to the instrument
panel outlets.
z: Air is directed to the floor outlets.
0MAX : Air is directed to the windshield
and the fan runs at a higher speed. This
mode overrides the previous mode selected
and clears fog or frost from the windshield
more quickly. When the button is pressed
again, the system returns to the previous
mode setting and fan speed. The current
mode setting and fan speed appear in the
display screen.
For best results, clear all snow and ice from
the windshield before defrosting.
A/C : Press to turn the air conditioning
system on or off. This status appears in the
display screen. If the fan control is turned
off or the outside temperature falls below
freezing, the air conditioner will not run.
@: Press to turn on recirculation. An
indicator light comes on and the status
appears in the display screen. Air is
recirculated to quickly cool the inside of the
vehicle or to reduce the entry of outside air
and odors. Ionizer :
If equipped, this feature helps to
clean the air inside the vehicle and remove
contaminants such as pollen, odors, and
dust. If the climate control system is on and
the ionizer is enabled, the ionizer status
indicator will be lit on the climate control
display. To turn the ionizer on or off, see
“Climate and Air Quality” underVehicle
Personalization 0100.
Rear Window Defogger
K:Press to turn the rear window defogger
on or off. An indicator light on the button
comes on to show that the rear window
defogger is on. The defogger turns off when
the ignition is turned to off or to ACC/
ACCESSORY.
The upper lines on the rear window are
antenna grids and are not intended to
defrost the glass.
The rear window defogger can be set to
automatic operation. See “Climate and Air
Quality” underVehicle Personalization 0100.
When Auto Rear Defog is selected, the rear
window defogger turns on automatically
when the interior temperature is cold and
the outside temperature is about 7 °C (44 °F)
and below. The auto rear defogger turns off
automatically. If the vehicle is equipped with heated
outside mirrors, they turn on when the rear
window defogger button is on and help to
clear fog or frost from the surface of the
mirror. See
Heated Mirrors 022.
Caution
Do not try to clear frost or other material
from the inside of the front windshield
and rear window with a razor blade or
anything else that is sharp. This may
damage the rear window defogger grid
and affect the radio's ability to pick up
stations clearly. The repairs would not be
covered by the vehicle warranty.
Remote Start Climate Control Operation :
If equipped with remote start, the climate
control system may run when the vehicle is
started remotely. The system will determine
the best mode and temperature setting for
operation. Once the vehicle is started with
the Engine Start/Stop button, the climate
control system will begin to operate at the
last customer selected operating mode and
temperature. If equipped with heated or
ventilated seats, they may come on
during a remote start. See Remote Vehicle
Start 013 and
Heated and Ventilated Front Seats 034.
Page 274 of 351

Chevrolet Malibu Owner Manual (GMNA-Localizing-U.S./Canada-
14584249) - 2021 - CRC - 11/9/20
Vehicle Care 273
Check that all wheel nuts are properly
tightened. See“Wheel Nut Torque”
under Capacities and Specifications
0 317, and “Removing the Flat Tire and
Installing the Spare Tire” underTire
Changing 0285.
{Warning
Rust or dirt on a wheel, or on the
parts to which it is fastened, can
cause wheel nuts to become loose
over time. The wheel could come off
and cause a crash. When changing a
wheel, remove any rust or dirt from
places where the wheel attaches to
the vehicle. In an emergency, a cloth
or paper towel can be used; however,
use a scraper or wire brush later to
remove all rust or dirt.
Lightly coat the inner diameter of the
wheel hub opening with wheel bearing
grease after a wheel change or tire
rotation to prevent corrosion or rust
buildup.
{Warning
Do not apply grease to the wheel
mounting surface, wheel conical
seats, or the wheel nuts or bolts.
Grease applied to these areas could
cause a wheel to become loose or
come off, resulting in a crash.
When It Is Time for New Tires
Factors, such as maintenance, temperatures,
driving speeds, vehicle loading, and road
conditions affect the wear rate of the tires.
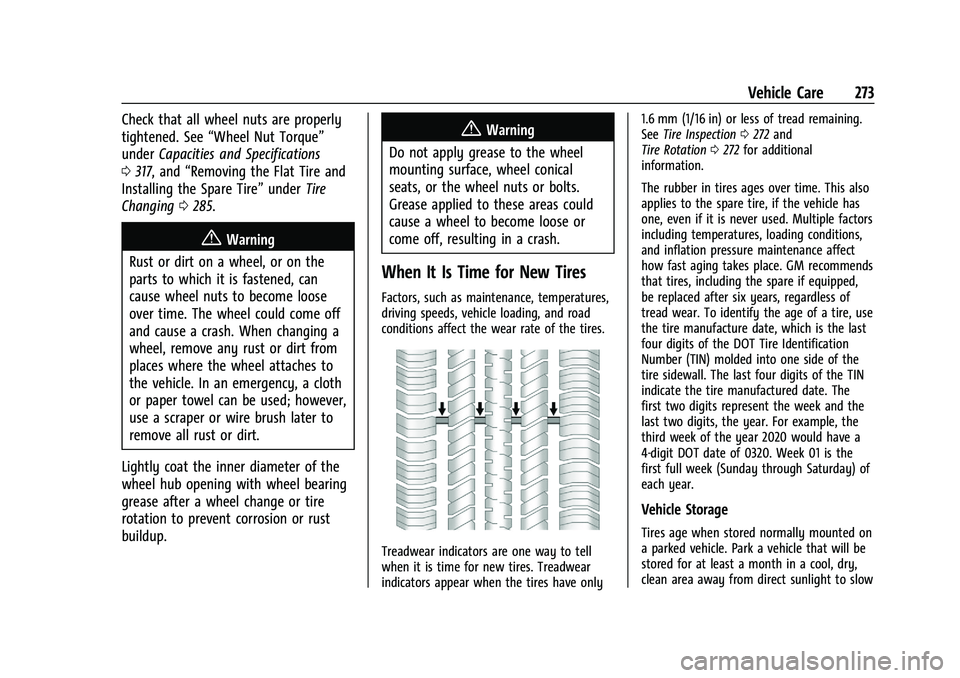
Treadwear indicators are one way to tell
when it is time for new tires. Treadwear
indicators appear when the tires have only 1.6 mm (1/16 in) or less of tread remaining.
See
Tire Inspection 0272 and
Tire Rotation 0272 for additional
information.
The rubber in tires ages over time. This also
applies to the spare tire, if the vehicle has
one, even if it is never used. Multiple factors
including temperatures, loading conditions,
and inflation pressure maintenance affect
how fast aging takes place. GM recommends
that tires, including the spare if equipped,
be replaced after six years, regardless of
tread wear. To identify the age of a tire, use
the tire manufacture date, which is the last
four digits of the DOT Tire Identification
Number (TIN) molded into one side of the
tire sidewall. The last four digits of the TIN
indicate the tire manufactured date. The
first two digits represent the week and the
last two digits, the year. For example, the
third week of the year 2020 would have a
4-digit DOT date of 0320. Week 01 is the
first full week (Sunday through Saturday) of
each year.
Vehicle Storage
Tires age when stored normally mounted on
a parked vehicle. Park a vehicle that will be
stored for at least a month in a cool, dry,
clean area away from direct sunlight to slow