2021 CHEVROLET EQUINOX fuel
[x] Cancel search: fuelPage 2 of 20

2
INSTRUMENT PANEL
Low Fuel
Traction Control Off
Brake System
Cruise Control
StabiliTrak Active
StabiliTrak Off
Forward Collision Alert
Security
PARK Electric Parking Brake
Electric Parking Brake Service
Lights On Reminder
Airbag Readiness
Engine Oil Pressure
Check Engine
Lane Keep Assist
SYMBOLS
Turn Signal Lever/IntelliBeam Control
Driver Information Center
Voice Recognition Buttons/Driver Information Center ControlsWindshield Wipers Lever
Power Mirror/Window Switches
Heated Steering WheelF/Cruise Control/Forward Collision Alert/Lane Keep Assist Buttons
Steering Wheel Adjustment Lever
Audio Volume Controls (behind steering wheel)
Instrument Panel/Exterior Lamp Controls
Audio Next/Previous Favorite Station Controls (behind steering wheel)
Memory Seat ButtonsFPower Liftgate ControlF
Engine Start/Stop Button
Page 5 of 20

5
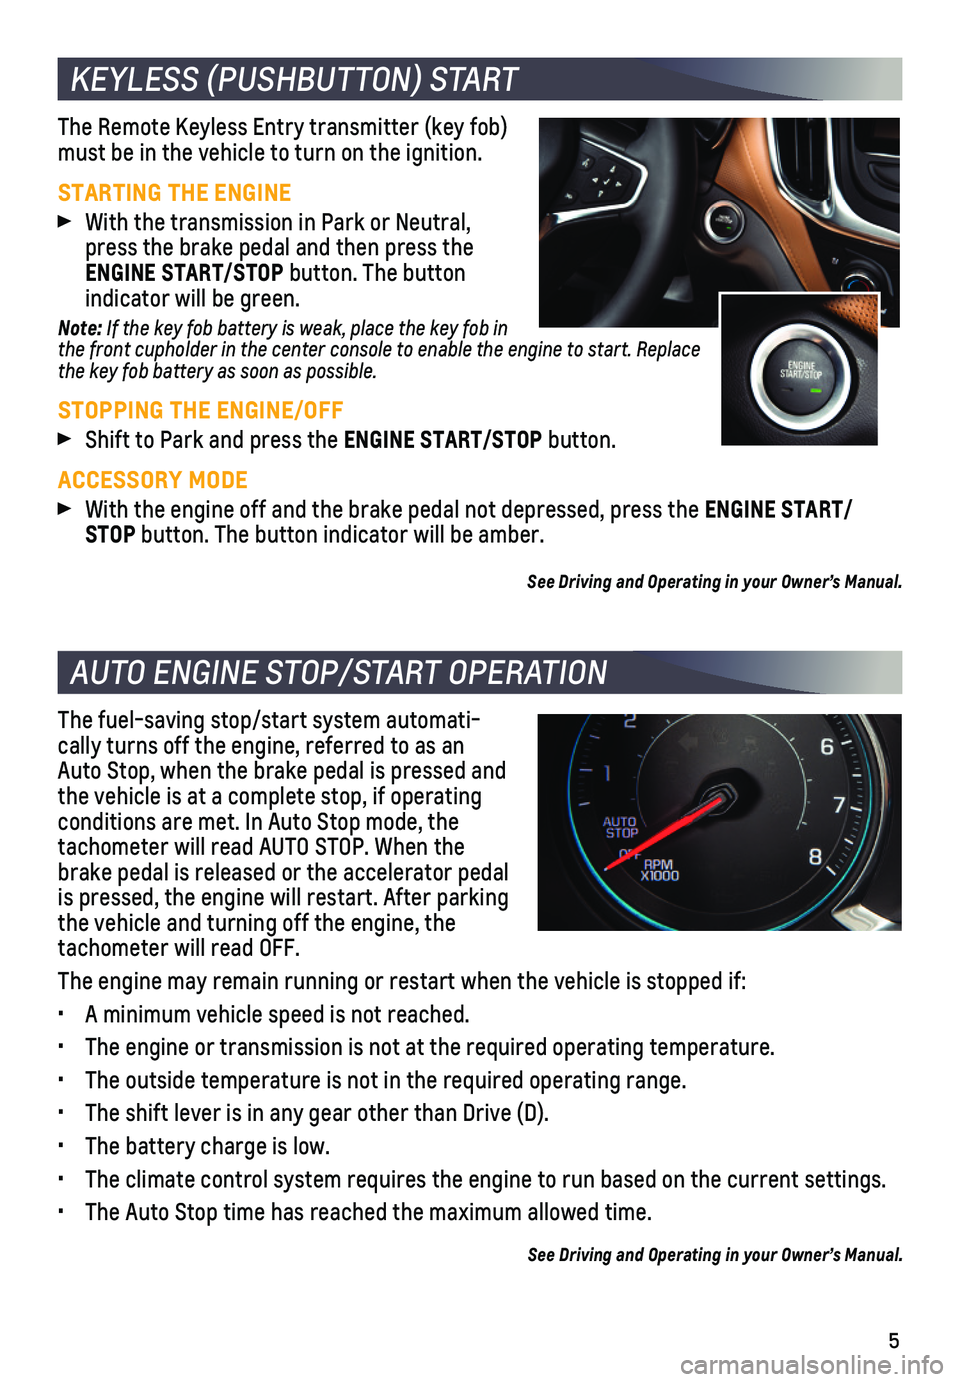
The Remote Keyless Entry transmitter (key fob) must be in the vehicle to turn on the ignition.
STARTING THE ENGINE With the transmission in Park or Neutral, press the brake pedal and then press the ENGINE START/STOP button. The button
indicator will be green.
Note: If the key fob battery is weak, place the key fob in the front cupholder in the center console to enable the engine to start. Replace the key fob battery as soon as possible.
STOPPING THE ENGINE/OFF Shift to Park and press the ENGINE START/STOP button.
ACCESSORY MODE With the engine off and the brake pedal not depressed, press the ENGINE START/STOP button. The button indicator will be amber.
See Driving and Operating in your Owner’s Manual.
The fuel-saving stop/start system automati-cally turns off the engine, referred to as an Auto Stop, when the brake pedal is pressed and the vehicle is at a complete stop, if operating
conditions are met. In Auto Stop mode, the tachometer will read AUTO STOP. When the brake pedal is released or the accelerator pedal is pressed, the engine will restart. After parking the vehicle and turning off the engine, the tachometer will read OFF.
The engine may remain running or restart when the vehicle is stopped if:\
• A minimum vehicle speed is not reached.
• The engine or transmission is not at the required operating temperature.\
• The outside temperature is not in the required operating range.
• The shift lever is in any gear other than Drive (D).
• The battery charge is low.
• The climate control system requires the engine to run based on the curre\
nt settings.
• The Auto Stop time has reached the maximum allowed time.
See Driving and Operating in your Owner’s Manual.
KEYLESS (PUSHBUTTON) START
AUTO ENGINE STOP/START OPERATION
Page 8 of 20

8
DRIVER INFORMATION CENTER
AUDIO STEERING WHEEL CONTROLS
F Optional equipment
The Driver Information Center (DIC) on the instrument cluster displays a variety of vehicle messages and system information.
Use the controls on the right side of the steer-ing wheel to select the Trip, Vehicle, or Eco menus (base DIC) or the Home, Info (includes trip and fuel information), Audio, Navigation, Phone, and Options menus (midlevel and uplevel DICF). Go to Options > Info Pages to select the info pages to display in the Info menu.
DIC CONTROLS
Press the or button to move between the display zones.
Press the or button to scroll through the menus.
Press the button to open a menu, or to select or reset an item.
See Instruments and Controls in your Owner’s Manual.
Push to Talk
Press to answer an incoming call or to use natural voice recognition with the Bluetooth or OnStar® system.
Press and hold to activate Bluetooth Voice Recognition/Siri® Eyes Free on a paired,
compatible cell phone.
End Call/Mute
Press to end or decline a call.
Press to mute/unmute the speakers.
+ – Volume (behind right side of steering wheel)
Press the top or bottom button to adjust the volume.
Next/Previous Favorite Station (behind left side of steering wheel)
Press the top or bottom button to go to the next or previous favorite radio station or track.
Uplevel DIC shown
Next/Previous Favorite Station button shown
See Infotainment System in your Owner’s Manual.
Page 16 of 20

16F Optional equipment
The vehicle can operate in two-wheel drive (2WD) or all-wheel drive (AWD).
In 2WD, power is sent to the front wheels only and the vehicle may have better fuel economy. In AWD, power is sent to all four wheels for better traction.
Press the AWD button in front of the shift lever to switch to AWD. The button indicator will flash when engaging AWD and stay illu-minated when AWD is active. Press the button again to return to 2WD.
See Driving and Operating in your Owner’s Manual.
ALL-WHEEL DRIVEF
CRUISE CONTROL
SETTING CRUISE CONTROL
Press the On/Off button. The Cruise Control symbol will illuminate in white on the instrument cluster.
When traveling at the desired speed, press the –SET button to set the speed. The symbol will illuminate in green on the instru-ment cluster.
ADJUSTING CRUISE CONTROL
+ RES Resume/Accelerate
Press to resume a set speed. When the system is active, press to increas\
e speed.
– SET Set/Coast
When the system is active, press to decrease speed.
Cancel
Press the button, or press the brake pedal, to cancel the Cruise Control without
erasing the set speed from memory. The set speed is erased when Cruise C\
ontrol or the vehicle ignition is turned off.
ADAPTIVE CRUISE CONTROLF
The system enhances regular Cruise Control to maintain a driver-selected\
following gap — the time between your vehicle and a vehicle detected directly ahead\
— by accelerating or braking automatically while you continue to steer.
Press the Following Gap button to select a following gap setting of Far, Medium, or Near. This is also the Forward Collision Alert setting.
Press and hold the Cancel button to switch between regular Cruise Control and Adaptive Cruise Control.
See Driving and Operating in your Owner’s Manual.
Page 19 of 20

19
REFUELING THE VEHICLE
To open the fuel door, press and release the center of the rear edge of \
the door. It will pop out slightly. Pull the door open.
The vehicle’s capless fuel system does not have a fuel cap. Fully ins\
ert the fuel pump nozzle before starting to fill the tank.
Note: When using a portable gas can, insert the funnel adapter, stored under the spare tire, into the capless fuel fill.
See Driving and Operating in your Owner’s Manual.
ELECTRIC PARKING BRAKE
To apply the parking brake, pull the Parking Brake switch on the center console.
To release the parking brake, turn on the
ignition, press the brake pedal, and then press the switch.
Note: The parking brake will release automatically if the vehicle is running, placed into gear and an attempt is made to drive.
See Driving and Operating in your Owner’s Manual.
UNIVERSAL REMOTE SYSTEMF
The Universal Remote System on the overhead console enables your vehicle\
to control 3 different devices, ranging from garage doors and gates to home lightin\
g. Go to homelink.com for detailed videos and instructions on how to program the Universal Remote System. For additional assistance, call 1-800-355-3515.
See Instruments and Controls in your Owner’s Manual.
F Optional equipment
Page 20 of 20

20
ROADSIDE ASSISTANCE
1-800-CHEV-USA (1-800-243-8872) TTY Users: 1-888-889-2438
As the owner of a new Chevrolet, you are automatically enrolled in the C\
hevrolet Roadside Assistance program for up to 5 years/60,000 miles, whichever oc\
curs first, at no expense to you. Chevrolet’s Roadside Assistance toll-free numbe\
r is staffed by a team of trained advisors who are available 24 hours a day, 365 days a ye\
ar, to contact a service provider for light services (fuel delivery, jump-starts, flat\
tire and lock-outs) or make arrangements to tow your vehicle to the nearest Chevrolet dealer fo\
r any repairs.
ROADSIDE ASSISTANCE AND ONSTAR®
If you have a current OnStar Safety & Security plan, push the blue OnStar button or red Emergency button to get the help you need. An OnStar advisor will use GPS technol\
ogy to pinpoint your vehicle location and contact the nearest service provid\
er.
To learn more about OnStar services, press the blue OnStar button, visit onstar.com, call 1-888-4-ONSTAR (1-888-466-7827), or refer to your Owner’s Manual.
CHEVROLET OWNER CENTER
Get to know your vehicle inside and out with the Chevrolet Owner Center.\
Check out personalized information, including an online Owner’s Manual and help\
ful how-to videos, track your service history and warranty status, review your current OnSt\
ar Vehicle Diagnostics report (active OnStar account required) and more. Create a\
n account today at my.chevrolet.com.
Download the myChevrolet app to your compatible smartphone (or device)\
and, if your vehicle is properly equipped, you can start or turn off your engine, loc\
k or unlock your doors, view key diagnostic information, set parking information and more\
.
The app is available on select Apple and Android devices. Service availa\
bility, features and functionality vary by vehicle, device and data plan. Device data con\
nection required. Visit onstar.com for more details. Download the mobile app from your compatible mobile device’s app store.
84443514 A!84443514=A!
Certain restrictions, precautions and safety procedures apply to your ve\
hicle. Please read your Owner’s Manual for complete instructions. All information contained in this guide is ba\
sed on the latest information available at the time of printing and is subject to change without notice. Copyright 2020 General Motors. All rights reserved.
We recommend always using ACDelco or GM Genuine Parts.
MYCHEVROLET MOBILE APP