2021 CHEVROLET CORVETTE light
[x] Cancel search: lightPage 218 of 338
Chevrolet Corvette Owner Manual (GMNA-Localizing-U.S./Canada/Mexico-
14622938) - 2021 - CRC - 2/10/21
Driving and Operating 217
.Dry conditions only.
.Requires more driving skill than mode 2.
.StabiliTrak/ESC is on and more engine
power is available than in mode 2.
Performance Traction –Race 1
.For use by drivers who are familiar with
the track.
.Dry conditions only.
.Requires more driving skill than modes 2
or 3.
.StabiliTrak/ESC is off and available engine
power is the same as mode 3.
Performance Traction –Race 2
.For use by experienced drivers who are
familiar with the track.
.Dry conditions only.
.Requires more driving skill than in other
modes.
.StabiliTrak/ESC is off and engine power is
available for maximum cornering speed.
Press and release
@to turn off PTM and
return to the TCS and StabiliTrak/ESC
systems. The traction off light
iand
StabiliTrak Off light
@will go out.
Launch Control (Sport and Track
Mode Only)
A Launch Control feature is available, within
Competitive Driving Mode or PTM, on all
vehicles to allow the driver to achieve high
levels of vehicle acceleration in a straight
line. Launch Control is a form of TCS that
manages tire spin, and transmissions clutch,
while launching the vehicle. This feature is
intended for use during closed course race
events where consistent zero to
60 and quarter mile times are desirable.
Launch Control is only available when the
following criteria are met:
.Competitive Driving Mode or any of the
PTM Modes are selected (if equipped).
.The vehicle is not moving.
.The wheels and steering wheel are
pointing straight.
Launching the Vehicle
.Ensure the vehicle is in Competitive
Driving Mode or any of the PTM modes.
.The brake pedal must be firmly pressed
to the floor, equivalent to a panic brake
event.
.While maintaining the brake pedal, the
accelerator pedal is rapidly applied to
wide open throttle. (If the vehicle rolls due to wide open throttle, release the
throttle, press the brake pedal more
firmly, and re-apply the accelerator to
wide open throttle.)
The Launch Control feature will initially limit
engine speed as the driver rapidly applies
the accelerator pedal to wide open throttle.
Allow the engine rpm’s to stabilize.
A smooth, quick release of the brake pedal,
while maintaining the fully pressed
accelerator pedal, will manage tire slip and
transmissions clutch. After the vehicle is
launched, the system continues in
Competitive Driving Mode or PTM.
Competitive Driving Mode, PTM, and Launch
Control are systems designed for a closed
course race track and not intended for use
on public roads. The systems are not
intended to compensate for lack of driver
experience or familiarity with the race track.
Caution
The new vehicle break-in period should be
completed before using the launch
control feature, otherwise performance
will be limited and damage may occur to
the powertrain/engine. See New Vehicle
Break-In 0192.
Page 221 of 338
Chevrolet Corvette Owner Manual (GMNA-Localizing-U.S./Canada/Mexico-
14622938) - 2021 - CRC - 2/10/21
220 Driving and Operating
Increasing Speed While Using Cruise Control
Do one of the following:
.Press and hold +RES until the desired
speed is reached, then release it.
.To increase vehicle speed in small
increments, briefly press +RES. For each
press, the vehicle goes about 1 km/h
(1 mph) faster.
Reducing Speed While Using Cruise Control
Do one of the following:
.Press and hold SET– until the desired
lower speed is reached, then release it.
.To decrease the vehicle speed in small
increments, briefly press SET–. For each
press, the vehicle goes about 1 km/h
(1 mph) slower.
Passing Another Vehicle While Using Cruise
Control
Use the accelerator pedal to increase the
vehicle speed. When you take your foot off
the pedal, the vehicle will slow down to the
previously set cruise speed.
While pressing the accelerator pedal or
shortly following the release to override
cruise control, briefly pressing SET– will
result in cruise set to the current vehicle
speed. Using Cruise Control on Hills
How well the cruise control works on hills
depends upon the vehicle speed, load, and
the steepness of the hills. When going up
steep hills, you may have to step on the
accelerator pedal to maintain your speed.
When going downhill, you may have to
brake or shift to a lower gear to keep your
speed down. If the brake pedal is applied,
cruise control will disengage.
Cruise Control in Manual Paddle Shift Gear
Selection
When the vehicle is in M (Manual Mode)
and the manual paddle shift controls are not
being used, cruise control operates in the
same manner as D (Drive).
When the vehicle is in M (Manual Mode)
and the manual paddle shift controls are
being used, cruise control operates as
follows:
.If cruise control is active and a gear is
selected with the manual paddle shift
controls, the vehicle speed is maintained
in the driver selected gear and will not
automatically upshift or downshift the
transmission while the driver’s gear
selection is active.
.If driving in hilly terrain, cruise control
may not be able to maintain vehicle
speed if an upshift or downshift is not
selected by the driver. While driving on
hilly terrain and cruise control is active
with a manual paddle shift gear selection,
the driver must select the proper gear for
the terrain or select D (Drive) on the
shifter for full automatic transmission
operation.
Ending Cruise Control
.Step lightly on the brake pedal.
.Shift the transmission to N (Neutral).
.Press*.
.To turn off cruise control, press1.
Erasing Speed Memory
The cruise control set speed is erased from
memory if
1is pressed or if the ignition is
turned off.
Driver Assistance Systems
This vehicle may have features that work
together to help avoid crashes or reduce
crash damage while driving, backing, and
parking. Read this entire section before
using these systems.
Page 225 of 338
Chevrolet Corvette Owner Manual (GMNA-Localizing-U.S./Canada/Mexico-
14622938) - 2021 - CRC - 2/10/21
224 Driving and Operating
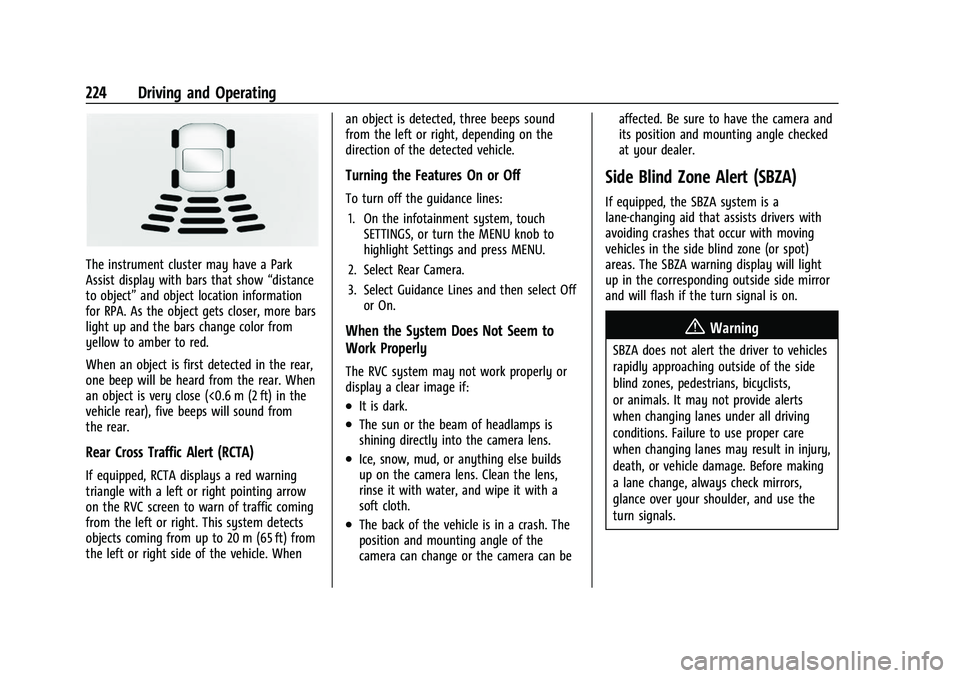
The instrument cluster may have a Park
Assist display with bars that show“distance
to object” and object location information
for RPA. As the object gets closer, more bars
light up and the bars change color from
yellow to amber to red.
When an object is first detected in the rear,
one beep will be heard from the rear. When
an object is very close (<0.6 m (2 ft) in the
vehicle rear), five beeps will sound from
the rear.
Rear Cross Traffic Alert (RCTA)
If equipped, RCTA displays a red warning
triangle with a left or right pointing arrow
on the RVC screen to warn of traffic coming
from the left or right. This system detects
objects coming from up to 20 m (65 ft) from
the left or right side of the vehicle. When an object is detected, three beeps sound
from the left or right, depending on the
direction of the detected vehicle.
Turning the Features On or Off
To turn off the guidance lines:
1. On the infotainment system, touch SETTINGS, or turn the MENU knob to
highlight Settings and press MENU.
2. Select Rear Camera.
3. Select Guidance Lines and then select Off or On.
When the System Does Not Seem to
Work Properly
The RVC system may not work properly or
display a clear image if:
.It is dark.
.The sun or the beam of headlamps is
shining directly into the camera lens.
.Ice, snow, mud, or anything else builds
up on the camera lens. Clean the lens,
rinse it with water, and wipe it with a
soft cloth.
.The back of the vehicle is in a crash. The
position and mounting angle of the
camera can change or the camera can be affected. Be sure to have the camera and
its position and mounting angle checked
at your dealer.
Side Blind Zone Alert (SBZA)
If equipped, the SBZA system is a
lane-changing aid that assists drivers with
avoiding crashes that occur with moving
vehicles in the side blind zone (or spot)
areas. The SBZA warning display will light
up in the corresponding outside side mirror
and will flash if the turn signal is on.
{Warning
SBZA does not alert the driver to vehicles
rapidly approaching outside of the side
blind zones, pedestrians, bicyclists,
or animals. It may not provide alerts
when changing lanes under all driving
conditions. Failure to use proper care
when changing lanes may result in injury,
death, or vehicle damage. Before making
a lane change, always check mirrors,
glance over your shoulder, and use the
turn signals.
Page 226 of 338

Chevrolet Corvette Owner Manual (GMNA-Localizing-U.S./Canada/Mexico-
14622938) - 2021 - CRC - 2/10/21
Driving and Operating 225
SBZA Detection Zones
The SBZA sensor covers a zone of
approximately one lane over from both
sides of the vehicle, or 3.5 m (11 ft). The
height of the zone is approximately between
0.5 m (1.5 ft) and 2 m (6 ft) off the ground.
This zone starts at approximately the middle
of the vehicle and goes back 5 m (16 ft).
How the System Works
The SBZA symbol lights up in the side
mirrors when the system detects a moving
vehicle in the next lane over that is in the
side blind zone. This indicates it may be
unsafe to change lanes. Before making alane change, check the SBZA display, check
mirrors, glance over your shoulder, and use
the turn signals.
Left Side Mirror
DisplayRight Side Mirror Display
When the vehicle is started, both outside
mirror SBZA displays will briefly come on to
indicate the system is operating. When the
vehicle is in a forward gear, the left- or
right-side mirror display will light up if a
moving vehicle is detected in that blind
zone. If the turn signal is activated in the
same direction of a detected vehicle, this
display will flash as an extra warning not to
change lanes.
SBZA can be disabled through vehicle
personalization. See “Collision/Detection
Systems” underVehicle Personalization 098.
If SBZA is disabled by the driver, the SBZA
mirror displays will not light up.
When the System Does Not Seem to
Work Properly
SBZA displays may not come on when
passing a vehicle quickly or for a stopped
vehicle. SBZA may alert to objects attached
to the vehicle, such as a bicycle, or object
extending out to either side of the vehicle.
This is normal system operation; the vehicle
does not need service.
SBZA may not always alert the driver to
vehicles in the side blind zone, especially in
wet conditions. The system does not need
to be serviced. The system may light up due
to guardrails, signs, trees, shrubs, and other
non-moving objects. This is normal system
operation; the vehicle does not need service.
SBZA may not operate when the SBZA
sensors in the left or right corners of the
rear bumper are covered with mud, dirt,
snow, ice, or slush, or in heavy rainstorms.
For cleaning instructions, see "Washing the
Vehicle" under Exterior Care0283. If the DIC
still displays the system unavailable
message after cleaning both sides of the
vehicle toward the rear corners of the
vehicle, see your dealer.
Page 227 of 338
Chevrolet Corvette Owner Manual (GMNA-Localizing-U.S./Canada/Mexico-
14622938) - 2021 - CRC - 2/10/21
226 Driving and Operating
If the SBZA displays do not light up when
vehicles are in the blind zone and the
system is clean, the system may need
service. Take the vehicle to your dealer.
When SBZA is disabled for any reason other
than the driver turning it off, the Side Blind
Zone Alert On option will not be available
on the personalization menu.
Radio Frequency Information
SeeRadio Frequency Statement 0316.
Fuel
Top Tier Fuel
GM recommends the use of TOP TIER
Detergent Gasoline to keep the engine clean,
reduce engine deposits, and maintain
optimal vehicle performance. Look for the
TOP TIER Logo or see www.toptiergas.com
for a list of TOP TIER Detergent Gasoline
marketers and applicable countries.
Recommended Fuel
Use premium unleaded gasoline meeting
ASTM specification D4814 with a posted
octane rating of 93 —(R+M)/2.
If unavailable, unleaded gasoline with a
posted octane rating of 91 may be used, but
with reduced performance and fuel
economy. If the octane is less than 91, the
engine could be damaged and the repairs
would not be covered by the vehicle warranty. If heavy knocking is heard when
using gasoline rated at 93 octane, the
engine needs service.
Do not use any fuel labeled E85 or FlexFuel.
Do not use gasoline with ethanol levels
greater than 15% by volume.
Prohibited Fuels
Caution
Do not use fuels with any of the
following conditions; doing so may
damage the vehicle and void its
warranty:
.For vehicles that are not FlexFuel, fuel
labeled greater than 15% ethanol by
volume, such as mid-level ethanol
blends (16–50% ethanol), E85,
or FlexFuel.
.Fuel with any amount of methanol,
methylal, ferrocene, and aniline. These
fuels can corrode metal fuel system
parts or damage plastic and rubber
parts.
(Continued)
Page 230 of 338

Chevrolet Corvette Owner Manual (GMNA-Localizing-U.S./Canada/Mexico-
14622938) - 2021 - CRC - 2/10/21
Driving and Operating 229
Warning (Continued)
.Do not fill a container while it is
inside a vehicle, in a vehicle's trunk, in
a pickup bed, or on any surface other
than the ground.
.Bring the fill nozzle in contact with
the inside of the fill opening before
operating the nozzle. Maintain contact
until filling is complete.
.Keep sparks, flames, and smoking
materials away from fuel.
.Avoid using electronic devices while
pumping fuel.
Trailer Towing
General Towing Information
{Warning
Never tow a trailer with your vehicle.
It was not designed or intended to tow a
trailer.
Conversions and Add-Ons
Add-On Electrical Equipment
{Warning
The Data Link Connector (DLC) is used for
vehicle service and Emission Inspection/
Maintenance testing. SeeMalfunction
Indicator Lamp (Check Engine Light) 086.
A device connected to the DLC —such as
an aftermarket fleet or driver-behavior
tracking device —may interfere with
vehicle systems. This could affect vehicle
operation and cause a crash. Such devices
may also access information stored in the
vehicle’s systems.
Caution
Some electrical equipment can damage
the vehicle or cause components to not
work and would not be covered by the
vehicle warranty. Always check with your
dealer before adding electrical equipment.
Add-on equipment can drain the vehicle's
12-volt battery, even if the vehicle is not
operating. The vehicle has an airbag system. Before
attempting to add anything electrical to the
vehicle, see
Servicing the Airbag-Equipped
Vehicle 060 and
Adding Equipment to the Airbag-Equipped
Vehicle 060.
Page 231 of 338

Chevrolet Corvette Owner Manual (GMNA-Localizing-U.S./Canada/Mexico-
14622938) - 2021 - CRC - 2/10/21
230 Vehicle Care
Vehicle Care
General Information
General Information . . . . . . . . . . . . . . . . . . . 231
California Proposition 65 Warning . . . . . 231
California Perchlorate MaterialsRequirements . . . . . . . . . . . . . . . . . . . . . . . . 231
Accessories and Modifications . . . . . . . . . 231
Lifting the Vehicle . . . . . . . . . . . . . . . . . . . . . 232
Vehicle Checks
Doing Your Own Service Work . . . . . . . . . 233
Underhood Compartment Overview . . . 234
Engine Compartment Overview . . . . . . . . 235
Engine Oil . . . . . . . . . . . . . . . . . . . . . . . . . . . . . 237
Engine Oil Life System . . . . . . . . . . . . . . . . . 241
Dual Clutch Transmission Fluid . . . . . . . . 241
Dual Clutch Transmission Fluid Life System . . . . . . . . . . . . . . . . . . . . . . . . . . . . . . 242
Engine Air Filter Life System . . . . . . . . . . 242
Engine Air Cleaner/Filter . . . . . . . . . . . . . . . 243
Cooling System . . . . . . . . . . . . . . . . . . . . . . . . 245
Engine Overheating . . . . . . . . . . . . . . . . . . . 248
Washer Fluid . . . . . . . . . . . . . . . . . . . . . . . . . . 249
Brakes . . . . . . . . . . . . . . . . . . . . . . . . . . . . . . . . 249
Brake Fluid . . . . . . . . . . . . . . . . . . . . . . . . . . . . . 251
Battery - North America . . . . . . . . . . . . . . . 251
Park Brake and P (Park) Mechanism Check . . . . . . . . . . . . . . . . . . . . . . . . . . . . . . . . 252
Wiper Blade Replacement . . . . . . . . . . . . . 253 Windshield Replacement . . . . . . . . . . . . . . . 253
Gas Strut(s) . . . . . . . . . . . . . . . . . . . . . . . . . . . 254
Headlamp Aiming
Front Headlamp Aiming . . . . . . . . . . . . . . . 254
Bulb Replacement
LED Lighting . . . . . . . . . . . . . . . . . . . . . . . . . . . 255
Electrical System
Electrical System Overload . . . . . . . . . . . . . 255
Fuses and Circuit Breakers . . . . . . . . . . . . . 255
Instrument Panel Fuse Block . . . . . . . . . . 256
Rear Compartment Fuse Block . . . . . . . . . 258
Wheels and Tires
Tires . . . . . . . . . . . . . . . . . . . . . . . . . . . . . . . . . . . 261
All-Season Tires . . . . . . . . . . . . . . . . . . . . . . . 262
Winter Tires . . . . . . . . . . . . . . . . . . . . . . . . . . . 262
Run-Flat Tires . . . . . . . . . . . . . . . . . . . . . . . . . . 262
Low-Profile Tires . . . . . . . . . . . . . . . . . . . . . . . 263
Summer Tires . . . . . . . . . . . . . . . . . . . . . . . . . 263
Tire Sidewall Labeling . . . . . . . . . . . . . . . . . 263
Tire Designations . . . . . . . . . . . . . . . . . . . . . . 264
Tire Terminology and Definitions . . . . . . 265
Tire Pressure . . . . . . . . . . . . . . . . . . . . . . . . . . 267
Tire Pressure for High-Speed
Operation . . . . . . . . . . . . . . . . . . . . . . . . . . . 268
Tire Pressure Monitor System . . . . . . . . . 269
Tire Pressure Monitor Operation . . . . . . 270
Tire Inspection . . . . . . . . . . . . . . . . . . . . . . . . . 272
Tire Rotation . . . . . . . . . . . . . . . . . . . . . . . . . . 272 When It Is Time for New Tires . . . . . . . . 273
Buying New Tires . . . . . . . . . . . . . . . . . . . . . 274
Different Size Tires and Wheels . . . . . . . . 275
Uniform Tire Quality Grading . . . . . . . . . . 275
Wheel Alignment and Tire Balance . . . . 277
Wheel Replacement . . . . . . . . . . . . . . . . . . . 277
Tire Chains . . . . . . . . . . . . . . . . . . . . . . . . . . . . 278
If a Tire Goes Flat . . . . . . . . . . . . . . . . . . . . . 278
Jump Starting
Jump Starting - North America . . . . . . . . 278
Towing the Vehicle
Towing the Vehicle . . . . . . . . . . . . . . . . . . . . 281
Recreational Vehicle Towing . . . . . . . . . . . 283
Appearance Care
Exterior Care . . . . . . . . . . . . . . . . . . . . . . . . . . 283
Interior Care . . . . . . . . . . . . . . . . . . . . . . . . . . 288
Floor Mats . . . . . . . . . . . . . . . . . . . . . . . . . . . . 290
Page 252 of 338
Chevrolet Corvette Owner Manual (GMNA-Localizing-U.S./Canada/Mexico-
14622938) - 2021 - CRC - 2/10/21
Vehicle Care 251
Brake Fluid
The brake master cylinder reservoir is filled
with GM approved DOT 4 brake fluid as
indicated on the reservoir cap. See
Underhood Compartment Overview0234 for
the location of the reservoir.
Checking Brake Fluid
With the vehicle in P (Park) on a level
surface, the brake fluid level should be
between the minimum and maximum marks
on the brake fluid reservoir.
There are only two reasons why the brake
fluid level in the reservoir may go down:
.Normal brake lining wear. When new
linings are installed, the fluid level goes
back up.
.A fluid leak in the brake hydraulic system.
Have the brake hydraulic system fixed.
With a leak, the brakes will not
work well. Always clean the brake fluid reservoir cap
and the area around the cap before
removing it.
Do not top off the brake fluid. Adding fluid
does not correct a leak. If fluid is added
when the linings are worn, there will be too
much fluid when new brake linings are
installed. Add or remove fluid, as necessary,
only when work is done on the brake
hydraulic system.
Caution
If too much brake fluid is added, the
brake fluid can spill and cause vehicle
damage, including damage to electrical
components and surfaces. Add brake fluid
only when work is done on the brake
hydraulic system.
When the brake fluid falls to a low level,
the brake warning light comes on. See Brake
System Warning Light 088.
Brake fluid absorbs water over time which
degrades the effectiveness of the brake fluid.
Replace brake fluid at the specified intervals
to prevent increased stopping distance. See
Maintenance Schedule 0293. What to Add
Use only GM approved DOT 4 brake fluid
from a clean, sealed container. See
Recommended Fluids and Lubricants
0301.
{Warning
The wrong or contaminated brake fluid
could result in damage to the brake
system. This could result in the loss of
braking leading to a possible injury.
Always use the proper GM approved
brake fluid.
Caution
If brake fluid is spilled on the vehicle's
painted surfaces, the paint finish can be
damaged. Immediately wash off any
painted surface.
Battery - North America
The original equipment battery is
maintenance free. Do not remove the cap
and do not add fluid.
Refer to the replacement number on the
original battery label when a new battery is
needed. For battery replacement, see your
dealer.