2021 CADILLAC XT6 brake
[x] Cancel search: brakePage 324 of 431

Cadillac XT6 Owner Manual (GMNA-Localizing-U.S./Canada-14574701) -
2021 - CRC - 2/8/21
VEHICLE CARE 323
.A fluid leak in the brake hydraulic
system. Have the brake hydraulic
system fixed. With a leak, the
brakes will not work well.
Always clean the brake fluid reservoir
cap and the area around the cap
before removing it.
Do not top off the brake fluid. Adding
fluid does not correct a leak. If fluid is
added when the linings are worn,
there will be too much fluid when
new brake linings are installed. Add or
remove fluid, as necessary, only when
work is done on the brake hydraulic
system.
{Warning
If too much brake fluid is added, it
can spill on the engine and burn,
if the engine is hot enough. You or
others could be burned, and the
vehicle could be damaged. Add
brake fluid only when work is done
on the brake hydraulic system.
When the brake fluid falls to a low
level, the brake warning light comes
on. See Brake System Warning Light
0 117. Brake fluid absorbs water over time
which degrades the effectiveness of
the brake fluid. Replace brake fluid at
the specified intervals to prevent
increased stopping distance. See
Maintenance Schedule
0380.
What to Add
Use only GM approved DOT 3 brake
fluid from a clean, sealed container.
See Recommended Fluids and
Lubricants 0389.
{Warning
The wrong or contaminated brake
fluid could result in damage to the
brake system. This could result in
the loss of braking leading to a
possible injury. Always use the
proper GM approved brake fluid.
Caution
If brake fluid is spilled on the
vehicle's painted surfaces, the paint
finish can be damaged. Immediately
wash off any painted surface.
Battery - North America
The original equipment battery is
maintenance free. Do not remove the
cap and do not add fluid.
Refer to the replacement number on
the original battery label when a new
battery is needed. For replacement of
the battery, see your dealer.
The vehicle has an Absorbed Glass
Mat (AGM) 12-volt battery.
Installation of a standard 12-volt
battery will result in reduced 12-volt
battery life.
When using a 12-volt battery charger
on the 12-volt AGM battery, some
chargers have an AGM battery setting
on the charger. If available, use the
AGM setting on the charger, to limit
charge voltage to 14.8 volts.
Stop/Start System
This vehicle has a Stop/Start system
to shut off the engine to help
conserve fuel. See Stop/Start System
0 234.
Page 325 of 431

Cadillac XT6 Owner Manual (GMNA-Localizing-U.S./Canada-14574701) -
2021 - CRC - 2/8/21
324 VEHICLE CARE
{Warning
WARNING:Battery posts,
terminals, and related accessories
contain lead and lead compounds,
chemicals known to the State of
California to cause cancer and birth
defects or other reproductive harm.
Batteries also contain other
chemicals known to the State of
California to cause cancer. WASH
HANDS AFTER HANDLING. For
more information go to
www.P65Warnings.ca.gov/
passenger-vehicle.
See California Proposition 65 Warning
0 304 and the back cover.
Vehicle Storage
{Warning
Batteries have acid that can burn
you and gas that can explode. You
can be badly hurt if you are not
(Continued)
Warning (Continued)
careful. SeeJump Starting - North
America 0364 for tips on working
around a battery without
getting hurt.
Infrequent Usage: Remove the black,
negative (−) cable from the battery to
keep the battery from running down.
Extended Storage: Remove the black,
negative (−) cable from the battery or
use a battery trickle charger.
All-Wheel Drive
Transfer Case
Under normal driving conditions,
transfer case fluid does not require
maintenance unless there is a fluid
leak or unusual noise. If required,
have the transfer case serviced by
your dealer.
Park Brake and P (Park)
Mechanism Check
{Warning
When you are doing this check, the
vehicle could begin to move. You or
others could be injured and
property could be damaged. Make
sure there is room in front of the
vehicle in case it begins to roll. Be
ready to apply the regular brake at
once should the vehicle begin
to move.
Park on a fairly steep hill, with the
vehicle facing downhill. Keeping your
foot on the regular brake, set the
parking brake.
.To check the parking brake's
holding ability: With the engine
running and the transmission in
N (Neutral), slowly remove foot
pressure from the regular brake
pedal. Do this until the vehicle is
held by the parking brake only.
Page 326 of 431

Cadillac XT6 Owner Manual (GMNA-Localizing-U.S./Canada-14574701) -
2021 - CRC - 2/8/21
VEHICLE CARE 325
.To check the P (Park) mechanism's
holding ability: With the engine
running, shift to P (Park). Then
release the parking brake followed
by the regular brake.
Contact your dealer if service is
required.
Wiper Blade Replacement
Windshield wiper blades should be
inspected for wear or cracking.
It is a good idea to clean or replace
the wiper blade assembly on a regular
basis or when worn. For proper
windshield wiper blade length and
type, see Maintenance Replacement
Parts 0390.
Caution
Allowing the wiper arm to touch
the windshield when no wiper blade
is installed could damage the
windshield. Any damage that occurs
would not be covered by the vehicle
warranty. Do not allow the wiper
arm to touch the windshield.
Front Wiper Blade Replacement
To replace the wiper blade assembly:
1. Pull the windshield wiper assembly away from the windshield.
2. Lift up on the latch (2) in themiddle of the wiper blade (1)
assembly where the wiper arm (3)
attaches.
3. With the latch (2) open, pull thewiper blade (1) assembly down
toward the windshield far enough
to release it from the J-hooked end
of the wiper arm (3).
4. Remove the wiper blade.
5. Reverse Steps 1–3 for wiper blade replacement.
Rear Wiper Blade Replacement
To replace the wiper blade assembly:
1. Put the vehicle in ACC/ACCESSORY and turn on the rear windshield
wiper. The wiper will stop pointing
down. See Rear Window Wiper/
Washer 0104.
2. Push ENGINE START/STOP to turn the vehicle off.
3. Pull the wiper arm away from the window.
Page 331 of 431

Cadillac XT6 Owner Manual (GMNA-Localizing-U.S./Canada-14574701) -
2021 - CRC - 2/8/21
330 VEHICLE CARE
FusesUsage
F1 Antilock Brake System Fuses
Usage
F2 Starter 1
F3 DC DC Transformer 1 Fuses
Usage
F4 –
F5 DC DC Transformer 2
F6 Amplifier 1
F7 Front Blower
F8 Starter 3
F9 –
F10 –
F11 –
F12 Front Wiper
F13 Starter 2
F14 –
F15 Rear Wiper 1
F16 –
F17 –
F18 Automatic Headlamp Leveling Module
F19 –
F20 –
F21 –
Page 332 of 431

Cadillac XT6 Owner Manual (GMNA-Localizing-U.S./Canada-14574701) -
2021 - CRC - 2/8/21
VEHICLE CARE 331
FusesUsage
F22 Electronic Brake Control Module
F23 Parking/Trailer Lamps
F24 Right Trailer Stoplamp/Turnlamp
F25 Steering Column Lock
F26 –
F27 Left Trailer Stoplamp/ Turnlamp
F28 –
F29 –
F30 Washer Pump
F31 –
F32 Headlamp Left
F33 –
F34 Horn
F35 –
F36 –
F37 Headlamp Right
F38 Not Used/Spare Fuses
Usage
F39 Transmission Control Module 1
F40 Left Rear Bus Electrical Center/DC
DC Ignition
F41 Instrument Cluster
F42 Heating, Ventilation, and Air Conditioning/
Central Gateway
Module/Run/Crank
F43 Head-up Display/ Reflective Light
Auxiliary
F44 Electronic Brake Control Module
Electric Brake
Booster/Run/Crank
F45 –
F46 –
F47 –
F48 Rear Wiper 2 Fuses
Usage
F49 Interior Rearview Mirror/Trailer/Rear
Heated Seats/Run/
Crank
F50 Fuel Tank Zone Module/Run/Crank
F51 Heated Steering Wheel
F52 Folding Seats Switch
F53 Engine Coolant Pump
F54 –
F55 Air Conditioning Clutch
F56 Not Used/Spare
F57 Engine Control Module/Ignition
F58 Transmission Control Module/Ignition
F59 Engine Control Module Battery
F60 –
Page 335 of 431
Cadillac XT6 Owner Manual (GMNA-Localizing-U.S./Canada-14574701) -
2021 - CRC - 2/8/21
334 VEHICLE CARE
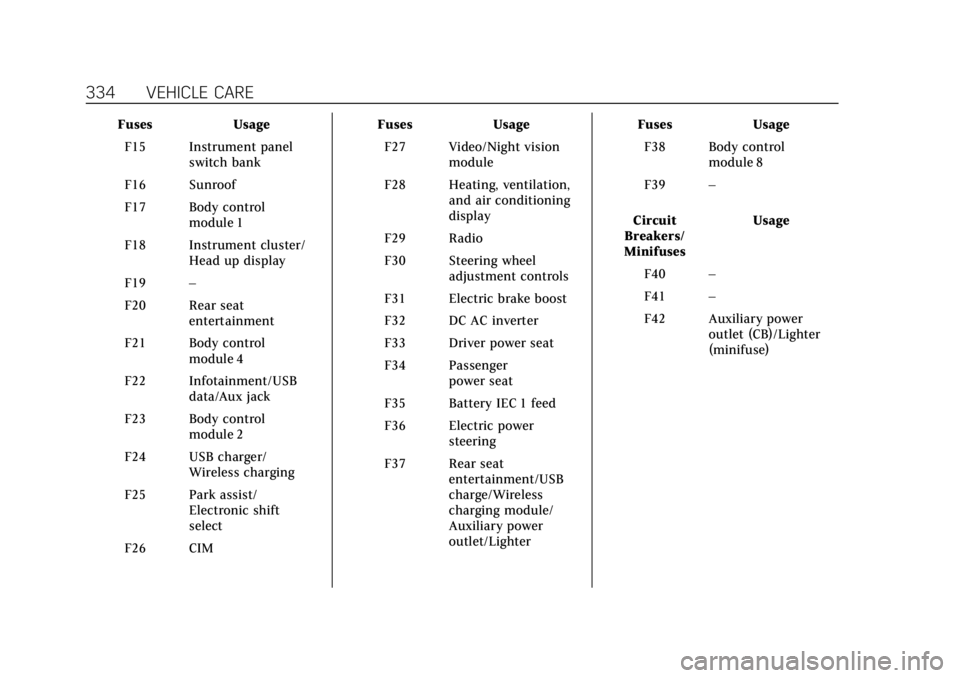
FusesUsage
F15 Instrument panel switch bank
F16 Sunroof
F17 Body control module 1
F18 Instrument cluster/ Head up display
F19 –
F20 Rear seat entertainment
F21 Body control module 4
F22 Infotainment/USB data/Aux jack
F23 Body control module 2
F24 USB charger/ Wireless charging
F25 Park assist/ Electronic shift
select
F26 CIM Fuses
Usage
F27 Video/Night vision module
F28 Heating, ventilation, and air conditioning
display
F29 Radio
F30 Steering wheel adjustment controls
F31 Electric brake boost
F32 DC AC inverter
F33 Driver power seat
F34 Passenger power seat
F35 Battery IEC 1 feed
F36 Electric power steering
F37 Rear seat entertainment/USB
charge/Wireless
charging module/
Auxiliary power
outlet/Lighter Fuses
Usage
F38 Body control module 8
F39 –
Circuit
Breakers/
Minifuses Usage
F40 –
F41 –
F42 Auxiliary power outlet (CB)/Lighter
(minifuse)
Page 337 of 431

Cadillac XT6 Owner Manual (GMNA-Localizing-U.S./Canada-14574701) -
2021 - CRC - 2/8/21
336 VEHICLE CARE
FusesUsage
F19 Ventilated seats/Left front heated seats/
Run/Crank
F20 –
F21 Trailer connector
F22 –
F23 –
F24 Passenger window switch
F25 –
F26 Trailer brake
F27 –
F28 Passive entry/Passive start
F29 –
F30 Canister vent
F31 –
F32 Heated mirror
F33 –
F34 Liftgate module Fuses
Usage
F35 Fuel system control module
F36 –
F37 –
F38 Window module
F39 –
F40 Memory seat module
F41 Automatic occupancy sensor
F42 Trailer battery 2
F43 –
F44 Third row seats
F45 Liftgate motor
F46 Rear heated seats
F47 –
F48 Glass break sensor
F49 –
F50 –
F51 –
F52 Active dampening system module Fuses
Usage
F53 –
F54 External object calculating/Side blind
zone alert
F55 Theft deterrent
F56 Universal garage door opener/Rain sensor
F57 Folding seats 2
Circuit
Breakers Usage
CB1 –
CB2 –
CB3 Rear auxiliary power outlet
Relays Usage
K1 Folding seats 1
K2 –
Page 350 of 431

Cadillac XT6 Owner Manual (GMNA-Localizing-U.S./Canada-14574701) -
2021 - CRC - 2/8/21
VEHICLE CARE 349
When the low tire pressure warning
light comes on:1. Park the vehicle in a safe, level place.
2. Set the parking brake firmly.
3. Place the vehicle in P (Park).
4. Add air to the tire that is underinflated. The turn signal lamp
will flash.
When the recommended pressure
is reached, the horn sounds once
and the turn signal lamp will stop
flashing and briefly turn solid.
Repeat these steps for all
underinflated tires that have
illuminated the low tire pressure
warning light.
{Warning
Overinflating a tire could cause the
tire to rupture and you or others
could be injured. Do not exceed the
maximum pressure listed on the
tire sidewall. See Tire Sidewall
Labeling 0339 and
Vehicle Load Limits 0228. If the tire is overinflated by more than
35 kPa (5 psi), the horn will sound
multiple times and the turn signal
lamp will continue to flash for several
seconds after filling stops. To release
and correct the pressure, while the
turn signal lamp is still flashing,
briefly press the center of the valve
stem. When the recommended
pressure is reached, the horn
sounds once.
If the turn signal lamp does not flash
within 15 seconds after starting to
inflate the tire, the tire fill alert has
not been activated or is not working.
If the hazard warning flashers are on,
the tire fill alert visual feedback will
not work properly.
The TPMS will not activate the tire fill
alert properly under the following
conditions:
.There is interference from an
external device or transmitter.
.The air pressure from the inflation
device is not sufficient to inflate
the tire.
.There is a malfunction in the TPMS.
.There is a malfunction in the horn
or turn signal lamps.
.The identification code of the TPMS
sensor is not registered to the
system.
.The battery of the TPMS sensor
is low.
If the tire fill alert does not operate
due to TPMS interference, move the
vehicle about 1 m (3 ft) back or
forward and try again. If the tire fill
alert feature is not working, use a tire
pressure gauge.
TPMS Sensor Matching Process
Each TPMS sensor has a unique
identification code. The identification
code needs to be matched to a new
tire/wheel position after rotating the
vehicle’s tires or replacing one or more
of the TPMS sensors. The TPMS
sensor matching process should also
be performed after replacing a spare
tire with a road tire containing the
TPMS sensor. The malfunction light
and the DIC message should go off at
the next ignition cycle. The sensors
are matched to the tire/wheel
positions, using a TPMS relearn tool,