2021 CADILLAC XT5 Auto lock
[x] Cancel search: Auto lockPage 3 of 20

3
KEYLESS ACCESS SYSTEM
Lock
Press to lock all doors.
Press and hold for 1 second to fold the power mirrors. To enable operation, go to Settings > Vehicle > Comfort and Convenience.
Unlock
Press to unlock the driver’s door only or all doors.
Press and hold for 1 second to unfold the power mirrors.
Press and hold to open all windows.
Remote Start
Press and release the Lock button and then immediately press and hold the button to start the engine.
Vehicle Locator/Panic Alarm
Press and release to locate your vehicle. The exterior lamps flash and the horn chirps 3 times.
Press and hold for 3 seconds to activate the alarm. Press it again to cancel the alarm.
Power Liftgate
Press twice to open or close the power liftgate. Press once to stop power operation.
Door/Glove Box Key
Press the button (A) on the side of the transmitter to pull out the key. Refer to your Owner’s Manual for instructions to remove the key cylinder cap on the driver’s door handle.
Note: To change or enable some Remote Lock and Unlock settings and Remote Start settings, go to Settings > Vehicle > Remote Lock, Unlock, S\
tart.
See Keys, Doors and Windows in your Owner’s Manual.
The Keyless Access System enables operation of the doors and lift-gate without removing the Remote Keyless Entry (RKE) transmitter from your pocket or purse. The transmitter must be within 3 feet of the door being unlocked or within 3 feet of the liftgate.
KEYLESS UNLOCKING
With the RKE transmitter within range:
Press the button on the driver’s door handle to unlock the driver’s door; press it again within 5 seconds to unlock all doors.
Press the button on a passenger door handle to unlock all doors.
Press the touch pad under the liftgate handle to open the liftgate.
KEYLESS LOCKING
With the ignition off, the RKE transmitter removed from the vehi-cle, and all doors closed:
Press the button on any door handle to lock all doors and the liftgate immediately.
If Passive Locking is turned on in the Settings menu, all doors and the liftgate will lock automatically after a short delay.
Note: To change the Keyless Unlocking and Locking settings, go to Settings > Vehicle > Remote Lock, Unlock, Start.
See Keys, Doors and Windows in your Owner’s Manual.
♦ Optional equipment
REMOTE KEYLESS ENTRY
TRANSMITTER (KEY FOB)
A
Page 5 of 20

5
The automatic trans-mission shift pattern is displayed on top of the shift lever with the selected gear position in red. The shift lever always starts in the
center position and, after shifting, returns to the center position.
Park – Press the button (A) on top of the lever to shift into Park. To shift out of Park, press and hold the shift lock button (B) on the side of the lever while selecting the desired gear.
Reverse – Press and hold the shift lock button (B) and move the lever forward completely (pass the detent) to shift into Reverse.
Neutral – Move the lever forward (to the detent) to shift into Neutral.
Note: The transmission will not stay in Neutral for an extended period. It will automatically shift into Park. See Automated Car Wash Mode.
Drive – Move the lever rearward to shift into Drive.
Tap Shift Mode – With the transmission in Drive, pull back on the shift lever to shift manually. Pull the left steering wheel paddle to downshift and the right paddle to upshift. Pull back on the shift lever again to return to Drive.
AUTOMATED CAR WASH MODE
There are different procedures for placing the transmission in Neutral with the engine on or off and if the driver exits the vehicle. Refer to your Owner’s Manual for each procedure.
See Driving and Operating in your Owner's Manual.
ELECTRONIC PRECISION SHIFT
ELECTRIC PARKING BRAKE
DRIVER MODE CONTROL
Driver Mode Control auto-matically adjusts the steering, suspension, and powertrain tuning in real time. Pressing the MODE button on the cen-ter console displays the mode menu on the instrument clus-ter and activates the next available mode.
ALL-WHEEL DRIVE (AWD) OPERATION♦
On AWD models, the vehicle can operate in front-wheel drive or all-wheel drive.
Press the MODE button to select Tour (front-wheel drive), AWD, Sport, or Off-Road mode.
If the vehicle is turned off while in Tour or AWD mode, it will stay in that mode the next time the vehicle is started. If in Sport or Off-Road mode, the vehicle defaults to Tour mode when restarted.
FRONT-WHEEL DRIVE (FWD) OPERATION Press the MODE button on the center console to select the Tour, Snow/Ice, or Sport mode.
The vehicle defaults to Tour mode each time the vehicle is started.
See Driving and Operating in your Owner's Manual.
♦ Optional equipment
To apply the parking brake, press the Parking Brake switch on the left side of the instrument panel.
To release the parking brake, turn on the ignition, press the brake pedal, and then press the switch.
See Driving and Operating in your Owner’s Manual.
A
B
Page 12 of 20

12
CLIMATE CONTROLS
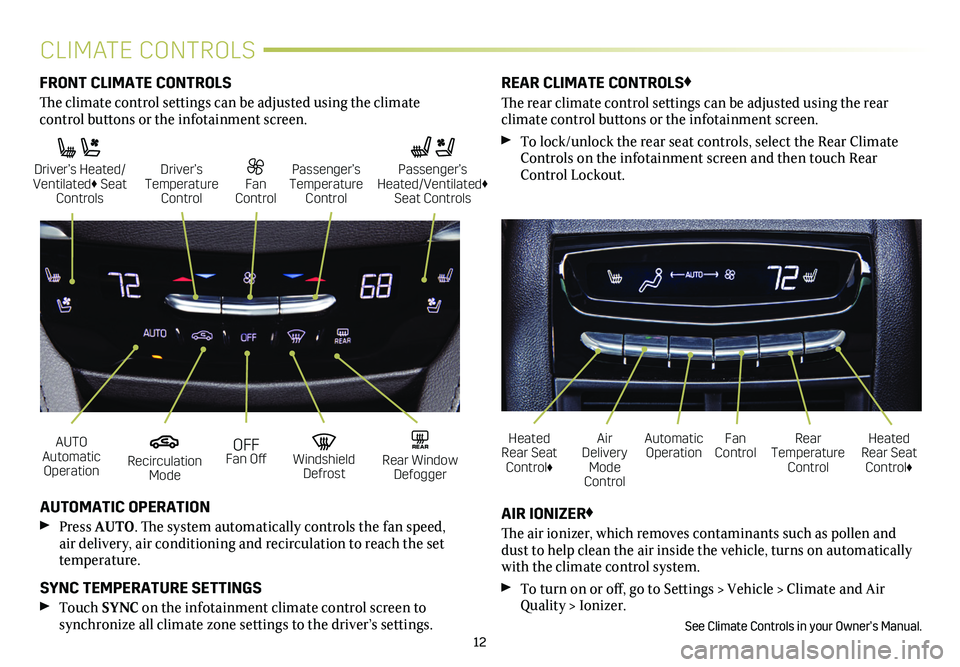
AUTO Automatic Operation
Driver’s Heated/ Ventilated♦ Seat Controls
OFF Fan Off
Fan Control
Recirculation Mode
Driver’s Temperature Control
Windshield Defrost
Passenger’s Temperature Control
REAR Rear Window Defogger
Automatic OperationFan ControlHeated Rear Seat Control♦
Heated Rear Seat Control♦
Rear Temperature Control
Air Delivery Mode Control
AUTOMATIC OPERATION
Press AUTO. The system automatically controls the fan speed, air delivery, air conditioning and recirculation to reach the set temperature.
SYNC TEMPERATURE SETTINGS
Touch SYNC on the infotainment climate control screen to
synchronize all climate zone settings to the driver’s settings.
AIR IONIZER♦
The air ionizer, which removes contaminants such as pollen and dust to help clean the air inside the vehicle, turns on automatically with the climate control system.
To turn on or off, go to Settings > Vehicle > Climate and Air Quality > Ionizer.
See Climate Controls in your Owner’s Manual.
FRONT CLIMATE CONTROLS
The climate control settings can be adjusted using the climate
control buttons or the infotainment screen.
REAR CLIMATE CONTROLS♦
The rear climate control settings can be adjusted using the rear
climate control buttons or the infotainment screen.
To lock/unlock the rear seat controls, select the Rear Climate Controls on the infotainment screen and then touch Rear Control Lockout.
Passenger’s Heated/Ventilated♦ Seat Controls
Page 14 of 20

14
FRONT SEATSREAR SEATS
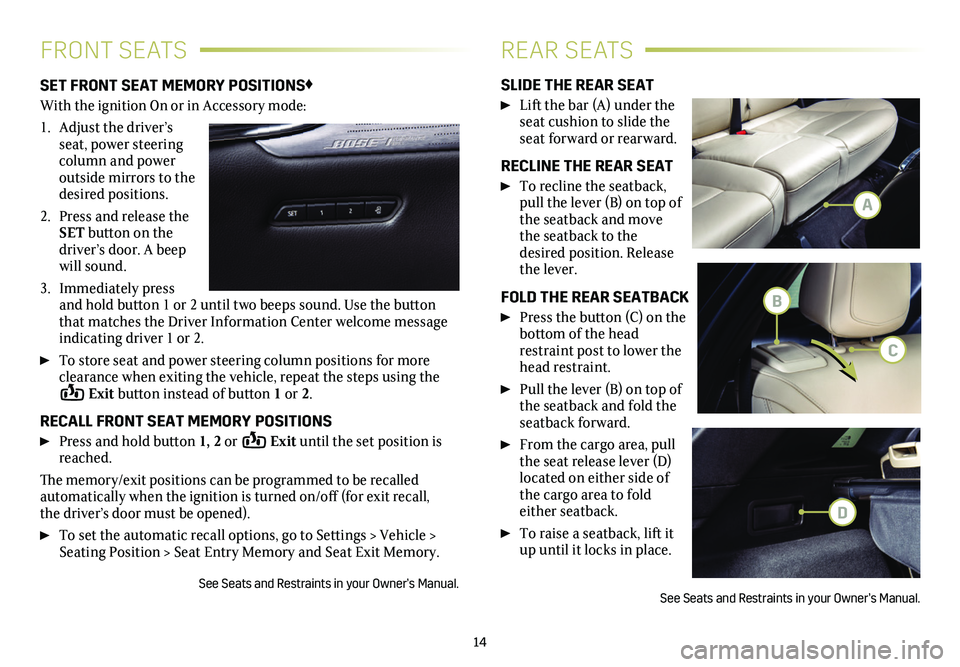
SET FRONT SEAT MEMORY POSITIONS♦
With the ignition On or in Accessory mode:
1. Adjust the driver’s seat, power steering column and power outside mirrors to the desired positions.
2. Press and release the SET button on the driver’s door. A beep will sound.
3. Immediately press and hold button 1 or 2 until two beeps sound. Use the button that matches the Driver Information Center welcome message
indicating driver 1 or 2.
To store seat and power steering column positions for more clearance when exiting the vehicle, repeat the steps using the Exit button instead of button 1 or 2.
RECALL FRONT SEAT MEMORY POSITIONS
Press and hold button 1, 2 or Exit until the set position is reached.
The memory/exit positions can be programmed to be recalled automatically when the ignition is turned on/off (for exit recall, the driver’s door must be opened).
To set the automatic recall options, go to Settings > Vehicle > Seating Position > Seat Entry Memory and Seat Exit Memory.
See Seats and Restraints in your Owner’s Manual.
SLIDE THE REAR SEAT
Lift the bar (A) under the seat cushion to slide the seat forward or rearward.
RECLINE THE REAR SEAT
To recline the seatback, pull the lever (B) on top of the seatback and move the seatback to the desired position. Release the lever.
FOLD THE REAR SEATBACK
Press the button (C) on the bottom of the head restraint post to lower the head restraint.
Pull the lever (B) on top of the seatback and fold the seatback forward.
From the cargo area, pull the seat release lever (D)
located on either side of the cargo area to fold either seatback.
To raise a seatback, lift it up until it locks in place.
See Seats and Restraints in your Owner’s Manual.
A
B
C
D