Page 224 of 313

Buick Encore Owner Manual (GMNA-Localizing-U.S./Canada-14607636) -
2021 - CRC - 8/18/20
Vehicle Care 223
Headlamp Aiming
Front Headlamp Aiming
Headlamp aim has been preset and should
need no further adjustment.
If the vehicle is damaged in a crash, the
headlamp aim may be affected.
If adjustment to the headlamps is necessary,
see your dealer.
Bulb Replacement
For the proper type of replacement bulbs,
or any bulb changing procedure not listed in
this section, contact your dealer.
Caution
Do not replace incandescent bulbs with
aftermarket LED replacement bulbs. This
can cause damage to the vehicle electrical
system.
Halogen Bulbs
{Warning
Halogen bulbs have pressurized gas inside
and can burst if you drop or scratch the
bulb. You or others could be injured. Be
sure to read and follow the instructions
on the bulb package.
LED Lighting
This vehicle has several LED lamps. For
replacement of any LED lighting assembly,
contact your dealer.
Headlamps, Front Turn Signal and
Parking Lamps
Headlamp Assembly
The vehicle has halogen high-beam and
low-beam headlamps, an LED turn signal
lamp, Daytime Running Lamps (DRL), and a
sidemarker lamp on the headlamp assembly.
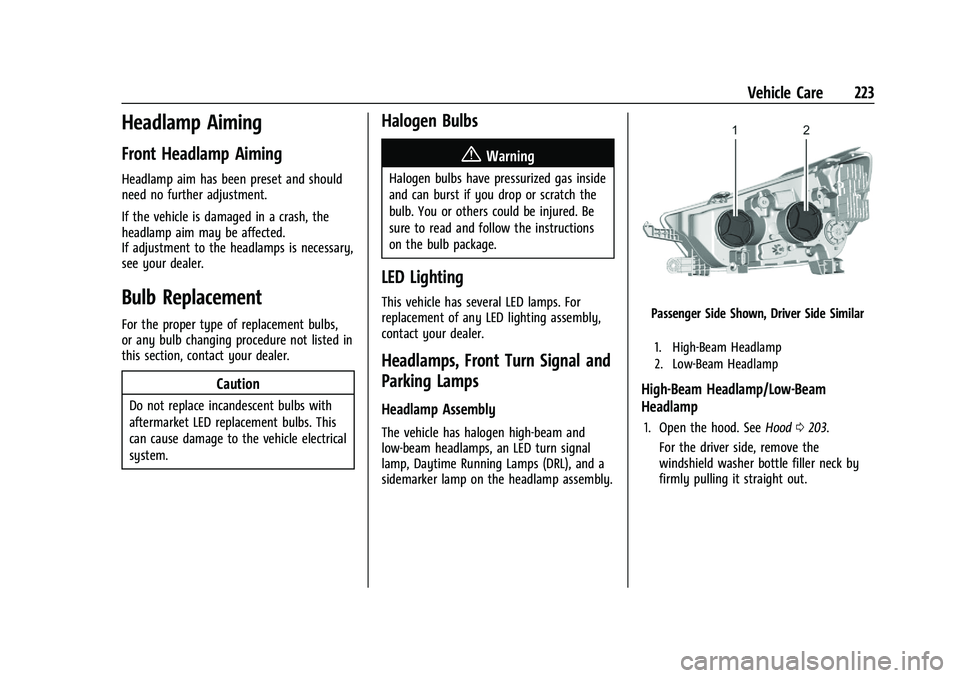
Passenger Side Shown, Driver Side Similar
1. High-Beam Headlamp
2. Low-Beam Headlamp
High-Beam Headlamp/Low-Beam
Headlamp
1. Open the hood. SeeHood0203.
For the driver side, remove the
windshield washer bottle filler neck by
firmly pulling it straight out.
Page 255 of 313

Buick Encore Owner Manual (GMNA-Localizing-U.S./Canada-14607636) -
2021 - CRC - 8/18/20
254 Vehicle Care
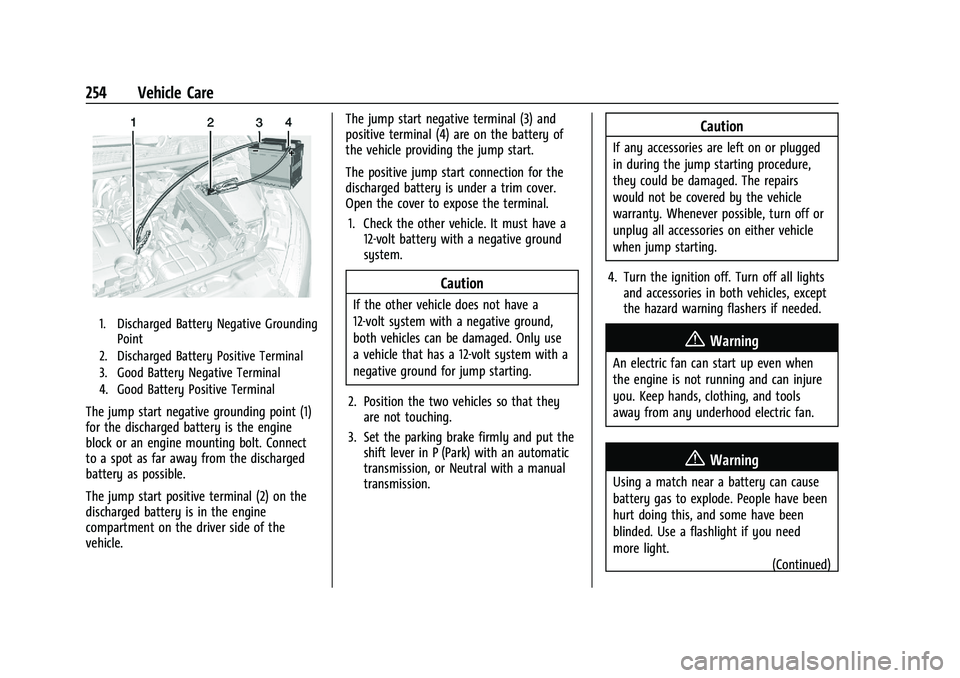
1. Discharged Battery Negative GroundingPoint
2. Discharged Battery Positive Terminal
3. Good Battery Negative Terminal
4. Good Battery Positive Terminal
The jump start negative grounding point (1)
for the discharged battery is the engine
block or an engine mounting bolt. Connect
to a spot as far away from the discharged
battery as possible.
The jump start positive terminal (2) on the
discharged battery is in the engine
compartment on the driver side of the
vehicle. The jump start negative terminal (3) and
positive terminal (4) are on the battery of
the vehicle providing the jump start.
The positive jump start connection for the
discharged battery is under a trim cover.
Open the cover to expose the terminal.
1. Check the other vehicle. It must have a 12-volt battery with a negative ground
system.
Caution
If the other vehicle does not have a
12-volt system with a negative ground,
both vehicles can be damaged. Only use
a vehicle that has a 12-volt system with a
negative ground for jump starting.
2. Position the two vehicles so that they are not touching.
3. Set the parking brake firmly and put the shift lever in P (Park) with an automatic
transmission, or Neutral with a manual
transmission.
Caution
If any accessories are left on or plugged
in during the jump starting procedure,
they could be damaged. The repairs
would not be covered by the vehicle
warranty. Whenever possible, turn off or
unplug all accessories on either vehicle
when jump starting.
4. Turn the ignition off. Turn off all lights and accessories in both vehicles, except
the hazard warning flashers if needed.
{Warning
An electric fan can start up even when
the engine is not running and can injure
you. Keep hands, clothing, and tools
away from any underhood electric fan.
{Warning
Using a match near a battery can cause
battery gas to explode. People have been
hurt doing this, and some have been
blinded. Use a flashlight if you need
more light.
(Continued)
Page 263 of 313

Buick Encore Owner Manual (GMNA-Localizing-U.S./Canada-14607636) -
2021 - CRC - 8/18/20
262 Vehicle Care
Visually check constant velocity joint boots
and axle seals for leaks.
Body Component Lubrication
Lubricate all key lock cylinders, hood hinges,
liftgate hinges, and the steel fuel door
hinges, unless the components are plastic.
Applying silicone grease on weatherstrips
with a clean cloth will make them last
longer, seal better, and not stick or squeak.
Underbody Maintenance
At least twice a year, spring and fall, use
plain water to flush any corrosive materials
from the underbody. Take care to
thoroughly clean any areas where mud and
other debris can collect.
Do not directly power wash the transfer
case and/or front/rear axle output seals.
High pressure water can overcome the seals
and contaminate the fluid. Contaminated
fluid will decrease the life of the transfer
case and/or axles and should be replaced.
Sheet Metal Damage
If the vehicle is damaged and requires sheet
metal repair or replacement, make sure the
body repair shop applies anti-corrosion
material to parts repaired or replaced to
restore corrosion protection.Original manufacturer replacement parts will
provide the corrosion protection while
maintaining the vehicle warranty.
Finish Damage
Quickly repair minor chips and scratches
with touch-up materials available from your
dealer to avoid corrosion. Larger areas of
finish damage can be corrected in your
dealer's body and paint shop.
Chemical Paint Spotting
Airborne pollutants can fall upon and attack
painted vehicle surfaces causing blotchy,
ring-shaped discolorations, and small,
irregular dark spots etched into the paint
surface. See
“Finish Care” previously in this
section.
Interior Care
To prevent dirt particle abrasions, regularly
clean the vehicle's interior. Immediately
remove any soils. Newspapers or dark
garments can transfer color to the vehicle’s
interior.
Use a soft bristle brush to remove dust from
knobs and crevices on the instrument
cluster. Using a mild soap solution,
immediately remove hand lotions, sunscreen, and insect repellent from all
interior surfaces or permanent damage may
result.
Use cleaners specifically designed for the
surfaces being cleaned to prevent
permanent damage. Apply all cleaners
directly to the cleaning cloth. Do not spray
cleaners on any switches or controls.
Remove cleaners quickly.
Before using cleaners, read and follow all
safety instructions on the label. While
cleaning the interior, open the doors and
windows to get proper ventilation.
To prevent damage, do not clean the
interior using the following cleaners or
techniques:
.Never use a razor or any other sharp
object to remove soil from any interior
surface.
.Never use a brush with stiff bristles.
.Never rub any surface aggressively or
with too much pressure.
.Do not use laundry detergents or
dishwashing soaps with degreasers. For
liquid cleaners, use approximately
20 drops per 3.8 L (1 gal) of water.
A concentrated soap solution will create