2021 AUDI TT service
[x] Cancel search: servicePage 133 of 280
8S1012721BE
Telephone
— The mobile device may become hot during
wireless charging. Pay attention to the tem-
perature of your mobile device and be care-
ful when removing it from the Audi phone
box.
— An alternating magnetic field is used for
wireless charging. Maintain a minimum dis-
tance of approximately 2.4 inches (6 cm) to
the Audi phone box charging plate. The
thresholds for prolonged exposure at this
distance comply with ICNIRP1998. There-
fore, interactions such as irritation of senso-
ry organs, malfunctions of active implants
(such as pacemakers, infusion pumps, or
neurostimulators) or effects on passive im-
plants (such as prosthetic limbs) is highly
unlikely. If you have an implant, consult a
medical specialist if you have any questions.
@) Note
Applicable to U.S.A.
Operation of the Audi phone box is subject to
the following requirements of the Federal
Communications Commission:
— This is a CONSUMER device.
— BEFORE USE, you MUST REGISTER THIS DE-
VICE with your wireless provider and have
your provider’s consent. Most wireless pro-
viders consent to the use of signal boosters.
Some providers may not consent to the use
of this device on their network. If you are
unsure, contact your service provider.
— You MUST operate this device with approved
antennas and cables as specified by the
manufacturer. Antennas MUST be installed
at least 20 cm (8 inches) from any person.
— You MUST cease operating this device im-
mediately if requested by the FCC or a li-
censed wireless service provider.
— WARNING: E911 location information may
not be provided or may be inaccurate for
calls served by using this device.
@) Note
Applicable to Canada
In Canada, operation of a Zone Enhancer,
such as an Audi phone box, is subject to the
following requirements of the Innovation,
Science and Economic Development Canada
(ISED):
—This is a CONSUMER device.
— BEFORE USE, you MUST meet all require-
ments set out in CPC-2-1-05. At the time of
printing this user manual, the CPC-2-1-05
client procedures circular of ISED Canada
was available at the following web page:
http://www.ic.gc.ca/eic/site/smt-gst.
nsf/eng/sf08942.html.
— You MUST operate this device with approved
antennas and cables as specified by the
manufacturer. Antennas MUST NOT be in-
stalled within 20 cm of any person.
— You MUST cease operating this device im-
mediately if requested by ISED or a licensed
wireless service provider.
— WARNING: £911 location information may
not be provided or may be inaccurate for
calls served by using this device.
G@) Tips
— The system complies with United States FCC
regulations and ISED regulations
=> page 267.
— Placing the mobile device in a bag or protec-
tive sleeve inside the Audi phone box can in-
terfere with the connection to the external
antenna*.
— Metallic objects in the Audi phone box block
the wireless charging of your mobile device
and calls made using the exterior antenna”.
— The charging time and temperature will vary
depending on the mobile device being used.
— Your mobile device can only be charged in
the Audi phone box when the ignition is
switched on.
—To reduce the risk of malfunctions, make
sure the mobile device is positioned correct-
ly in the Audi phone box.
—The maximum charging output is 5 W.
— Strong transmission quality* cannot be
guaranteed if more than one mobile device
is in the box.
— Only one mobile device at a time can be
charged wirelessly in the Audi phone box.
131
>
Page 134 of 280
Telephone
— Audi recommends using Audi Genuine Ac-
cessories. Audi has verified their reliability,
safety, and suitability.
— You can purchase a USB adapter from an au-
thorized Audi dealer or authorized Audi
Service Facility, or at specialty stores.
— If you place your remote control key togeth-
er with your mobile device in the Audi phone
box, it may cause your mobile device to stop
charging if wireless charging is active.
Using the telephone
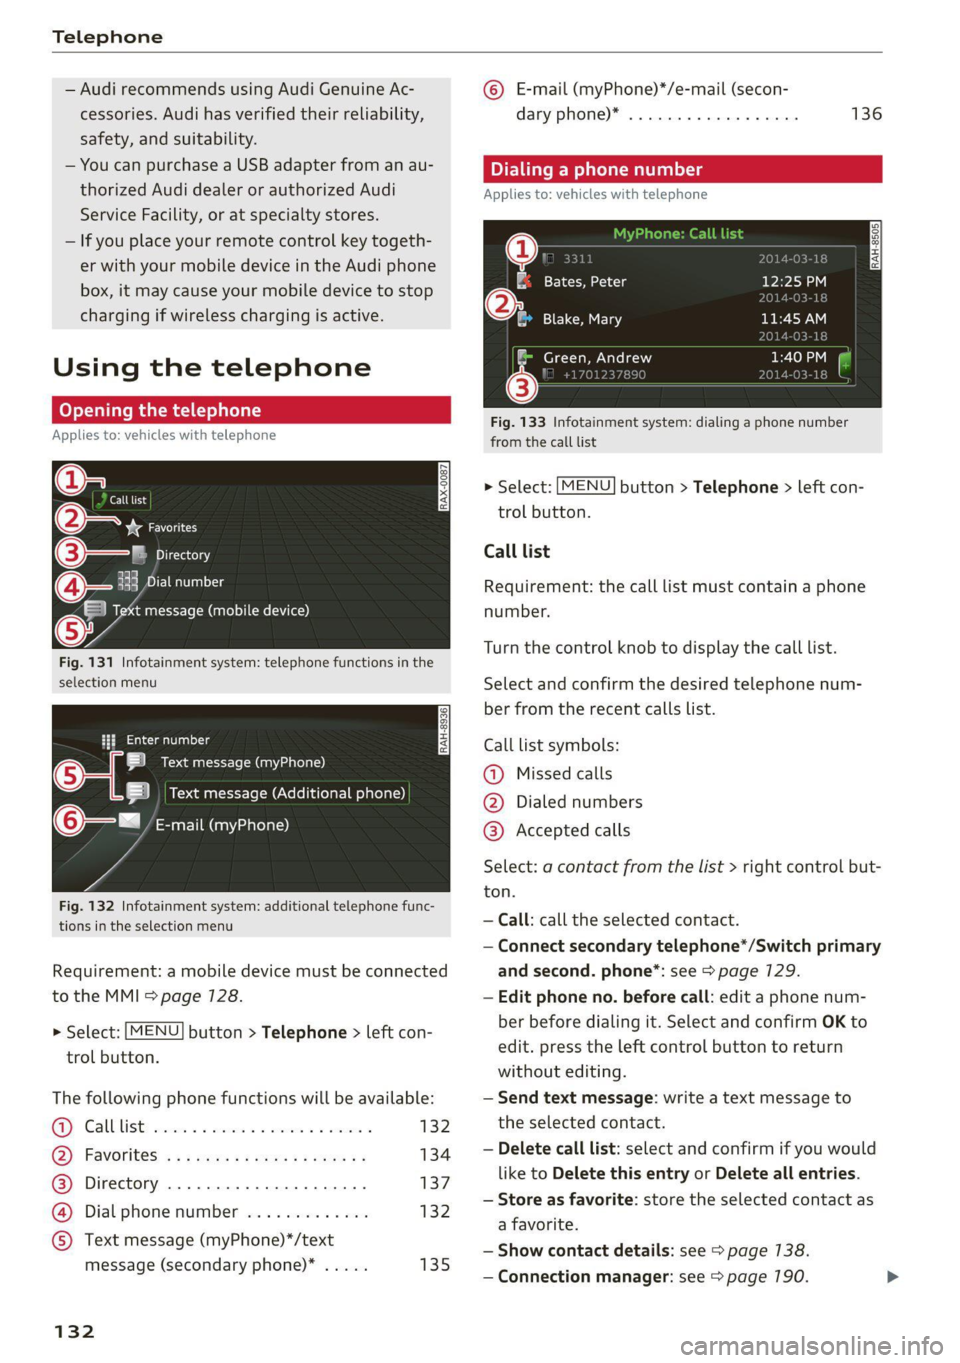
Opening the telephone
Applies to: vehicles with telephone
Call list
(2 Sa
©— Directory
cy DUEL \1g
a message (mobile device)
Fig. 131 Infotainment system: telephone functions in the
selection menu
alee laa oli RAH-8936|
BS Text message (myPhone)
SB Text message (Additional phone)
@—= E-mail (myPhone)
Fig. 132 Infotainment system: additional telephone func-
tions in the selection menu
Requirement: a mobile device must be connected
to the MMI > page 7128.
> Select: [MENU
trol button.
button > Telephone > left con-
The following phone functions will be available:
GS CALS Ee encci oo siete 2 cote memati 132
G) FAVOTItes! « ss ows ce mee as ra a 134
@®) Directory ................0000. 137
@ Dial phone number ............. 132
© Text message (myPhone)*/text
message (secondary phone)* ..... 135
132
© E-mail (myPhone)*/e-mail (secon-
dary phone)*
Dialing a phone number
Applies to: vehicles with telephone
| cep!
| Bates, Peter
|e) ola
136
2014-03-16
bya)
TORO aE:
11:45 AM
Toe EO eae)
RAH-8505
& Green, Andrew
Je
Fig. 133 Infotainment system: dialing a phone number
from the call list
> Select: [MENU
trol button.
button > Telephone > left con-
Call list
Requirement: the call list must contain a phone
number.
Turn the control knob to display the call list.
Select and confirm the desired telephone num-
ber from the recent calls list.
Call list symbols:
@ Missed calls
@ Dialed numbers
@® Accepted calls
Select: a contact from the list > right control but-
ton.
— Call: call the selected contact.
— Connect secondary telephone*/Switch primary
and second. phone”: see > page 129.
— Edit phone no. before call: edit a phone num-
ber before dialing it. Select and confirm OK to
edit. press the left control button to return
without editing.
— Send text message: write a text message to
the selected contact.
— Delete call list: select and confirm if you would
like to Delete this entry or Delete all entries.
— Store as favorite: store the selected contact as
a favorite.
— Show contact details: see > page 138.
— Connection manager: see > page 190. >
Page 135 of 280
8S1012721BE
Telephone
— Bluetooth settings: see > page 7192.
— Online settings*: see > page 192.
— Wi-Fi settings”: see > page 146.
— Telephone settings: see > page 139.
Favorites
Requirement: a phone number or contact must
be stored as a favorite > page 134.
Select and confirm a favorite in the favorites list.
Directory
Requirement: you must have at least one contact
stored in your cell phone.
Select and confirm a phone number from the di-
rectory > page 137.
Enter number
— Entering a phone number as a sequence of
numbers: enter a phone number using the
number speller.
— Entering the phone number as a sequence of
letters: select and confirm ABC above the num-
ber speller. Enter a sequence of letters using
the letter speller, for example AUDISERVICE.
— Dialing a phone number: select and confirm &,
or push the control knob downward. Select and
confirm OK.
— Deleting individual characters: select and con-
firm &.
— Deleting all characters entered at once: turn
the control knob with the character selection to
l] and press and hold the control knob, or se-
lect: right control button > Clear input field.
Tone sequences (DTMF) can be entered directly
into the speller during a phone call.
Accepting or ending a call
Applies to: vehicles with telephone
> Accepting a call: select and confirm Answer.
> Declining a call: select and confirm Decline.
> Muting the active call: select and confirm
Mute.
> Ending a phone call/cancel dialing: select and
confirm End call.
> Accepting another call: see > page 7133.
@) Tips
The radio or media playback is muted during a
phone call.
During a phone call
Applies to: vehicles with telephone
Requirement: there must be a call in progress.
> Press the right control button.
The following options may be possible during a
call depending on the mobile device being used
and the type of connection:
— Making an additional call: select: Find contact
> Call list/Directory/Favorites > an entry from
the list.
— Accepting an incoming call when there is an
active call and a call on hold: select Replace.
The active call is replaced with the incoming
call.
— Answering an additional call: if there is an in-
coming call while another call is active, you can
select Answer to put the existing call on hold
and answer the incoming call. If you select De-
cline, the incoming call will be declined.
Additional functions include:
Mute: if you select and confirm this function, the
other person on the phone cannot hear you. You
will still be able to hear the other person. To turn
the microphone back on, select and confirm Un-
mute.
Hold call/Resume: you can place the existing call
on hold and resume it again. To resume the call,
select and confirm the call you would like to re-
sume.
Transfer call to mobile device”: select and con-
firm Transfer call to mobile device to transfer
the existing call from the MMI to your cell phone.
Switch to hands-free mode*: Requirement: you
must have a phone call in progress on your cell
phone. Select and confirm Switch to hands-free
mode to transfer the call from your cell phone to
the MMI.
Swap call: alternate between two phone calls
while one of the calls is on hold. Selecting End
133
Page 138 of 280
Telephone
Telephone settings
See > page 139.
@) Tips
Messages that are deleted in the MMI are also
deleted in the mobile device automatically.
Applies to: cell phones with Bluetooth Message Access Profile
(MAP)
Depending on the type of mobile device being
used, you may be able to receive and send e-
mails through the MMI.
Requirement: your mobile device must be con-
nected to the MMI via Bluetooth Message Access
Profile (Bluetooth MAP) > page 128.
> Select: [MENU] button > Telephone > left con-
trol button > e-mail (myPhone)/e-mail (secon-
dary phone)*.
Write new e-mail
— Using a template: select and confirm the de-
sired template from the list.
— Enter one or more recipients.
— Select and confirm Send.
Inbox
All received e-mails are displayed.
Sent
All sent e-mails are displayed.
Outbox
All e-mails that will be sent are displayed.
Drafts
All saved e-mails that have not been sent yet are
displayed.
©) Note
Read the information about Audi connect, and
be sure to note the connectivity costs section
=> page 1417.
136
G) Tips
To ensure that your sent e-mails are received,
connect your cell phone to the Wi-Fi hotspot*
in the vehicle so that the e-mail app on your
cell phone continues to have Internet access.
If you are still not receiving e-mails even
though you have a successful connection,
then contact your e-mail service provider or
your cell phone service provider.
Message options
Applies to: cell phones with Bluetooth Message Access Profile
(MAP)
> Select: [MENU] button > Telephone > left con-
trol button > e-mail (myPhone)/e-mail (secon-
dary phone)* > Inbox/Sent/Outbox > right con-
trol button.
The following options may be available depend-
ing on the selected menu.
Store as template
Ten e-mail templates are stored in the MMI. You
can save up to 10 additional templates of your
own.
— Create an e-mail.
— Select and confirm Store as template.
Resume last edited e-mail
The last e-mail in progress can be resumed.
Reply*
A reply can be sent for the selected e-mail in the
Inbox.
Reply all*
A reply can be sent for the selected e-mail in the
Inbox and it will be sent to all of the entered re-
cipients.
Forward
The selected e-mail can be forwarded to a differ-
ent recipient.
Page 139 of 280
8S1012721BE
Telephone
Delete this message*
The selected e-mail can be deleted.
Read out!)
You can have the MMI read an open e-mail.
E-mail settings*
To display when a new e-mail is received, activate
the E-mail notifications. New e-mails are indicat-
ed with an envelope & in the Infotainment sys-
tem display status line.
Connection manager
See > page 190.
Bluetooth settings
See > page 192.
Online settings*
See > page 192.
Wi-Fi settings*
See > page 146.
Telephone settings
See > page 139.
@) Tips
Messages that are deleted in the MMI are also
automatically deleted in the connected cell
phone.
Listening to voicemail
Applies to: vehicles with telephone
> Select: [MENU] button > Telephone > left con-
trol button. Select and confirm Call list/Direc-
tory/Favorites > Voicemail.
Requirement: there must be no voicemail num-
ber stored.
> Entering the voicemail number: enter the de-
sired number. Select and confirm OK.
Requirement: a voicemail number must be stor-
ed.
1) Not available in all languages.
> Dialing the voicemail number: select and con-
firm Voicemail.
@) Tips
This service must be set up and activated in
advance by the cell phone service provider.
Directory
Coy oYTal rem an Meleacelaly
Applies to: vehicles with telephone
After connecting the cell phone, the contacts in it
are automatically imported into the MMI.
Requirement: you must have at least one contact
stored in your cell phone.
> Select: [MENU] button > Telephone > left con-
trol button > Directory.
> Calling a contact: select and confirm a contact
from the directory. The phone numbers for your
selected contact are displayed. Select and con-
firm a phone number to start a call.
> Free text search for a contact: see > page 138.
The contacts will be displayed. You can change
the sort order > page 139, Sort order.
Gi) Tips
— Check for a possible request to synchronize
on your cell phone. Requests to synchronize
the directory must be confirmed so that
your cell phone contacts can be loaded into
the MMI.
—The directory from the cell phone with the
active connection will always be displayed.
— The contacts from the mobile device may
not be transferred in alphabetical order. If
there are too many entries, contacts with
different first letters may be missing in the
MMI.
—The contacts in the local MMI memory are
always visible and can be accessed by other
users.
137
Page 142 of 280
Telephone
Safety belt microphone
Applies to: vehicles with safety belt microphone
z 8 8 | z| | |
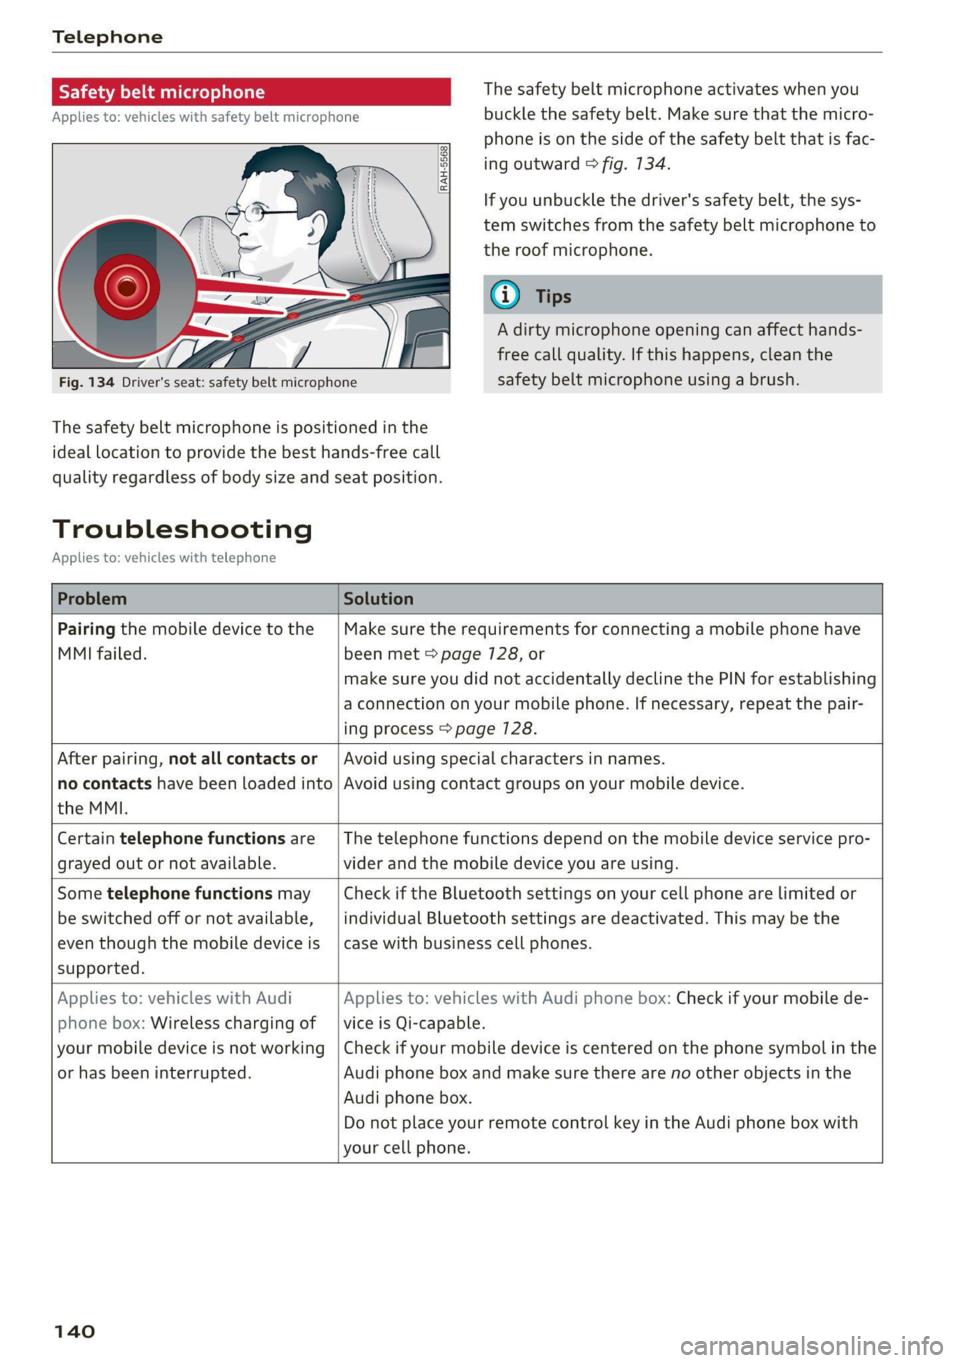
Fig. 134 Driver's seat: safety belt microphone
The safety belt microphone is positioned in the
ideal
location to provide the best hands-free call
quality regardless of body size and seat position.
The safety belt microphone activates when you
buckle the safety belt. Make sure that the micro-
phone is on the side of the safety belt that is fac-
ing outward > fig. 134.
If you unbuckle the driver's safety belt, the sys-
tem switches from the safety belt microphone to
the roof microphone.
@ Tips
A dirty microphone opening can affect hands-
free call quality. If this happens, clean the
safety belt microphone using a brush.
Troubleshooting
Applies to: vehicles with telephone
Problem Solution
Pairing the mobile device to the
MMI failed.
Make sure the requirements for connecting a mobile phone have
been met > page 7128, or
make sure you did not accidentally decline the PIN for establishing
a connection on your mobile phone. If necessary, repeat the pair-
ing process > page 128.
After pairing, not all contacts or
no contacts have been loaded into
the MMI.
Avoid using special characters in names.
Avoid using contact groups on your mobile device.
Certain telephone functions are
grayed out or not available.
The telephone functions depend on the mobile device service pro-
vider and the mobile device you are using.
Some telephone functions may
be switched off or not available,
even though the mobile device is
supported.
Check if the Bluetooth settings on your cell phone are limited or
individual Bluetooth settings are deactivated. This may be the
case with business cell phones.
Applies to: vehicles with Audi
phone box: Wireless charging of
your mobile device is not working
or has been interrupted.
Applies to: vehicles with Audi phone box: Check if your mobile de-
vice is Qi-capable.
Check if your mobile device is centered on the phone symbol in the
Audi phone box and make sure there are no other objects in the
Audi phone box.
Do not place your remote control key in the Audi phone box with
your cell phone.
140
Page 143 of 280
8S1012721BE
Audi connect
Audi connect
General information
Applies to: vehicles with Audi connect
Depending on the country and the vehicle equip-
ment, the following functions may be available:
— Audi connect Infotainment
ZA WARNING
—To reduce the risk of an accident, only use
Audi connect services and the Wi-Fi hotspot
only if the traffic situation permits it. Read
and follow the guidelines provided in
=> page 110, Traffic safety information.
— It is only safe to use tablets, laptops, mobile
devices and other similar devices when the
vehicle is stationary because, like all loose
objects, they could be thrown around the in-
side of the vehicle in a crash and cause seri-
ous injuries. Store these types of devices se-
curely while driving. Also read the warnings
in the chapter > page 52.
@) Note
— Applies to: use of separate SIM card in the
SIM card reader or SIM card in the Wi-Fi de-
vice via personal hotspot: If you use your
own SIM card, all data connections for all
Audi connect Infotainment services will run
through your SIM card. This could result in
additional costs, depending on your cell
phone service provider and especially when
using in other countries. A flat rate data
plan is strongly recommended. You can ob-
tain more information from your cell phone
service provider.
— In certain situations, the Wi-Fi hotspot data
connection may be established as a replace-
ment for the SIM card on your Wi-Fi device.
This feature depends on the configuration
of your Wi-Fi device and operating system.
This could result in fees depending on your
cell phone service provider, especially if you
are using this feature while abroad. A flat
rate data plan is strongly recommended.
For more information, contact your cell
phone service provider or refer to the own-
er's manual for your Wi-Fi device.
— You are responsible for all precautions tak-
en for data protection, anti-virus protection,
and protection against loss of data on mo-
bile devices that are used, for example, to
access the Internet through the Wi-Fi hot-
spot.
— In areas with poor GPS reception or outside
the coverage range of the respective cell
phone service provider, some functions
and/or services may not be available, it may
not be possible to send or receive data, or
functionality may be limited.
@) Tips
— The availability of services depends on the
subscription.
— Audi merely provides access to third party
services through the MMI and does not as-
sume any responsibility for the content and
availability of these services.
— Use of the most up-to-date mobile network
standard is not available in every country.
Contact an authorized Audi dealer or au-
thorized Audi Service Facility or your cell
phone service provider for additional infor-
mation.
— Availability, scope, providers, screen dis-
play, and costs of services may vary depend-
ing on the country, model, model year, end
device and rates.
— All services can be modified, activated/deac-
tivated, renamed, and enhanced without
further notification.
Audi connect
Infotainment
Applies to: vehicles with Audi connect Infotainment
With Audi connect Infotainment services, online
information is transmitted directly to the vehicle.
An Internet connection is required to use Audi
connect Infotainment. Depending on the country
and the vehicle equipment, the following options
may be available:
141
>
Page 144 of 280
Audi connect
— SIM card reader
— Personal Wi-Fi hotspot
ZA\ WARNING
Always follow the information found in > AV
in General information on page 1417.
©) Note
Always follow the information found in >@ in
General information on page 147.
SIM card reader
Applies to: vehicles with Audi connect Infotainment and a SIM
card reader
All data connections will be made through the
SIM card in the card reader, if a SIM card is insert-
ed >@) in General information on page 141.
Requirement: the vehicle must be stationary and
the ignition must be switched on. A data connec-
tion must be configured for Audi connect Info-
tainment services. Your personal SIM card must
be a mini SIM card >@) and have a data option.
Inserting a SIM card
The SIM card reader is located in the glove com-
partment.
> The angled corner of the SIM card must face to-
ward the left front side when being inserted.
> Slide the SIM card into the SIM card reader slot
until you feel the SIM card click into place.
> Select and confirm Enter PIN on the MMI. Enter
the PIN for your SIM card.
> Select and confirm OK.
> To connect to the Internet automatically in the
future, select and confirm Yes; see also
=> page 145.
After connecting successfully, the signal strength
@ and connection type @) will be displayed in
the MMI status bar > page 779, fig. 128.
Removing a SIM card
> Press on the SIM card briefly.
@) Note
— Always follow the information found in >®
in General information on page 141.
142
—To reduce the risk of damaging the SIM card
reader, only use mini SIM cards (25 mmx 15
mm). Contact your cell phone service pro-
vider for more information on mini SIM
cards.
— If a SIM card of a different size is inserted in
the SIM card reader, do not under any cir-
cumstances remove this card yourself due
to the risk of damaging the SIM card reader.
Contact an authorized Audi dealer or au-
thorized Audi Service Facility.
— There is a risk of damaging the SIM card
reader if you use a SIM card adapter, be-
cause vibrations can cause the SIM card to
fall out of the adapter while driving. Contact
an authorized Audi dealer or authorized
Audi Service Facility.
@) Tips
— Additional Internet connection settings can
be found under > page 7145.
— Do not remove the SIM card from the SIM
card reader when using the Audi connect In-
fotainment services.
Using personal Wi-Fi hotspot
Applies to: vehicles with Audi connect Infotainment and a per-
sonal Wi-Fi hotspot
Depending on the country and the vehicle equip-
ment, the MMI can use the established Internet
connection on your mobile device through a Wi-Fi
connection.
Requirement: the vehicle must be stationary and
the ignition must be switched on. Your mobile
device and your cell phone service provider must
support the personal Wi-Fi hotspot function. The
personal Wi-Fi hotspot must be activated on your
mobile device. Access by other devices must be
permitted on the personal hotspot. Your own SIM
card in the mobile device must have a data op-
tion. No SIM card is inserted in the SIM card read-
er.
Connecting the MMI with the personal
hotspot
> Select: [MENU] button > Telephone > right con-
trol button > Wi-Fi settings > Wi-Fi > On.