2021 AUDI TT lock
[x] Cancel search: lockPage 93 of 280

8S1012721BE
Assist systems
Seem ea
Applies to: vehicles with cruise control system
When you switch the system off, the cruise con-
trol speed will be erased.
Requirement: the system must be switched on.
> To switch the system off, press the lever toward
@ (locked into place) > page 90, fig. 94, or
> Switch the ignition off.
Applies to: vehicles with cruise control system
ICRUISE| / 3) Speed control system: currently un-
available. See owner's manual
If the indicator light turns on and this message
appears, the cruise control system has been de-
activated. There is a temporary malfunction, for
example the brakes are overheating. Switch the
cruise control system on again later.
Lap timer
Introduction
Applies to: vehicles with lap timer
You can measure and analyze lap times with the
lap timer in the display. The time is measured in
minutes, seconds and 1/10 seconds. With lap
times longer than 60 minutes, the hour is also
shown and the display of 1/10 seconds is re-
moved.
The time measurement on an individual lap ends
after 99 hours 59 minutes and 59 seconds. A new
lap starts automatically after that.
You can control the lap timer using the controls
on the multifunction steering wheel > page 72.
ZA WARNING
Your focus should always be on driving your
vehicle safely. As the driver, you have com-
plete responsibility for safety in traffic. To re-
duce the risk of an accident, only use the lap
timer functions in such a way that you always
maintain complete control over your vehicle in
all traffic situations.
@) Tips
You can retrieve information from the trip
computer while the lap timer stopwatch is
running.
Caer mi ra Opening the lap
Applies to: vehicles with lap timer
Fig. 95 Multifunction steering wheel: controls
[RAH-£493]
@—» 0:07.2——_@
Best lap 0:29.0
0:30.5 ETO)
New Lap
Fig. 96 Instrument cluster: lap timer
Opening the lap timer
> Select in the Infotainment system: [MENU] but-
ton > Vehicle > left control button > Lap times
> Turn the left thumbwheel @) © fig. 95 until
Start lap 1 by driving off or Start by driving
off appears.
> Press the left thumbwheel to confirm the selec-
tion.
Timing laps
> To measure the lap time, press the left thumb-
wheel again to confirm the New lap menu item.
This starts timing the next lap at the same
time. The last time measurement moves up to
the top line @). The current lap time is in the
center line in area @).
As long as the [@J symbol is green during the cur-
rent lap time measurement, the current timeis >
91
Page 103 of 280
8S1012721BE
Parking aid
General infor ion
Applies to: vehicles with rearview camera
© © 3 g
S £ 0
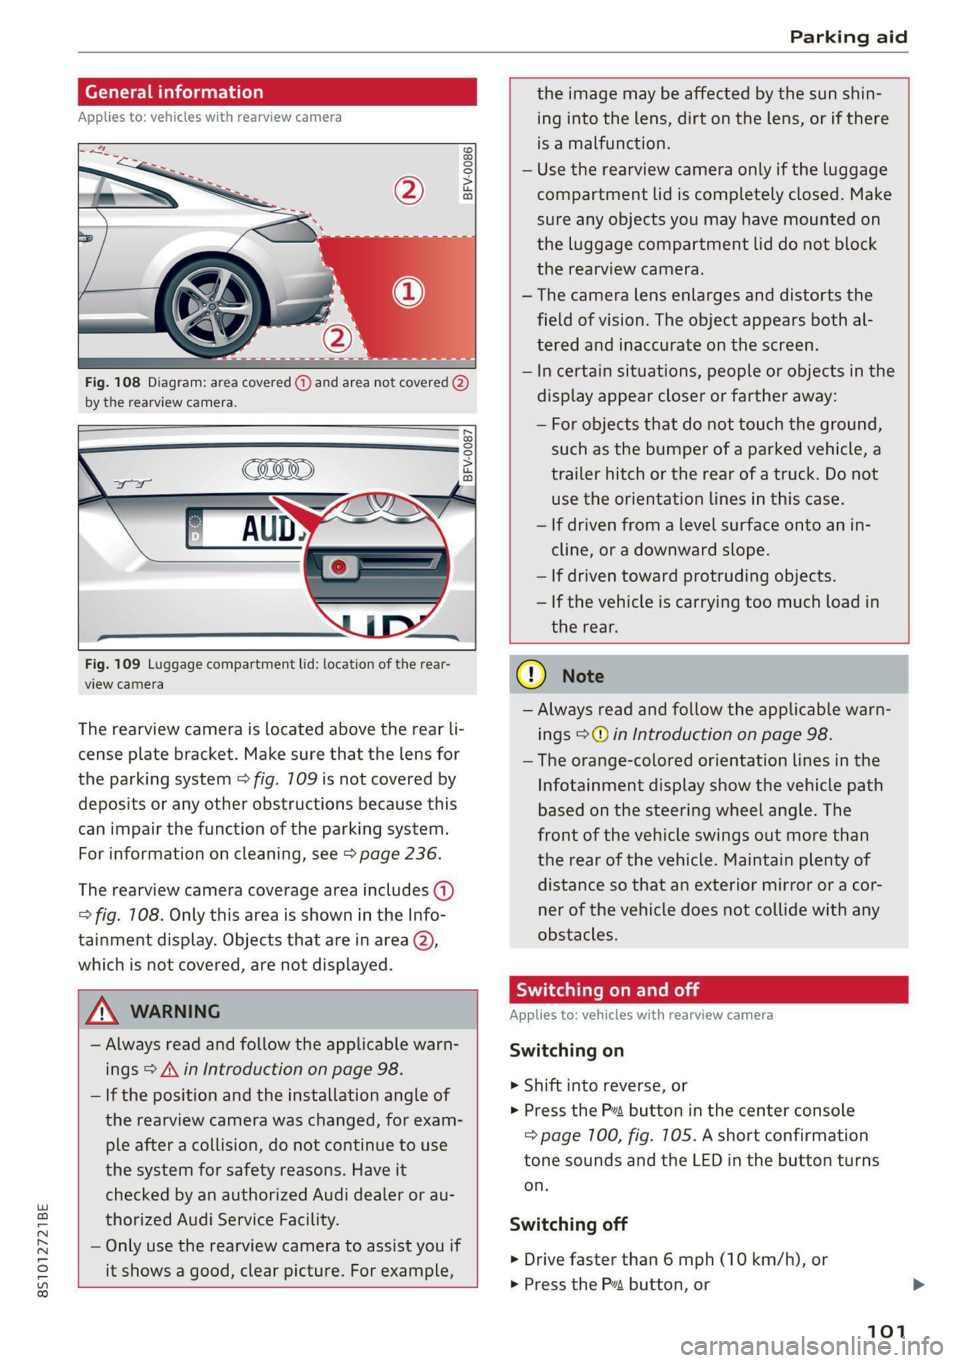
Fig. 108 Diagram: area covered (@) and area not covered @)
by the rearview camera.
Fig. 109 Luggage compartment lid: location of the rear-
view camera
The rearview camera is located above the rear li-
cense plate bracket. Make sure that the lens for
the parking system > fig. 709 is not covered by
deposits or any other obstructions because this
can impair the function of the parking system.
For information on cleaning, see > page 236.
The rearview camera coverage area includes (1)
=> fig. 108. Only this area is shown in the Info-
tainment display. Objects that are in area (2),
which is not covered, are not displayed.
ZA\ WARNING
— Always read and follow the applicable warn-
ings > A\ in Introduction on page 98.
— If the position and the installation angle of
the rearview camera was changed, for exam-
ple after a collision, do not continue to use
the system for safety reasons. Have it
checked by an authorized Audi dealer or au-
thorized Audi Service Facility.
— Only use the rearview camera to assist you if
it shows a good, clear picture. For example,
the image may be affected by the sun shin-
ing into the lens, dirt on the lens, or if there
is a malfunction.
— Use the rearview camera only if the luggage
compartment lid is completely closed. Make
sure any objects you may have mounted on
the luggage compartment lid do not block
the rearview camera.
— The camera lens enlarges and distorts the
field of vision. The object appears both al-
tered and inaccurate on the screen.
—Incertain situations, people or objects in the
display appear closer or farther away:
— For objects that do not touch the ground,
such as the bumper of a parked vehicle, a
trailer hitch or the rear of a truck. Do not
use
the orientation lines in this case.
— If driven from a level surface onto an in-
cline, or a downward slope.
— If driven toward protruding objects.
— If the vehicle is carrying too much load in
the rear.
CG) Note
— Always read and follow the applicable warn-
ings >@ in Introduction on page 98.
— The orange-colored orientation lines in the
Infotainment display show the vehicle path
based on the steering wheel angle. The
front
of the vehicle swings out more than
the rear of the vehicle. Maintain plenty of
distance so that an exterior mirror or a cor-
ner of the vehicle does not collide with any
obstacles.
Sica Re moll
Applies to: vehicles with rearview camera
Switching on
> Shift into reverse, or
> Press the P button in the center console
=> page 100, fig. 105. A short confirmation
tone sounds and the LED in the button turns
on.
Switching off
> Drive faster than 6 mph (10 km/h), or
> Press the P button, or
101
Page 106 of 280

Intelligent Technology
Intelligent Technology
Electronic Stabilization
Control (ESC)
Electronic Stabilization Control (ESC) supports
driver safety. It reduces the risk of slipping and
improves driving stability. ESC detects critical sit-
uations such as the vehicle oversteering and un-
dersteering or the wheels are spinning. The
brakes are applied or the motor torque is reduced
in order to stabilize the vehicle. When the ESC
engages, the B indicator light flashes in the in-
strument cluster.
The following systems are integrated in the ESC:
Anti-lock braking system (ABS)
ABS prevents the wheels from locking when brak-
ing. The vehicle can still be steered even during
hard braking. Apply steady pressure to the brake
pedal. Do not pump the pedal. A pulsing in the
brake pedal indicates that the system is acting to
stabilize the vehicle.
Brake assist
The brake assist system can decrease braking dis-
tance. It increases braking power when the driver
presses the brake pedal quickly in emergency sit-
uations. You must press and hold the brake pedal
until the dangerous situation is over.
Anti-Slip Regulation (ASR)
ASR reduces drive power when the wheels begin
spinning and adapts the power to the road condi-
tions. This will increase the driving stability.
Electronic Differential Lock (EDL)
The EDL applies the brakes to wheels that are
slipping and transfers the drive power to the oth-
er wheels. This function is not available at higher
speeds.
In extreme cases, EDL automatically switches off
to keep the brake on the braked wheel from over-
heating. The vehicle is still functioning correctly.
EDL will switch on again automatically when con-
ditions have returned to normal.
104
Power steering
The ESC can also support vehicle stability
through steering.
Selective wheel torque control
Selective wheel torque control is used when driv-
ing on curves. Braking is targeted toward the
wheels on the inside of the curve as needed. This
allows more precise driving in curves.
Automatic post-collision braking system
The automatic post-collision braking system can
help to reduce the risk of sliding and of addition-
al collisions after an accident. If the airbag con-
trol module detects a collision above a certain ve-
hicle speed, the vehicle is braked by the ESC.
The vehicle does not brake automatically if one of
the following occurs:
— The driver presses the accelerator pedal
—The braking force generated by the pressed
brake pedal is greater than the braking force
that would be initiated by the system
— The ESC, the brake system, or the vehicle elec-
trical system is not functioning
Z\ WARNING
— The ESC and its integrated systems cannot
overcome the limits imposed by natural
physical laws. This is especially important on
slippery or wet roads. If the systems begin
acting to stabilize your vehicle, you should
immediately alter your speed to match the
road and traffic conditions. Do not let the in-
creased safety provided tempt you into tak-
ing risks. This could increase your risk of a
collision.
— Please note the risk of a collision increases
when driving fast, especially through curves
and on slippery or wet roads, and when driv-
ing too close to objects ahead. There is still
a risk of accidents because the ESC and its
integrated systems cannot always prevent
collisions.
— Accelerate carefully when driving on
smooth, slippery surfaces such as ice and
snow. The drive wheels can spin even when
these control systems are installed and this
Page 110 of 280

Intelligent Technology
steering wheel, and stop your vehicle in a safe lo-
cation as soon as possible. Do not continue driv-
ing. See an authorized Audi dealer or authorized
Audi Service Facility for assistance.
& Steering: malfunction! You can continue
driving
There is a malfunction in the steering system.
Steering may be more difficult or more sensitive.
Adapt your driving style. Have the steering sys-
tem checked immediately by an authorized Audi
dealer or authorized Audi Service Facility. Please
note that the red indicator light may turn on af-
ter restarting the engine. Do not continue driving
if it does.
@ Tips
If the a or El indicator light only stays on
for a short time, you may continue driving.
All wheel drive (quattro)
Applies to: vehicles with all wheel drive
The all-wheel drive system distributes the driving
power variably to the front and rear axle to im-
prove the driving characteristics. It works togeth-
er with selective wheel torque control, which can
activate when driving through curves
=> page 104.
The all-wheel drive system is designed for high
motor power. Your vehicle is exceptionally power-
ful and has excellent driving characteristics both
under normal driving conditions and on snow and
ice. Always read and follow safety precautions
>A.
Z\ WARNING
— Even in vehicles with all wheel drive, you
should adapt your driving style to the cur-
rent road and traffic conditions to reduce
the risk of an accident.
— The braking ability of your vehicle is limited
to the traction of the wheels. In this way, it
is not different from a two wheel drive vehi-
cle. Do not drive too fast because this in-
creases the risk of an accident.
108
— Note that on wet streets, the front wheels
can “hydroplane’” if driving at speeds that
are too high. Unlike front wheel drive
vehicles, the motor RPM does not increase
suddenly when the vehicle begins hydro-
planing. Adapt your speed to the road condi-
tions to reduce the risk of an accident.
Rear spoiler
Applies to: vehicles with retractable rear spoiler
a
id > z
oO
Fig. 113 Center console: button for the rear spoiler
The rear spoiler increases driving stability. The
rear spoiler extends automatically at speeds
above approximately 75 mph (120 km/h). It will
retract automatically when the speed drops be-
low approximately 50 mph (80 km/h).
You can also extend and retract the rear spoiler
manually.
> Extending: press > briefly.
> Retracting: press and hold 3% when driving at
speeds up to approximately 10 mph (20 km/h).
At speeds from approximately 10 mph (20
km/h) to 75 mph (120 km/h), press 3% briefly.
Messages
If the HB or Mturns on and a corresponding
message appears, the rear spoiler may not be
able to extend due to a malfunction. This could
change the vehicle's driving characteristics at
high speeds. Do not drive faster than 85 mph
(140 km/h).
The rear spoiler may be blocked. Clean the rear
spoiler compartment > page 237, close all vehi-
cle doors and lids, and wait several minutes until
the vehicle has completely turned off. If the indi-
cator light turns on again the next time the >
Page 128 of 280
Voice recognition system
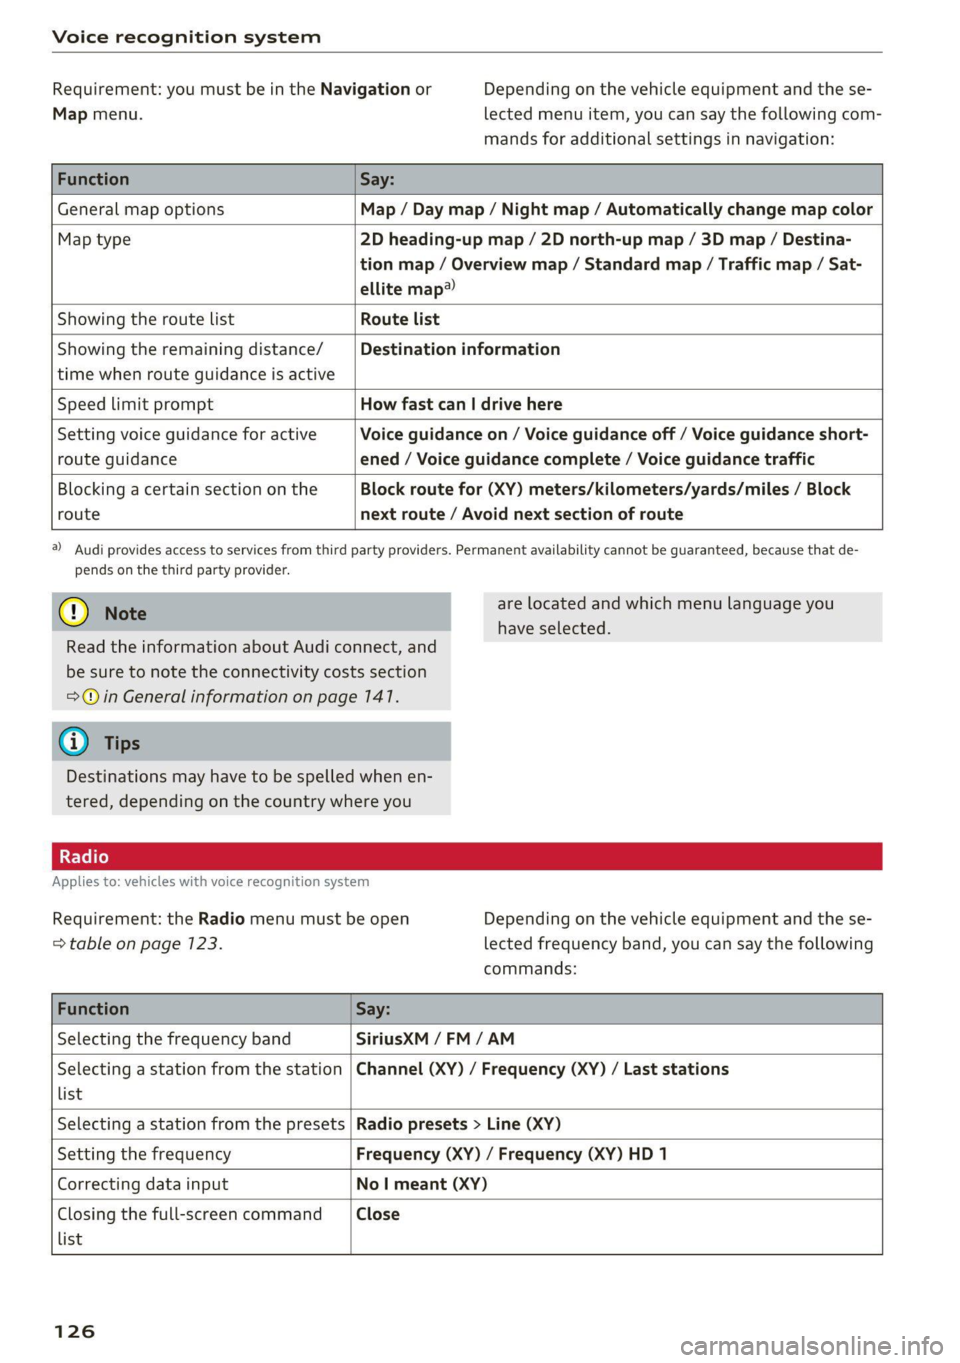
Requirement: you must be in the Navigation or
Map menu.
Depending on the vehicle equipment and the se-
lected menu item, you can say the following com-
mands for additional settings in navigation:
Function Say:
General map options Map / Day map / Night map / Automatically change map color
Map type 2D heading-up map / 2D north-up map / 3D map / Destina-
tion map / Overview map / Standard map / Traffic map / Sat-
ellite map®
Showing the route list Route list
Showing the remaining distance/
time when route guidance is active
Destination information
Speed limit prompt How fast can | drive here
Setting voice guidance for active
route guidance
Voice guidance on / Voice guidance off / Voice guidance short-
ened / Voice guidance complete / Voice guidance traffic
Blocking a certain section on the
route
Block route for (XY) meters/kilometers/yards/miles / Block
next route / Avoid next section of route
a) Audi provides access to services from third party providers. Permanent availability cannot be guaranteed, because that de-
pends on the third party provider.
@) Note
are located and which menu language you
have selected.
Read the information about Audi connect, and
be sure to note the connectivity costs section
=@ in General information on page 141.
G@) Tips
Destinations may have to be spelled when en-
tered, depending on the country where you
Applies to: vehicles with voice recognition system
Requirement: the Radio menu must be open
=> table on page 123.
Depending on the vehicle equipment and the se-
lected frequency band, you can say the following
commands:
Function Say:
Selecting the frequency band SiriusXM / FM/AM
Selecting a station from the station
list
Channel (XY) / Frequency (XY) / Last stations
Selecting a station from the presets Radio presets > Line (XY)
Setting the frequency Frequency (XY) / Frequency (XY) HD 1
Correcting data input No | meant (XY)
Closing the full-screen command
list
Close
126
Page 133 of 280
8S1012721BE
Telephone
— The mobile device may become hot during
wireless charging. Pay attention to the tem-
perature of your mobile device and be care-
ful when removing it from the Audi phone
box.
— An alternating magnetic field is used for
wireless charging. Maintain a minimum dis-
tance of approximately 2.4 inches (6 cm) to
the Audi phone box charging plate. The
thresholds for prolonged exposure at this
distance comply with ICNIRP1998. There-
fore, interactions such as irritation of senso-
ry organs, malfunctions of active implants
(such as pacemakers, infusion pumps, or
neurostimulators) or effects on passive im-
plants (such as prosthetic limbs) is highly
unlikely. If you have an implant, consult a
medical specialist if you have any questions.
@) Note
Applicable to U.S.A.
Operation of the Audi phone box is subject to
the following requirements of the Federal
Communications Commission:
— This is a CONSUMER device.
— BEFORE USE, you MUST REGISTER THIS DE-
VICE with your wireless provider and have
your provider’s consent. Most wireless pro-
viders consent to the use of signal boosters.
Some providers may not consent to the use
of this device on their network. If you are
unsure, contact your service provider.
— You MUST operate this device with approved
antennas and cables as specified by the
manufacturer. Antennas MUST be installed
at least 20 cm (8 inches) from any person.
— You MUST cease operating this device im-
mediately if requested by the FCC or a li-
censed wireless service provider.
— WARNING: E911 location information may
not be provided or may be inaccurate for
calls served by using this device.
@) Note
Applicable to Canada
In Canada, operation of a Zone Enhancer,
such as an Audi phone box, is subject to the
following requirements of the Innovation,
Science and Economic Development Canada
(ISED):
—This is a CONSUMER device.
— BEFORE USE, you MUST meet all require-
ments set out in CPC-2-1-05. At the time of
printing this user manual, the CPC-2-1-05
client procedures circular of ISED Canada
was available at the following web page:
http://www.ic.gc.ca/eic/site/smt-gst.
nsf/eng/sf08942.html.
— You MUST operate this device with approved
antennas and cables as specified by the
manufacturer. Antennas MUST NOT be in-
stalled within 20 cm of any person.
— You MUST cease operating this device im-
mediately if requested by ISED or a licensed
wireless service provider.
— WARNING: £911 location information may
not be provided or may be inaccurate for
calls served by using this device.
G@) Tips
— The system complies with United States FCC
regulations and ISED regulations
=> page 267.
— Placing the mobile device in a bag or protec-
tive sleeve inside the Audi phone box can in-
terfere with the connection to the external
antenna*.
— Metallic objects in the Audi phone box block
the wireless charging of your mobile device
and calls made using the exterior antenna”.
— The charging time and temperature will vary
depending on the mobile device being used.
— Your mobile device can only be charged in
the Audi phone box when the ignition is
switched on.
—To reduce the risk of malfunctions, make
sure the mobile device is positioned correct-
ly in the Audi phone box.
—The maximum charging output is 5 W.
— Strong transmission quality* cannot be
guaranteed if more than one mobile device
is in the box.
— Only one mobile device at a time can be
charged wirelessly in the Audi phone box.
131
>
Page 177 of 280
8S1012721BE
Media
ZA WARNING
—To reduce the risk of an accident, only use
Audi connect services and the Wi-Fi hotspot
only if the traffic situation permits it. Read
and follow the guidelines provided in
=>
page 110, Traffic safety information.
— It is only safe to use tablets, laptops, mobile
devices and other similar devices when the
vehicle is stationary because, like all loose
objects, they could be thrown around the in-
side of the vehicle in a crash and cause seri-
ous injuries. Store these types of devices se-
curely while driving. Also read the warnings
in the chapter > page 52.
Multimedia connections
USB adapter for Audi music interface or
USB charging port
Applies to: vehicles with Audi music interface/USB charging
es
2
<
eg
[RAH-9203|
@) Note
Always follow the information found in >@® in
General information on page 141.
G) Tips
— Depending on the Internet connection and
network traffic, the connection may discon-
nected when online media sources are play-
ing.
— Online media and Internet radio usage de-
pends on the service availability of the third
party provider.
— Audi simply makes the access to online me-
dia services possible through the MMI and
does not take any responsibility for the con-
tent
of the online media services.
— Depending on the mobile device being used,
there may be interruptions during media
playback and when using the myAudi app.
To avoid interruptions when using a mobile
device, do not lock the screen on your mo-
bile device and keep the myAudi app in the
foreground.
— Contact an authorized Audi dealer or au-
thorized Audi Service Facility for additional
information about online media.
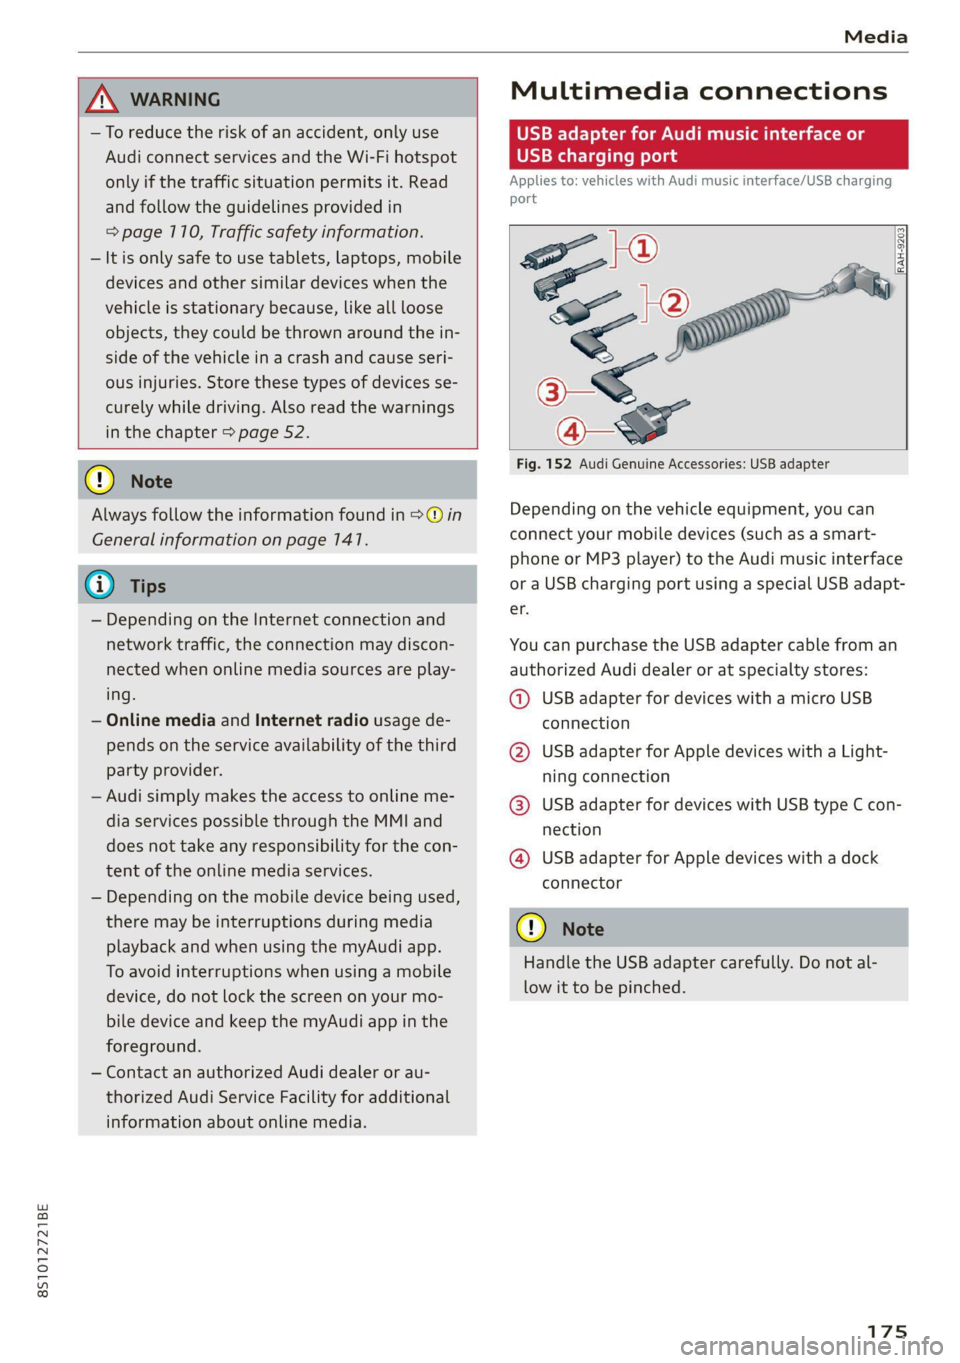
Fig. 152 Audi Genuine Accessories: USB adapter
Depending on the vehicle equipment, you can
connect your mobile devices (such as a smart-
phone or MP3 player) to the Audi music interface
or a USB charging port using a special USB adapt-
er.
You can purchase the USB adapter cable from an
authorized Audi dealer or at specialty stores:
@ USB adapter for devices with a micro USB
connection
@ USB adapter for Apple devices with a Light-
ning connection
@ USB adapter for devices with USB type C con-
nection
@ USB adapter for Apple devices with a dock
connector
C) Note
Handle the USB adapter carefully. Do not al-
low it to be pinched.
Page 184 of 280
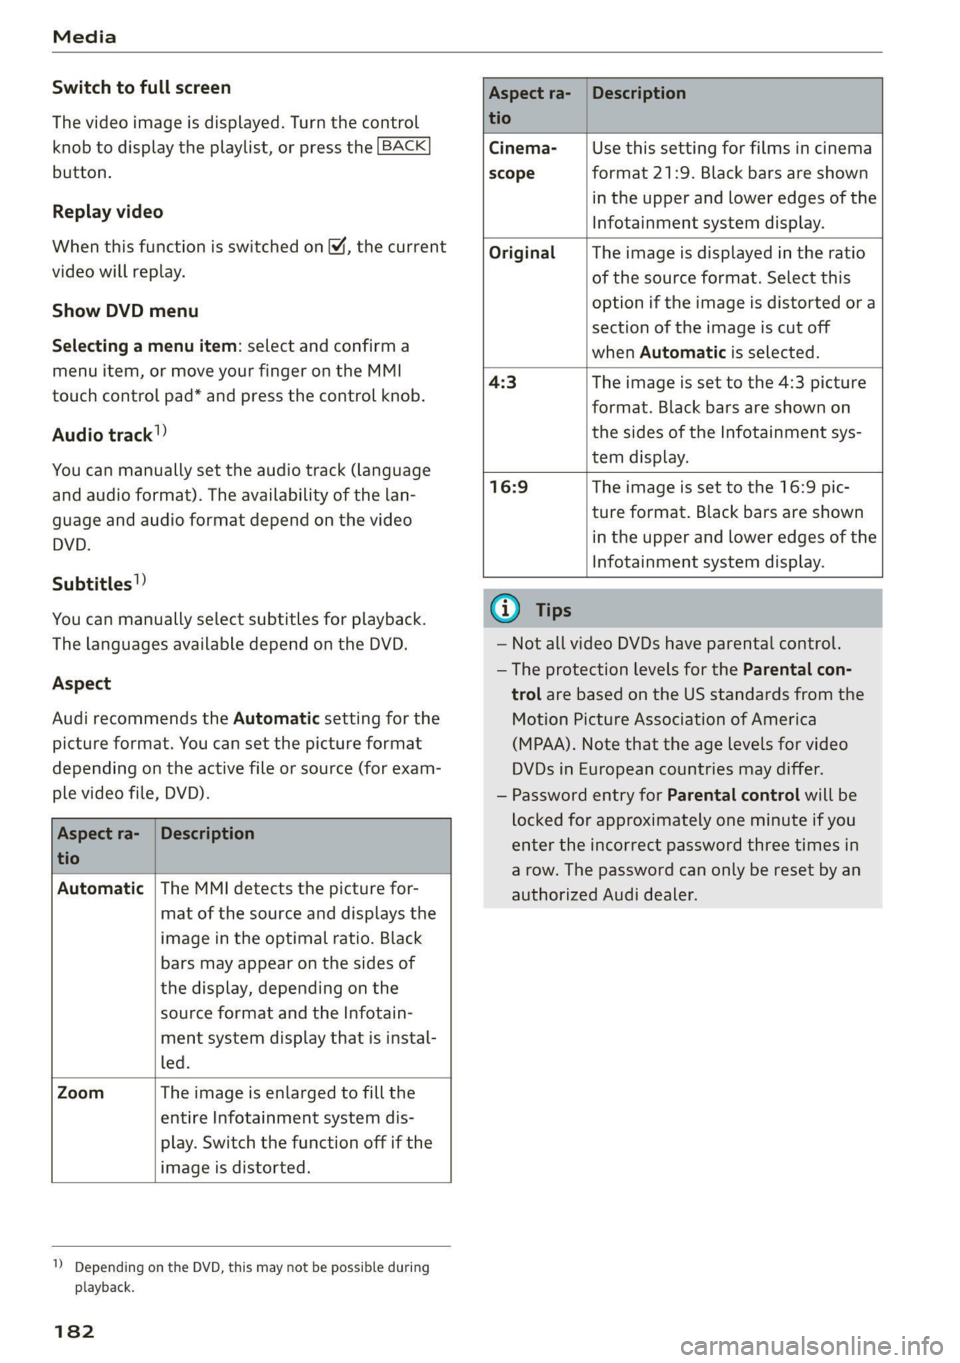
Media
Switch to full screen
The video image is displayed. Turn the control
knob to display the playlist, or press the [BACK
button.
Replay video
When this function is switched on ¥, the current
video will replay.
Show DVD menu
Selecting a menu item: select and confirma
menu item, or move your finger on the MMI
touch control pad* and press the control knob.
Audio track”)
You can manually set the audio track (language
and audio format). The availability of the lan-
guage and audio format depend on the video
DVD.
Subtitles!)
You can manually select subtitles for playback.
The languages available depend on the DVD.
Aspect
Audi recommends the Automatic setting for the
picture format. You can set the picture format
depending on the active file or source (for exam-
ple video file, DVD).
Aspect ra-
tio
Description
Cinema-
scope
Use this setting for films in cinema
format 21:9. Black bars are shown
in the upper and lower edges of the
Infotainment system display.
Original The image is displayed in the ratio
of the source format. Select this
option if the image is distorted or a
section of the image is cut off
when Automatic is selected.
4:3 The image is set to the 4:3 picture
format. Black bars are shown on
the sides of the Infotainment sys-
tem display.
16:9 The image is set to the 16:9 pic-
ture format. Black bars are shown
in the upper and lower edges of the
Infotainment system display.
Aspect ra-
tio
Description
Automatic | The MMI detects the picture for-
mat of the source and displays the
image in the optimal ratio. Black
bars may appear on the sides of
the display, depending on the
source format and the Infotain-
ment system display that is instal-
led.
Zoom The image is enlarged to fill the
entire Infotainment system dis-
play. Switch the function off if the
image is distorted.
1) Depending on the DVD, this may not be possible during
playback.
182
G) Tips
— Not all video DVDs have parental control.
— The protection levels for the Parental con-
trol are based on the US standards from the
Motion Picture Association of America
(MPAA). Note that the age levels for video
DVDs in European countries may differ.
— Password entry for Parental control will be
locked for approximately one minute if you
enter the incorrect password three times in
a row. The password can only be reset by an
authorized Audi dealer.