2021 AUDI TT turn signal
[x] Cancel search: turn signalPage 40 of 280

Lights and Vision
Daytime running lights
USA models: the daytime running lights can be
switched on or off using the MMI. Select On or
Off.
Canada models: this function cannot be switched
off. They activate automatically each time the ig-
nition is switched on. This menu item is shown
with a “gray background”.
Entry/exit lighting
The Entry/exit lighting illuminates the area
around the vehicle when the vehicle is unlocked
or when the driver’s door is opened while the ig-
nition is off. The entry/exit lighting works when it
is dark and the light switch is in the AUTO posi-
tion. The front and rear daytime running lights*
switch on automatically each time the vehicle is
unlocked regardless of how bright it is outside
the vehicle.
Emergency flashers
a 2 3 g
g|
z a.
Fig. 42 Center console: emergency flasher button
The emergency flashers makes other drivers
aware of your vehicle in dangerous situations.
> Press the A button to switch the emergency
flashers on or off.
When the emergency flashers are turned on, the
a and B indicator lights will flash at the same
time.
You can indicate a lane change or a turn when the
emergency flashers are switched on by using the
turn signal lever. The emergency flashers stop
temporarily.
The emergency flashers also work when the igni-
tion is turned off.
38
G) Tips
You should switch the emergency flashers on
if:
— you are the last car in a traffic jam so that
all other vehicles approaching from behind
can see your vehicle
— your vehicle has broken down or you are
having an emergency
—your vehicle is being towed or if you are tow-
ing another vehicle
Messages
If the & indicator light turns on, a bulb has
failed. The message indicates the location of the
bulb. Replace the bulb immediately.
Vehicle lights: malfunction! Please contact
Service
There is a malfunction in the headlights or the
light switch. Drive immediately to an authorized
Audi dealer or authorized Audi Service Facility to
have the malfunction repaired.
Bg) Audi adaptive light: malfunction! See own-
er's manual
Adaptive light* is not working. The headlights
still function.
Drive immediately to an authorized Audi dealer
or authorized Audi Service Facility to have the
malfunction repaired.
a Automatic headlights: malfunction! See
owner's manual
The light/rain sensor is malfunctioning.
The low beams remain switched on at all times
for safety reasons when the light switch is in the
AUTO position. However, you can continue to
turn the lights on and off using the light switch.
Drive immediately to an authorized Audi dealer
or authorized Audi Service Facility to have the
malfunction repaired.
Ba Headlight range control: malfunction! See
owner's manual
Page 78 of 280
![AUDI TT 2021 Owner´s Manual Driving
Stopping the engine
> Bring the vehicle to a full stop.
> Press the [START ENGINE STOP] button.
Emergency off function*
If it is absolutely necessary, the engine can also
be AUDI TT 2021 Owner´s Manual Driving
Stopping the engine
> Bring the vehicle to a full stop.
> Press the [START ENGINE STOP] button.
Emergency off function*
If it is absolutely necessary, the engine can also
be](/manual-img/6/40287/w960_40287-77.png)
Driving
Stopping the engine
> Bring the vehicle to a full stop.
> Press the [START ENGINE STOP] button.
Emergency off function*
If it is absolutely necessary, the engine can also
be turned off while driving at speeds starting at
4 mph (7 km/h). To stop the engine, press the
START ENGINE STOP] button twice in a row or
press and hold it one time.
Z\ WARNING
— Never turn off the engine before the vehicle
has come to a complete stop. Switching it
off before the vehicle has stopped may im-
pair the function of the brake booster and
power steering. You may need to use more
force when braking or steering. Because you
cannot brake and steer as you usually would,
this could lead to accidents and serious inju-
ries.
— If you leave the vehicle, switch the ignition
off and take the vehicle key with you. If you
do not do this, the engine could be started
and electrical equipment such as the power
windows could be activated. This can lead to
serious injuries.
— For safety reasons, always park the vehicle
with the selector lever in the P position.
Otherwise, there is the risk that the vehicle
could roll unintentionally.
@) Note
If the engine has been under heavy load for an
extended period of time, heat builds up in the
engine compartment after the engine is
switched off and there is a risk of damaging
the engine. For this reason, let the engine run
at idle for approximately two minutes before
shutting it off.
@) Tips
For up to 10 minutes after stopping the en-
gine, the radiator fan may turn on again auto-
matically or it may continue to run, even if the
ignition is switched off.
76
IY ett Tel -1
Pressing the start/stop button again will switch
off the engine
This message appears when you press the
START ENGINE STOP] button while driving.
Engine start system: malfunction! Please con-
tact Service
The engine automatic start system has a mal-
function. Drive immediately to an authorized
Audi dealer or authorized Audi Service Facility to
have the malfunction repaired. To start the en-
gine, press and hold the [START ENGINE STOP
button.
Remote control key: hold back of key
against the designated area. See owner's man-
ual
This message appears if there is no convenience
key inside the vehicle or if the system does not
recognize the key. The convenience key may not
be recognized, for example, if it is covered by an
object that disrupts the signal (such as a brief-
case), or if the key battery is weak. Electronic de-
vices such as cell phones can also interfere with
the signal.
To still be able to start or stop the engine, see
= page 77, Starting the engine when there is a
malfunction.
B Remote control key: key not detected. Is the
key still in the vehicle?
The B indicator light turns on and this message
appears if the convenience key was removed from
the vehicle when the engine was running. If the
convenience key is no longer in the vehicle, you
cannot switch the ignition on or start the engine
once you stop it. You also cannot lock the vehicle
from the outside.
Please press the brake pedal
This message appears if you do not press the
brake pedal when starting the engine.
Please select N or P
Page 95 of 280

8S1012721BE
Assist systems
— If timing is paused, you can continue it later
even if you switch the ignition off.
— Saved lap times cannot be individually de-
leted from the total results.
— The saved lap timer values will remain after
switching the ignition off.
Audi side assist
Applies to: vehicles with Audi side assist
BFV-0079
Fig. 98 Diagram: coverage area of the sensors
BFV-0080
Fig. 99 Exterior mirror: display
Side assist helps you monitor your blind spot and
traffic behind your vehicle. Within the limits of
the system, it warns you about vehicles that are
coming closer or that are traveling with you with-
in sensor range @) > fig. 98: if a lane change is
classified as critical, the display @ in the exterior
mirror © fig. 99 turns on.
The display in the left exterior mirror provides as-
sistance when making a lane change to the left,
while the display in the right exterior mirror pro-
vides assistance when making a lane change to
the right.
Information stage
As long as you do not activate the turn signal,
side assist informs you about vehicles that are
detected and classified as critical. The display in
the mirror turns on, but is dim.
The display remains dim in the information stage
so that your view toward the front is not distur-
bed.
Warning stage
If you activate the turn signal, side assist warns
you about vehicles that are detected and classi-
fied as critical. The display in the respective mir-
ror blinks brightly. If this happens, check traffic
by glancing in the exterior mirrors and over your
shoulder > A\ in General information on
page 94.
You can adjust the brightness on of the dis-
play on the rearview mirror > page 95.
93
Page 102 of 280
Parking aid
Siedler lie Rela
Applies to: vehicles with parking aid plus
BFV-0209
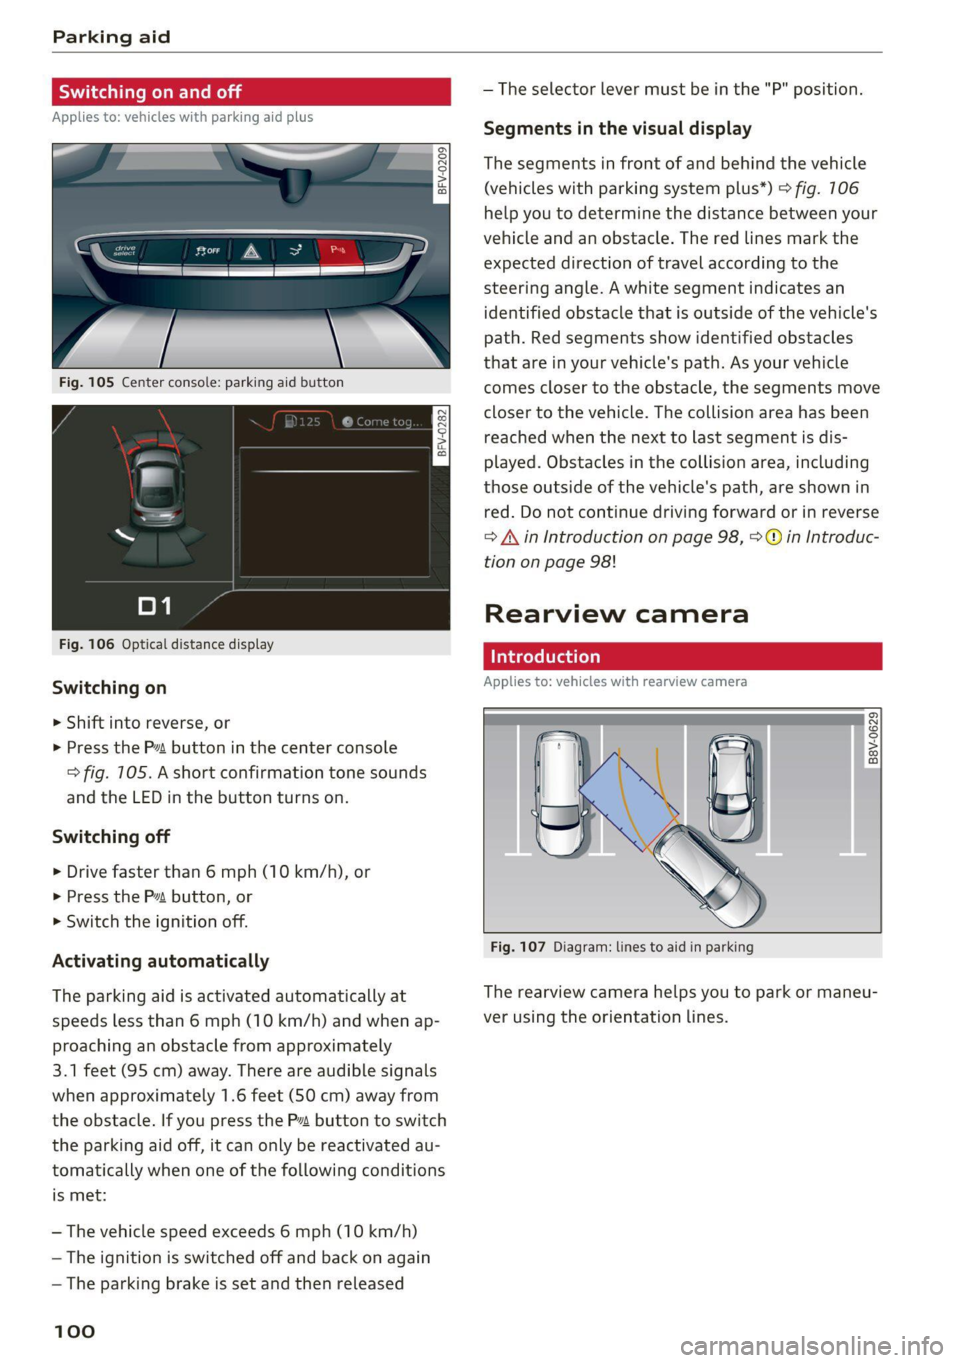
Fig. 105 Center console: parking aid button
Fig. 106 Optical distance display
Switching on
> Shift into reverse, or
> Press the P~ button in the center console
> fig. 105. A short confirmation tone sounds
and the LED in the button turns on.
Switching off
> Drive faster than 6 mph (10 km/h), or
> Press the P button, or
> Switch the ignition off.
Activating automatically
The parking aid is activated automatically at
speeds less than 6 mph (10 km/h) and when ap-
proaching an obstacle from approximately
3.1 feet (95 cm) away. There are audible signals
when approximately 1.6 feet (50 cm) away from
the obstacle. If you press the Pa button to switch
the parking aid off, it can only be reactivated au-
tomatically when one of the following conditions
is met:
— The vehicle speed exceeds 6 mph (10 km/h)
— The ignition is switched off and back on again
— The parking brake is set and then released
100
— The selector lever must be in the "P" position.
Segments in the visual display
The segments in front of and behind the vehicle
(vehicles with parking system plus*) > fig. 106
help you to determine the distance between your
vehicle and an obstacle. The red lines mark the
expected direction of travel according to the
steering angle. A white segment indicates an
identified obstacle that is outside of the vehicle's
path. Red segments show identified obstacles
that are in your vehicle's path. As your vehicle
comes closer to the obstacle, the segments move
closer to the vehicle. The collision area has been
reached when the next to last segment is dis-
played. Obstacles in the collision area, including
those outside of the vehicle's path, are shown in
red. Do not continue driving forward or in reverse
= A in Introduction on page 98, >@ in Introduc-
tion on page 98!
Rearview camera
Introduction
Applies to: vehicles with rearview camera
B8V-0629
Fig. 107 Diagram: lines to aid in parking
The rearview camera helps you to park or maneu-
ver using the orientation lines.
Page 104 of 280
Parking aid
> Switch the ignition off.
iG) Tips
— The visual display in the left part of the dis-
play should help you detect the critical vehi-
cle areas.
— You can change the volume of the signals
and the display > page 102.
Perpendicular parking
Applies to: vehicles with rearview camera
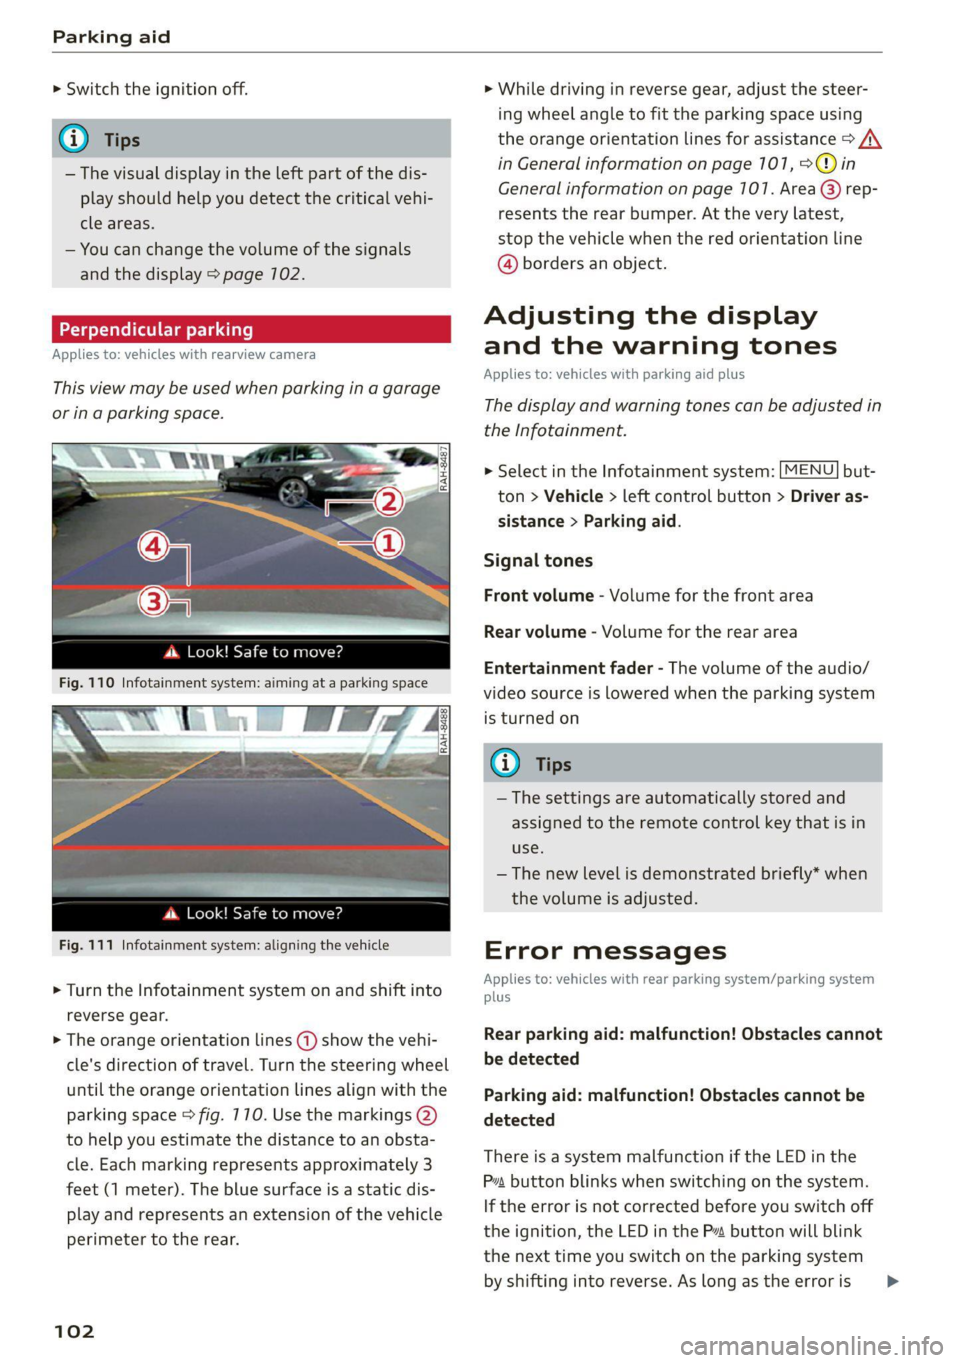
This view may be used when parking in a garage
or ina parking space.
4. Look! Safe to move?
Fig. 110 Infotainment system: aiming at a parking space
ds. Look! Safe to move?
Fig. 111 Infotainment system: aligning the vehicle
> Turn the Infotainment system on and shift into
reverse gear.
> The orange orientation lines @) show the vehi-
cle's direction of travel. Turn the steering wheel
until the orange orientation lines align with the
parking space > fig. 710. Use the markings @)
to help you estimate the distance to an obsta-
cle. Each marking represents approximately 3
feet (1 meter). The blue surface is a static dis-
play and represents an extension of the vehicle
perimeter to the rear.
102
> While driving in reverse gear, adjust the steer-
ing wheel angle to fit the parking space using
the orange orientation lines for assistance > /\.
in General information on page 101, >@)in
General information on page 107. Area @) rep-
resents the rear bumper. At the very latest,
stop the vehicle when the red orientation line
@ borders an object.
Adjusting the display
and the warning tones
Applies to: vehicles with parking aid plus
The display and warning tones can be adjusted in
the Infotainment.
> Select in the Infotainment system: [MENU] but-
ton > Vehicle > left control button > Driver as-
sistance > Parking aid.
Signal tones
Front volume - Volume for the front area
Rear volume - Volume for the rear area
Entertainment fader - The volume of the audio/
video source is lowered when the parking system
is turned on
@ Tips
— The settings are automatically stored and
assigned to the remote control key that is in
use.
— The new level is demonstrated briefly* when
the volume is adjusted.
Error messages
Applies to: vehicles with rear parking system/parking system
plus
Rear parking aid: malfunction! Obstacles cannot
be detected
Parking aid: malfunction! Obstacles cannot be
detected
There is a system malfunction if the LED in the
Pva button blinks when switching on the system.
If the error is not corrected before you switch off
the ignition, the LED in the P button will blink
the
next time you switch on the parking system
by shifting into reverse. As long as the error is >
Page 113 of 280
8S1012721BE
Multi Media Interface
A WARNING Opening a main menu/menu
To reduce the risk of an accident, adjust the
volume of the audio systems so that signals EJ Vehicle
outside of the vehicle, such as police and fire
sirens, can be heard easily at all times.
}) NI cl
6) Tips = J édia
The MMI switches off automatically if the en-
gine is not running and the vehicle battery is
low.
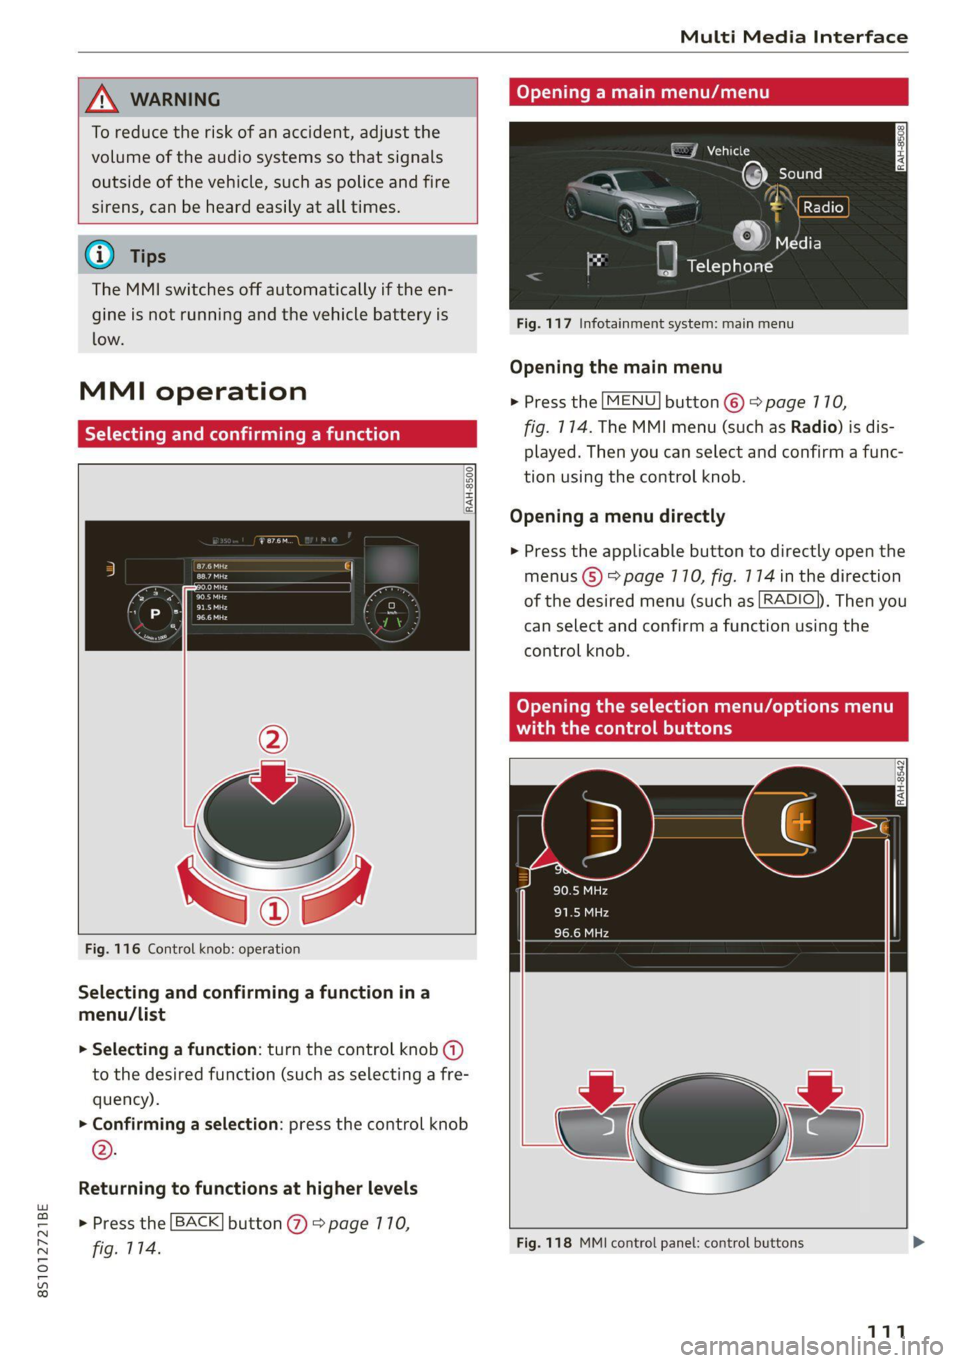
Fig. 117 Infotainment system: main menu
Opening the main menu
> Press the [MENU] button ©) > page 770,
fig. 114. The MMI menu (such as Radio) is dis-
played. Then you can select and confirm a func-
tion using the control knob.
MMI operation
Ya ate) rming a func
RAH-8500.
Opening a menu directly
> Press the applicable button to directly open the
eras menus (5) > page 110, fig. 174 in the direction
sare ‘ ' of the desired menu (such as [RADIO}), Then you
— can select and confirm a function using the
control knob.
Opening the selection menu/options menu
with the control buttons
RAH-8542
Fig. 116 Control knob: operation
Selecting and confirming a function ina
menu/List
> Selecting a function: turn the control knob (a)
to the desired function (such as selecting a fre-
quency).
> Confirming a selection: press the control knob
®.
Returning to functions at higher levels
> Press the [BACK] button @ > page 770,
fig. 114. Fig. 118 MMI control panel: control buttons >
111
Page 115 of 280
8S1012721BE
Multi Media Interface
Requirement: it must be possible to enter text or
numbers and the symbol (4) must appear in the
Infotainment system display.
Basic input
> Write in individual upper case or lower case Let-
ters or numbers/characters on the MMI touch
control pad using your finger. A symbol that is
recognized clearly by the system is displayed in
the Infotainment system display 2)
=> page 112, fig. 119, confirmed with an audi-
ble signal if necessary, and transferred to the
input field.
Entering spaces
> Move your finger from Left to right on the MMI
touch control pad.
Deleting characters
> Move your finger from right to left on the MMI
touch control pad.
Deleting characters quickly
> Move your finger quickly from right to left on
the MMI touch control pad.
Selecting the input suggestion
> Press the control knob.
Switching directly to the results list
> Turn the control knob to the left or to the right.
Opening the speller
> Select: the right control button > Open speller.
Text or numbers are entered using the speller
=> page 117.
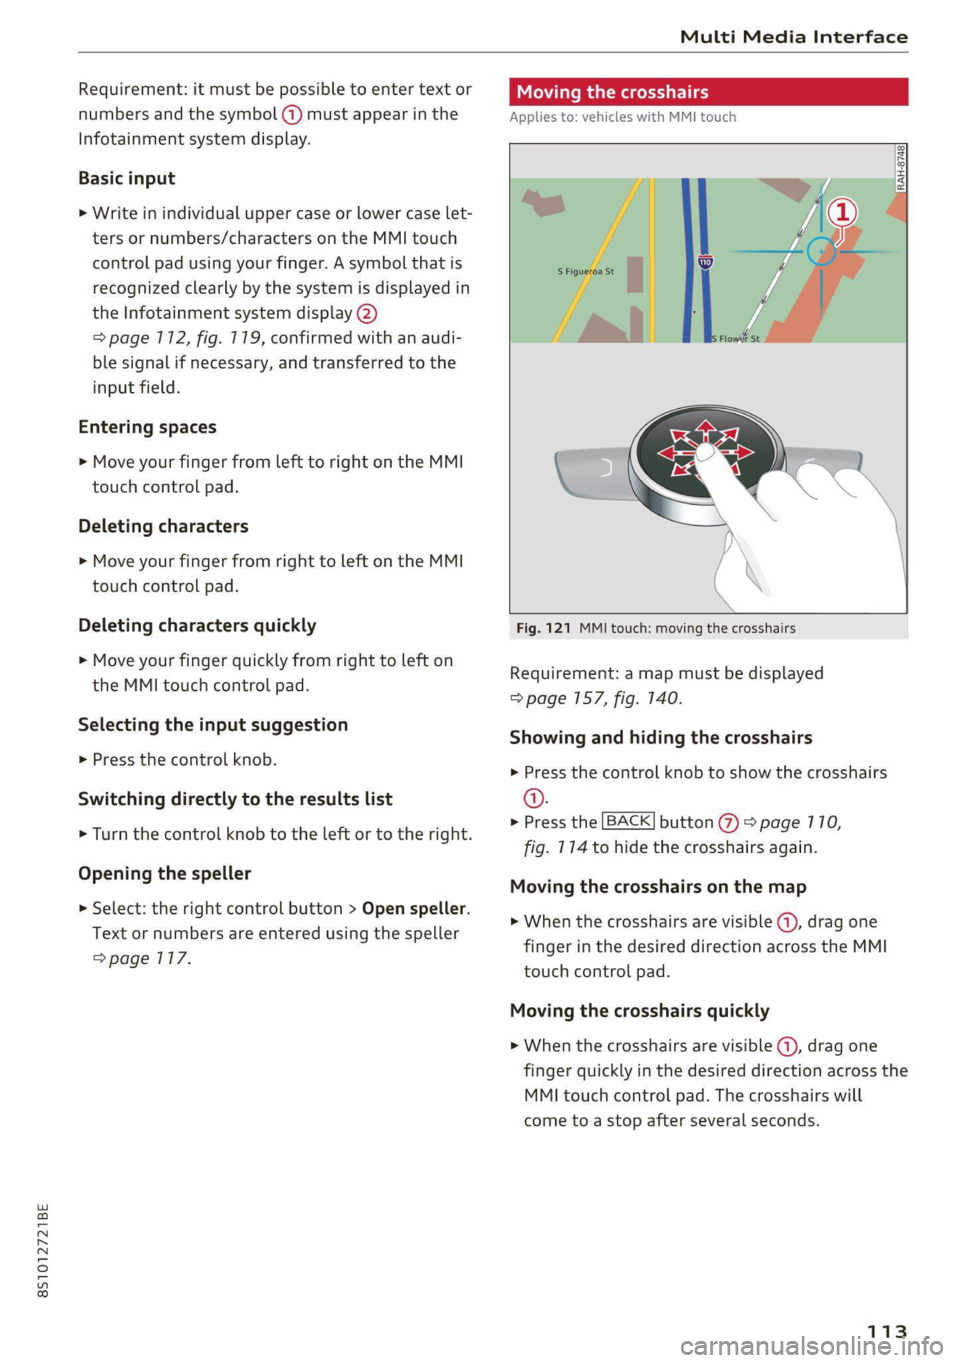
Moving the crosshairs
Applies to: vehicles with MMI touch
Fig. 121 MMI touch: moving the crosshairs
Requirement: a map must be displayed
=> page 157, fig. 140.
Showing and hiding the crosshairs
» Press the control knob to show the crosshairs
@.
> Press the [BACK] button % > page 110,
fig. 114 to hide the crosshairs again.
Moving the crosshairs on the map
> When the crosshairs are visible @, drag one
finger in the desired direction across the MMI
touch control pad.
Moving the crosshairs quickly
> When the crosshairs are visible (4), drag one
finger quickly in the desired direction across the
MMI touch control pad. The crosshairs will
come to a stop after several seconds.
113
Page 122 of 280
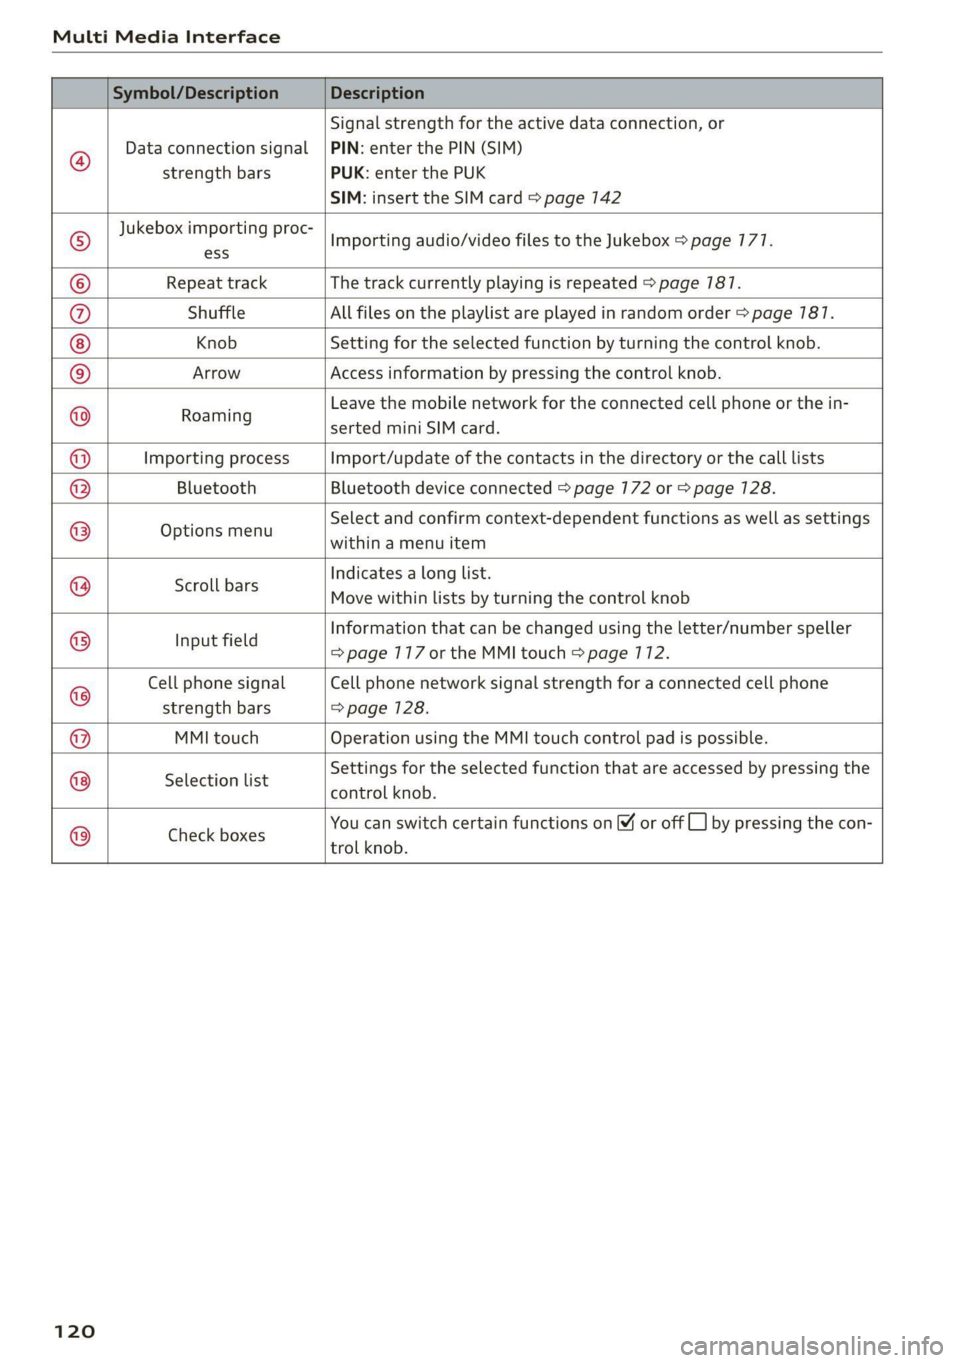
Multi Media Interface
Symbol/Description Description
®
Data connection signal
strength bars
Signal strength for the active data connection, or
PIN: enter the PIN (SIM)
PUK: enter the PUK
SIM: insert the SIM card > page 142
Jukebox importing proc-
Importing audio/video files to the Jukebox > page 177.
© ess
© Repeat track The track currently playing is repeated > page 787.
®@ Shuffle All files on the playlist are played in random order > page 787.
Knob Setting for the selected function by turning the control knob.
© Arrow Access information by pressing the control knob.
Earning Leave the mobile network for the connected cell phone or the in-
serted mini SIM card.
Importing process Import/update of the contacts in the directory or the call lists
Bluetooth Bluetooth device connected > page 172 or > page 128.
Options menu
Select and confirm context-dependent functions as well as settings
within a menu item
Scroll bars
Indicates a long list.
Move within lists by turning the control knob
Input field
Information that can be changed using the letter/number speller
=> page 117 or the MMI touch > page 712.
Cell phone signal
strength bars
Cell phone network signal strength for a connected cell phone
=> page 128.
MMI touch Operation using the MMI touch control pad is possible.
Selection list
Settings for the selected function that are accessed by pressing the
control knob.
@©@|@
|O}
@|O/]@
|
©
|O|O
Check boxes
You can switch certain functions on © or off
trol knob.
by pressing the con-
120