2021 AUDI TT change time
[x] Cancel search: change timePage 104 of 280
Parking aid
> Switch the ignition off.
iG) Tips
— The visual display in the left part of the dis-
play should help you detect the critical vehi-
cle areas.
— You can change the volume of the signals
and the display > page 102.
Perpendicular parking
Applies to: vehicles with rearview camera
This view may be used when parking in a garage
or ina parking space.
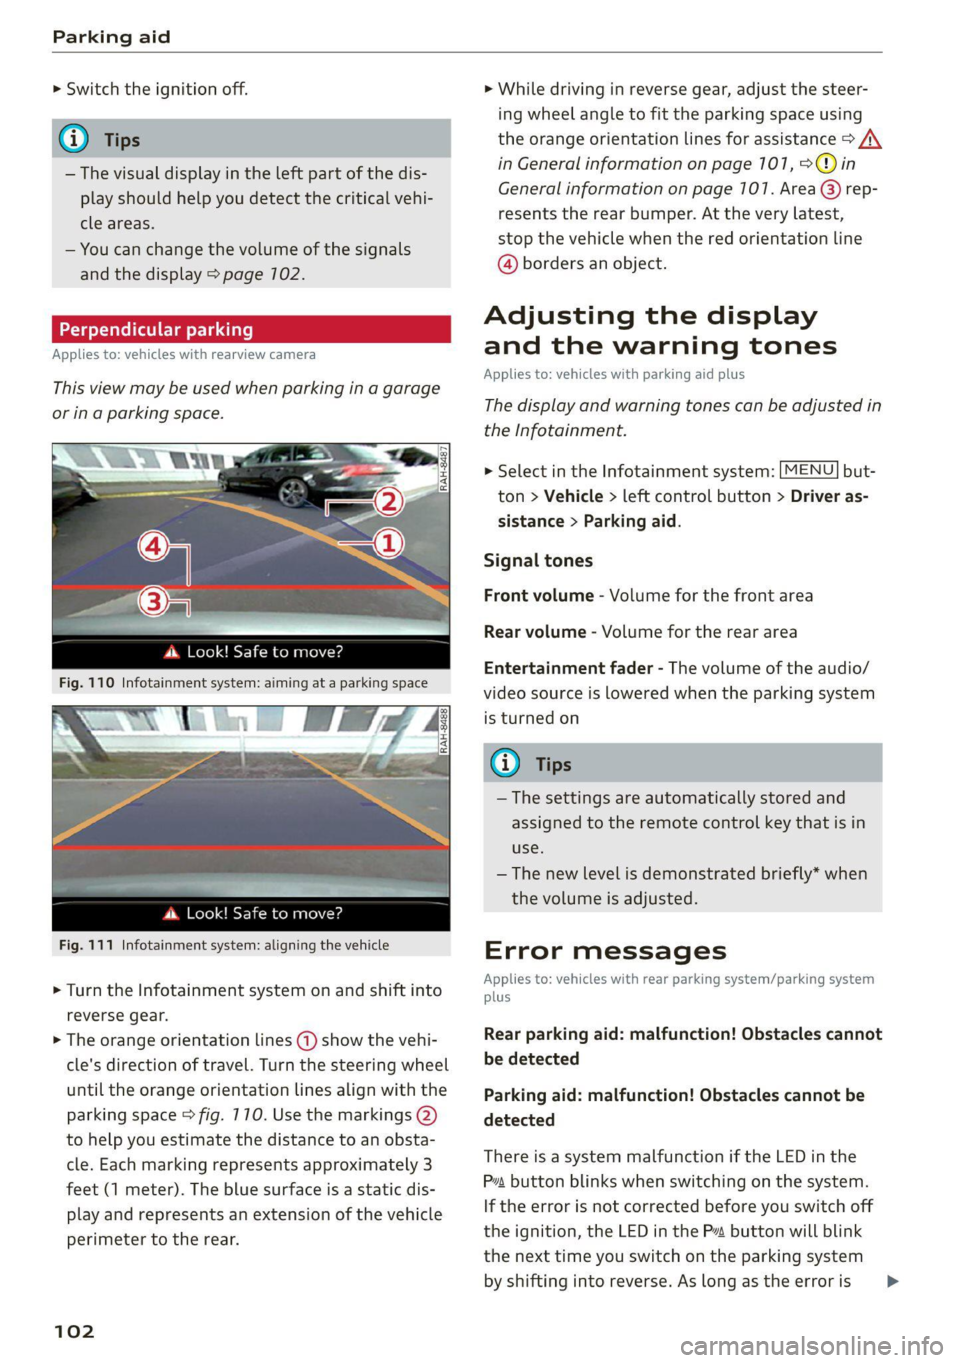
4. Look! Safe to move?
Fig. 110 Infotainment system: aiming at a parking space
ds. Look! Safe to move?
Fig. 111 Infotainment system: aligning the vehicle
> Turn the Infotainment system on and shift into
reverse gear.
> The orange orientation lines @) show the vehi-
cle's direction of travel. Turn the steering wheel
until the orange orientation lines align with the
parking space > fig. 710. Use the markings @)
to help you estimate the distance to an obsta-
cle. Each marking represents approximately 3
feet (1 meter). The blue surface is a static dis-
play and represents an extension of the vehicle
perimeter to the rear.
102
> While driving in reverse gear, adjust the steer-
ing wheel angle to fit the parking space using
the orange orientation lines for assistance > /\.
in General information on page 101, >@)in
General information on page 107. Area @) rep-
resents the rear bumper. At the very latest,
stop the vehicle when the red orientation line
@ borders an object.
Adjusting the display
and the warning tones
Applies to: vehicles with parking aid plus
The display and warning tones can be adjusted in
the Infotainment.
> Select in the Infotainment system: [MENU] but-
ton > Vehicle > left control button > Driver as-
sistance > Parking aid.
Signal tones
Front volume - Volume for the front area
Rear volume - Volume for the rear area
Entertainment fader - The volume of the audio/
video source is lowered when the parking system
is turned on
@ Tips
— The settings are automatically stored and
assigned to the remote control key that is in
use.
— The new level is demonstrated briefly* when
the volume is adjusted.
Error messages
Applies to: vehicles with rear parking system/parking system
plus
Rear parking aid: malfunction! Obstacles cannot
be detected
Parking aid: malfunction! Obstacles cannot be
detected
There is a system malfunction if the LED in the
Pva button blinks when switching on the system.
If the error is not corrected before you switch off
the ignition, the LED in the P button will blink
the
next time you switch on the parking system
by shifting into reverse. As long as the error is >
Page 110 of 280

Intelligent Technology
steering wheel, and stop your vehicle in a safe lo-
cation as soon as possible. Do not continue driv-
ing. See an authorized Audi dealer or authorized
Audi Service Facility for assistance.
& Steering: malfunction! You can continue
driving
There is a malfunction in the steering system.
Steering may be more difficult or more sensitive.
Adapt your driving style. Have the steering sys-
tem checked immediately by an authorized Audi
dealer or authorized Audi Service Facility. Please
note that the red indicator light may turn on af-
ter restarting the engine. Do not continue driving
if it does.
@ Tips
If the a or El indicator light only stays on
for a short time, you may continue driving.
All wheel drive (quattro)
Applies to: vehicles with all wheel drive
The all-wheel drive system distributes the driving
power variably to the front and rear axle to im-
prove the driving characteristics. It works togeth-
er with selective wheel torque control, which can
activate when driving through curves
=> page 104.
The all-wheel drive system is designed for high
motor power. Your vehicle is exceptionally power-
ful and has excellent driving characteristics both
under normal driving conditions and on snow and
ice. Always read and follow safety precautions
>A.
Z\ WARNING
— Even in vehicles with all wheel drive, you
should adapt your driving style to the cur-
rent road and traffic conditions to reduce
the risk of an accident.
— The braking ability of your vehicle is limited
to the traction of the wheels. In this way, it
is not different from a two wheel drive vehi-
cle. Do not drive too fast because this in-
creases the risk of an accident.
108
— Note that on wet streets, the front wheels
can “hydroplane’” if driving at speeds that
are too high. Unlike front wheel drive
vehicles, the motor RPM does not increase
suddenly when the vehicle begins hydro-
planing. Adapt your speed to the road condi-
tions to reduce the risk of an accident.
Rear spoiler
Applies to: vehicles with retractable rear spoiler
a
id > z
oO
Fig. 113 Center console: button for the rear spoiler
The rear spoiler increases driving stability. The
rear spoiler extends automatically at speeds
above approximately 75 mph (120 km/h). It will
retract automatically when the speed drops be-
low approximately 50 mph (80 km/h).
You can also extend and retract the rear spoiler
manually.
> Extending: press > briefly.
> Retracting: press and hold 3% when driving at
speeds up to approximately 10 mph (20 km/h).
At speeds from approximately 10 mph (20
km/h) to 75 mph (120 km/h), press 3% briefly.
Messages
If the HB or Mturns on and a corresponding
message appears, the rear spoiler may not be
able to extend due to a malfunction. This could
change the vehicle's driving characteristics at
high speeds. Do not drive faster than 85 mph
(140 km/h).
The rear spoiler may be blocked. Clean the rear
spoiler compartment > page 237, close all vehi-
cle doors and lids, and wait several minutes until
the vehicle has completely turned off. If the indi-
cator light turns on again the next time the >
Page 124 of 280
Voice recognition system
Voice recognition system
General information
Applies to: vehicles with voice recognition system
You can operate many functions in the vehicle
easily using voice commands.
Using the voice recognition system optimally
> Speak clearly and distinctly at a normal volume.
Speak louder when driving faster.
> Emphasize the words in the commands evenly
and do not leave long pauses.
> Close the doors, the windows, and the power
top* to reduce background noise. Make sure
that passengers are not speaking when you are
giving a voice command.
> Do not direct the vents toward the hands-free
microphone, which is in the roof headliner/on
the driver’s safety belt* near the front interior
lights. For additional information on the safety
belt microphone’, see > page 140.
> Only the driver should speak to the system, be-
cause the handsfree microphone is aimed to-
ward this seating position.
ZA\ WARNING
— Direct your full attention to driving. As the
driver, you have complete responsibility for
safety in traffic. Only use the functions in
such a way that you always maintain com-
plete control over your vehicle in all traffic
situations.
— Do not use the voice recognition system in
emergencies because your voice may change
in stressful situations. The system may take
longer to dial the number or may not be
able to dial it at all. Dial the emergency
number manually.
G) Tips
There are no voice guidance* prompts when a
dialog is active.
Operating
Applies to: vehicles with voice recognition system
Requirement: the ignition and the MMI must be
switched on. A system language supported by
122
the voice recognition system must be set. There
must be no phone calls in progress and the park-
ing aid must not be active.
> Switching on: briefly press the %» button @)
=> page 14, fig. 10 on the multifunction steer-
ing wheel and say the desired command after
the Beep.
> Switching off: press and hold the ™» button,
or:
» Say the command Cancel.
> Pausing: say the command Pause. To resume,
press the ™» button.
> Correcting: press the button one time G)
=> page 12, fig. 6, or:
» Say the command Correction.
Input assistance
The system guides you through the input with
visual and audio feedback.
— Visual input assistance: after switching on
voice recognition, a display with a selection of
possible commands appears. This command
display can be switched on or off. Select:
MENU] button > Settings > left control button
> MMI settings > Speech dialog system.
— Audio input assistance: to have the possible
commands read, press the “9 button on the
multifunction steering wheel briefly and say
Help.
Additional settings
See > page 194, Voice recognition system.
Gi) Tips
—The dialog pauses when there is an incom-
ing phone call and will continue if you ig-
nore the call. The dialog ends if you answer
the call.
— You can select an item in the list using ei-
ther the voice recognition system or the
control knob.
Page 128 of 280
Voice recognition system
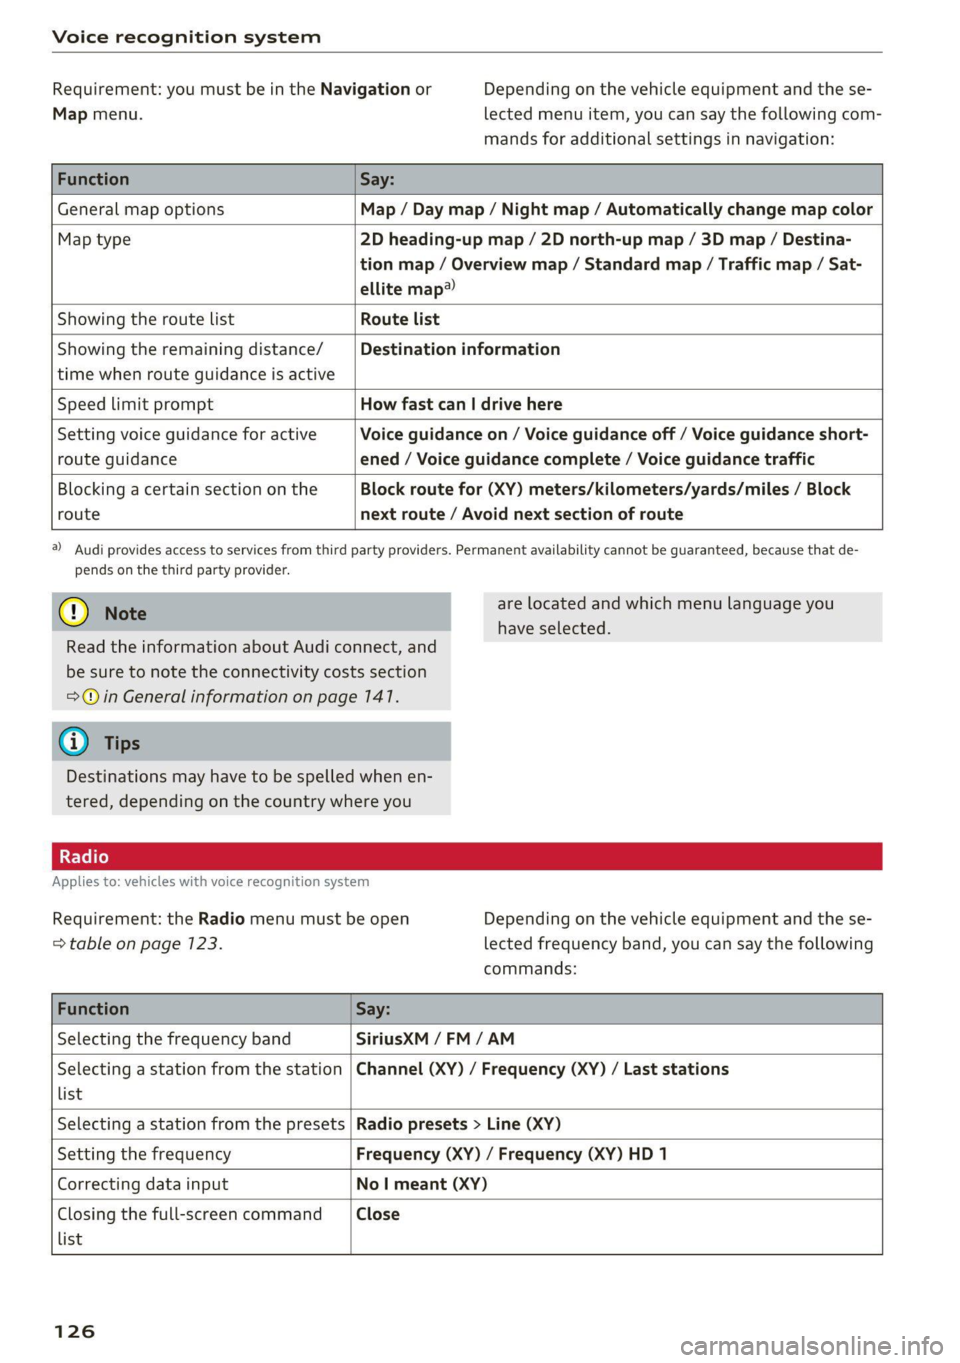
Requirement: you must be in the Navigation or
Map menu.
Depending on the vehicle equipment and the se-
lected menu item, you can say the following com-
mands for additional settings in navigation:
Function Say:
General map options Map / Day map / Night map / Automatically change map color
Map type 2D heading-up map / 2D north-up map / 3D map / Destina-
tion map / Overview map / Standard map / Traffic map / Sat-
ellite map®
Showing the route list Route list
Showing the remaining distance/
time when route guidance is active
Destination information
Speed limit prompt How fast can | drive here
Setting voice guidance for active
route guidance
Voice guidance on / Voice guidance off / Voice guidance short-
ened / Voice guidance complete / Voice guidance traffic
Blocking a certain section on the
route
Block route for (XY) meters/kilometers/yards/miles / Block
next route / Avoid next section of route
a) Audi provides access to services from third party providers. Permanent availability cannot be guaranteed, because that de-
pends on the third party provider.
@) Note
are located and which menu language you
have selected.
Read the information about Audi connect, and
be sure to note the connectivity costs section
=@ in General information on page 141.
G@) Tips
Destinations may have to be spelled when en-
tered, depending on the country where you
Applies to: vehicles with voice recognition system
Requirement: the Radio menu must be open
=> table on page 123.
Depending on the vehicle equipment and the se-
lected frequency band, you can say the following
commands:
Function Say:
Selecting the frequency band SiriusXM / FM/AM
Selecting a station from the station
list
Channel (XY) / Frequency (XY) / Last stations
Selecting a station from the presets Radio presets > Line (XY)
Setting the frequency Frequency (XY) / Frequency (XY) HD 1
Correcting data input No | meant (XY)
Closing the full-screen command
list
Close
126
Page 130 of 280
Telephone
Telephone
Introduction
Applies to: vehicles with telephone
You can operate various telephone functions easi-
ly through the MMI in your vehicle.
Depending on the country and the vehicle equip-
ment, the following options may be available:
— Connecting a cell phone with Bluetooth
— Using two telephones
— Using the Audi phone box
ZA\ WARNING
— Medical experts warn that mobile devices
can interfere with the function of pacemak-
ers. Always maintain a minimum distance of
about 7.9 inches (20 cm) between the mo-
bile device antennas and the pacemaker.
— Do not carry the mobile device in a pocket
directly over the pacemaker when the
phone is switched on.
— Switch the mobile device off immediately
if you suspect it may be interfering with
the pacemaker.
— Do not use the voice recognition system*
=> page 122 in emergencies because your
voice may change in stressful situations. The
system may take longer to dial the number
or may not be able to dial it at all. Dial the
emergency number manually.
— Switch your mobile device off in areas where
there is a risk of an explosion. These loca-
tions are not always clearly marked. This
may include gas stations, fuel and chemical
storage facilities or transport vehicles, or lo-
cations where fuel vapors (such as propane
or gasoline vapor in vehicles or buildings),
chemicals or large quantities of dust parti-
cles (such as flour, sawdust or metal) may
be present in the air. This also applies to all
other locations where you would normally
turn your vehicle motor off.
— The demands of traffic require your full at-
tention. Always read the chapter
= page 110, Traffic safety information.
128
@) Note
Read the information about Audi connect, and
be sure to note the connectivity costs section
=> page 1417.
@) Tips
— The Bluetooth connection range is limited
to inside the vehicle.
—Aselection of supported Bluetooth devices
can be found in the database for tested mo-
bile devices at www.audi.com/bluetooth.
Setup
Connecting a mobile phone via Bluetooth
Applies to: vehicles with telephone
Requirement: the vehicle must be stationary and
the ignition must be switched on. The Bluetooth
settings must be open on your mobile device dur-
ing the connection setup. The mobile device to be
connected must not be actively connected to any
other Bluetooth device. The MMI must not be
connected to a mobile device.
> Enable the Bluetooth function and visibility on
the MMI = page 192 and the mobile phone.
> Select: [MENU] button > Telephone > Connect
mobile device > Find new devices > Next. The
available
Bluetooth devices are shown in the In-
fotainment system display, or:
>» Search for the MMI on your cell phone using the
Bluetooth device search.
> Select and confirm the desired cell phone from
the list of displayed Bluetooth devices.
A PIN for a secure Bluetooth connection will be
generated.
> Confirm the PIN on your cell phone and on the
MMI, or:
> Enter the PIN for connecting on your cell
phone. The time allowed for entering the PIN is
limited to approximately 30 seconds.
> Follow the system instructions.
> Pay attention to any other system prompts on
the MMI and on your cell phone.
Page 131 of 280
8S1012721BE
Telephone
After connecting successfully
Information about the connected profiles will ap-
pear. You can also change the profiles later
=> page 1917.
The cell phone contacts are automatically loaded
in the MMI. This process can take several mi-
nutes, depending on the number of contacts.
Depending on your cell phone and the connection
type, you can use the following functions:
Handsfree
Requirement: your cell phone must be connected
to the MMI via a Bluetooth Hands Free Profile
(Bluetooth HFP).
You can use the hands-free system. You can make
calls using the antenna on your mobile device.
Sending and receiving messages
See > page 135.
() Note
Read the information about Audi connect, and
be sure to note the connectivity costs section
=> page 1417.
@) Tips
— You can apply additional settings to con-
nected mobile devices using the Connection
manager > page 790.
— You can also search for the MMI on your mo-
bile device using the Bluetooth device
search.
— You only have to pair your device one time.
Bluetooth devices that are already paired
automatically connect to the MMI when the
Bluetooth function is switched on, when
they are within range, and when the ignition
is switched on. The last connected mobile
device is given first priority.
— Pay attention to any system prompts dis-
played on your cell phone, for example if
the system should connect automatically in
the future. Depending on the cell phone,
you may also need to download the directo-
ry and confirm access to your text messages
separately.
— When leaving the vehicle, the Bluetooth
connection to the mobile device will auto-
matically disconnect. Depending on your
mobile device, phone calls in progress may
be automatically redirected from the MMI to
your mobile device so that you can continue
the call on your phone.
Using two telephones
Applies to: vehicles with telephone, and Audi phone box
You can connect two cell phones to the MMI, for
example your business cell phone as the primary
phone and your private cell phone as the secon-
dary phone. You can be reached in your vehicle
through both mobile phones.
The first connected cell phone is displayed as the
primary phone in the MMI. The second cell phone
is connected as the secondary phone.
The directory from the connected primary phone
will always be displayed. If you would like to use
the
directory from the secondary phone, you
must switch the primary and secondary phone
=> page 130.
Connecting a cell phone as the primary
phone
> Connect your cell phone to the MMI via Blue-
tooth. The first connected cell phone is dis-
played as the Primary phone in the MMI.
See > page 128, Connecting a mobile phone via
Bluetooth.
Connecting a cell phone as the secondary
phone
Requirement: a cell phone must be connected to
the MMI as the primary phone.
> Select: [MENU] button > Telephone > right con-
trol button > Connect secondary telephone.
See = page 128, Connecting a mobile phone via
Bluetooth.
Example: you have connected your business cell
phone to the MMI as the primary phone and your
private cell phone as the secondary phone. To be
able to call contacts from your private cell phone
directory, you must switch the primary and
129
Page 146 of 280
Audi connect
— Some Audi connect Infotainment services
must be activated at my.audi.com.
— To make logging in easier in the vehicle, you
will receive an 8-digit myAudi PIN as an al-
ternative to your myAudi password after you
have created a myAudi account.
— Depending on the country, you may be able
to use the myAudi app or my.audi.com.
— For detailed information on configuration,
visit my.audi.com.
Accessing Audi connect Infotainment
Applies to: vehicles with Audi connect Infotainment
> Select: the [MENU] button > Audi connect.
A list of all of the available Audi connect Infotain-
ment services is shown on the Infotainment sys-
tem display.
You can also filter the Audi connect Infotainment
services by category:
> Select: [MENU] button > Audi connect > left
control button > for example, Navigation for
the Audi connect Infotainment services in the
Navigation menu.
Applies to: vehicles with Audi connect Infotainment
> Select: [MENU] button > Audi connect > desired
Audi connect Infotainment service > right con-
trol button.
Depending on the equipment and the Audi con-
nect Infotainment service selected, the following
basic functions may be available:
Save as preview
You can also see a preview of the selected Audi
connect Infotainment services on the Audi con-
nect Infotainment home page.
Show on map
You can show selected contents on the map and
use them for route guidance.
1) Not available in all languages.
144
Log in
See > page 143.
Read out!)
You can allow the MMI to read out the selected
contents.
Call
If a phone number was assigned to an entry, you
can call the number, for example to reserve tick-
ets.
Refresh
The contents for the selected Audi connect Info-
tainment service are refreshed.
Start route guidance
If a location was saved with an entry, you can use
it as the navigation destination. Route guidance
starts immediately.
Change search area
The set search area can be changed at any time.
Additional information on search areas can be
found under > page 7517.
Closing Audi connect Infotainment services
Regardless of the function selected, you can
close an Audi connect Infotainment service at any
time and return to the home screen.
Services
Applies
to: vehicles with Audi connect Infotainment
Depending on the country and the vehicle equip-
ment, the following services may be available:
Weather information
Information on current weather conditions as
well as weather forecasts for the selected search
area.
> Select and confirm Weather.
Online news
> Select: Online news > desired newsfeed > a
headline.
Page 151 of 280
8S1012721BE
Navigation
— Because street names sometimes change,
the names stored in the MMI may in rare
cases differ from the actual street name.
Entering a destination
aia eee mid Lela
Applies to: vehicles with navigation system
Using the MMI touch control pad, you can enter
the data for a navigation destination all at once
in any order (for example, Los Angeles,
20 Main St.). Likewise, you can search for points
of interest, contacts, previous destinations or fa-
vorites to navigate to the desired address.
Free text search
> Press the [NAV/MAP] button repeatedly until
the Enter destination menu is displayed
=> page 148, fig. 135.
> Keep turning the control knob to the left until
the input field appears.
> Enter one or more search terms into the input
field.
> If available, confirm the input suggestion” to
complete the entry or a word suggestion*
= page 117, Letter/number speller.
> Turn the control knob to the right to change the
results list.
> Select and confirm a destination from the re-
sults list.
The route displays as an overview in the map.
Route guidance is already active.
Narrowing the search area
All countries/states are selected at the factory
for the free text search.
> Select: the right control button > Country/state
selection in the input field @ > page 148,
fig. 135.
> Select the country or state @ that should be
searched for in the free text search in order to
narrow the number of results and increase the
search speed. The selected entry in the coun-
try/state selection is stored, or:
> Select and confirm All countries/states.
@) Tips
— The MMI input suggestions depend on the
last navigated destinations.
— Up to 50 entries can be stored in the last
destinations list.
— Additional information on free text searches
can be found under = page 118.
Loading previous destinations
Applies to: vehicles with navigation system
Your last destinations are automatically stored
and can be loaded directly as a destination.
Opening a menu
Requirement: a destination was already navigat-
ed to.
> Press the [NAV/MAP] button repeatedly until
the Enter destination menu is displayed
=> page 148, fig. 135.
Your last destination is listed directly in the Enter
destination menu under the home address and
identified with the symbol @) > page 148,
fig. 135.
> Select and confirm one of the last destinations
from the list.
Deleting previous destinations
> Select one of the last destinations from the list.
> Select: right control button > Delete destina-
tion > Delete this last destination or Delete all
last destinations.
The selected destination or all last destinations
is/are deleted and no longer displayed in the En-
ter destination menu.
Enter address
Applies to: vehicles with navigation system
As an alternative to free text search, you can also
enter an address in stages.
> Press the [NAV/MAP] button repeatedly until
the Enter destination menu is displayed
=> page 148, fig. 135.
> Select: left control button > Enter address.
149
>