2021 AUDI TT center console
[x] Cancel search: center consolePage 87 of 280

8S1012721BE
Driving
— If the engine must run while you are working
in the engine compartment with the hood
open, make sure a gear is not engaged. The
selector lever must be firmly in the P posi-
tion and locked in place and the parking
brake must be set > page 200. Otherwise,
the vehicle could begin moving when in-
creasing the engine speed, even with the
parking brake set.
() Note
— If you have to stop on an incline, always
press the brake pedal to hold the vehicle in
place to reduce the risk of the vehicle rolling
backward. Do not try to hold the vehicle in
place by pressing and holding the accelera-
tor pedal. The transmission can overheat,
which increases the risk of damage.
— Allowing the vehicle to roll when the engine
is stopped and the selector lever is in the N
position will damage the automatic trans-
mission because it is not lubricated under
those circumstances.
— The transmission can overheat and be dam-
aged under certain driving and traffic condi-
tions such as frequent starts, creeping fora
long time, or stop-and-go traffic. When the
i or os] indicator light turns on, stop the
vehicle at the next opportunity and let the
transmission cool > page 87.
— Allowing the vehicle to roll when the engine
is stopped will damage the S tronic trans-
mission because it is not lubricated
= page 250, Towing.
@® Tips
For safety reasons, the parking brake is re-
leased automatically only when the driver's
safety belt is fastened.
Hill descent control
The hill descent control system assists the driver
when driving down hills.
Hill descent control is activated when the selec-
tor lever is in the "D" or "S" position and you
press the brake pedal. The transmission auto-
matically selects a gear that is suitable for the
hill. Hill descent control tries to maintain the
speed that was selected at the time of braking,
within physical and technical limitations. If may
still be necessary to adjust the speed with the
brakes. Because hill descent control cannot shift
down farther than 3rd gear, it may be necessary
to shift into tiptronic mode in very steep areas. In
this case, shift manually into 1st or 2nd gear in
tiptronic mode to use the engine's braking force
to relieve the brakes.
Hill descent control switches off once the hill lev-
els
out or if you press the accelerator pedal.
On vehicles with a cruise control system*
= page 89, hill descent control is also activated
when the speed is set.
ZA\ WARNING
Hill descent control may not be able to main-
tain a constant speed under all conditions. Al-
ways be ready to apply the brakes.
Shifting manually (tiptronic mode)
The tiptronic mode allows the driver to shift the
gears manually.
| 8Fv-0114]
Fig. 90 Center console: shifting manually with the selector
lever
Fig. 91 Steering wheel: shift paddles*
8s
Page 98 of 280
Assist systems
The system cannot guarantee that it will detect
vehicles correctly and it has switched off. The
sensors have been moved or are faulty. Have the
system checked by an authorized Audi dealer or
authorized Audi Service Facility soon.
Audi drive select (drive
settings)
Introduction
Applies to: vehicles with Audi drive select
Drive select makes it possible to experience dif-
ferent types of vehicle characteristics in one vehi-
cle. With different driving modes, the driver can
switch the setting, for example from sporty to
comfortable. In the Individual mode, the set-
tings can be adjusted to your personal preferen-
ces. This makes it possible to combine settings
such as a sporty drivetrain setting with comforta-
ble steering.
Using Audi drive select incorrectly can lead to
collisions, other accidents and serious inju-
ries.
Applies to: vehicles with Audi drive select
The vehicle setup in each mode depends on the
vehicle's features.
Engine and automatic transmission
Depending on the mode, the engine and auto-
matic transmission respond more quickly or ina
more balanced manner to accelerator pedal
movements.
Suspension control (Audi magnetic ride)*
The suspension control uses sensors to record in-
formation regarding steering movements, brak-
ing and acceleration operations by the driver, as
well as information about the road surface, driv-
ing speed, and load. With drive select, you can
adjust the suspension control to sporty (dynam-
ic), comfortable (comfort) or balanced (auto).
96
Steering
The power steering adapts. Indirect steering that
moves easily as in comfort mode is especially
suited to long drives on a highway. The dynamic
mode provides sporty, direct steering.
Engine sound*
The engine sound adapts to the current mode
and can be subtle to sporty.
— Certain vehicle settings will be reset when
the ignition is switched off.
— In some models, the maximum vehicle
speed can only be reached in the auto and
dynamic modes.
Selecting the driving mode
Applies to: vehicles with Audi drive select
You can choose between comfort, auto, dynamic
and individual.
BFV-0307
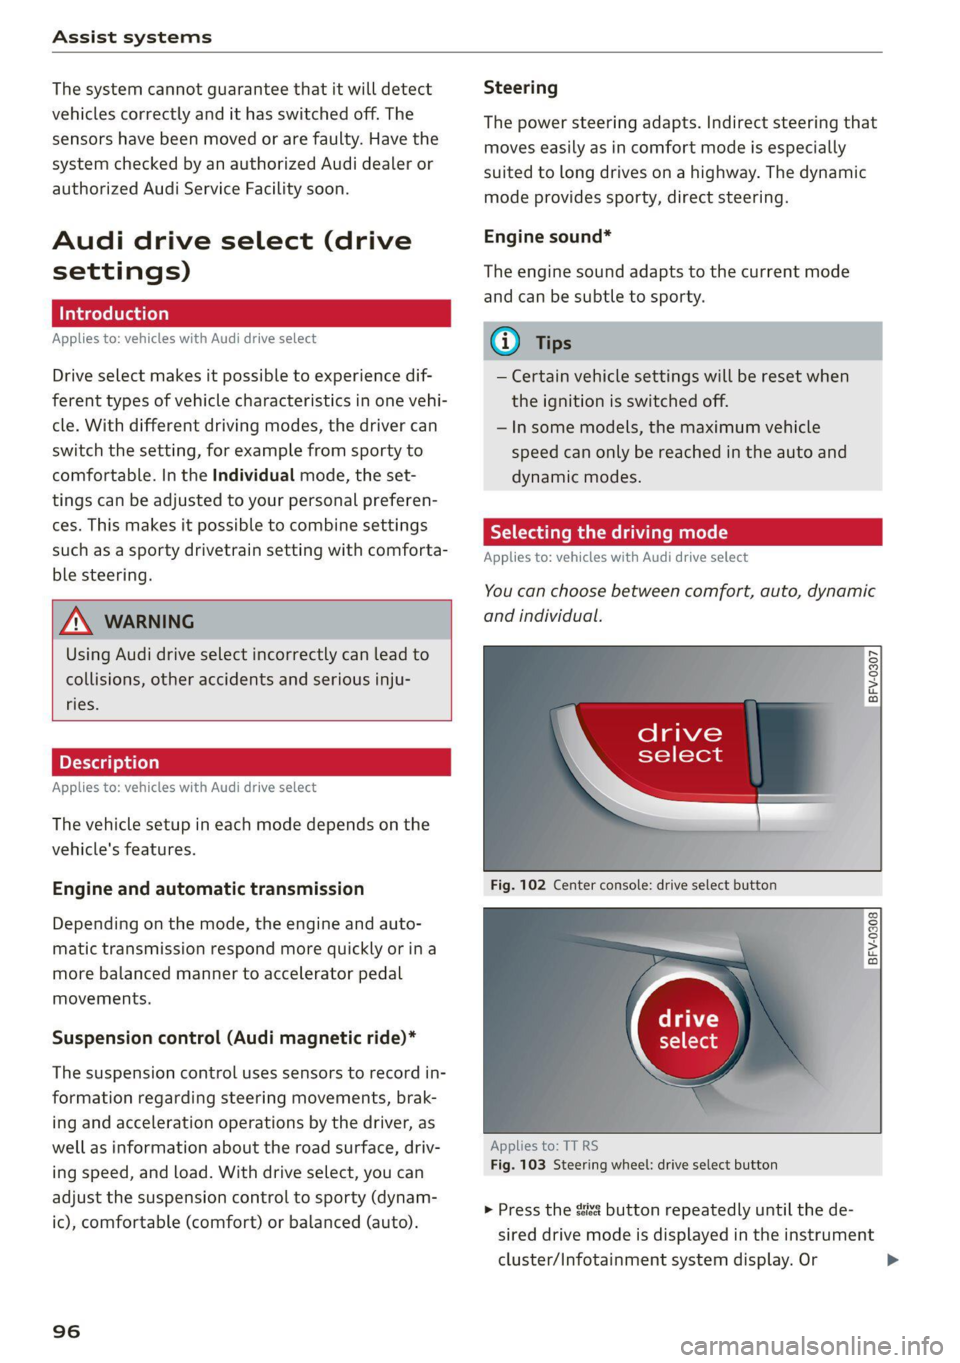
drive
select
Fig. 102 Center console: drive select button
BFV-0308
Applies to: TT RS
Fig. 103 Steering wheel: drive select button
> Press the ste button repeatedly until the de-
sired drive mode is displayed in the instrument
cluster/Infotainment system display. Or
Page 102 of 280
Parking aid
Siedler lie Rela
Applies to: vehicles with parking aid plus
BFV-0209
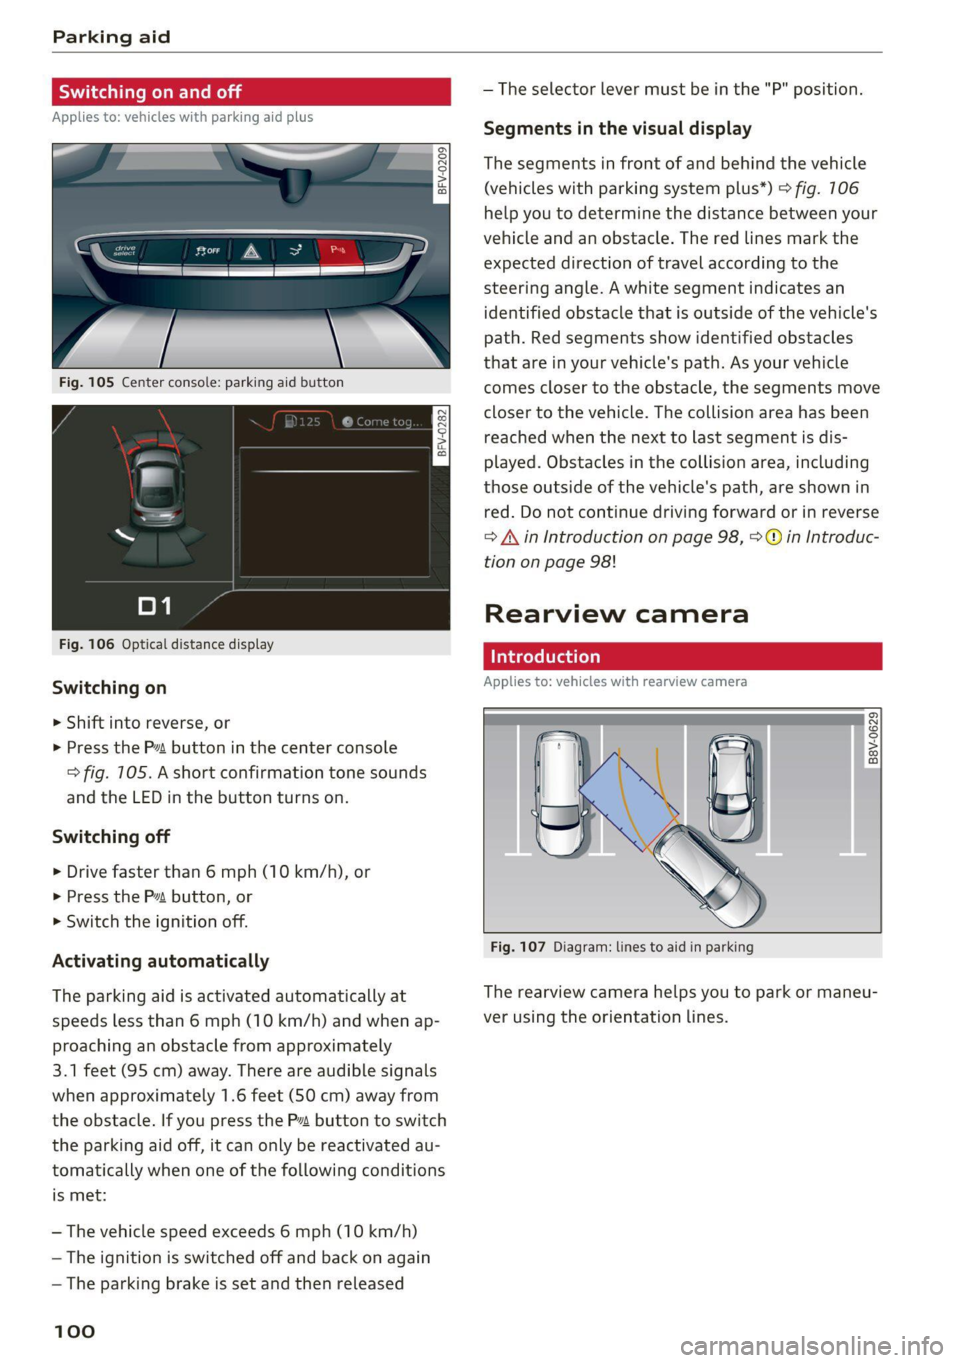
Fig. 105 Center console: parking aid button
Fig. 106 Optical distance display
Switching on
> Shift into reverse, or
> Press the P~ button in the center console
> fig. 105. A short confirmation tone sounds
and the LED in the button turns on.
Switching off
> Drive faster than 6 mph (10 km/h), or
> Press the P button, or
> Switch the ignition off.
Activating automatically
The parking aid is activated automatically at
speeds less than 6 mph (10 km/h) and when ap-
proaching an obstacle from approximately
3.1 feet (95 cm) away. There are audible signals
when approximately 1.6 feet (50 cm) away from
the obstacle. If you press the Pa button to switch
the parking aid off, it can only be reactivated au-
tomatically when one of the following conditions
is met:
— The vehicle speed exceeds 6 mph (10 km/h)
— The ignition is switched off and back on again
— The parking brake is set and then released
100
— The selector lever must be in the "P" position.
Segments in the visual display
The segments in front of and behind the vehicle
(vehicles with parking system plus*) > fig. 106
help you to determine the distance between your
vehicle and an obstacle. The red lines mark the
expected direction of travel according to the
steering angle. A white segment indicates an
identified obstacle that is outside of the vehicle's
path. Red segments show identified obstacles
that are in your vehicle's path. As your vehicle
comes closer to the obstacle, the segments move
closer to the vehicle. The collision area has been
reached when the next to last segment is dis-
played. Obstacles in the collision area, including
those outside of the vehicle's path, are shown in
red. Do not continue driving forward or in reverse
= A in Introduction on page 98, >@ in Introduc-
tion on page 98!
Rearview camera
Introduction
Applies to: vehicles with rearview camera
B8V-0629
Fig. 107 Diagram: lines to aid in parking
The rearview camera helps you to park or maneu-
ver using the orientation lines.
Page 103 of 280
8S1012721BE
Parking aid
General infor ion
Applies to: vehicles with rearview camera
© © 3 g
S £ 0
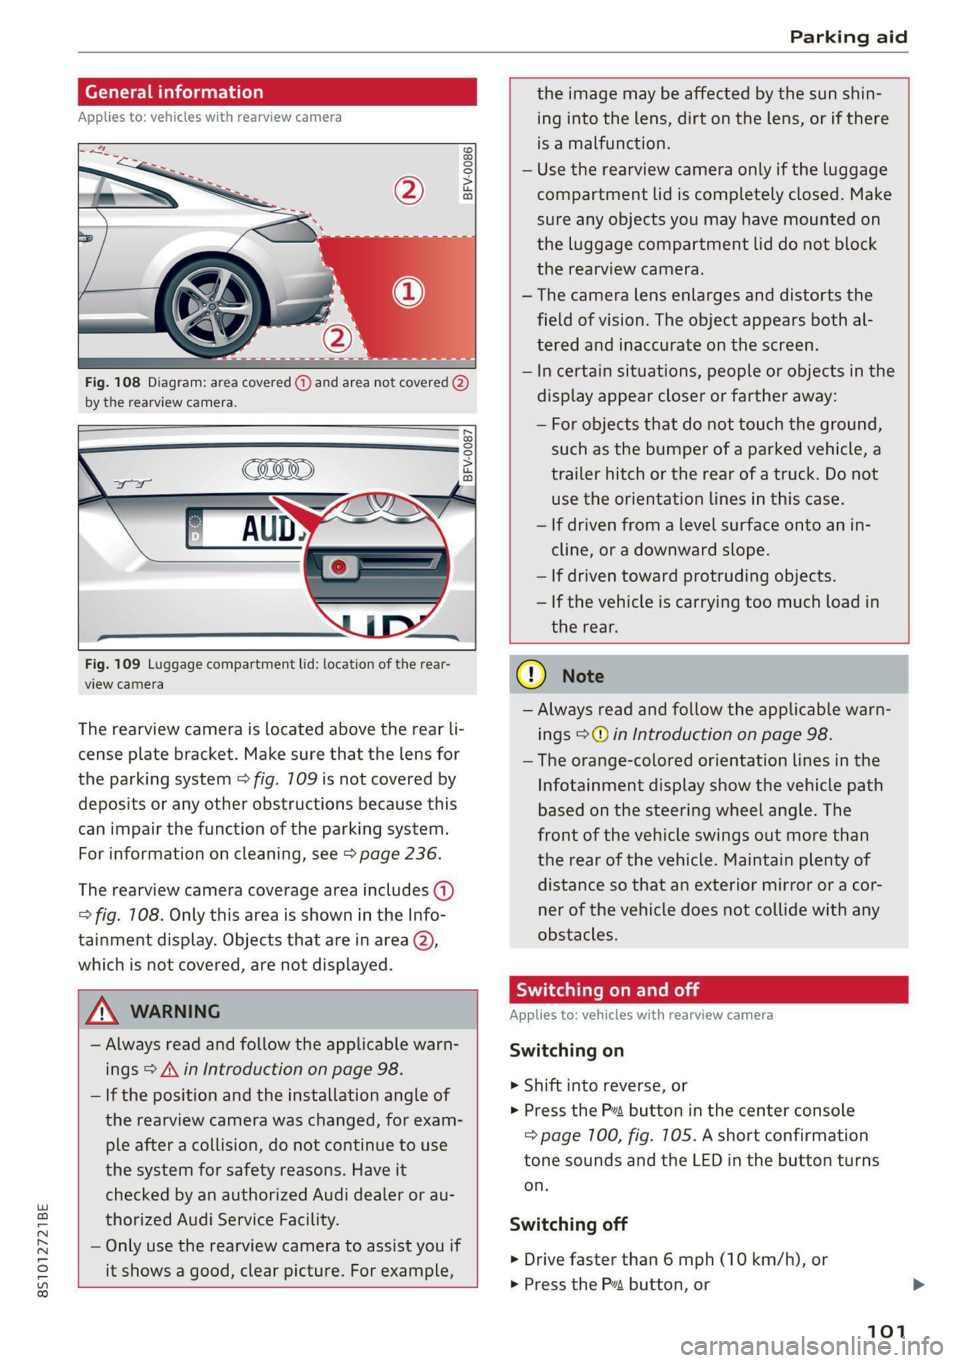
Fig. 108 Diagram: area covered (@) and area not covered @)
by the rearview camera.
Fig. 109 Luggage compartment lid: location of the rear-
view camera
The rearview camera is located above the rear li-
cense plate bracket. Make sure that the lens for
the parking system > fig. 709 is not covered by
deposits or any other obstructions because this
can impair the function of the parking system.
For information on cleaning, see > page 236.
The rearview camera coverage area includes (1)
=> fig. 108. Only this area is shown in the Info-
tainment display. Objects that are in area (2),
which is not covered, are not displayed.
ZA\ WARNING
— Always read and follow the applicable warn-
ings > A\ in Introduction on page 98.
— If the position and the installation angle of
the rearview camera was changed, for exam-
ple after a collision, do not continue to use
the system for safety reasons. Have it
checked by an authorized Audi dealer or au-
thorized Audi Service Facility.
— Only use the rearview camera to assist you if
it shows a good, clear picture. For example,
the image may be affected by the sun shin-
ing into the lens, dirt on the lens, or if there
is a malfunction.
— Use the rearview camera only if the luggage
compartment lid is completely closed. Make
sure any objects you may have mounted on
the luggage compartment lid do not block
the rearview camera.
— The camera lens enlarges and distorts the
field of vision. The object appears both al-
tered and inaccurate on the screen.
—Incertain situations, people or objects in the
display appear closer or farther away:
— For objects that do not touch the ground,
such as the bumper of a parked vehicle, a
trailer hitch or the rear of a truck. Do not
use
the orientation lines in this case.
— If driven from a level surface onto an in-
cline, or a downward slope.
— If driven toward protruding objects.
— If the vehicle is carrying too much load in
the rear.
CG) Note
— Always read and follow the applicable warn-
ings >@ in Introduction on page 98.
— The orange-colored orientation lines in the
Infotainment display show the vehicle path
based on the steering wheel angle. The
front
of the vehicle swings out more than
the rear of the vehicle. Maintain plenty of
distance so that an exterior mirror or a cor-
ner of the vehicle does not collide with any
obstacles.
Sica Re moll
Applies to: vehicles with rearview camera
Switching on
> Shift into reverse, or
> Press the P button in the center console
=> page 100, fig. 105. A short confirmation
tone sounds and the LED in the button turns
on.
Switching off
> Drive faster than 6 mph (10 km/h), or
> Press the P button, or
101
Page 107 of 280
8S1012721BE
Intelligent Technology
can affect driving stability and increase the
risk of a collision.
@) Tips
— The ABS and ASR only function correctly
when all four wheels have a similar wear
condition. Different tire sizes can lead toa
reduction in motor power.
— You may hear noises when the systems de-
scribed are working.
Sica Re meal
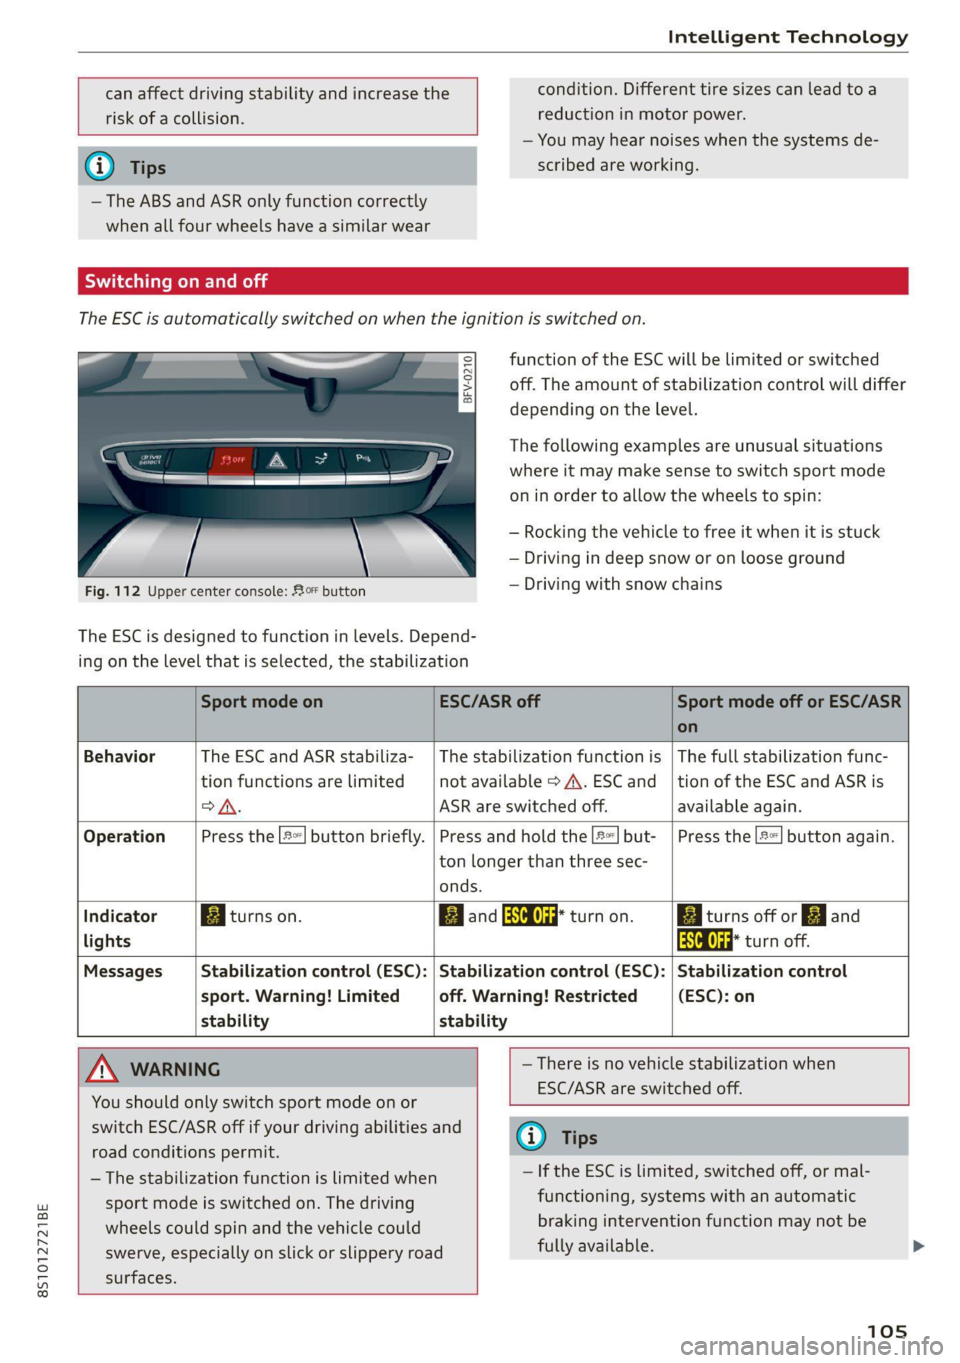
The ESC is automatically switched on when the ignition is switched on.
eS
5 Ss
> 6
Fig. 112 Upper center console: £0 button
The ESC is designed to function in levels. Depend-
ing on the level that is selected, the stabilization
function of the ESC will be limited or switched
off. The amount of stabilization control will differ
depending on the level.
The following examples are unusual situations
where it may make sense to switch sport mode
on in order to allow the wheels to spin:
— Rocking the vehicle to free it when it is stuck
— Driving in deep snow or on loose ground
— Driving with snow chains
You should only switch sport mode on or
switch ESC/ASR off if your driving abilities and
road conditions permit.
— The stabilization function is limited when
sport mode is switched on. The driving
wheels could spin and the vehicle could
swerve, especially on slick or slippery road
surfaces.
Sport mode on ESC/ASR off Sport mode off or ESC/ASR
on
Behavior The ESC and ASR stabiliza- | The stabilization function is | The full stabilization func-
tion functions are limited not available > A\. ESC and _|tion of the ESC and ASR is
SA. ASR are switched off. available again.
Operation Press the [£| button briefly. | Press and hold the |#«| but- | Press the [2] button again.
ton longer than three sec-
onds.
Indicator Biturns on. BBand aa turn on. Baiturns off or J and
lights aa turn off.
Messages Stabilization control (ESC): | Stabilization control (ESC): | Stabilization control
sport. Warning! Limited off. Warning! Restricted (ESC): on
stability stability
TN WARNING —There is no vehicle stabilization when
ESC/ASR are switched off.
@ Tips
fully available.
— If the ESC is limited, switched off, or mal-
functioning, systems with an automatic
braking intervention function may not be
105
Page 110 of 280

Intelligent Technology
steering wheel, and stop your vehicle in a safe lo-
cation as soon as possible. Do not continue driv-
ing. See an authorized Audi dealer or authorized
Audi Service Facility for assistance.
& Steering: malfunction! You can continue
driving
There is a malfunction in the steering system.
Steering may be more difficult or more sensitive.
Adapt your driving style. Have the steering sys-
tem checked immediately by an authorized Audi
dealer or authorized Audi Service Facility. Please
note that the red indicator light may turn on af-
ter restarting the engine. Do not continue driving
if it does.
@ Tips
If the a or El indicator light only stays on
for a short time, you may continue driving.
All wheel drive (quattro)
Applies to: vehicles with all wheel drive
The all-wheel drive system distributes the driving
power variably to the front and rear axle to im-
prove the driving characteristics. It works togeth-
er with selective wheel torque control, which can
activate when driving through curves
=> page 104.
The all-wheel drive system is designed for high
motor power. Your vehicle is exceptionally power-
ful and has excellent driving characteristics both
under normal driving conditions and on snow and
ice. Always read and follow safety precautions
>A.
Z\ WARNING
— Even in vehicles with all wheel drive, you
should adapt your driving style to the cur-
rent road and traffic conditions to reduce
the risk of an accident.
— The braking ability of your vehicle is limited
to the traction of the wheels. In this way, it
is not different from a two wheel drive vehi-
cle. Do not drive too fast because this in-
creases the risk of an accident.
108
— Note that on wet streets, the front wheels
can “hydroplane’” if driving at speeds that
are too high. Unlike front wheel drive
vehicles, the motor RPM does not increase
suddenly when the vehicle begins hydro-
planing. Adapt your speed to the road condi-
tions to reduce the risk of an accident.
Rear spoiler
Applies to: vehicles with retractable rear spoiler
a
id > z
oO
Fig. 113 Center console: button for the rear spoiler
The rear spoiler increases driving stability. The
rear spoiler extends automatically at speeds
above approximately 75 mph (120 km/h). It will
retract automatically when the speed drops be-
low approximately 50 mph (80 km/h).
You can also extend and retract the rear spoiler
manually.
> Extending: press > briefly.
> Retracting: press and hold 3% when driving at
speeds up to approximately 10 mph (20 km/h).
At speeds from approximately 10 mph (20
km/h) to 75 mph (120 km/h), press 3% briefly.
Messages
If the HB or Mturns on and a corresponding
message appears, the rear spoiler may not be
able to extend due to a malfunction. This could
change the vehicle's driving characteristics at
high speeds. Do not drive faster than 85 mph
(140 km/h).
The rear spoiler may be blocked. Clean the rear
spoiler compartment > page 237, close all vehi-
cle doors and lids, and wait several minutes until
the vehicle has completely turned off. If the indi-
cator light turns on again the next time the >
Page 178 of 280
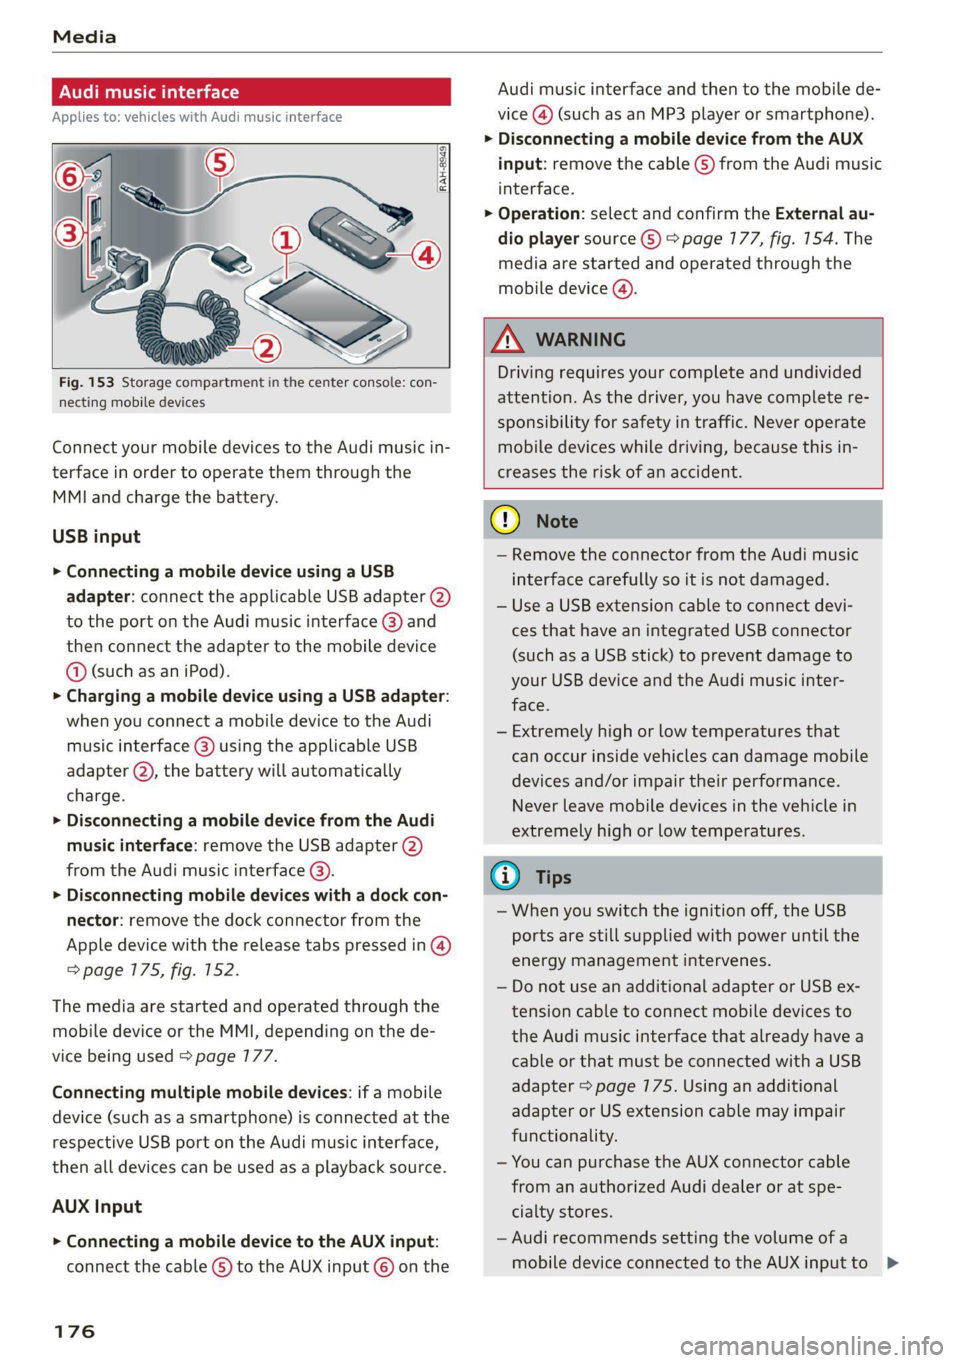
Fig. 153 Storage compartment in the center console: con-
necting mobile devices
Connect your mobile devices to the Audi music in-
terface in order to operate them through the
MMI and charge the battery.
USB input
> Connecting a mobile device using a USB
adapter: connect the applicable USB adapter (2)
to the port on the Audi music interface @) and
then connect the adapter to the mobile device
@ (such as an iPod).
> Charging a mobile device using a USB adapter:
when you connect a mobile device to the Audi
music interface (@) using the applicable USB
adapter @), the battery will automatically
charge.
> Disconnecting a mobile device from the Audi
music interface: remove the USB adapter @)
from the Audi music interface @).
> Disconnecting mobile devices with a dock con-
nector: remove the dock connector from the
Apple device with the release tabs pressed in @)
=> page 175, fig. 152.
The media are started and operated through the
mobile device or the MMI, depending on the de-
vice being used > page 177.
Connecting multiple mobile devices: if a mobile
device (such as a smartphone) is connected at the
respective USB port on the Audi music interface,
then all devices can be used as a playback source.
AUX Input
> Connecting a mobile device to the AUX input:
connect the cable G) to the AUX input © on the
176
Audi music interface and then to the mobile de-
vice
@) (such as an MP3 player or smartphone).
> Disconnecting a mobile device from the AUX
input: remove the cable (S) from the Audi music
interface.
> Operation: select and confirm the External au-
dio player source ©) > page 177, fig. 154. The
media are started and operated through the
mobile device ().
ZA WARNING
Driving requires your complete and undivided
attention. As the driver, you have complete re-
sponsibility for safety in traffic. Never operate
mobile devices while driving, because this in-
creases the risk of an accident.
@) Note
— Remove the connector from the Audi music
interface carefully so it is not damaged.
— Use a USB extension cable to connect devi-
ces that have an integrated USB connector
(such as a USB stick) to prevent damage to
your USB device and the Audi music inter-
face.
— Extremely high or low temperatures that
can occur inside vehicles can damage mobile
devices and/or impair their performance.
Never leave mobile devices in the vehicle in
extremely high or low temperatures.
@ Tips
— When you switch the ignition off, the USB
ports are still supplied with power until the
energy management intervenes.
— Do not use an additional adapter or USB ex-
tension cable to connect mobile devices to
the Audi music interface that already have a
cable or that must be connected with a USB
adapter > page 175. Using an additional
adapter or US extension cable may impair
functionality.
— You can purchase the AUX connector cable
from an authorized Audi dealer or at spe-
cialty stores.
— Audi recommends setting the volume of a
mobile device connected to the AUX input to >
Page 267 of 280

8S1012721BE
Index
A
A/C cooling mode.........-...--00e ee eee 70
A/C system refrigerant oil............... 264
ACCESSORIES 6 crccei
Adjusting air distribution (automatic climate
control system) .........2.-00 eee eee ee 70
Adjusting the additional display........... 14
Adjusting the blower (automatic climate con-
50) Dc 70
Adjusting the center console lighting....... 39
Adjusting the sound ................0005 193
Adjusting the temperature (automatic climate
control systeM) . 1.6... ce eee eee eee ees 70
Adjusting the vents...............00 eee 71
Airbagisystem « sacs + wemenn + apzeas « ¥ nrauien Wo 6 52
Alarm system
refer to Anti-theft alarm system.......... 24
Alignment pin (tire change).............. 242
All-weather lights: s+ nse ss « soni i agua 5 36
AlUSCAaSOM IFES sxc 5 coscene «armen wo eerie © ¥ os 229
All wheel drive
refer to quattro... 2... eee eee 108
Alternative
routes wiies i 6 ese ss cone oo scene 155
Ambientilighting)s « s iss so sen «6 aesue + wane 39
AMI
refer to Audi music interface....... 175,176
Android Auto
refer to Audi smartphone interface...... 187
Anti-freeze
Windshield washer system...........-. 212
Anti-lock braking system (ABS)........... 104
Anti-Slip Regulation...............-.05 104
Anti-theft alarm system................0. 24
Anti-theft wheel bolts.................. 245
Apple CarPlay
refer to Audi smartphone interface...... 187
Armrest... 2.0... 0.0 eee eee eee 47
Aspect ratio (video) ............00220008 180
ASR
refer to Anti-Slip Regulation............ 104
Audi adaptive light.................0005. 36
Audi connect
refer toconnect..............00 eee eee 141
Audi connect Infotainment
Personal hotspot..............00000ee 142
SEMICES OVENVIEW sx = gaeu ss eee ae ROE a 144
Audi drive select
refer to Drive select............--000005 96
Audi magnetic ride
refer to Suspension control.............. 96
Audi music interface..............00005 175
Audi music stream
refer to Wi-Fi..............0000- 146, 173
AUGIOMLESiesius 6s arava 6 w anew «0 weivana wo annem a 177
Audio player
Bluetooth audio player................ 172
Wi-Fi audio player a. « s swas ss sees de vee 173
Audio track. ...... cece eee eee 180
Audi phone box.............-.000 2200s 130
Audi side assist
refer to Side assist..... 0.0.0... eee eae 93
Audi smartphone interface.......... 187,191
Audi virtual cockpit
refer to Instrument cluster.............. 10
AUTO
Automatic headlights.................. 36
Climate control system .......... cee eee 70
Auto Lock (central locking) .............. 18
Automatic post-collision braking system... 104
Automatic transmission............-...5- 81
Driving tips... 2.0... eee eee ee eee 83
Emergency mode..............002-000- 87
Hilldescenticontrolsses « saws 4 2 aque 9 2 once 85
KICREP OW Miiiacs wo awoswiee w « ceevivae oo amine sw avon © 86
Malfunction ....... 0.00. cece eee eee ee 83
Selector lever emergency release......... 88
Selector lever: lOCK eis s+ esesos we + enon 0 saver 83
Selector lever positions................. 81
Shifting Manually « wees + xaes s 2 new so gee 85
Steering wheel with shift paddles........ 85
tiptronic... 2... ee eee eee 85
Automatic wiper/washer system........... 41
Automatic zoom (navigation) ............ 159
AUX IMPUt wscuses w 6 sseeees vo ssrome ws seems ww sue 176
Average fuel consumption................ 15
Average speed... . cece cece este eee enes 15
B
BACK BUttON ¢ seas so exes 5 e een oe ee see 110