2021 AUDI A6 steering
[x] Cancel search: steeringPage 180 of 332
Parking and maneuvering
Exiting parking spaces with the myAudi
app)2)
Applies to: vehicles with remote park assist plus
> Start the myAudi app.
> Start the engine in the myAudi app soon. When
starting, the vehicle key and mobile device
must not be more than approximately 10 feet
(3 m) away from the vehicle.
> Start the parking process with the mobile de-
vice soon. Otherwise, the function will be can-
celed.
> Pay attention to the path of the vehicle. If the
traffic situation permits, drive the vehicle out of
the parking space using the mobile device
> JX. The vehicle key and the mobile device
cannot be more than approximately 20 feet
(6 m) away from the vehicle during remote con-
trolled parking.
> The process for exiting a parking space ends
when the maximum distance is reached or if ad-
ditional corrective movements are no longer
necessary. Unlock and resume manual control
of the vehicle.
If an obstacle appears, stop the parking process
=>page 178.
Z\ WARNING
— Observe the safety precautions and note the
limits of the assist systems, sensors, and
cameras > page 122.
— Failing to pay careful attention to the vehi-
cle's surroundings increases the risk of an
accident. Park your vehicle with the mobile
device only if you are sure that no obstacle is
in the vehicle's path or under the vehicle,
and that no obstacles will move into the ve-
hicle's path.
@) Tips
You can interrupt the path set by the vehicle,
for example if it will drive very close to an ob-
stacle, by pausing the parking process using
the mobile device. Based on the position of
)_ system availability may be limited depending on the mar-
ket.
2) In preparation at the time of printing.
178
the vehicle, the system then calculates the
additional steering and driving directions for
maneuvering.
Interrupting remote controlled parking)
Applies to: vehicles with remote park assist plus
To stop the vehicle, you can temporarily pause re-
mote controlled parking at any time using your
mobile device.
You can also completely stop the parking process
and come to full stop immediately using the ve-
hicle key by pressing any button on the vehicle
key. Therefore, always keep the vehicle key with
you during the remote controlled parking proc-
ess.
Canceling automatically
The remote controlled parking will be canceled
automatically in the following situations, among
other things:
— If the myAudi app is not started soon after exit-
ing the vehicle,
— If you switch off the system
— If the time limit is exceeded
— The ESC intervenes
Taking over the parking process
After canceling the parking process, the vehicle
will come to a stop and the "P" position will be
engaged. Take over control of the vehicle, end the
parking process manually, and stop the vehicle.
You can also restart the entire parking process
from inside the vehicle.
ZA WARNING
— Observe the safety precautions and note the
limits of the assist systems, sensors, and
cameras > page 122.
— Failing to pay careful attention to the vehi-
cle's surroundings increases the risk of an
accident. Park your vehicle with the mobile
device only if you are sure that no obstacle is
in the vehicle's path or under the vehicle, >
Page 187 of 332

4K0012721BE
Telephone
Mobile device reminder signal
Applies to: vehicles with Audi phone box
When the device reminder signal is switched on,
you will be notified that your mobile device is still
in the Audi phone box when you leave the vehicle.
Requirement: your mobile device must be located
in the Audi phone box (if Qi-capable) or connect-
ed to the Audi music interface with a USB adapt-
er, and the Audi smartphone interface must be
active or your iPhone must be connected to the
MMI via Bluetooth and charging using a USB
adapter connected to the Audi music interface.
> Applies to: MMI: Select on the home screen:
SETTINGS > General > Reminder signal and
mobile device charging.
The following settings may be available, depend-
ing on vehicle equipment:
— Signal tone
— Off
Spoken cue
this setting is switched on at the factory.
Mobile device notes: reminder, charge level
When this function is switched on, the charge
status of your mobile device is displayed. You will
also be reminded not to forget your mobile de-
vice when leaving the vehicle.
Using the telephone
Accessing the telephone functions
Applies to: vehicles with telephone
nn @y
ee oo ar
Fig. 135 Upper display: selection menu
Requirement: a mobile device must be connected
to the MMI.
> Applies to: MMI: Select on the home screen:
PHONE.
The following phone functions will be available:
@ Search
OS) CAUUTISE oc sesone 2 0 coins ov soars 185
@) Favorites aca: ss ses y eeys vows 186
@ Contacts .............0.0.000. 186
(BS) Voicemail svc: «2 ccc 2% wiccove 2 4 snson 187
© Dial phonenumber ............ 187
@ Switch telephones ............. 189
call
Applies to: icles with telephone
Pe DP | catttist
Te ny o—@
Prec rer a
j fo}
[RAX-0145]
U7
on
Albert, Simon (3)
a) Creme ZEY |
Albinson, Mary (2)
esCM Are 27)
(34 001718765432 (1)
Fig. 136 Upper display: call list
Opening call lists using the MMI
> Applies to: MMI: Select on the home screen:
PHONE > Call list.
Opening call lists using the multifunction
steering wheel
> Select in the instrument cluster: Telephone tab
> 2) button > Call list.
Possible call list symbols:
Missed calls
Dialed numbers
Accepted calls
Editing a telephone number
Display business card ........... 187
©OOOCOLO Number of interactions with a con-
tact
If more than one interaction with a contact or
number has taken place, the last one is displayed
in the form of an arrow @), @), or @).
Press and hold a contact or a phone number in
the list until the Options menu appears.
185
Page 188 of 332
Telephone
Depending on your mobile device, the following
options may be available:
— Save as a shortcut > page 24, Shortcuts.
— Store as favorite > page 186.
— Send text message > page 189.
— Send e-mail > page 190.
Edit number
Edit a phone number before dialing it.
Show history
Requirement: you must have had more than one
interaction with a contact.
All interactions with a contact or a number are
displayed.
Managing favorites
Applies to: vehicles with telephone
You can store contacts for all connected mobile
devices as shortcuts in the favorites list.
Selecting favorites using the MMI
> Applies to: MMI: Select on the home screen:
PHONE > Favorites.
Opening favorites using the multifunction
steering wheel
> Select in the instrument cluster: Telephone tab
> [=] button > Favorites.
Storing favorites
> Press YY > page 187 in the business card, or
> Press Store as favorite in the options
=> page 185.
Deleting favorites
> Press W © page 187 in the business card, or
> Select: Favorites > Z > one or multiple favor-
ites or Select all > Delete > (Done).
G@) Tips
The favorites can only be edited via the MMI.
186
Managing the directory
Applies to: vehicles with telephone
You can manage up to four directories in the
MMI.
Requirement: a mobile device must be connected
to the MMI.
Opening the directory
> Applies to: MMI: Select on the home screen:
PHONE > Contacts.
The contacts will be displayed. You can change
the sort order > page 189, Sort order.
Deleting imported contacts
Requirement: you must have imported at least
one contact > page 189.
> Select: Contacts > Z > one or more text mes-
sages > Delete > (Done). The imported contacts
are deleted.
Directory options
> Press and hold a contact in the directory until
the Options menu appears.
Depending on your mobile device, the following
options may be available:
— Store as favorite > page 186.
— Send contact: you can select Text message or
E-mail > page 189.
— Send text message > page 189.
— Send e-mail > page 190.
— Save as a shortcut > page 24, Shortcuts.
Gi) Tips
— Pay attention to any synchronization
prompts on your mobile device when down-
loading contacts.
—The contacts from the mobile device may
not be transferred in alphabetical order. If
there are too many entries, contacts with
different first letters may be missing in the
MMI.
— Only the contacts from the active connected
mobile device are displayed.
Page 189 of 332

4K0012721BE
Telephone
— The contacts in the local MMI memory are
always visible and can be accessed by other
users.
— After switching off the ignition and exiting
the vehicle, the mobile device directory will
be loaded when the MMI is started again if
the mobile device is within range and the
Bluetooth function is switched on in the mo-
bile device and the MMI.
— Only the contacts in the local MMI memory
can be deleted.
Opening business cards
Applies to: vehicles with telephone
The business card shows you details about a con-
tact.
> To open a business card, press on a contact in
the directory, or
> Press © in the call list ©) > page 185, fig. 136.
Possible options in the business card:
> Call: press on a phone number.
> Storing a favorite: press W.
> Deleting a favorite: press W.
> Sending a text message: press {1.
>» Starting navigation: press on an address.
> Sending an e-mail: press on an e-mail address.
> Send contact: you can select Text message or
E-mail > page 189.
» Save as a shortcut > page 24, Shortcuts.
Listening to voicemail
Applies to: vehicles with telephone
> Applies to: MMI: Select on the home screen:
PHONE > Voicemail.
Requirement: there must be no voicemail num-
ber stored.
> Entering the voicemail number: enter the de-
sired number. Press OK.
Requirement: a voicemail number must be stor-
ed.
> Dialing the voicemail number: press Voice-
mail. The call begins immediately.
@) Tips
This service must be set up and activated by
the mobile phone service provider.
Dialing a telephone number
Applies to: vehicles with telephone
Depending on the vehicle equipment, you may
have the following options for dialing a phone
number:
— Using text input in the MMI > page 25.
— Using voice operation > page 28.
Call options
Applies to: vehicles with telephone
> To accept or end a call, press the @ button on
the multifunction steering wheel. Operating
=> page 13 and > page 31.
Depending on your mobile device, the following
options may be available in the MMI when there
is an incoming call:
— Answer
— Decline
— Message
If you exit the vehicle during a phone call, the
Bluetooth connection will be disconnected. De-
pending on your mobile device, phone calls in
progress may be automatically transferred from
the MMI to your mobile device.
G) Tips
The radio or media playback is muted during a
phone call.
PTT Tae RW urea]
Applies to: vehicles with telephone
Depending on your mobile device and the type of
connection, the following options may be availa-
ble during a call:
— End call
— Mute
187
Page 202 of 332
Navigation
Navigation
Opening navigation
Applies to: vehicles with navigation system
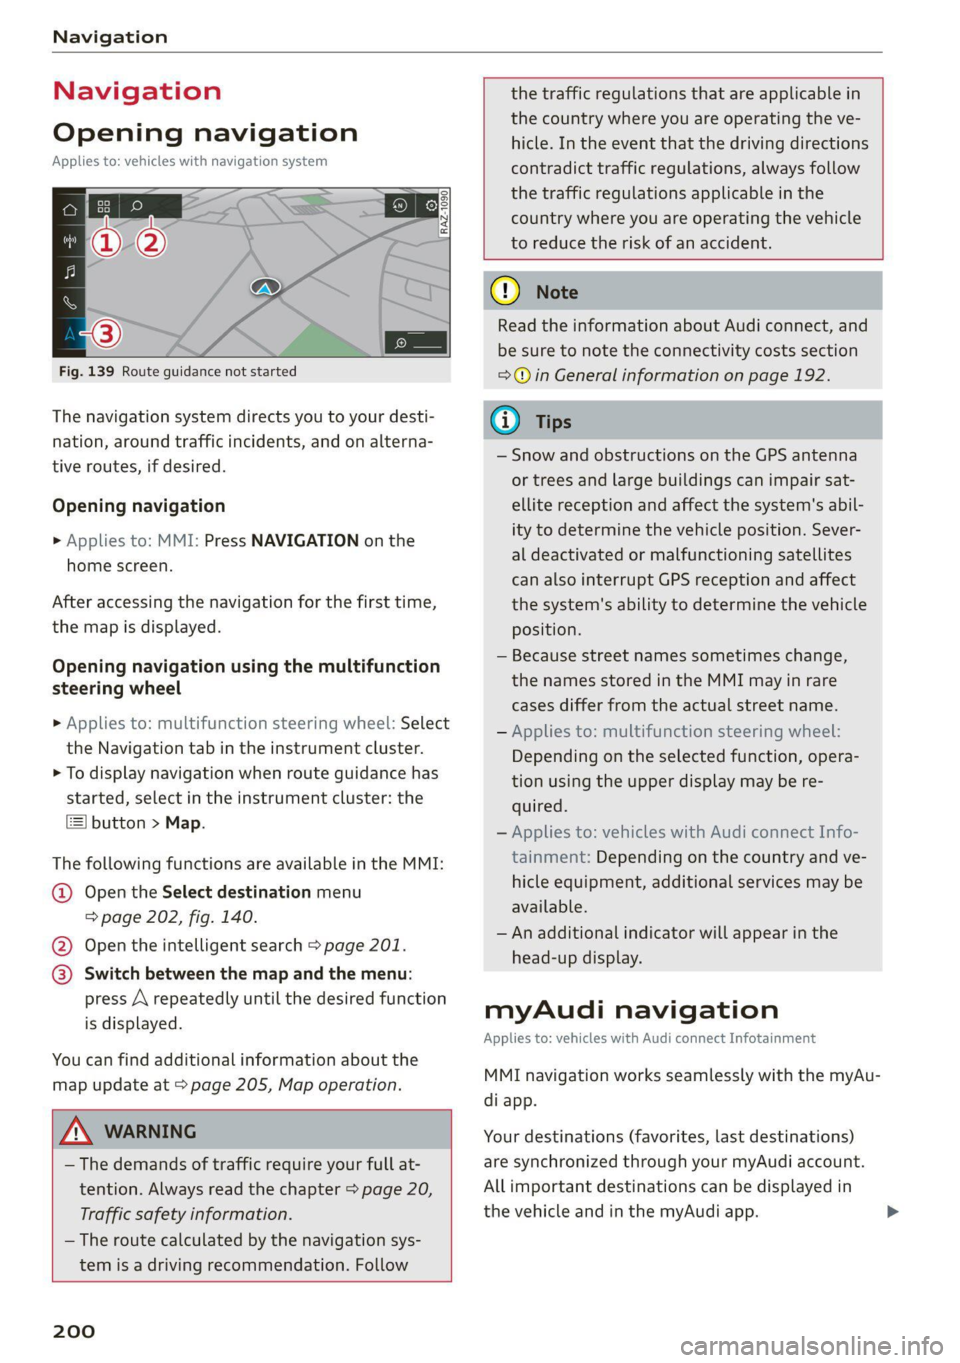
Fig. 139 Route guidance not started
The navigation system directs you to your desti-
nation, around traffic incidents, and on alterna-
tive routes, if desired.
Opening navigation
>» Applies to: MMI: Press NAVIGATION on the
home screen.
After accessing the navigation for the first time,
the map is displayed.
Opening navigation using the multifunction
steering wheel
> Applies to: multifunction steering wheel: Select
the Navigation tab in the instrument cluster.
> To display navigation when route guidance has
started, select in the instrument cluster: the
button > Map.
The following functions are available in the MMI:
@ Open the Select destination menu
= page 202, fig. 140.
@ Open the intelligent search > page 201.
@ Switch between the map and the menu:
press A repeatedly until the desired function
is displayed.
You can find additional information about the
map update at > page 205, Map operation.
ZA\ WARNING
— The demands of traffic require your full at-
tention. Always read the chapter > page 20,
Traffic safety information.
— The route calculated by the navigation sys-
tem is a driving recommendation. Follow
200
the traffic regulations that are applicable in
the country where you are operating the ve-
hicle. In the event that the driving directions
contradict traffic regulations, always follow
the traffic regulations applicable in the
country where you are operating the vehicle
to reduce the risk of an accident.
() Note
Read the information about Audi connect, and
be sure to note the connectivity costs section
=@ in General information on page 192.
(i) Tips
— Snow and obstructions on the GPS antenna
or trees and large buildings can impair sat-
ellite reception and affect the system's abil-
ity to determine the vehicle position. Sever-
al deactivated or malfunctioning satellites
can also interrupt GPS reception and affect
the system's ability to determine the vehicle
position.
— Because street names sometimes change,
the names stored in the MMI may in rare
cases differ from the actual street name.
— Applies to: multifunction steering wheel:
Depending on the selected function, opera-
tion using the upper display may be re-
quired.
— Applies to: vehicles with Audi connect Info-
tainment: Depending on the country and ve-
hicle equipment, additional services may be
available.
— An additional indicator will appear in the
head-up display.
myAudi navigation
Applies to: vehicles with Audi connect Infotainment
MMI navigation works seamlessly with the myAu-
di app.
Your destinations (favorites, last destinations)
are synchronized through your myAudi account.
All important destinations can be displayed in
the vehicle and in the myAudi app.
Page 204 of 332
Navigation
Check the spelling of the term that was
searched or check the search area
=> page 201.
— Distances to points of interest are displayed
as a straight-line distance from your current
location. The actual distance from your cur-
rent location to the point of interest is up-
dated automatically. The list of points of in-
terest that were found is not resorted when
this happens.
Select destinati
Applies to: vehicles with navigation system
eer er
RAX-0146 cr) m
& wv
A Last
need Cee
a)
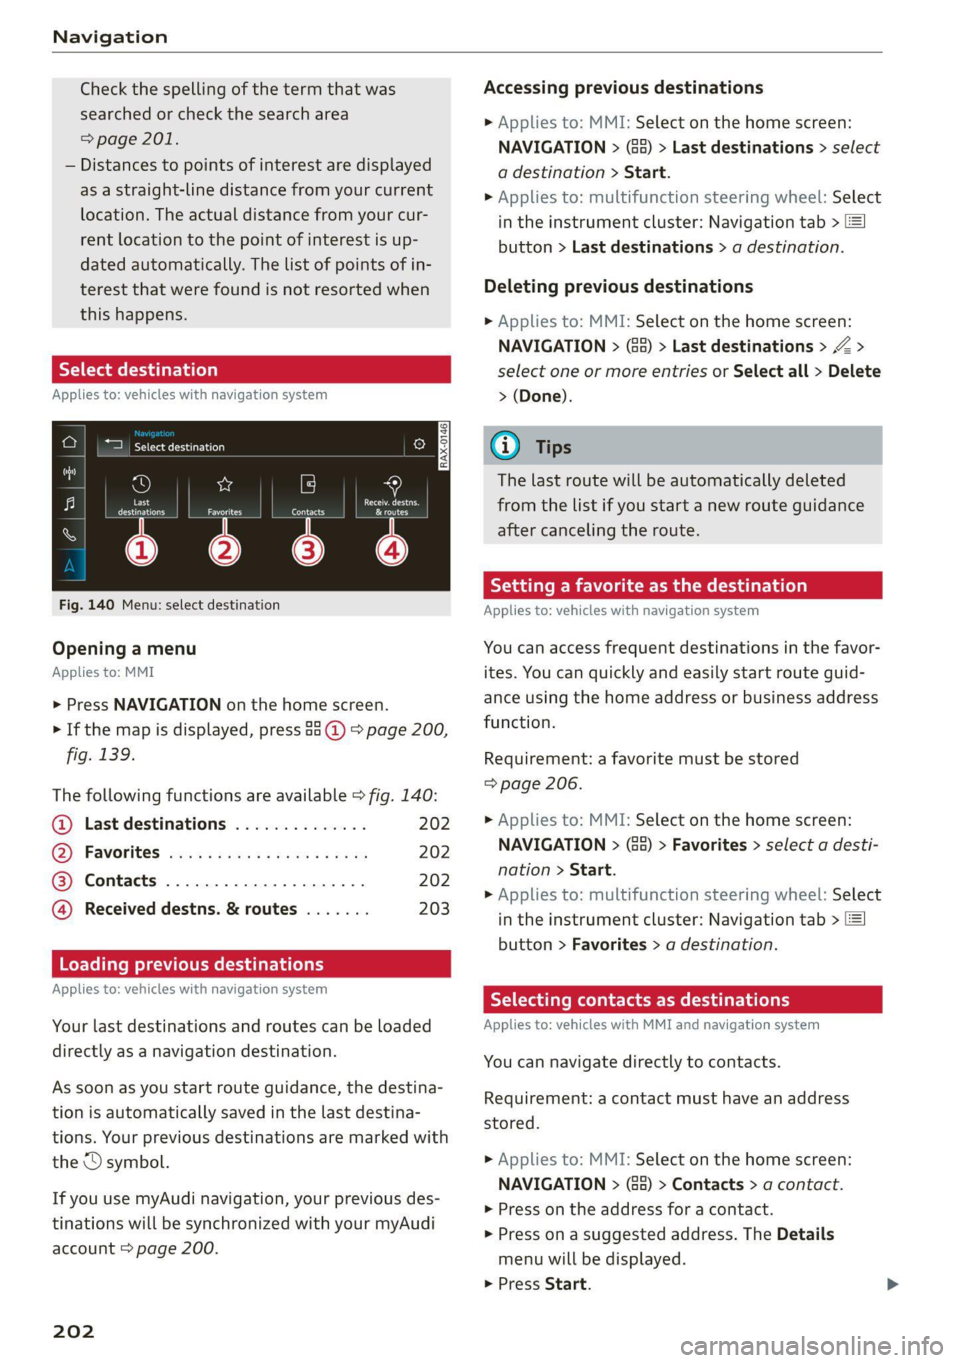
Fig. 140 Menu: select destination
Opening a menu
Applies to: MMI
> Press NAVIGATION on the home screen.
> If the map is displayed, press aa (1) > page 200,
fig. 139.
The following functions are available > fig. 140:
© Last destinations 202
@® Favorites ...............000008 202
@® Contacts ..................0., 202
@ Received destns. & routes ....... 203
Loading previous destinations
Applies to: vehicles with navigation system
Your last destinations and routes can be loaded
directly as a navigation destination.
As soon as you start route guidance, the destina-
tion is automatically saved in the last destina-
tions. Your previous destinations are marked with
the © symbol.
If you use myAudi navigation, your previous des-
tinations will be synchronized with your myAudi
account > page 200.
202
Accessing previous destinations
> Applies to: MMI: Select on the home screen:
NAVIGATION > (Ga) > Last destinations > select
a destination > Start.
> Applies to: multifunction steering wheel: Select
in the instrument cluster: Navigation tab > [=]
button > Last destinations > a destination.
Deleting previous destinations
> Applies to: MMI: Select on the home screen:
NAVIGATION > (88) > Last destinations > Z >
select one or more entries or Select all > Delete
> (Done).
Gi) Tips
The last route will be automatically deleted
from the list if you start a new route guidance
after canceling the route.
Setting a favorite as the destination
Applies to: vehicles with navigation system
You can access frequent destinations in the favor-
ites. You can quickly and easily start route guid-
ance using the home address or business address
function.
Requirement: a favorite must be stored
=> page 206.
> Applies to: MMI: Select on the home screen:
NAVIGATION > (G8) > Favorites > select a desti-
nation > Start.
> Applies to: multifunction steering wheel: Select
in the instrument cluster: Navigation tab >
button > Favorites > a destination.
Yaad deme aee eRe dir tliry
Applies to: vehicles with MMI and navigation system
You can navigate directly to contacts.
Requirement: a contact must have an address
stored.
> Applies to: MMI: Select on the home screen:
NAVIGATION > (8) > Contacts > a contact.
> Press on the address for a contact.
> Press on a suggested address. The Details
menu will be displayed.
> Press Start.
Page 206 of 332
Navigation
Selecting map content (such as POIs) as the
destination
Requirement: map content must be displayed
=> page 210.
> Press on map content on the map (for example,
ii).
Selecting the destination
> Select: F2 > Start.
Route guidance will be activated and the map will
be displayed > page 204, fig. 142.
Stopovers and route plan
Applies to: vehicles with navigation system
You can enter additional destinations during ac-
tive route guidance.
Entering a stopover
Requirement: route guidance must be active.
> Enter a destination > page 201.
Displaying stopovers or the route plan
All destinations are listed in the route plan.
> Press on fin the side menu on the map
=> page 204, fig. 142.
Editing stopovers
> Press on Pin the side menu on the map
=> page 204, fig. 142.
> Adding a stopover: Select: Add destination >
select a destination > Add to route.
> Moving a stopover: press Z. Touch the > sym-
bol and move the entry to the desired position.
Press Done.
> Deleting a stopover: Select: Z > one or more
entries or Select all > Delete > (Done).
Stopping route guidance
Applies to: vehicles with navigation system
Requirement: route guidance must be active and
the map must be displayed.
> Applies to: MMI: Press B( > page 204, fig. 142.
> Applies to: multifunction steering wheel: Select
in the instrument cluster: Navigation tab >
button > Cancel route guidance.
204
Map
Map functions
Applies to: vehicles with navigation system
yn >] 13:51 | E53 Dreshertown Rd
py pe Dee aay a ae LE
- oF ‘a € “epio
Fig. 143 Marked map object
Opening the map
Applies to: MMI
> Press NAVIGATION on the home screen.
> If necessary, press A to display the map.
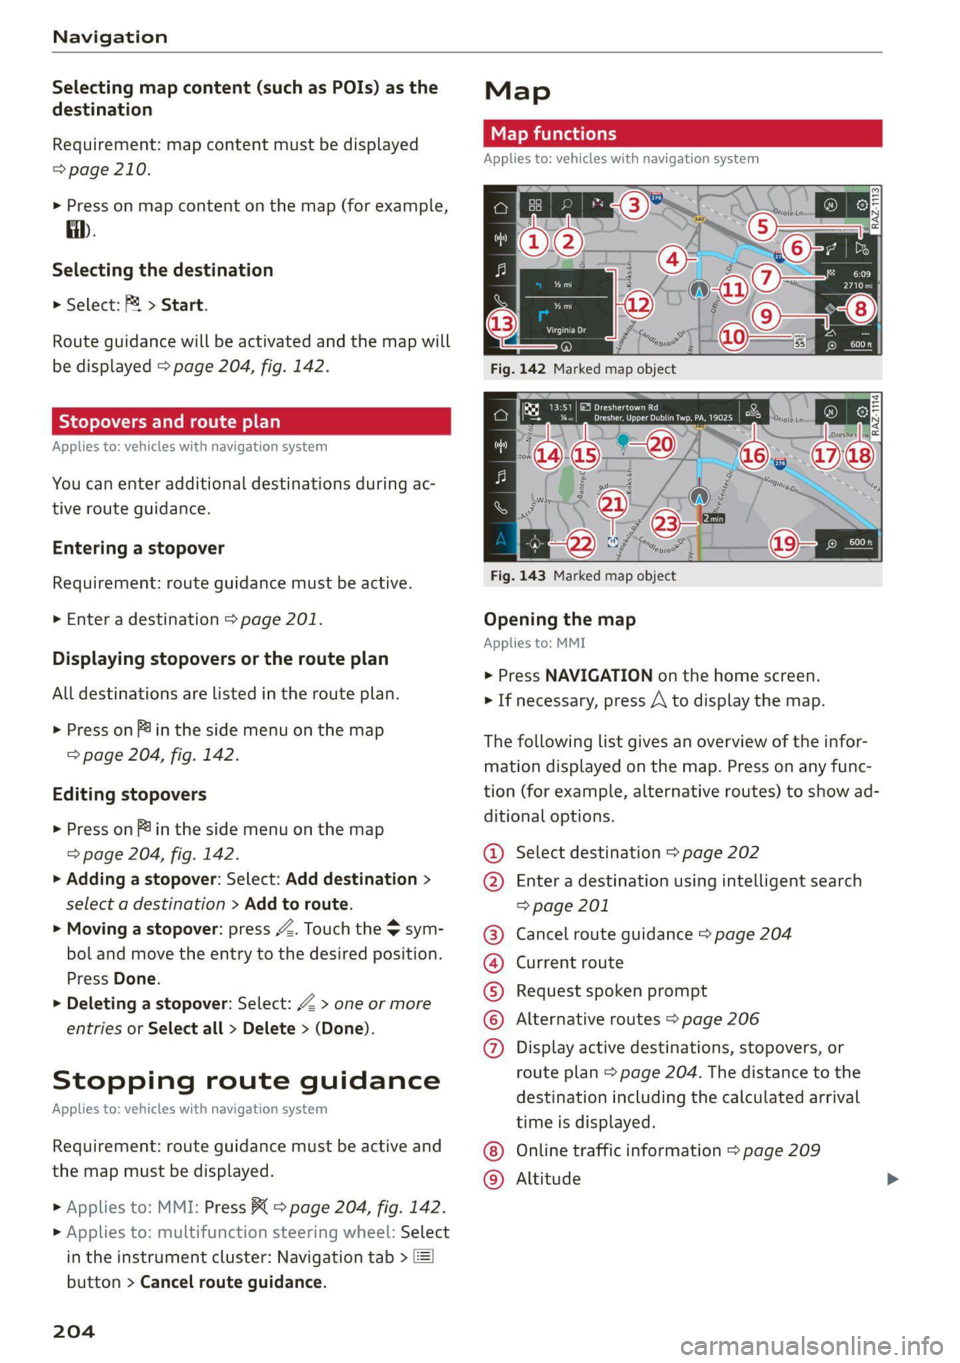
The following list gives an overview of the infor-
mation displayed on the map. Press on any func-
tion (for example, alternative routes) to show ad-
ditional options.
Select destination > page 202
Enter a destination using intelligent search
=> page 201
Cancel route guidance > page 204
Current route
Request spoken prompt
Alternative routes > page 206
COOH
OO
Display active destinations, stopovers, or
route plan > page 204. The distance to the
destination including the calculated arrival
time is displayed.
Online traffic information > page 209
Altitude ©®
Page 212 of 332

Navigation
Online traffic information
Applies to: vehicles with navigation system and online traffic
information
The MMI can receive real-time online traffic infor-
mation about congestion, accidents, road
construction, and other incidents.
Requirement: the MMI must be connected to the
Internet > page 192, Audi connect. Traffic infor-
mation must be switched on in the MMI
=> page 210.
Traffic information will be displayed on the
standard map > page 204, fig. 142.
Online traffic information is also displayed on the
standard map > page 207.
G) Tips
— Having the online traffic information func-
tion switched on provides the most accurate
reports of traffic situations and traffic fore-
casting. Your vehicle transmits and process-
es its anonymous, encrypted position infor-
mation at regular intervals to the traffic da-
ta provider. You can switch off data transfer
at any time > page 305.
— The online traffic information network is
not available in all countries, and the cover-
age is not nationwide.
Settings
Applies to: vehicles with navigation system
You can adjust the navigation system settings in
the instrument cluster and in the MMI display
separately. The settings depend on the country
and vehicle equipment.
Accessing settings
» Applies to: MMI: Select on the home screen:
NAVIGATION > ©}.
Accessing settings using the multifunction
steering wheel
> Applies to: multifunction steering wheel: Select
in the instrument cluster: Navigation tab >
button.
210
Please note that a setting applied to the multi-
function steering wheel is only valid for the in-
strument cluster map.
Map settings
Satellite map: see > page 207.
Traffic: you can display current traffic informa-
tion on the map.
— Free flowing traffic
— Traffic obstructions
— Traffic incidents
Map colors
— Automatic: the map display adapts to the light-
ing conditions (for example, by changing from
day to night when driving through a tunnel).
— Day or Night
Map orientation
— 2D heading-up map/2D north-up map: the
current vehicle position is displayed. The map is
oriented in the direction of travel or to the
north.
— 3D heading-up map: the current vehicle posi-
tion is shown on a three-dimensional map and
is aligned to the direction of travel.
— Overview: the entire route from the vehicle po-
sition to the destination or the next stopover is
displayed on the map. The map is oriented to
the north.
Automatic zoom
— On: the map scale is adapted automatically de-
pending on the type of road being traveled (ex-
pressway, highway, other roads) so that you al-
ways have an optimal overview of the road
ahead. When route guidance is active, the scale
is adjusted automatically for a better detailed
view when there are upcoming maneuvers.
— Intersection: when route guidance is active, the
scale is adjusted automatically for a better de-
tailed view when there are upcoming maneu-
vers.
— Off
MMI map contents/Map content: you can switch
the display of additional information (such as
POIs) on the map in the upper display on or off. >