2021 AUDI A6 tow
[x] Cancel search: towPage 146 of 332

Driver assistance
without a speed limit, the system will regu-
late the speed to 80 mph (130 km/h)».
Then the system adjusts to the last speed
set by the driver.
— There is no adaptation to speed limits when
driving through highway interchanges and
when driving on or off the expressway.
— The system can fail to provide control or the
control may be faulty if the values from the
camera-based traffic sign recognition* are
incorrect or the navigation system map data
is outdated.
— When route guidance is switched on, the
system adapts to the route provided by the
navigation system. Driving without route
guidance or leaving a route can result in
faulty control.
Tae ema Keita)
Applies to: vehicles with adaptive cruise assist
B4M-0234
Fig. 105 Operating lever: setting the distance
If you adjust the speed, you must also change the
time gap to the vehicle driving ahead. The higher
the speed, the greater the distance that is need-
ed.
> Tap the rocker switch to display the distance
that is currently set.
> To increase or decrease the distance in incre-
ments, tap the switch again toward @) or ().
The newly-set distance will be shown briefly, for
example with the fg indicator light. In the Driv-
er assistance display, a graphic display is shown
instead of the indicator lights > page 139,
D_ In certain countries.
144
fig. 100. The display matches the functions of
the indicator lights.
When approaching a vehicle driving ahead, the
adaptive cruise assist brakes to the set speed and
then maintains the set distance. If the vehicle
driving ahead accelerates, then the adaptive
cruise assist will also accelerate up to the speed
that you have set.
The following distances can be set:
Meaning
The time between is approximately 1
second. This setting corresponds toa
distance of approximately 92 feet (28
m) when traveling at 62 mph (100
km/h).
The time between is approximately 1.3
seconds. This setting corresponds toa
distance of approximately 118 feet
(100 m) when traveling at 62 mph
(36 m/h).
The time between is approximately 1.8
seconds. This setting meets the general
recommendation of “half the speed
shown on the speedometer”. This cor-
responds to a distance of approximate-
ly 164 feet (50 m) when traveling at
62 mph (100 km/h).
The time between is approximately 2.4
seconds. This setting corresponds toa
distance of approximately 219 feet
(100 m) when traveling at 62 mph
(67 m/h).
The time between is approximately 3.6
seconds. This setting corresponds toa
distance of approximately 328 feet
(100 m) when traveling at 62 mph
(100 m/h).
nv
HN)
ZA\ WARNING
Observe the safety precautions and note the
limits of the assist systems, sensors, and
cameras > page 122.
Page 147 of 332

4K0012721BE
Driver assistance
@) Tips
— When setting the distance, the driver is re-
sponsible for adhering to any applicable le-
gal regulations.
— Depending on the selected driving program
and distance, driving behavior when acceler-
ating may vary from moderate to sporty
= page 146, Adjusting the adaptive cruise
assist.
— The distances provided are specified values.
Depending on the driving situation and how
the vehicle ahead is driving, the actual dis-
tance may be more or less than these target
distances.
Overriding control
Applies to: vehicles with adaptive cruise assist
RAZ-0096
Fig. 106 Lever: overriding the control
Requirement: the adaptive cruise assist must be
switched on.
Overriding control
You can completely override the control, for ex-
ample when passing or if you would like to accel-
erate more quickly.
> To accelerate manually, pull the lever toward
you in the direction of the arrow and hold it
there, or press the accelerator pedal.
> To resume the usual cruise control, release the
lever or remove your foot from the accelerator
pedal.
When you are in the Driver assistance display,
the message Overridden will appear.
Decreasing the distance
The function decreases the set distance and pro-
vides assistance, for example when merging
when a lane is ending.
> To further reduce the distance to the vehicle
ahead temporarily, pull the lever toward your-
self in the direction of the arrow and hold it in
that position.
> To resume the system control, release the lever.
The adaptive cruise assist reduces the distance
and, if necessary, accelerates the vehicle above
the set speed. When you are in the Driver assis-
tance display, the message Overridden will ap-
pear.
ZA\ WARNING
— Observe the safety precautions and note the
limits of the assist systems, sensors, and
cameras > page 122.
— Resting your foot on the accelerator pedal
could override the cruise control. Braking in-
terventions and corrective actions by the
system may not occur.
g in stop-and-go traffic
Applies to: vehicles with adaptive cruise assist
Fig. 107 Instrument cluster: safe start monitor
Stopping with adaptive cruise assist
The adaptive cruise assist also assists you in stop-
and-go traffic. Within the limits of the system,
your vehicle may brake and remain at a stop if a
vehicle driving ahead stops.
145
Page 148 of 332

Driver assistance
Starting to drive with adaptive cruise assist)
As long as the message ready to drive and a is
displayed, your vehicle will begin driving when
the vehicle ahead starts to move > /\.
If you are stopped for several seconds, your vehi-
cle will no longer drive autonomously for safety
reasons, and the message will turn off.
> To extend ready to drive for several seconds or
reactivate, pull the lever briefly towards you in
the direction of the arrow > page 145, fig. 106.
> To resume manual control of the vehicle, tap
the accelerator pedal.
Safe start monitor
The vehicle can still start to drive even if certain
obstacles are detected when starting to drive
=> /\. If the surrounding area detection detects
an obstacle, you will be alerted to the danger by
the A indicator light.
If you are in the Driver assistance display, the
display @ © fig. 107 and the message Warning!
will also appear. An audio signal will also sound.
Your vehicle will drive more slowly when starting.
This may also occur in some situations when
there is no apparent obstacle.
>» Press the brake pedal to slow your vehicle
down.
ZA WARNING
— Observe the safety precautions and note the
limits of the assist systems, sensors, and
cameras > page 122.
— If the message ready to drive) appears,
your vehicle will start driving even if there is
an obstacle between your vehicle and the ve-
hicle ahead. To reduce the risk of an acci-
dent, always make sure there are no obsta-
cles between your vehicle and the vehicle
driving ahead.
@) Tips
For safety reasons, adaptive cruise assist is
only active if:
D_ This is not available in some countries.
146
— The driver's safety belt is fastened
— All doors and the hood are closed
— Your vehicle is not stopped for a long period
of time
al 3 3
iF Ny Pe fac
Fig. 108 Instrument cluster: request for driver interven-
tion
The request for driver intervention instructs you
to resume manual control of the vehicle if the
adaptive cruise assist braking function is not able
to maintain a sufficient distance to the vehicle
ahead. The system will warn you of the hazard
with the A indicator light and the message Dis-
tance!. An audio signal will also sound.
The display @ only appears when the Driver as-
sistance display is open in the on-board comput-
er > page 17.
ZA\ WARNING
Observe the safety precautions and note the
limits of the assist systems, sensors, and
cameras > page 122.
Adjusting the adaptive cruise assist
Applies to: vehicles with adaptive cruise assist
You can adjust the adaptive cruise assist to your
own preferences. The settings depend on the ve-
hicle equipment.
> Applies to MMI: Select on the home screen: VE-
HICLE > Driver assistance > (<3) > Adaptive
cruise assist.
Possible settings:
Page 156 of 332

Driver assistance
» Applies to MMI: Select on the home screen: VE-
HICLE > Driver assistance > (<3) > Audi pre
sense.
Setting the prewarning
You can adjust the warning time for the prewarn-
ing individually (Early/Medium/Late) or switch
the prewarning off.
Set the warning time for the early warning to
Early at first. If you feel that the prewarnings ap-
pear too early, then set the warning time to Me-
dium. The Late warning time should only be set
in special circumstances.
@ Tips
— If the system is switched off, it switches on
again automatically once the ignition is
switched on again).
— Switch Audi pre sense off when you are not
using public streets, when loading the vehi-
cle onto a vehicle carrier, train, ship, or oth-
er type of transportation, or when towing
the vehicle. This can help to prevent an un-
desired intervention from the Audi pre
sense system.
Messages
Applies to: vehicles with Audi pre sense
re is displayed when there is a malfunction,
the Audi pre sense functions may be unavailable
or may be limited.
A message that indicates the cause and possible
solution may appear with some displays. The
weather conditions may be too poor or a sensor
may be covered. Bring the vehicle to a full stop,
switch the ignition off, and clean the area in front
of the sensors > page 124.
If the message still appears after switching the
ignition on again, have an authorized repair facili-
ty correct the malfunction as soon as possible.
D_Incertain countries.
154
Side assist
Description
Applies to: vehicles with side assist
al 3
eI
q e|
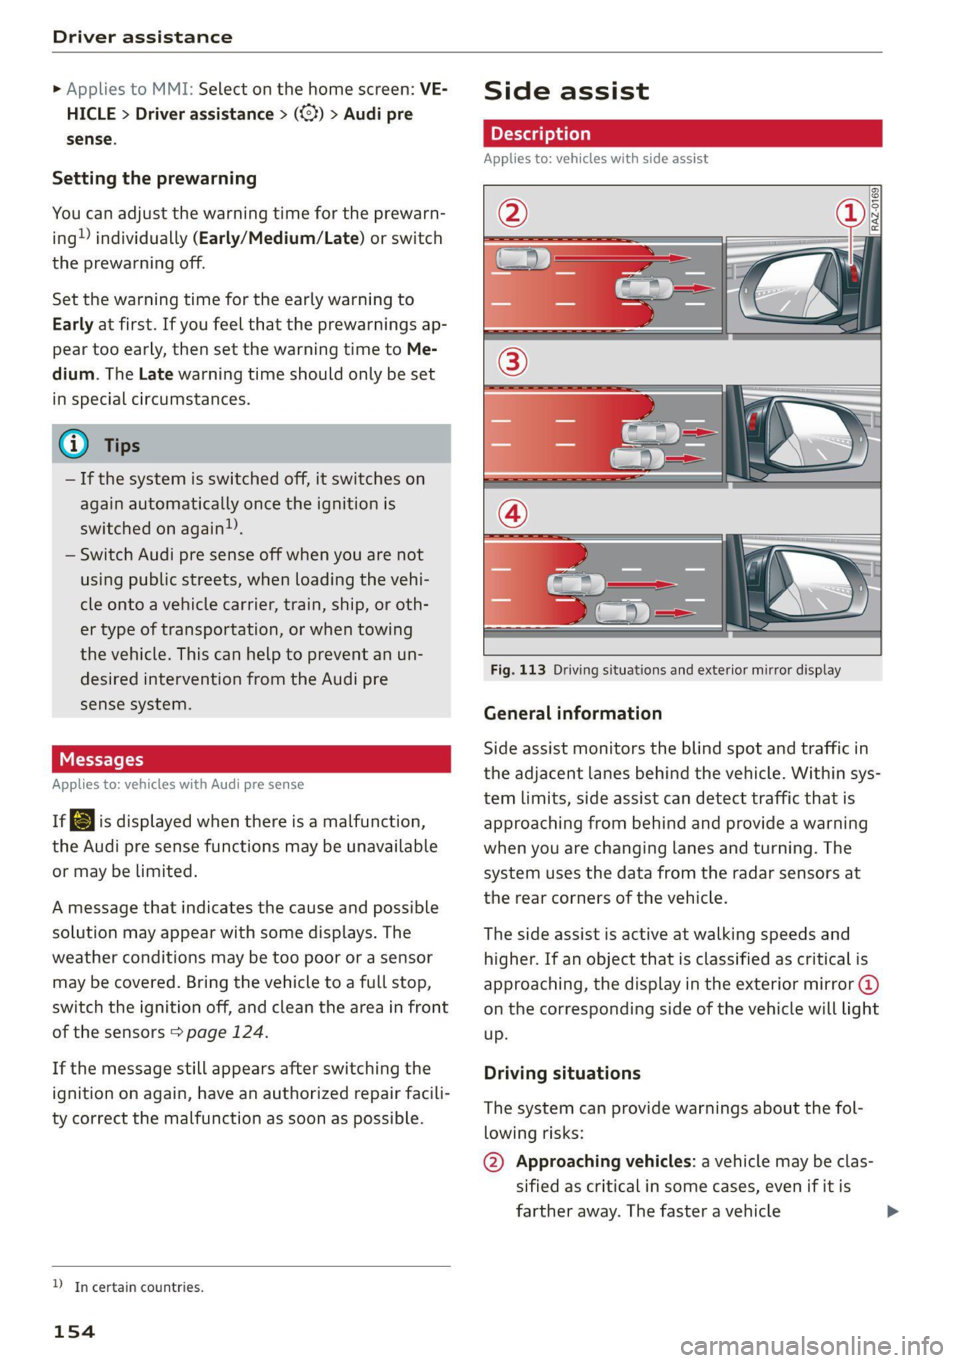
Fig. 113 Driving situations and exterior mirror display
General information
Side assist monitors the blind spot and traffic in
the adjacent lanes behind the vehicle. Within sys-
tem limits, side assist can detect traffic that is
approaching from behind and provide a warning
when you are changing lanes and turning. The
system uses the data from the radar sensors at
the rear corners of the vehicle.
The side assist is active at walking speeds and
higher. If an object that is classified as critical is
approaching, the display in the exterior mirror @
on the corresponding side of the vehicle will light
up.
Driving situations
The system can provide warnings about the fol-
lowing risks:
@ Approaching vehicles: a vehicle may be clas-
sified as critical in some cases, even if it is
farther away. The faster a vehicle
Page 181 of 332

4K0012721BE
Parking and maneuvering
and that no obstacles will move into the ve-
hicle's path.
@) Tips
The parking process will be interrupted tem-
porarily if an obstacle is detected.
Maneuver assist!)2)
Applies to: vehicles with maneuver assist
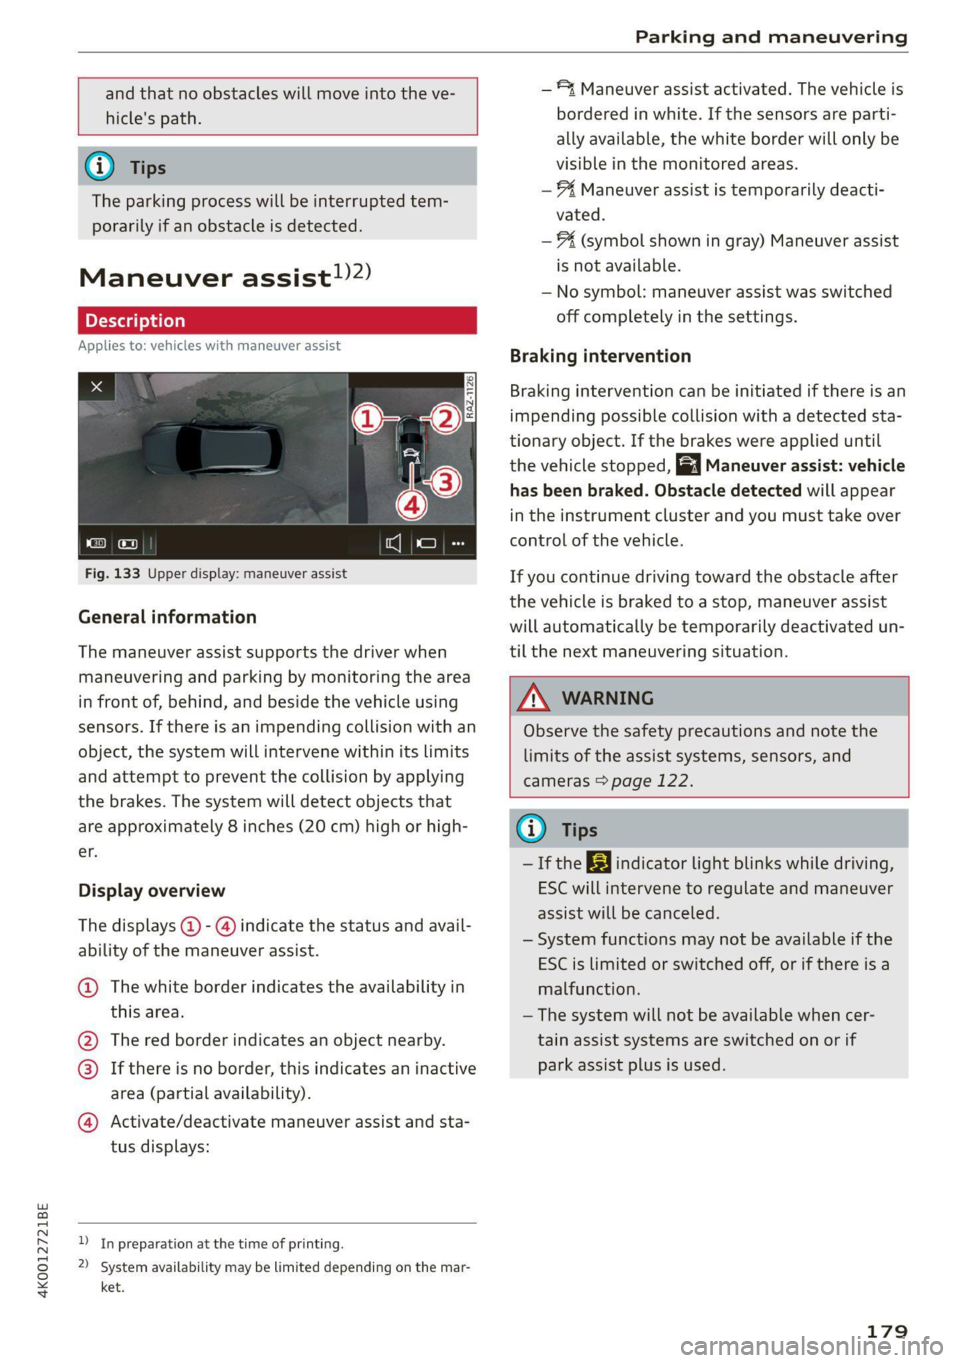
Fig. 133 Upper display: maneuver assist
General information
The maneuver assist supports the driver when
maneuvering and parking by monitoring the area
in front of, behind, and beside the vehicle using
sensors. If there is an impending collision with an
object, the system will intervene within its limits
and attempt to prevent the collision by applying
the brakes. The system will detect objects that
are approximately 8 inches (20 cm) high or high-
er.
Display overview
The displays @ - @ indicate the status and avail-
ability of the maneuver assist.
@ The white border indicates the availability in
this area.
The red border indicates an object nearby.
If there is no border, this indicates an inactive
area (partial availability).
®
©®&
Activate/deactivate maneuver assist and sta-
tus displays:
)_ In preparation at the time of printing.
2) System availability may be limited depending on the mar-
ket.
— 4 Maneuver assist activated. The vehicle is
bordered in white. If the sensors are parti-
ally available, the white border will only be
visible in the monitored areas.
— % Maneuver assist is temporarily deacti-
vated.
— (symbol shown in gray) Maneuver assist
is not available.
— No symbol: maneuver assist was switched
off completely in the settings.
Braking intervention
Braking intervention can be initiated if there is an
impending possible collision with a detected sta-
tionary object. If the brakes were applied until
the vehicle stopped, Maneuver assist: vehicle
has been braked. Obstacle detected will appear
in the instrument cluster and you must take over
control of the vehicle.
If you continue driving toward the obstacle after
the
vehicle is braked to a stop, maneuver assist
will automatically be temporarily deactivated un-
til the next maneuvering situation.
Z\ WARNING
Observe the safety precautions and note the
limits of the assist systems, sensors, and
cameras > page 122.
(i) Tips
-If the B indicator light blinks while driving,
ESC will intervene to regulate and maneuver
assist will be canceled.
— System functions may not be available if the
ESC is limited or switched off, or if there is a
malfunction.
— The system will not be available when cer-
tain assist systems are switched on or if
park assist plus is used.
179
Page 182 of 332

Parking and maneuvering
Activating or deactivating maneuver assist
Applies to: vehicles with maneuver assist
Requirements
> Maneuver assist must be switched on in the
parking system settings in the MMI.
> The speed must not be higher than approxi-
mately 6 mph (10 km/h).
Automatic activation
Maneuver assist activates automatically when re-
verse gear is engaged while the engine is run-
ning. A brief tone will sound.
Deactivating temporarily
If you do not want to use maneuver assist during
a parking cycle, you can deactivate it temporarily.
If maneuver assist is deactivated temporarily, it
will be activated again automatically the next
time park assist is activated.
> To deactivate maneuver assist temporarily,
press % @) > page 179, fig. 133 in the upper
display. The “% symbol will appear.
If you continue driving toward the obstacle after
the vehicle is braked to a stop, maneuver assist
will automatically be temporarily deactivated un-
til the next maneuvering situation.
Activating manually
You can activate maneuver assist in various ways
depending on the situation:
> To activate maneuver assist manually (such as
when driving forward), press the % button in
the center console.
> To reactivate maneuver assist after it has been
deactivated temporarily, press 74 @,
=> page 179, fig. 133 in the upper display. The
® symbol will appear.
Switching on or off permanently
» Applies to MMI: Select on the home screen: VE-
HICLE > Parking aid > Maneuver assist. Or
> Select [| > Maneuver assist in the upper dis-
play when the parking aid is active.
If maneuver assist is switched off permanently,
there will be no symbol in the center of the vehi-
cle graphic @) > page 179, fig. 133.
180
ZA WARNING
Observe the safety precautions and note the
limits of the assist systems, sensors, and
cameras > page 122.
Messages
Applies to: vehicles with maneuver assist
if or fg is displayed when there is a malfunc-
tion, the maneuver assist functions may be un-
available or may be limited.
A message that indicates the cause and possible
solution may appear with some displays. The
weather conditions may be too poor or a sensor
may be covered. Clean the area in front of the
sensors and cameras > page 124 and try to turn
the system on again later.
If the malfunction remains, drive to an author-
ized Audi dealer or authorized Audi Service Facili-
ty immediately to have the malfunction correct-
ed.
Page 206 of 332

Navigation
Selecting map content (such as POIs) as the
destination
Requirement: map content must be displayed
=> page 210.
> Press on map content on the map (for example,
ii).
Selecting the destination
> Select: F2 > Start.
Route guidance will be activated and the map will
be displayed > page 204, fig. 142.
Stopovers and route plan
Applies to: vehicles with navigation system
You can enter additional destinations during ac-
tive route guidance.
Entering a stopover
Requirement: route guidance must be active.
> Enter a destination > page 201.
Displaying stopovers or the route plan
All destinations are listed in the route plan.
> Press on fin the side menu on the map
=> page 204, fig. 142.
Editing stopovers
> Press on Pin the side menu on the map
=> page 204, fig. 142.
> Adding a stopover: Select: Add destination >
select a destination > Add to route.
> Moving a stopover: press Z. Touch the > sym-
bol and move the entry to the desired position.
Press Done.
> Deleting a stopover: Select: Z > one or more
entries or Select all > Delete > (Done).
Stopping route guidance
Applies to: vehicles with navigation system
Requirement: route guidance must be active and
the map must be displayed.
> Applies to: MMI: Press B( > page 204, fig. 142.
> Applies to: multifunction steering wheel: Select
in the instrument cluster: Navigation tab >
button > Cancel route guidance.
204
Map
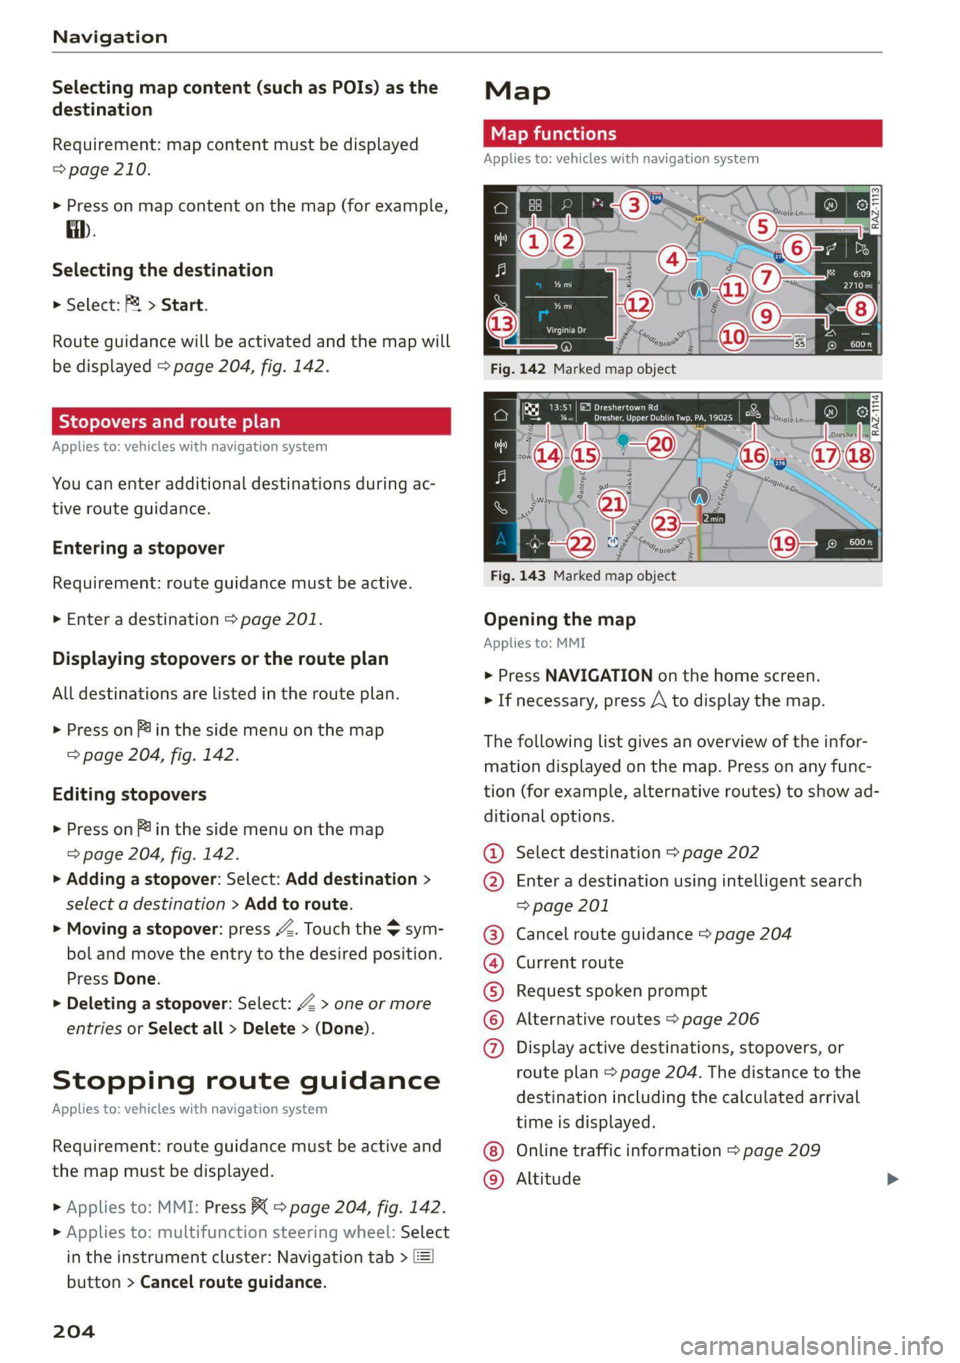
Map functions
Applies to: vehicles with navigation system
yn >] 13:51 | E53 Dreshertown Rd
py pe Dee aay a ae LE
- oF ‘a € “epio
Fig. 143 Marked map object
Opening the map
Applies to: MMI
> Press NAVIGATION on the home screen.
> If necessary, press A to display the map.
The following list gives an overview of the infor-
mation displayed on the map. Press on any func-
tion (for example, alternative routes) to show ad-
ditional options.
Select destination > page 202
Enter a destination using intelligent search
=> page 201
Cancel route guidance > page 204
Current route
Request spoken prompt
Alternative routes > page 206
COOH
OO
Display active destinations, stopovers, or
route plan > page 204. The distance to the
destination including the calculated arrival
time is displayed.
Online traffic information > page 209
Altitude ©®
Page 252 of 332

Checking and Filling
— You can continue driving if the permitted
G12evo coolant additive was not added.
However, go to an authorized Audi dealer or
authorized Audi Service Facility immediately
to have the coolant replaced to reduce the
risk of engine damage.
— Due to the risk of engine damage, the cool-
ing system should only be refilled by an au-
thorized Audi dealer or authorized Audi
Service Facility. An authorized Audi dealer or
authorized Audi Service Facility can also pro-
vide you with important information about
the recommended coolant additive.
ecking coolant
= Fe [RAZ-0540]
MIN
Fig. 162 Engine compartment - Coolant expansion tank:
@ cover with release button; @) markings
Observe the safety precautions > page 242, Gen-
eral information.
Checking the coolant level
> Park the vehicle on a level surface.
> Switch the ignition off.
> Open the hood > page 243.
The coolant expansion tank for some engines is
located in the water drip tray under a cover. Slide
the
cover that is located below the windshield
wiper on the front passenger's side toward the
windshield and remove the cover.
> Check the coolant level in the coolant expan-
sion tank > page 245, fig. 160 using the outer
markings @) > fig. 162. The coolant level must
be between the markings @) when the engine is
cold. When the engine is warm it can be slight-
ly above the upper marking.
>» When you add coolant to the expansion tank,
please refer to > page 249, Cooling system.
250
Adding coolant
Requirement: there must be a residual amount of
coolant in the expansion tank >(@).
If you must add coolant, use a mixture of water
and coolant additive. Audi recommends mixing
the coolant additive with distilled water.
> Allow the engine to cool.
> Place a large, thick towel on the coolant expan-
sion tank cap.
» Push the release button @ > fig. 162 on the
cap and carefully turn it to the left until you
feel resistance > /\.
> Push the release button again and remove the
cap completely.
> Add coolant mixed in the correct ratio
=> page 249 up to the MAX marking.
> Make sure that the fluid level remains stable.
Add more coolant if necessary.
> Turn the cap to the right to tighten it until you
feel resistance a second time.
Coolant loss usually indicates that there is a leak.
Immediately drive your vehicle to an authorized
Audi dealer or authorized Audi Service Facility
and have the cooling system inspected. If the
cooling system is not leaking, coolant loss can re-
sult from the coolant boiling due overheating
and then being forced out of the cooling system.
ZA WARNING
— The engine compartment in any vehicle is a
potentially dangerous area. Stop the engine,
switch the ignition off, and allow the engine
to cool before working in the engine com-
partment. Always follow the information
found in > page 242, General information.
— Never open the hood if you can see or hear
steam or coolant escaping from the engine
compartment. This increases the risk of
burns. The cooling system is under pressure.
When you no longer see or hear steam or
coolant escaping, you may open the engine
compartment with caution.
— When working in the engine compartment,
remember that the radiator fan can switch
on even if the ignition is switched off, which
increases the risk of injury.