2021 ALFA ROMEO STELVIO manual radio set
[x] Cancel search: manual radio setPage 10 of 280

8
DEAR CUSTOMER
READ THIS CAREFULLY
Refueling..................................................... 2
Starting The Engine .................................... 2
Parking On Flammable Material ............... 2
Respecting The Environment .................... 2
Electrical Accessories ................................ 2
Scheduled Servicing .................................. 2
Rollover Warning ........................................ 3
VEHICLE CHANGES / ALTERATIONS
Accessories Purchased By The Owner ...... 4
Installing Electrical/Electronic Devices .... 4
Radio Transmitters And Mobile Phones ... 5
GETTING TO KNOW YOUR VEHICLE
KEYS..........................................................18
Key Fob................................................... 18
ENGINE IMMOBILIZER SYSTEM ..............20
IGNITION SWITCH ...................................20
Keyless Push Button Ignition ................ 20
REMOTE START — IF EQUIPPED .............22
How To Use Remote Start ..................... 22
To Exit Remote Start Mode ................... 22
Remote Start Comfort Systems —
If Equipped ............................................. 23
VEHICLE SECURITY SYSTEM —
IF EQUIPPED............................................. 23
To Arm The System................................ 23
To Disarm The System .......................... 23
Volumetric/Anti-Lift Protection —
If Equipped ............................................. 24
DOORS ...................................................... 24
Power Door Locks.................................. 24
Locking The Doors With A Depleted
Battery .................................................... 25 Passive Entry System ........................... 25
Power Lock Safety Device..................... 27
Automatic Door Locks — If Equipped .. 27
Child-Protection Door Lock System — Rear
Doors ...................................................... 27
STEERING WHEEL.................................... 28
Manual Tilt/Telescoping Steering
Column ................................................. 28 Heated Steering Wheel —
If Equipped ............................................ 29
DRIVER MEMORY SETTINGS —
IF EQUIPPED............................................. 30
Programming The Memory Feature ..... 30
Memory Position Recall ........................ 30
SEATS ...................................................... 30
Sparco Racing Seats (Quadrifoglio
Vehicles) — If Equipped ......................... 30 Split Folding Rear Seat ......................... 31
Power Adjustment (Front Seats)........... 33
Heated Seats — If Equipped ................ 34
Head Restraints .................................. 35
MIRRORS ..................................................37
Automatic Dimming Mirror ....................37
Vanity Mirror ...........................................37
Outside Power Mirrors .........................38
Power Folding Outside Mirrors ..............38
Outside Automatic Dimming Mirrors —
If Equipped .............................................39 Heated Mirrors .....................................39
UNIVERSAL GARAGE DOOR OPENER
(HOMELINK®) ..........................................39
Before You Begin Programming
HomeLink® ............................................39 Erasing All The HomeLink®
Channels ................................................. 39 Identifying Whether You Have A Rolling
Code Or Non-Rolling Code Device .........40 Programming HomeLink® To A
Garage Door Opener ..............................40 Programming HomeLink® To A
Miscellaneous Device ............................ 41 Reprogramming A Single HomeLink®
Button .....................................................41 Canadian/Gate Operator
Programming .......................................... 41
EXTERIOR LIGHTS ....................................42
Headlight Switch ..................................42
Daytime Running Lights (DRLs) .........42
High Beam Headlights ..........................43
Automatic Headlights ...........................43
Flash-To-Pass .........................................43
21_GU_OM_EN_USC_t.book Page 8
Page 20 of 280

18
GETTING TO KNOW YOUR VEHICLE
In this section, you will find important informa-
tion to help you become familiar with the
features needed to operate your vehicle, and
how they function.
KEYS
Key Fob
Your vehicle is equipped with a key fob which
supports Passive Entry, Remote Keyless Entry
(RKE), Remote Start (if equipped), and remote
liftgate operation. The key fob allows you to
lock or unlock the doors and liftgate. The key
fob does not need to be pointed at the vehicle
to activate the system. The key fob also
contains an emergency key, which is stored
inside the key fob.
NOTE:
The key fob’s wireless signal may be
blocked if the key fob is located next to a
mobile phone, laptop, or other electronic
device. This may result in poor perfor -
mance.
With ignition in the ON position and the
vehicle moving at 2 mph (4 km/h), all RKE commands are disabled. Key Fob
In case the ignition switch does not change
with the push of a button, the key fob may
have a low or fully depleted battery. A low key
fob battery can be verified by referring to the
instrument cluster, which will display direc -
tions to follow
Ú
page 268.
To Lock/Unlock The Doors And Liftgate
Push and release the unlock button on the key
fob once to unlock the driver’s door or twice
within one second to unlock all doors and the
liftgate. To lock all the doors and the liftgate,
push the lock button once.
The current unlock setting can be changed
through the radio system menu, so that the
system unlocks:
All doors on the first push of the key fob
unlock button.
The driver door on the first push of the key
fob unlock button.
The liftgate "independently" or "with doors". When the doors are locked/unlocked, the turn
signals will flash and the illuminated entry
system will be activated.
NOTE:
If one or more doors are open when the lock
button is pushed, or the liftgate is open, the
doors will lock. The doors will unlock again
automatically if the key is left inside the
passenger compartment, otherwise the doors
will stay locked.
Flashing of the turn signals upon locking/
unlocking the doors, and activation of the
courtesy light upon unlocking the doors, can
be activated or deactivated through the radio
system. For further information, refer to the
Information and Entertainment System
Owner’s Manual Supplement.
Opening The Liftgate
Rapidly push the button on the key fob twice to
open the liftgate. The turn signals will flash to
indicate that the liftgate has been opened.
Replacing The Battery In The Key Fob
The recommended replacement battery is one
CR2032 battery.
NOTE:
Customers are recommended to use a
battery obtained from Mopar. Aftermarket
coin battery dimensions may not meet the
original OEM coin battery dimensions.
21_GU_OM_EN_USC_t.book Page 18
Page 27 of 280
25
Locking The Doors With A Depleted Battery
Proceed as follows to lock the doors if the
vehicle battery is depleted:
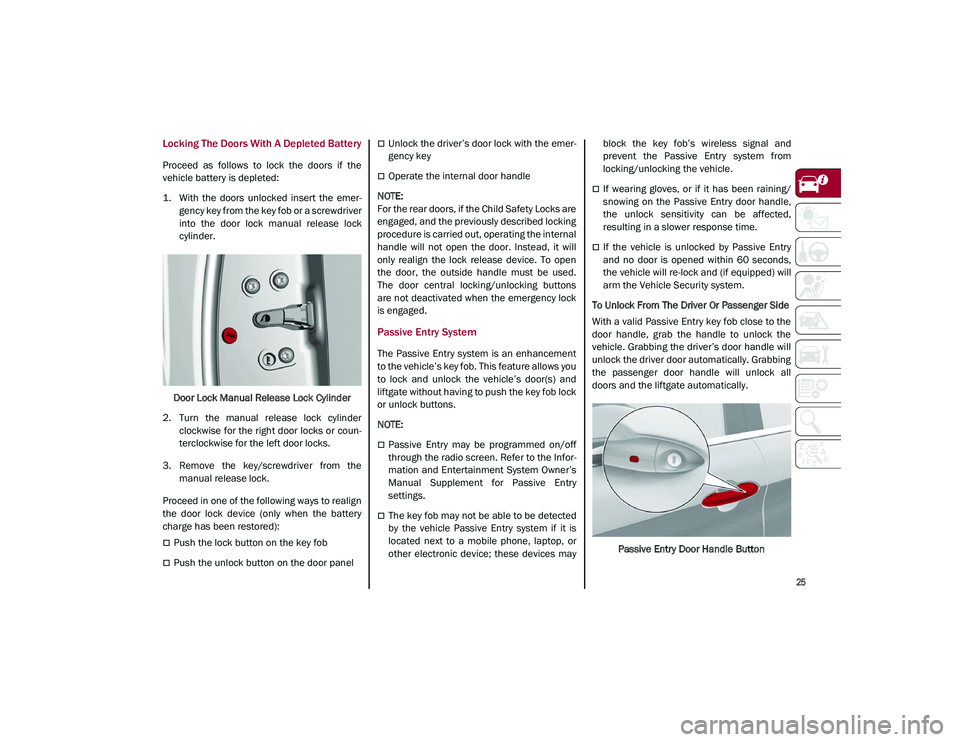
1. With the doors unlocked insert the emer-
gency key from the key fob or a screwdriver
into the door lock manual release lock
cylinder.
Door Lock Manual Release Lock Cylinder
2. Turn the manual release lock cylinder clockwise for the right door locks or coun -
terclockwise for the left door locks.
3. Remove the key/screwdriver from the manual release lock.
Proceed in one of the following ways to realign
the door lock device (only when the battery
charge has been restored):
Push the lock button on the key fob
Push the unlock button on the door panel
Unlock the driver’s door lock with the emer -
gency key
Operate the internal door handle
NOTE:
For the rear doors, if the Child Safety Locks are
engaged, and the previously described locking
procedure is carried out, operating the internal
handle will not open the door. Instead, it will
only realign the lock release device. To open
the door, the outside handle must be used.
The door central locking/unlocking buttons
are not deactivated when the emergency lock
is engaged.
Passive Entry System
The Passive Entry system is an enhancement
to the vehicle’s key fob. This feature allows you
to lock and unlock the vehicle’s door(s) and
liftgate without having to push the key fob lock
or unlock buttons.
NOTE:
Passive Entry may be programmed on/off
through the radio screen. Refer to the Infor -
mation and Entertainment System Owner’s
Manual Supplement for Passive Entry
settings.
The key fob may not be able to be detected
by the vehicle Passive Entry system if it is
located next to a mobile phone, laptop, or
other electronic device; these devices may block the key fob’s wireless signal and
prevent the Passive Entry system from
locking/unlocking the vehicle.
If wearing gloves, or if it has been raining/
snowing on the Passive Entry door handle,
the unlock sensitivity can be affected,
resulting in a slower response time.
If the vehicle is unlocked by Passive Entry
and no door is opened within 60 seconds,
the vehicle will re-lock and (if equipped) will
arm the Vehicle Security system.
To Unlock From The Driver Or Passenger Side
With a valid Passive Entry key fob close to the
door handle, grab the handle to unlock the
vehicle. Grabbing the driver’s door handle will
unlock the driver door automatically. Grabbing
the passenger door handle will unlock all
doors and the liftgate automatically.
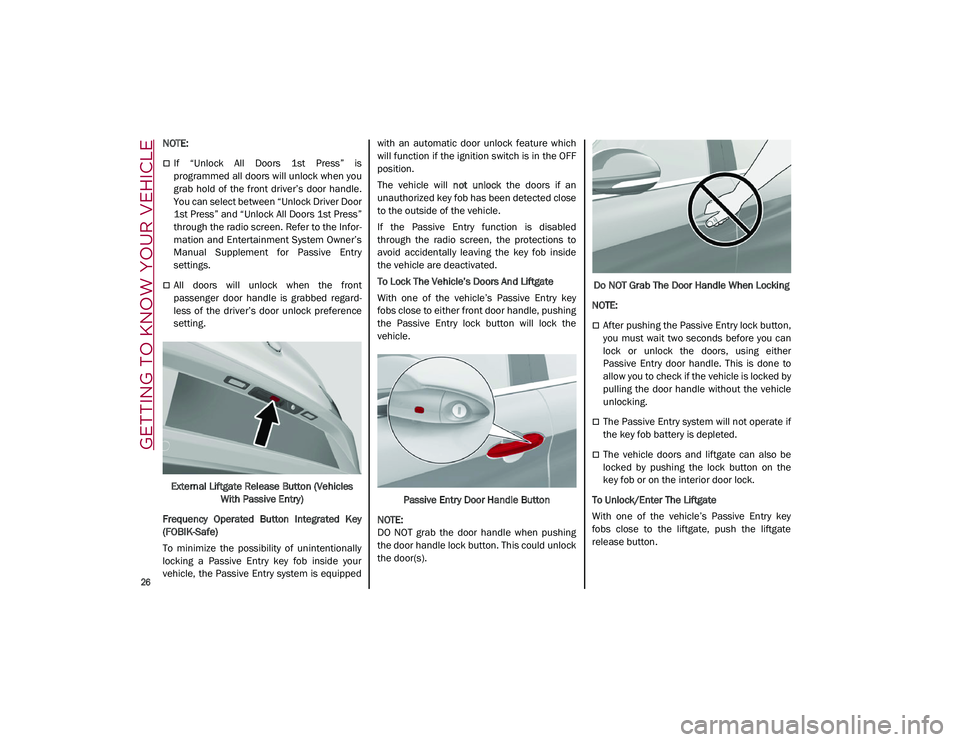
Passive Entry Door Handle Button
21_GU_OM_EN_USC_t.book Page 25
Page 28 of 280
GETTING TO KNOW YOUR VEHICLE
26
NOTE:
If “Unlock All Doors 1st Press” is
programmed all doors will unlock when you
grab hold of the front driver’s door handle.
You can select between “Unlock Driver Door
1st Press” and “Unlock All Doors 1st Press”
through the radio screen. Refer to the Infor-
mation and Entertainment System Owner’s
Manual Supplement for Passive Entry
settings.
All doors will unlock when the front
passenger door handle is grabbed regard -
less of the driver’s door unlock preference
setting.
External Liftgate Release Button (Vehicles With Passive Entry)
Frequency Operated Button Integrated Key
(FOBIK-Safe)
To minimize the possibility of unintentionally
locking a Passive Entry key fob inside your
vehicle, the Passive Entry system is equipped with an automatic door unlock feature which
will function if the ignition switch is in the OFF
position.
The vehicle will
not unlock the doors if an
unauthorized key fob has been detected close
to the outside of the vehicle.
If the Passive Entry function is disabled
through the radio screen, the protections to
avoid accidentally leaving the key fob inside
the vehicle are deactivated.
To Lock The Vehicle’s Doors And Liftgate
With one of the vehicle’s Passive Entry key
fobs close to either front door handle, pushing
the Passive Entry lock button will lock the
vehicle.
Passive Entry Door Handle Button
NOTE:
DO NOT grab the door handle when pushing
the door handle lock button. This could unlock
the door(s). Do NOT Grab The Door Handle When Locking
NOTE:
After pushing the Passive Entry lock button,
you must wait two seconds before you can
lock or unlock the doors, using either
Passive Entry door handle. This is done to
allow you to check if the vehicle is locked by
pulling the door handle without the vehicle
unlocking.
The Passive Entry system will not operate if
the key fob battery is depleted.
The vehicle doors and liftgate can also be
locked by pushing the lock button on the
key fob or on the interior door lock.
To Unlock/Enter The Liftgate
With one of the vehicle’s Passive Entry key
fobs close to the liftgate, push the liftgate
release button.
21_GU_OM_EN_USC_t.book Page 26
Page 36 of 280
GETTING TO KNOW YOUR VEHICLE
34
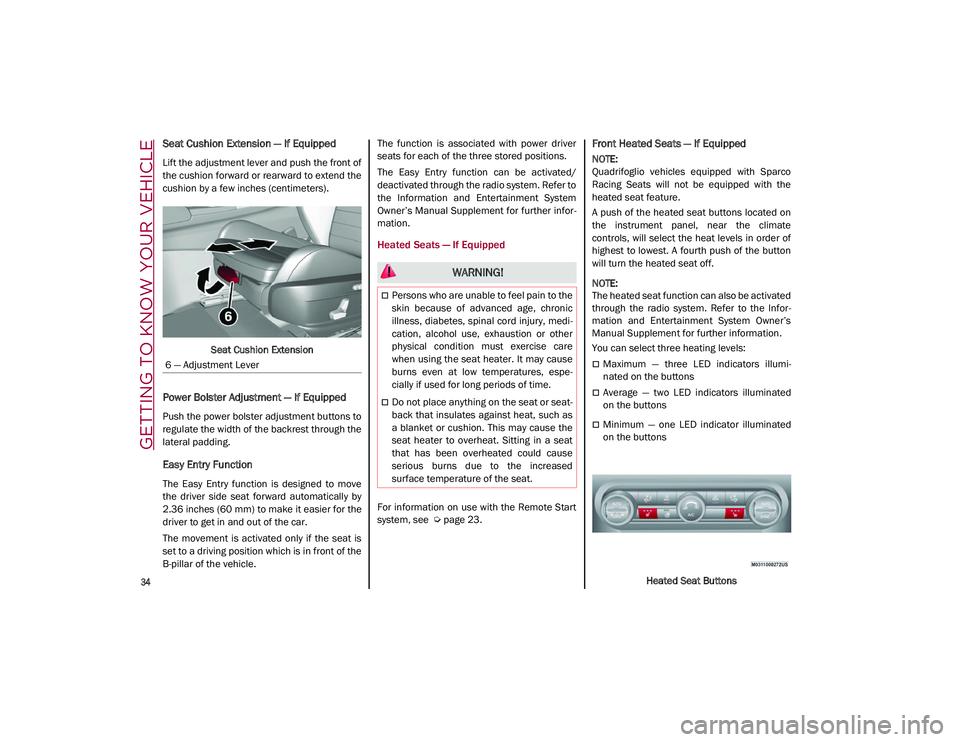
Seat Cushion Extension — If Equipped
Lift the adjustment lever and push the front of
the cushion forward or rearward to extend the
cushion by a few inches (centimeters).Seat Cushion Extension
Power Bolster Adjustment — If Equipped
Push the power bolster adjustment buttons to
regulate the width of the backrest through the
lateral padding.
Easy Entry Function
The Easy Entry function is designed to move
the driver side seat forward automatically by
2.36 inches (60 mm) to make it easier for the
driver to get in and out of the car.
The movement is activated only if the seat is
set to a driving position which is in front of the
B-pillar of the vehicle. The function is associated with power driver
seats for each of the three stored positions.
The Easy Entry function can be activated/
deactivated through the radio system. Refer to
the Information and Entertainment System
Owner’s Manual Supplement for further infor
-
mation.
Heated Seats — If Equipped
For information on use with the Remote Start
system, see
Ú
page 23.
Front Heated Seats — If Equipped
NOTE:
Quadrifoglio vehicles equipped with Sparco
Racing Seats will not be equipped with the
heated seat feature.
A push of the heated seat buttons located on
the instrument panel, near the climate
controls, will select the heat levels in order of
highest to lowest. A fourth push of the button
will turn the heated seat off.
NOTE:
The heated seat function can also be activated
through the radio system. Refer to the Infor -
mation and Entertainment System Owner’s
Manual Supplement for further information.
You can select three heating levels:
Maximum — three LED indicators illumi -
nated on the buttons
Average — two LED indicators illuminated
on the buttons
Minimum — one LED indicator illuminated
on the buttons
Heated Seat Buttons
6 — Adjustment Lever
WARNING!
Persons who are unable to feel pain to the
skin because of advanced age, chronic
illness, diabetes, spinal cord injury, medi
-
cation, alcohol use, exhaustion or other
physical condition must exercise care
when using the seat heater. It may cause
burns even at low temperatures, espe -
cially if used for long periods of time.
Do not place anything on the seat or seat -
back that insulates against heat, such as
a blanket or cushion. This may cause the
seat heater to overheat. Sitting in a seat
that has been overheated could cause
serious burns due to the increased
surface temperature of the seat.
21_GU_OM_EN_USC_t.book Page 34
Page 55 of 280
53
NOTE:
The MAX-DEF function remains active for
approximately three minutes once the engine
coolant reaches the proper temperature.
When the function is on, AUTO mode will deac-
tivate. The only manual operations possible
are adjusting blower speed and turning off the
Rear Window Defrost.
Pushing the button switches off the
MAX-DEF function.
Air Temperature Adjustment
Rotate the driver or passenger Temperature
Adjustment Knob clockwise for warmer
temperatures or counterclockwise for cooler
temperatures. The set temperatures are
shown on the radio system.
Push the SYNC button to sync the driver and
passenger air temperatures.
Rotate the passenger Temperature Adjust -
ment Knob to cancel the SYNC function. This
will set a new passenger side temperature.
Rotate the Temperature Adjustment Knob fully
clockwise to engage the HI (maximum heating)
setting or fully counterclockwise to engage the
LO (maximum cooling) setting. To deactivate
these functions, rotate the Temperature
Adjustment Knob to the desired temperature.
Rear passengers’ temperature is linked to
driver side selection.
AUTO Button
When the AUTO button is pushed (indicator
illuminated), the Climate Control system auto -
matically adjusts the following settings:
Quantity and distribution of air flow in the
passenger compartment
The air conditioner
Air recirculation
Cancels any manual settings
Selecting the AUTO function illuminates the
indicator on the A/C button.
If air distribution or the fan speed is manually
adjusted, the AUTO button indicator will turn
off to indicate that the Climate Control system
is no longer in AUTO mode.
After a manual adjustment, push the AUTO
button to resume the automatic system.
SYNC Button
Push the SYNC button (indicator illuminated)
to sync the passenger side air temperature
with the driver side air temperature.
This function makes temperature regulation
easier when the driver is traveling alone.
Turn the passenger Temperature Adjustment
Knob or push the passenger side Air Distribu-
tion Selection Button to change the passenger
side air temperature and return to separate air
temperature management.
Blower Speed
Turn the Blower Speed Knob to increase or
decrease the blower speed. The speed is
displayed with lighted indicators in the radio
system display.
Maximum fan speed = all indicators illumi -
nated on the radio system display
Minimum fan speed = one indicator illumi -
nated on the radio system display
The fan can be turned off by rotating the
Blower Speed Knob counterclockwise to the
off position (all segments on the radio system
display are turned off).
NOTE:
To restore automatic control of the fan speed,
push the AUTO button.
Air Distribution Selection
Push the Air Distribution Selection button on
the faceplate to change the mode of air distri -
bution.
NOTE:
In AUTO mode, the Climate Controls automati -
cally manage the air distribution. When set
manually, the respective symbols on the radio
system indicate the air distribution setting.
Panel Mode
Air comes from the outlets in the
instrument panel to ventilate the
chest and face. Each of these outlets
can be individually adjusted to direct
21_GU_OM_EN_USC_t.book Page 53
Page 65 of 280
63
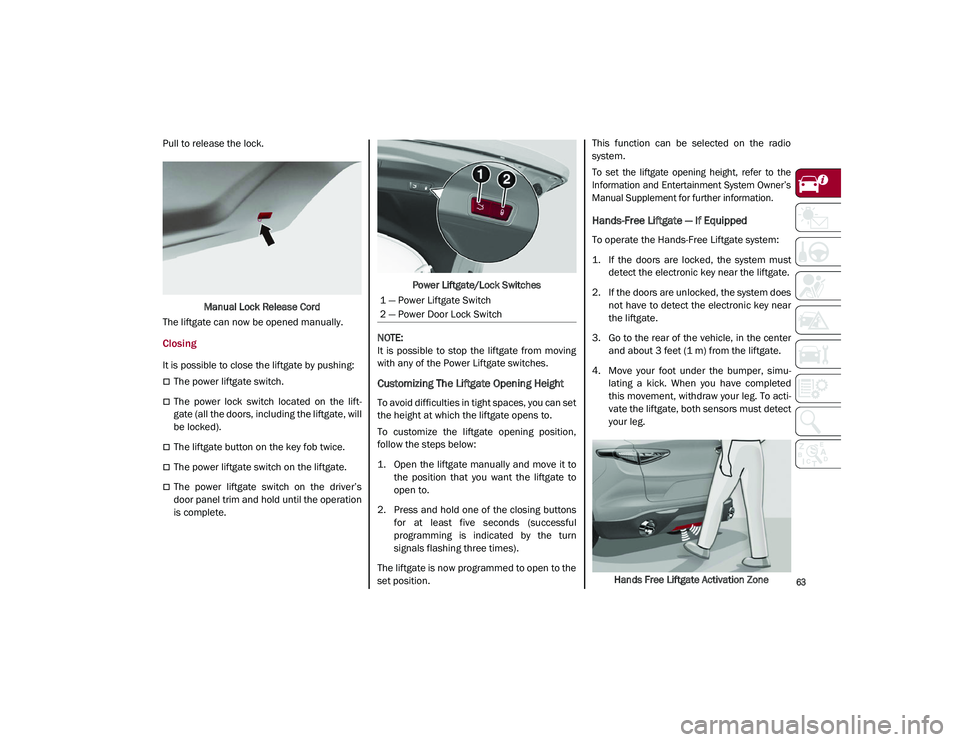
Pull to release the lock.Manual Lock Release Cord
The liftgate can now be opened manually.
Closing
It is possible to close the liftgate by pushing:
The power liftgate switch.
The power lock switch located on the lift -
gate (all the doors, including the liftgate, will
be locked).
The liftgate button on the key fob twice.
The power liftgate switch on the liftgate.
The power liftgate switch on the driver’s
door panel trim and hold until the operation
is complete. Power Liftgate/Lock Switches
NOTE:
It is possible to stop the liftgate from moving
with any of the Power Liftgate switches.
Customizing The Liftgate Opening Height
To avoid difficulties in tight spaces, you can set
the height at which the liftgate opens to.
To customize the liftgate opening position,
follow the steps below:
1. Open the liftgate manually and move it to the position that you want the liftgate to
open to.
2. Press and hold one of the closing buttons for at least five seconds (successful
programming is indicated by the turn
signals flashing three times).
The liftgate is now programmed to open to the
set position. This function can be selected on the radio
system.
To set the liftgate opening height, refer to the
Information and Entertainment System Owner’s
Manual Supplement for further information.
Hands-Free Liftgate — If Equipped
To operate the Hands-Free Liftgate system:
1. If the doors are locked, the system must
detect the electronic key near the liftgate.
2. If the doors are unlocked, the system does not have to detect the electronic key near
the liftgate.
3. Go to the rear of the vehicle, in the center and about 3 feet (1 m) from the liftgate.
4. Move your foot under the bumper, simu -
lating a kick. When you have completed
this movement, withdraw your leg. To acti -
vate the liftgate, both sensors must detect
your leg.
Hands Free Liftgate Activation Zone
1 — Power Liftgate Switch
2 — Power Door Lock Switch
21_GU_OM_EN_USC_t.book Page 63
Page 66 of 280
GETTING TO KNOW YOUR VEHICLE
64
(Continued)
If it is closed, the Hands-Free Liftgate unlocks
and opens completely, and with another
movement of the foot, it stops. A further move-
ment of the foot reverses the direction and
closes the liftgate completely, if you do not
stop it again.
If it is open, with a movement of the foot, the
Hands-Free Liftgate closes completely, and
with another movement of the foot, it stops. If
the liftgate is stopped, another movement of
the foot will reverse the direction and open it
completely.
NOTE:
To conserve the battery charge, avoid
performing this operation repeatedly with the
engine off.
You can activate/deactivate the Hands-Free
Liftgate on the radio system by pushing the
MENU button to select the Main menu, and
selecting the following items:
1. “Settings.”
2. “Doors And Locks.”
3. “Automatic Liftgate Opening.”
Liftgate Initialization
NOTE:
Automatic operation of the liftgate must be
initialized again in case of faulty liftgate opera -
tion. Proceed as follows:
1. Close all the doors and the liftgate.
2. Push the lock button on the key fob.
3. Push the unlock button on the key fob.
Cargo Area Features
Retractable Cargo Area Cover
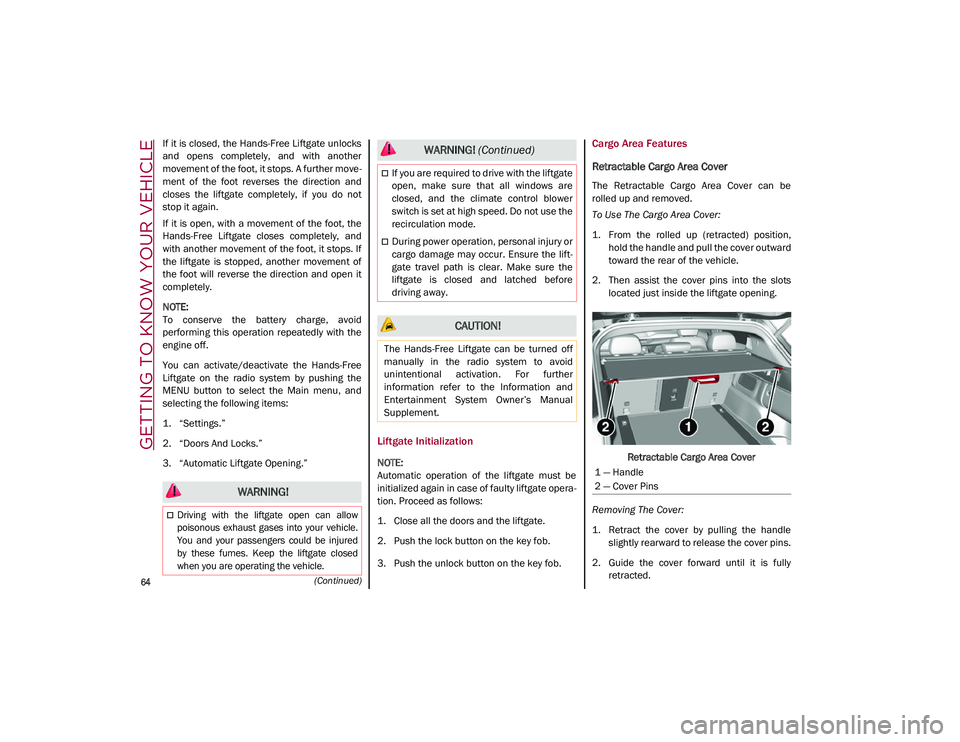
The Retractable Cargo Area Cover can be
rolled up and removed.
To Use The Cargo Area Cover:
1. From the rolled up (retracted) position, hold the handle and pull the cover outward
toward the rear of the vehicle.
2. Then assist the cover pins into the slots located just inside the liftgate opening.
Retractable Cargo Area Cover
Removing The Cover:
1. Retract the cover by pulling the handle slightly rearward to release the cover pins.
2. Guide the cover forward until it is fully retracted.
WARNING!
Driving with the liftgate open can allow
poisonous exhaust gases into your vehicle.
You and your passengers could be injured
by these fumes. Keep the liftgate closed
when you are operating the vehicle.
If you are required to drive with the liftgate
open, make sure that all windows are
closed, and the climate control blower
switch is set at high speed. Do not use the
recirculation mode.
During power operation, personal injury or
cargo damage may occur. Ensure the lift -
gate travel path is clear. Make sure the
liftgate is closed and latched before
driving away.
CAUTION!
The Hands-Free Liftgate can be turned off
manually in the radio system to avoid
unintentional activation. For further
information refer to the Information and
Entertainment System Owner’s Manual
Supplement.
WARNING! (Continued)
1 — Handle
2 — Cover Pins
21_GU_OM_EN_USC_t.book Page 64