2021 ALFA ROMEO GIULIA light
[x] Cancel search: lightPage 87 of 284

85
EMISSIONS INSPECTION AND
MAINTENANCE PROGRAMS
In some localities, it may be a legal require-
ment to pass an inspection of your vehicle's
emissions control system. Failure to pass
could prevent vehicle registration.
For states that require an Inspection
and Maintenance (I/M), this check
verifies the Malfunction Indicator
Light (MIL) is functioning and is not
on when the engine is running, and that the
OBD II system is ready for testing.
Normally, the OBD II system will be ready. The
OBD II system may not be ready if your vehicle
was recently serviced, recently had a depleted
battery or a battery replacement. If the OBD II
system should be determined not ready for the
I/M test, your vehicle may fail the test.
Your vehicle has a simple ignition actuated
test, which you can use prior to going to the
test station. To check if your vehicle's OBD II
system is ready, you must do the following:
1. Cycle the ignition switch to the ON posi -
tion, but do not crank or start the engine.
NOTE:
If you crank or start the engine, you will have to
start this test over. 2. As soon as you cycle the ignition switch to
the ON position, you will see the Malfunc -
tion Indicator Light (MIL) symbol come on
as part of a normal bulb check.
3. Approximately 15 seconds later, one of two things will happen:
• The MIL will flash for about 10 seconds
and then return to being fully illumi-
nated until you turn OFF the ignition or
start the engine. This means that your
vehicle's OBD II system is not ready and
you should not proceed to the I/M
station.
• The MIL will not flash at all and will
remain fully illuminated until you place the ignition in the off position or start
the engine. This means that your
vehicle's OBD II system is ready and you
can proceed to the I/M station. If your
OBD II system is
not ready, you should
see an authorized dealer or repair facility. If
your vehicle was recently serviced or had a
battery failure or replacement, you may need
to do nothing more than drive your vehicle as
you normally would in order for your OBD II
system to update. A recheck with the above
test routine may then indicate that the system
is now ready .
Regardless of whether your vehicle's OBD II
system is ready or not, if the MIL is illuminated
during normal vehicle operation you should
have your vehicle serviced before going to the
I/M station. The I/M station can fail your
vehicle because the MIL is on with the engine
running.
21_GA_OM_EN_USC_t.book Page 85
Page 92 of 284
STARTING AND OPERATING
90
100 to 300 miles (160 to 483 km):
Press the accelerator pedal slowly and not
more than halfway to avoid rapid accelera-
tion in lower gears (FIRST to THIRD gears).
Avoid aggressive braking.
Drive with the engine speed less than
5,000 RPM.
Maintain vehicle speed below 70 mph
(112 km/h) and observe local speed limits.
300 to 500 miles (483 to 805 km):
Exercise the full engine RPM range, shifting
manually (paddles or gear shift) at higher
RPM when possible.
Do not perform sustained operation with
the accelerator pedal at wide open throttle.
Maintain vehicle speed below 85 mph
(136 km/h) and observe local speed limits.
For the first 1,500 miles (2,414 km):
Do not participate in track events, sport
driving schools, or similar activities during
the first 1,500 miles (2,414 km).
NOTE:
Monitor engine oil with every refueling and add
if necessary. Oil and fuel consumption may be
higher through the first oil change interval.
ELECTRIC PARK BRAKE (EPB)
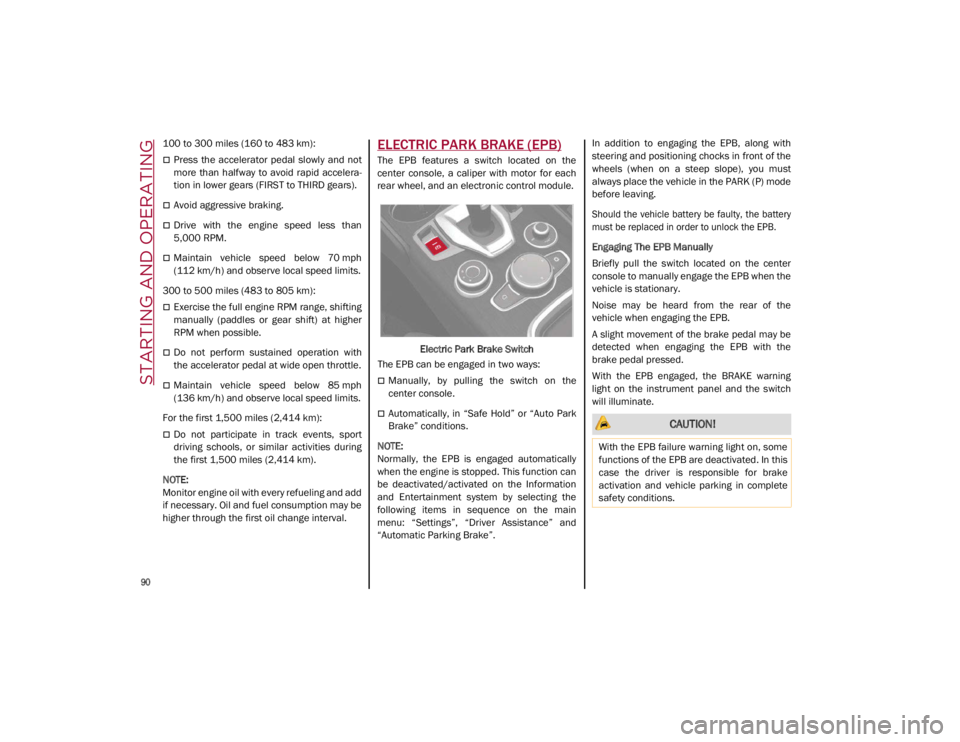
The EPB features a switch located on the
center console, a caliper with motor for each
rear wheel, and an electronic control module.
Electric Park Brake Switch
The EPB can be engaged in two ways:
Manually, by pulling the switch on the
center console.
Automatically, in “Safe Hold” or “Auto Park
Brake” conditions.
NOTE:
Normally, the EPB is engaged automatically
when the engine is stopped. This function can
be deactivated/activated on the Information
and Entertainment system by selecting the
following items in sequence on the main
menu: “Settings”, “Driver Assistance” and
“Automatic Parking Brake”. In addition to engaging the EPB, along with
steering and positioning chocks in front of the
wheels (when on a steep slope), you must
always place the vehicle in the PARK (P) mode
before leaving.
Should the vehicle battery be faulty, the battery
must be replaced in order to unlock the EPB.
Engaging The EPB Manually
Briefly pull the switch located on the center
console to manually engage the EPB when the
vehicle is stationary.
Noise may be heard from the rear of the
vehicle when engaging the EPB.
A slight movement of the brake pedal may be
detected when engaging the EPB with the
brake pedal pressed.
With the EPB engaged, the BRAKE warning
light on the instrument panel and the switch
will illuminate. CAUTION!
With the EPB failure warning light on, some
functions of the EPB are deactivated. In this
case the driver is responsible for brake
activation and vehicle parking in complete
safety conditions.
21_GA_OM_EN_USC_t.book Page 90
Page 93 of 284
91
(Continued)
If, under exceptional circumstances, the use of
the brake is required with the vehicle in motion,
keep the switch on the center console pulled as
long as the brake action is necessary.
The BRAKE warning light may turn on with the
hydraulic system temporarily unavailable; in
this case braking is controlled by the motors.
The brake lights will also automatically turn on
in the same way as for normal braking with the
use of the brake pedal.
Release the switch on the center console to
stop the braking action with the vehicle in
motion.
If, through this procedure, the vehicle is
braked until a speed below 1.9 mph (3 km/h)
is reached and the switch is kept pulled, the
parking brake will definitively engage.
NOTE:
Driving the vehicle with the EPB engaged, or
using it several times to slow down the vehicle,
may cause severe damage to the braking
system.Disengaging The EPB Manually
In order to manually release the parking brake,
the ignition should be in the ACC mode. Press
the brake pedal, and then push the switch on
the center console briefly.
Noise may be heard from the rear of the
vehicle, and a slight movement of the brake
pedal may be detected during disengagement.
After disengaging the Electric Park Brake, the
BRAKE warning light on the instrument panel
and the light on the switch will turn off.
If the BRAKE warning light on the instrument
panel remains on with the EPB disengaged,
this indicates a fault: in this case, contact an
authorized dealer.
WARNING!
Never leave children alone in a vehicle, or
with access to an unlocked vehicle.
Allowing children to be in a vehicle unat
-
tended is dangerous for a number of
reasons. A child or others could be seri -
ously or fatally injured. Children should be
warned not to touch the parking brake,
brake pedal or the gear selector.
Do not leave the key fob in or near the
vehicle or in a location accessible to chil -
dren. A child could operate power windows,
other controls, or move the vehicle.
Be sure the parking brake is fully disen -
gaged before driving; failure to do so can
lead to brake failure and a collision.
Always fully apply the parking brake when
leaving your vehicle, or it may roll and
cause damage or injury.
CAUTION!
Never use gear position PARK (P) instead of
the EPB. Always engage the EPB when
parking the vehicle to prevent injury or
damage caused by the unexpected
movement of the vehicle.
WARNING! (Continued)
21_GA_OM_EN_USC_t.book Page 91
Page 94 of 284
STARTING AND OPERATING
92
(Continued)
Electric Park Brake (EPB) Operating Modes
The EPB may operate as follows:
“Dynamic Operating Mode”: this mode is
activated by pulling the switch repeatedly
while driving.
“Static Engagement and Release Mode”:
with the vehicle stationary, the EPB can be
activated by pulling the switch on the center
console once. Push the switch and the
brake pedal at the same time to disengage
the brake.
“Drive Away Release”: the EPB will automat-
ically disengage with the driver side seat
belt fastened and the detection of an action
performed by the driver to move the vehicle
(forward gear or reverse gear). This feature
can be turned on or off in the Information
and Entertainment System.
NOTE:
If the car is equipped with carbon-ceramic
brake discs, it is necessary to fasten the seat
belts or turn off the EPB before starting to
avoid damages to the ceramic brake discs.
“Safe Hold”: if the vehicle speed is lower
than 1.9 mph (3 km/h), the gear selector is
not in PARK (P) position and the driver's
intention of leaving the vehicle is detected,
the EPB will automatically engage to hold
the vehicle in safety conditions.
“Auto Park Brake”: if the vehicle speed is
below 1.9 mph (3 km/h), the EPB will auto -
matically engage when the gear selector is
in PARK (P) position. The light on the switch
located on the center console switches on
together with the BRAKE warning light on
the instrument panel when the parking
brake is engaged and applied to the wheels.
Each automatic parking brake engagement
can be canceled by pressing the switch on
the center console and at the same time
moving the gear selector for the transmis -
sion to position PARK (P).
Safe Hold
Safe Hold is a safety function that automati -
cally engages the Electric Park Brake in the
event of a dangerous condition for the vehicle.
The Electric Park Brake engages automatically
to prevent vehicle movement if:
The vehicle speed is below 2 mph (3 km/h).
A transmission operating mode different
from PARK (P) is activated.
The driver's seat belt is not fastened.
The driver side door is open.
No attempts to apply pressure on the brake
pedal have been detected.
The vehicle is parked on roads with a slope
of more than 4%. The “Safe Hold” function can be temporarily
disabled by pushing the switch located on the
center console and the brake pedal at the
same time, with the vehicle stationary and the
driver side door open.
Once disabled, the function will activate again
when the vehicle speed reaches 12 mph
(20 km/h) or the ignition is cycled to OFF and
then to ACC.
AUTOMATIC TRANSMISSION
The vehicle is equipped with an electronically
controlled 8-speed automatic transmission
where gear shifting automatically takes place,
depending on the vehicle usage instanta
-
neous parameters (vehicle speed, grade, and
accelerator pedal position).
Manual gear shifting can still occur thanks to
the “sequential mode” position for the gear
selector.
WARNING!
It is dangerous to shift out of PARK or
NEUTRAL if the engine speed is higher
than idle speed. If your foot is not firmly
pressing the brake pedal, the vehicle
could accelerate quickly forward or in
reverse. You could lose control of the
vehicle and hit someone or something.
Only shift into gear when the engine is
idling normally and your foot is firmly
pressing the brake pedal.
21_GA_OM_EN_USC_t.book Page 92
Page 96 of 284

STARTING AND OPERATING
94
Gear Selector
The gear functioning is controlled by the gear
selector, which can assume the following posi-
tions:
P = PARK
R = REVERSE
N = NEUTRAL
D = DRIVE (automatic forward speed)
AutoStick : using + manually shift to higher
gear; – to manually shift to lower gear
The positions diagram is illustrated on the top
of the gear selector.
Gear Selector Center Console
The letter corresponding to the mode selected
on the gear selector lights up and appears on
the instrument cluster display. To select a mode, move the gear selector
forward or backwards, together with pressing
the brake pedal and gear selector button to
engage REVERSE (R).
Gear Selector
The gear selector is a joystick style shifting
mechanism which returns to the center posi -
tion automatically. It can be pushed forward
twice and rearward twice, based on the
starting condition.
The PARK (P) mode can be enabled/disabled
by pushing the PARK (P) button.
To transition the vehicle into REVERSE (R)
mode from DRIVE (D) mode, or into DRIVE (D)
mode from REVERSE (R) mode, it is necessary
to move the gear selector by pushing the gear
selector button. When using AutoStick to change gears, move
the gear selector left from DRIVE (D) and then
forward toward the - symbol or backward
toward the + symbol and the gear is changed.
To shift out of PARK (P), or to pass from posi
-
tion NEUTRAL (N) to position DRIVE (D) or
REVERSE (R), the vehicle must be moving at a
low speed or stopped, and the brake pedal
must also be pressed.
NOTE:
DO NOT accelerate while shifting from posi -
tion PARK (P) or NEUTRAL (N) to another
position.
After selecting a gear, wait a few seconds
before accelerating. This precaution is
particularly important with a engine cold.
Transmission Operating Modes
PARK (P)
The transmission is locked in this mode. The
engine can be started in this mode.
NOTE:
Never try to engage PARK (P) mode when the
vehicle is moving. Before leaving the vehicle,
make sure this mode is engaged (letter P
shown on the display and gear selector) and
that the parking brake is engaged.
When parking on a flat surface, first engage
the PARK (P) mode and then engage the Elec -
tric Park Brake.
1 — Gear Selector
2 — PARK (P) Button
3 — Gear Selector Button
21_GA_OM_EN_USC_t.book Page 94
Page 99 of 284

97
Automatic Transmission Limp Home Mode
Transmission function is monitored electroni-
cally for abnormal conditions. If a condition is
detected that could result in transmission
damage, Transmission Limp Home Mode is
activated.
In this condition, the transmission stays in
FOURTH gear, regardless of the selected gear.
Positions PARK (P), REVERSE (R) and
NEUTRAL (N) still work.
The symbol might light up in the instrument
cluster.
Temporary failure
In the event of a momentary problem, the
transmission can be reset to regain all forward
gears by performing the following steps:
1. Stop the vehicle.
2. Shift the transmission into PARK (P), if possible. If not, shift the transmission to
NEUTRAL (N).
3. Push and hold the ignition until the engine turns off.
4. Wait for about 10 seconds, then restart the engine.
5. Shift into the desired gear range. If the problem is no longer detected, the trans -
mission will return to normal operation.
NOTE:
Even if the transmission can be reset, we
recommend that you visit an authorized dealer
at your earliest possible convenience. An
authorized dealer has diagnostic equipment to
determine if the problem could reoccur. If the
transmission cannot be reset, service is
required at an authorized dealer.
Brake/Transmission Shift Interlock (BTSI)
System
This vehicle is equipped with a BTSI system
that holds the gear selector in PARK (P) unless
the brakes are applied.
This system prevents you from moving the
gear selector from position PARK (P) unless
the brakes are applied.
To shift the transmission out of PARK (P), the
ignition must be placed in the ON/RUN mode
(engine running or not) and the brake pedal
must be pressed.
Brake/Transmission Shift Interlock Disabling
Only if strictly necessary (e.g. pushing the
vehicle, conveyor vehicle washing systems)
inhibit the automatic activation of PARK (P)
mode when stopping the engine, or proceed
as described below:
1. Vehicle at a standstill.
2. NEUTRAL (N) mode activated.
3. Push the ignition button for at least three
seconds. The automatic parking brake engagement
function when the engine is stopped can also
be deactivated on the Information and Enter
-
tainment system by selecting the following
functions on the main menu: “Settings”,
“Driver Assistance” and “Automatic Parking
Brake”.
Important Notes
Failure to comply with what is reported below
may damage the transmission:
Shift into PARK (P) mode only with the
vehicle at a standstill.
Select REVERSE (R) mode, or pass from
REVERSE to another mode only with the
vehicle at a standstill and engine idling.
Do not change between PARK (P), REVERSE
(R), NEUTRAL (N) or DRIVE (D) modes with
engine running at a speed above idling.
Before activating any transmission oper -
ating mode, fully press the brake pedal.
NOTE:
The unexpected movement of the vehicle can
injure the occupants or people nearby. Do not
leave the vehicle with the engine running:
before getting out of the passenger compart -
ment always engage the Electric Park Brake,
select the PARK (P) mode and stop the engine.
21_GA_OM_EN_USC_t.book Page 97
Page 101 of 284
99
ALFA DNA / PRO SELECTOR
Alfa DNA System
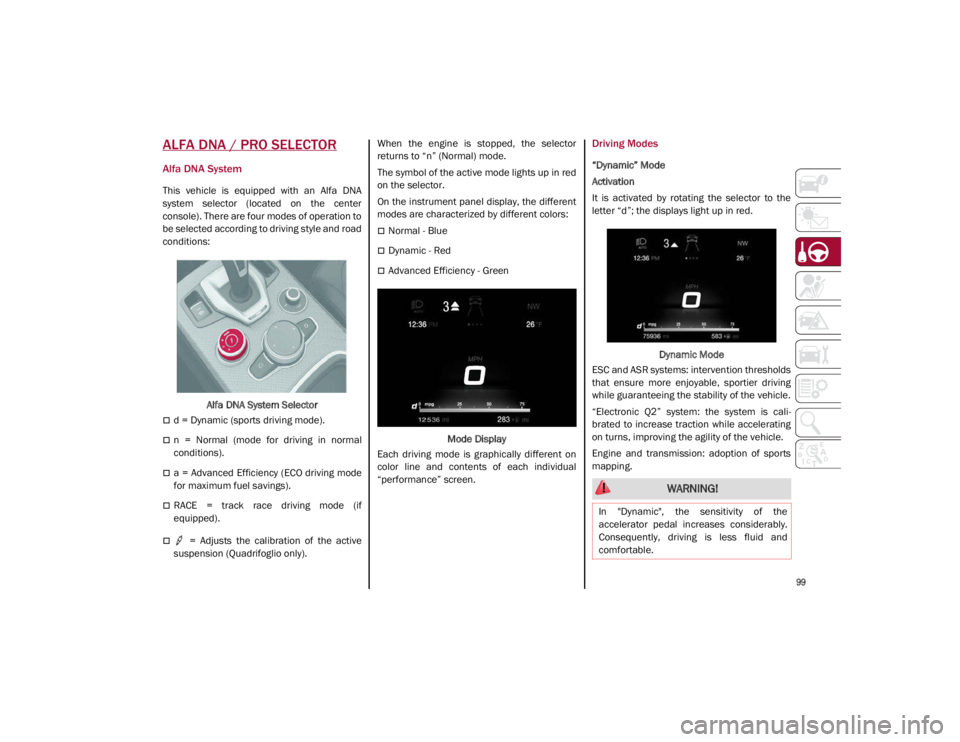
This vehicle is equipped with an Alfa DNA
system selector (located on the center
console). There are four modes of operation to
be selected according to driving style and road
conditions:Alfa DNA System Selector
d = Dynamic (sports driving mode).
n = Normal (mode for driving in normal
conditions).
a = Advanced Efficiency (ECO driving mode
for maximum fuel savings).
RACE = track race driving mode (if
equipped).
= Adjusts the calibration of the active
suspension (Quadrifoglio only). When the engine is stopped, the selector
returns to “n” (Normal) mode.
The symbol of the active mode lights up in red
on the selector.
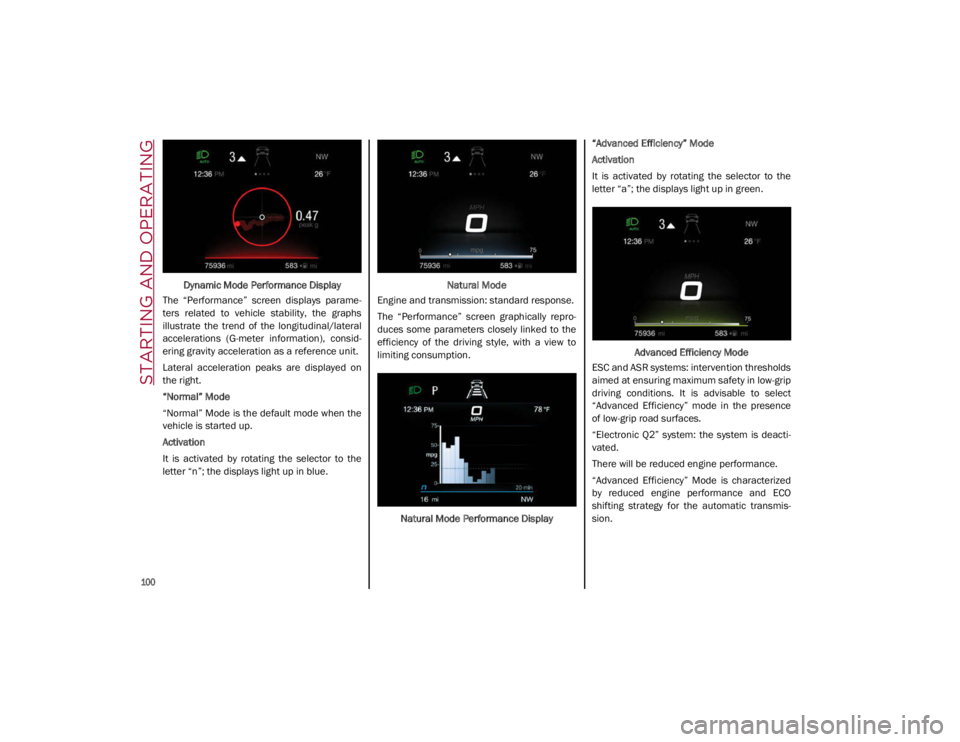
On the instrument panel display, the different
modes are characterized by different colors:
Normal - Blue
Dynamic - Red
Advanced Efficiency - Green
Mode Display
Each driving mode is graphically different on
color line and contents of each individual
“performance” screen.
Driving Modes
“Dynamic” Mode
Activation
It is activated by rotating the selector to the
letter “d”; the displays light up in red.
Dynamic Mode
ESC and ASR systems: intervention thresholds
that ensure more enjoyable, sportier driving
while guaranteeing the stability of the vehicle.
“Electronic Q2” system: the system is cali -
brated to increase traction while accelerating
on turns, improving the agility of the vehicle.
Engine and transmission: adoption of sports
mapping.
WARNING!
In "Dynamic", the sensitivity of the
accelerator pedal increases considerably.
Consequently, driving is less fluid and
comfortable.
21_GA_OM_EN_USC_t.book Page 99
Page 102 of 284
STARTING AND OPERATING
100
Dynamic Mode Performance Display
The “Performance” screen displays parame -
ters related to vehicle stability, the graphs
illustrate the trend of the longitudinal/lateral
accelerations (G-meter information), consid -
ering gravity acceleration as a reference unit.
Lateral acceleration peaks are displayed on
the right.
“Normal” Mode
“Normal” Mode is the default mode when the
vehicle is started up.
Activation
It is activated by rotating the selector to the
letter “n”; the displays light up in blue. Natural Mode
Engine and transmission: standard response.
The “Performance” screen graphically repro -
duces some parameters closely linked to the
efficiency of the driving style, with a view to
limiting consumption.
Natural Mode Performance Display “Advanced Efficiency” Mode
Activation
It is activated by rotating the selector to the
letter “a”; the displays light up in green.
Advanced Efficiency Mode
ESC and ASR systems: intervention thresholds
aimed at ensuring maximum safety in low-grip
driving conditions. It is advisable to select
“Advanced Efficiency” mode in the presence
of low-grip road surfaces.
“Electronic Q2” system: the system is deacti -
vated.
There will be reduced engine performance.
“Advanced Efficiency” Mode is characterized
by reduced engine performance and ECO
shifting strategy for the automatic transmis -
sion.
21_GA_OM_EN_USC_t.book Page 100