2021 ALFA ROMEO GIULIA fuel pressure
[x] Cancel search: fuel pressurePage 140 of 284

STARTING AND OPERATING
138
TRAILER TOWING
Trailer towing is not recommended for this
vehicle.
SUGGESTIONS FOR DRIVING
Saving Fuel
Below are some suggestions which may help
you save fuel and lower the amount of harmful
emissions released into the atmosphere.
Vehicle Maintenance
Checks and operations should be carried out
in accordance with the Maintenance Plan
Ú
page 204.
Tires
Check the tire pressures at least once every
four weeks: if the pressure is too low,
consumption levels increase as resistance to
rolling is higher.
Unnecessary Loads
Do not travel with an overloaded trunk. The
weight of the vehicle and its arrangement
greatly affect fuel consumption and stability.
Electric Devices
Use electrical systems only for the amount of
time needed. The rear window defroster, addi -
tional headlights, windshield wipers and
heater blower fan require a considerable
amount of energy; increasing the current
uptake increases fuel consumption (by up to
+25% when city driving). Climate Control System
Using the climate control system will increase
consumption: use standard ventilation when
the temperature outside permits.
Devices for Aerodynamic Control
The use of non-certified devices for aerody
-
namic control may adversely affect air drag
and consumption levels.
Driving Style
Starting
Do not warm up the engine at low or high revs
when the vehicle is stationary; this causes the
engine to warm up more slowly, thereby
increasing fuel consumption and emissions. It
is therefore advisable to drive off immediately,
slowly, avoiding high speeds: by doing this the
engine will warm up more quickly.
Unnecessary Actions
Avoid revving up when starting at traffic lights
or before stopping the engine. This action is
unnecessary and causes increased fuel
consumption and pollution.
Gear Selection
Use a high gear when traffic and road condi -
tions allow it. Using a low gear for faster accel -
eration will increase fuel consumption.
Improper use of a high gear increases
consumption, emissions and engine wear. Max. Speed
Fuel consumption considerably increases as
speed increases. Maintain a constant speed,
avoiding unnecessary braking and accelera
-
tion, which cost in terms of both fuel consump -
tion and emissions.
Acceleration
Accelerating violently severely affects consump -
tion and emissions: acceleration should be
gradual and should not exceed the maximum
torque.
Conditions Of Use
Cold Starting
Short trips and frequent cold starts will not
allow the engine to reach optimum operating
temperature. This results in a significant
increase in consumption levels (from +15 to
+30% in city driving) and emissions.
Traffic And Road Conditions
High fuel consumption is caused by heavy
traffic, for instance when traveling in traffic
with frequent use of low gears or in cities with
many traffic lights. Winding mountain roads
and rough road surfaces also adversely affect
consumption.
Stops In Traffic
During prolonged stops (e.g. railway cross -
ings), turn off the engine.
21_GA_OM_EN_USC_t.book Page 138
Page 160 of 284

SAFETY
158
TPMS Temporarily Disabled:
TPMS Check Message
When a system fault is detected, the Tire Pres-
sure Monitoring System Warning Light will
flash on and off for 75 seconds, and then
remain on solid. The system fault will also
sound a chime. If the ignition is cycled, this
sequence will repeat, provided that the system
fault still exists. The Tire Pressure Monitoring
System Warning Light will turn off when the
fault condition no longer exists. A system fault
can occur due to any of the following:
Jamming due to electronic devices or
driving next to facilities emitting the same
radio frequencies as the TPMS sensors.
Installing some form of aftermarket window
tinting that affects radio wave signals.
Packed snow or ice around the wheels or
wheel housings.
Using tire chains on the vehicle.
Using wheels/tires not equipped with TPMS
sensors.
After the punctured tire has been repaired
with the original tire sealant contained in the
Tire Kit, the previous condition must be
restored so that the Warning Light is off
during normal driving. TPMS Deactivation
The TPMS can be deactivated by replacing all
four wheel and tire assemblies (road tires)
with wheel and tire assemblies that do not
have TPMS sensors, such as when installing
winter wheel and tire assemblies on your
vehicle.
To deactivate the TPMS, first replace all four
wheel and tire assemblies (road tires) with
tires not equipped with Tire Pressure Moni
-
toring System sensors. Then, drive the vehicle
for 20 minutes above 15 mph (24 km/h). The
TPMS will chime, the TPMS Warning Light will
flash on and off for 75 seconds and then
remain on. The instrument cluster will display
the “SERVICE TPM SYSTEM” message and
then display dashes (--) in place of the pres -
sure values.
Beginning with the next ignition switch cycle,
the TPMS will no longer chime or display the
“SERVICE TPM SYSTEM” message in the
instrument cluster. Instead, dashes (--) will
remain in place of the pressure values.
To reactivate the TPMS, replace all four wheel
and tire assemblies (road tires) with tires
equipped with TPMS sensors. Then, drive the
vehicle for up to 20 minutes above 15 mph
(24 km/h). The TPMS will chime, the TPMS
Warning Light will flash on and off for 75
seconds and then turn off. The instrument cluster will display the “SERVICE TPM
SYSTEM” message and then display pressure
values in place of the dashes. On the next igni
-
tion switch cycle the "SERVICE TPM SYSTEM"
message will no longer be displayed, as long
as no system fault exists.
NOTE:
The TPMS is not intended to replace normal
tire care and maintenance, or to provide
warning of a tire failure or condition.
The TPMS should not be used as a tire pres -
sure gauge while adjusting your tire pressure.
Driving on a significantly underinflated tire will
cause the tire to overheat, and can lead to tire
failure. Underinflation also reduces fuel effi -
ciency and tire tread life, and may affect the
vehicle’s handling and stopping ability.
The TPMS is not a substitute for proper tire
maintenance, and it is the driver’s responsi -
bility to maintain correct tire pressure using
an accurate tire pressure gauge, even if
underinflation has not reached the level to
trigger illumination of the Tire Pressure
Monitoring System Warning Light.
Seasonal temperature changes will affect
tire pressure, and the TPMS will monitor the
actual tire pressure in the tire
Ú
page 273.
21_GA_OM_EN_USC_t.book Page 158
Page 190 of 284

SAFETY
188
(Continued)
Periodic Safety Checks You Should Make
Outside The Vehicle
Tires
Examine tires for excessive tread wear and
uneven wear patterns. Check for stones, nails,
glass, or other objects lodged in the tread or
sidewall. Inspect the tread for cuts and cracks.
Inspect sidewalls for cuts, cracks, and bulges.
Check the wheel nuts for tightness. Check the
tires (including spare) for proper cold inflation
pressure.
Lights
Have someone observe the operation of brake
lights and exterior lights while you work the
controls. Check turn signal and high beam
indicator lights on the instrument panel.
Door Latches
Check for proper closing, latching, and locking.
Fluid Leaks
Check area under the vehicle after overnight
parking for fuel, coolant, oil, or other fluid
leaks. Also, if gasoline fumes are detected or if
fuel or brake fluid leaks are suspected the
cause should be located and corrected imme-
diately.
ALWAYS REMOVE THE EXISTING FLOOR
MAT FROM THE VEHICLE before
installing any other floor mat. NEVER
install or stack an additional floor mat on
top of an existing floor mat.
ONLY install floor mats designed to fit your
vehicle. NEVER install a floor mat that
cannot be properly attached and secured
to your vehicle. If a floor mat needs to be
replaced, only use a FCA approved floor
mat for the specific make, model, and
year of your vehicle.
ONLY use the driver’s side floor mat on the
driver’s side floor area. To check for inter -
ference, with the vehicle properly parked
with the engine off, fully depress the
accelerator, the brake, and the clutch
pedal (if present) to check for interfer -
ence. If your floor mat interferes with the
operation of any pedal, or is not secure to
the floor, remove the floor mat from the
vehicle and place the floor mat in your
trunk.
ONLY use the passenger’s side floor mat
on the passenger’s side floor area.
WARNING! (Continued)
ALWAYS make sure objects cannot fall or
slide into the driver’s side floor area when
the vehicle is moving. Objects can become
trapped under accelerator, brake, or
clutch pedals and could cause a loss of
vehicle control.
NEVER place any objects under the floor
mat (e.g., towels, keys, etc.). These
objects could change the position of the
floor mat and may cause interference with
the accelerator, brake, or clutch pedals.
If the vehicle carpet has been removed
and re-installed, always properly attach
carpet to the floor and check the floor mat
fasteners are secure to the vehicle carpet.
Fully depress each pedal to check for
interference with the accelerator, brake,
or clutch pedals then re-install the floor
mats.
It is recommended to only use mild soap
and water to clean your floor mats. After
cleaning, always check your floor mat has
been properly installed and is secured to
your vehicle using the floor mat fasteners
by lightly pulling mat.
WARNING! (Continued)
21_GA_OM_EN_USC_t.book Page 188
Page 206 of 284

204
SERVICING AND MAINTENANCE
Correct servicing permits the performance of
the vehicle to be maintained over time, as well
as limited running costs and safeguarding the
efficiency of the safety systems.
This chapter explains how.
SCHEDULED SERVICING
Correct servicing is crucial for guaranteeing a
long life for the vehicle under the best condi-
tions.
For this reason, Alfa Romeo has planned a
series of checks and services for your vehicle
at fixed intervals based on distance and time,
as described in the Scheduled Servicing Plan.
Before each service, it is always necessary to
carefully follow the instructions in the Sched -
uled Servicing Plan (e.g. periodically check
level of fluids, tire pressure, etc.).
Scheduled Servicing is offered by an autho -
rized dealer according to a set time schedule.
If, during each operation, in addition to the
ones scheduled, the need arises for further
replacements or repairs, these may be carried
out with the owner’s explicit consent only.
NOTE:
Scheduled Servicing intervals are required by
FCA US LLC. Failure to have them carried out
may invalidate the New Vehicle Limited
Warranty.
You are advised to inform an authorized
dealer of any small operating irregularities
without waiting for the next service.
Periodic Checks
Every month or every 600 miles (1,000 km) or
before long trips check and, if necessary, top
off:
Engine coolant level.
Brake fluid level (if insufficient, see an
authorized dealer as soon as possible).
Windshield washer fluid level.
Tire inflation pressure and condition.
Operation of lighting system (headlights,
direction indicators, hazard warning lights,
etc.).
Operation of windshield washing/wiping
system and positioning/wear of wiper
blades.
Inspect the CV/Universal joints.
Oil consumption of the engine depends on
conditions and driving style. For this reason,
the engine oil level must be checked every
1,860 miles (3,000 km), and top off if neces -
sary
Ú
page 213.
Heavy Usage Of The Vehicle
If the vehicle is used under one of the following
conditions:
Dusty roads.
Short, repeated journeys less than 4 miles
(7 km) at sub-zero outside temperatures.
Engine often idling or driving long distances
at low speeds or long periods of inactivity.
In the event of a long period of inactivity.
The following checks must be carried out more
often than indicated in the Scheduled
Servicing Plan:
Check cleanliness of hood and trunk locks,
cleanliness and lubrication of linkage.
Visually inspect conditions of: engine, trans -
mission, pipes and hoses (exhaust/fuel
system/brakes) and rubber elements
(sleeves/bushes, etc.).
Check battery charge and battery fluid level
(electrolyte).
Visually inspect conditions of the accessory
drive belts.
Check and, if necessary, change engine oil
and replace oil filter.
Check and, if necessary, replace cabin air
filter.
Check and, if necessary, replace engine air
cleaner.
Severe Duty All Models
Vehicles that are operated in a dusty and
off-road environment, or predominately at idle
or very low engine RPM are known as Severe
Duty vehicles. It is recommended that you
change engine oil at 4,000 miles (6,500 km)
or 350 hours of engine run time.
21_GA_OM_EN_USC_t.book Page 204
Page 207 of 284

205
Maintenance Plan — 2.0L Engine
Thousands of miles102030405060708090100110120130140150
Years123456789101112131415
Thousands of kilometers163248648096112128144160176192208224240
SOS back up battery replacement (if equipped)1●●●
Check battery charge status with the proper
instrument
●●●●●●●●●●●●●●●
Check tire condition/wear and adjust pressure, if
necessary. Check the tire repair kit recharge
condition and expiration date
●●●●●●●●●●●●●●●
Check operation of lighting system (headlights,
direction indicators, hazard warning lights, trunk lid,
passenger compartment, glove compartment,
instrument panel warning lights, etc.)
●●●●●●●●●●●●●●●
Check and, if necessary, top up fluid levels
●●●●●●●●●●●●●●●
Check engine control system operation (via
diagnostic tool) and, if equipped, engine oil
degradation
2●●●●●●●●●●●●●●●
Visually inspect conditions of: exterior bodywork,
underbody protection, pipes and hoses (exhaust, fuel
system, brakes), rubber elements (sleeves, bushes,
etc.)
●●●●●●●
Check position/wear of front windshield wiper blade●●●●●●●●
Check operation of the windshield wiper/washer
system and adjust nozzles, if necessary
●●●●●●●●
21_GA_OM_EN_USC_t.book Page 205
Page 210 of 284
SERVICING AND MAINTENANCE
208
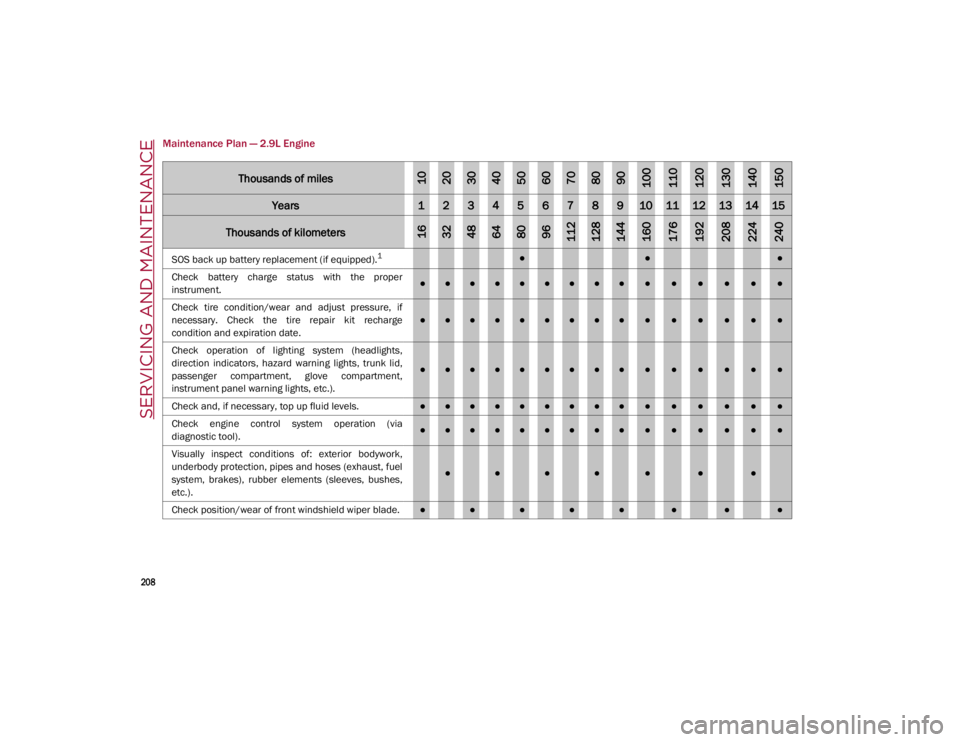
Maintenance Plan — 2.9L Engine
Thousands of miles102030405060708090100110120130140150
Years123456789101112131415
Thousands of kilometers163248648096112128144160176192208224240
SOS back up battery replacement (if equipped).1●●●
Check battery charge status with the proper
instrument.
●●●●●●●●●●●●●●●
Check tire condition/wear and adjust pressure, if
necessary. Check the tire repair kit recharge
condition and expiration date.
●●●●●●●●●●●●●●●
Check operation of lighting system (headlights,
direction indicators, hazard warning lights, trunk lid,
passenger compartment, glove compartment,
instrument panel warning lights, etc.).
●●●●●●●●●●●●●●●
Check and, if necessary, top up fluid levels.
●●●●●●●●●●●●●●●
Check engine control system operation (via
diagnostic tool).
●●●●●●●●●●●●●●●
Visually inspect conditions of: exterior bodywork,
underbody protection, pipes and hoses (exhaust, fuel
system, brakes), rubber elements (sleeves, bushes,
etc.).
●●●●●●●
Check position/wear of front windshield wiper blade.●●●●●●●●
21_GA_OM_EN_USC_t.book Page 208
Page 243 of 284

241
(Continued)
Tires — General Information
Tire Pressure
Proper tire inflation pressure is essential to
the safe and satisfactory operation of your
vehicle. Four primary areas are affected by
improper tire pressure:
Safety
Fuel Economy
Tread Wear
Ride Comfort and Vehicle Stability
Safety Both underinflation and overinflation affect
the stability of the vehicle and can produce a
feeling of sluggish response or over respon
-
siveness in the steering.
NOTE:
Unequal tire pressures from side to side
may cause erratic and unpredictable
steering response.
Unequal tire pressure from side to side may
cause the vehicle to drift left or right.
Fuel Economy
Underinflated tires will increase tire rolling
resistance resulting in higher fuel consump -
tion.
Tread Wear
Improper cold tire inflation pressures can
cause abnormal wear patterns and reduced
tread life, resulting in the need for earlier tire
replacement. Ride Comfort And Vehicle Stability
Proper tire inflation contributes to a comfort
-
able ride. Overinflation produces a jarring and
uncomfortable ride.
Tire Inflation Pressures
The proper cold tire inflation pressure is listed
on the driver's side B-pillar or rear edge of the
driver's side door.
At least once a month:
Check and adjust tire pressure with a good
quality pocket-type pressure gauge. Do not
make a visual judgment when determining
proper inflation. Tires may look properly
inflated even when they are under-inflated.
Inspect tires for signs of tire wear or visible
damage.
WARNING!
Improperly inflated tires are dangerous
and can cause collisions.
Underinflation increases tire flexing and
can result in overheating and tire failure.
Overinflation reduces a tire's ability to
cushion shock. Objects on the road and
chuckholes can cause damage that result
in tire failure.
Overinflated or underinflated tires can
affect vehicle handling and can fail
suddenly, resulting in loss of vehicle
control.
Unequal tire pressures can cause steering
problems. You could lose control of your
vehicle.
Unequal tire pressures from one side of
the vehicle to the other can cause the
vehicle to drift to the right or left.
Always drive with each tire inflated to the
recommended cold tire inflation pressure.
WARNING! (Continued)
CAUTION!
After inspecting or adjusting the tire
pressure, always reinstall the valve stem
cap. This will prevent moisture and dirt from
entering the valve stem, which could
damage the valve stem.
21_GA_OM_EN_USC_t.book Page 241
Page 276 of 284

274
INDEX
INDEX
WARRANTY INFORMATION .................. 272
A
Accessories Purchased By The Owner.......... 3
Active Blind Spot Assist .............................147
Active Safety Systems ................................ 141
Active Torque Vectoring (ATV) System ......142
Adaptive Cruise Control (ACC)
(Cruise Control) ..........................................105 Off ........................................................... 109
On............................................................109
Additives, Fuel ............................................ 264
Adjust Forward.............................................. 29, 32
Rearward ........................................... 29, 32
Air Bag......................................................... 166 Air Bag Operation ...................................168Air Bag Warning Light ............................165
Driver Knee Air Bag................................ 168Enhanced Accident Response .....172, 203
Event Data Recorder (EDR) ...................203
Front Air Bag...........................................166
If Deployment Occurs ............................171
Knee Impact Bolsters ............................168
Maintaining Your Air Bag System.......... 174
Maintenance ..........................................174
Redundant Air Bag Warning Light.........166
Side Air Bags ..........................................169
Transporting Pets...................................187
Air Bag Light ......................................165, 187
Air Pressure Tires ........................................................241 Alarm
Security Alarm.......................................... 21
Alfa Active Suspension (AAS) .................... 102
Alfa DNA System .......................................... 99
Anti-Lock Braking (ABS) System ............... 141
Anti-Lock Warning Light............................... 75
Automatic Door Locks ................................. 26
Automatic Headlights .................................. 42
Automatic Temperature Control (ATC)........ 49
Automatic Transmission .............................. 92
Auxiliary Driving Systems .......................... 144
B
Back-Up Camera ........................................ 134
Battery ................................................. 78, 215 Charging System Light ............................ 78
Battery Recharging .................................... 215
Belts, Seat .................................................. 187
Blind Spot Monitoring ................................ 145
Bodywork (Cleaning And Maintenance) ... 252
B-Pillar Location ......................................... 237
Brake System Warning Light .....................................73, 74
Brakes ........................................................ 258 Brake Fluid Level ................................... 214
Bulbs, Light ................................................ 188
C
Camera, Rear ............................................. 134
Carbon Monoxide Warning ........................ 189
Cargo Tie-Downs .......................................... 64
Certification Label...................................... 136
Chart, Tire Sizing ........................................ 234 Check Engine Light
(Malfunction Indicator Light) .......................85
Checking Levels................................ 211, 212
Checking Your Vehicle For Safety............. 187
Checks, Safety ........................................... 187
Child Restraint ........................................... 174
Child Restraints
Booster Seats ........................................ 177
Child Seat Installation........................... 185
How To Stow An unused ALR Seat Belt .................................... 182
Infant And Child Restraints................... 176
LATCH Positions .................................... 179
Lower Anchors And Tethers For Children ............................................. 179
Older Children And Child Restraints .... 176
Seating Positions................................... 178
Using The Top Tether Anchorage ......... 186
Clean Air Gasoline ..................................... 263
Cleaning Wheels ................................................... 246
Climate Control ...................................... 48, 54
Contract, Service ....................................... 271
Cruise Control (Speed Control) ................. 105
Customer Assistance ................................ 270
D
Daytime Running Lights ...............................42
Deck Lid Power Release.......................................... 63
Defroster, Windshield ............................... 187
Dimmer Switch Headlight ..................................................46
21_GA_OM_EN_USC_t.book Page 274