Page 76 of 126

8-1
8
EBU28789
PERIODIC MAINTENANCE AND ADJUSTMENT
EBU21677Periodic inspection, adjustment, and lubrication
will keep your vehicle in the safest and most effi-
cient condition possible. Safety is an obligation of
the vehicle owner and operator. The most impor-
tant points of vehicle inspection, adjustment, and
lubrication are explained on the following pages.
WARNING
EWB01842Failure to properly maintain the vehicle or per-
forming maintenance activities incorrectly may
increase your risk of injury or death during ser-
vice or while using the vehicle. If you are not fa-
miliar with vehicle service, have a Yamaha
dealer perform the service.
WARNING
EWB02563Turn off the engine when performing mainte-
nance unless otherwise specified.
A running engine has moving parts that can
catch on body parts or clothing and electri-
cal parts that can cause shocks or fires.
Running the engine while servicing can lead
to eye injury, burns, fire, or carbon monoxide
poisoning - possibly leading to death. See
page 2-8 for more information about carbon
monoxide.
WARNING
EWB02691Brake discs, calipers, drums, and linings can
become very hot during use. To avoid possible
burns, let brake components cool before
touching them. The intervals given in the periodic maintenance
charts should be considered as a general guide
under normal riding conditions. However, DE-
PENDING ON THE WEATHER, TERRAIN, GEO-
GRAPHICAL LOCATION, AND INDIVIDUAL USE,
THE MAINTENANCE INTERVALS MAY NEED TO
BE SHORTENED.
UBW463E0.book Page 1 Monday, January 28, 2019 10:22 AM
Page 83 of 126
8-8
8
EBU23062TIPSome maintenance items need more frequent service if you are riding in unusually wet, dusty, sandy or
muddy areas, or at full-throttle. UBW463E0.book Page 8 Monday, January 28, 2019 10:22 AM
Page 91 of 126

8-16
8
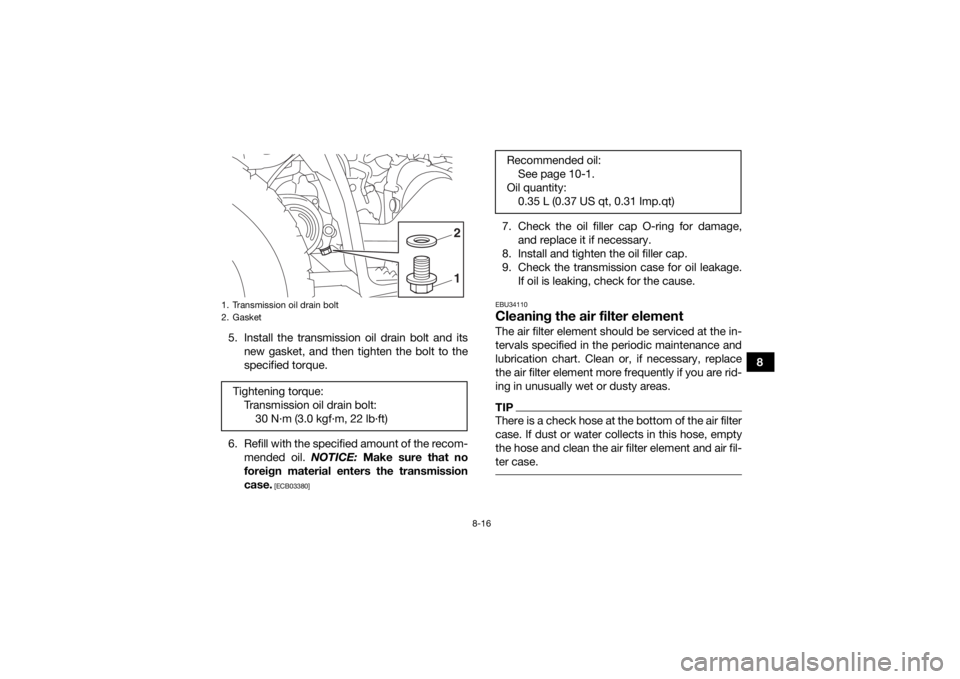
5. Install the transmission oil drain bolt and its
new gasket, and then tighten the bolt to the
specified torque.
6. Refill with the specified amount of the recom- mended oil. NOTICE: Make sure that no
foreign material enters the transmission
case.
[ECB03380]
7. Check the oil filler cap O-ring for damage, and replace it if necessary.
8. Install and tighten the oil filler cap.
9. Check the transmission case for oil leakage. If oil is leaking, check for the cause.EBU34110Cleaning the air filter elementThe air filter element should be serviced at the in-
tervals specified in the periodic maintenance and
lubrication chart. Clean or, if necessary, replace
the air filter element more frequently if you are rid-
ing in unusually wet or dusty areas.TIPThere is a check hose at the bottom of the air filter
case. If dust or water collects in this hose, empty
the hose and clean the air filter element and air fil-
ter case.
1. Transmission oil drain bolt
2. GasketTightening torque:Transmission oil drain bolt:30 N·m (3.0 kgf·m, 22 lb·ft)
12
Recommended oil: See page 10-1.
Oil quantity: 0.35 L (0.37 US qt, 0.31 Imp.qt)
UBW463E0.book Page 16 Monday, January 28, 2019 10:22 AM
Page 97 of 126

8-22
8
EBU33951Adjusting the throttle lever free playPeriodically check the throttle lever free play and
adjust if necessary.TIPThe engine idling speed must be checked and ad-
justed before adjusting the throttle lever free play.
1. Slide the rubber covers apart.
2. Loosen the locknut.
3. To increase the throttle lever free play, turnthe throttle lever free play adjusting nut in di-
rection (a). To decrease the throttle lever free
play, turn the adjusting nut in direction (b).
4. Tighten the locknut.
5. Slide the rubber covers to their original posi- tions.EBU24061Valve clearanceThe valve clearance changes with use, resulting in
improper air-fuel mixture and/or engine noise. To
prevent this from occurring, the valve clearance
must be adjusted by a Yamaha dealer at the inter-
vals specified in the periodic maintenance and lu-
brication chart.EBU29602BrakesReplacement of brake components requires pro-
fessional knowledge. Brake service should be
performed by a Yamaha dealer.
1. Rubber cover
2. Throttle lever free play adjusting nut
3. Locknut
4. Throttle lever free playThrottle lever free play:2.0–3.2 mm (0.08–0.13 in)
1
2
3
1
4
(a)(b)
UBW463E0.book Page 22 Monday, January 28, 2019 10:22 AM
Page 98 of 126
8-23
8
WARNING
EWB02572Operating with improperly serviced or adjust-
ed brakes could lead to a loss in braking ability
and an accident. EBU34511Checking the front and rear brake
shoesThe front and rear brake shoes must be checked
for wear at the intervals specified in the periodic
maintenance and lubrication chart. Without disas-
sembling the brake, this can be performed by
checking the position of the brake lever free play
adjusting bolts or nut.
Front brakes
To check front brake shoe wear, check the posi-
tion of the adjusting bolts. If a bolt extends more
than 12 mm (0.47 in) from its locknut, the brake
shoes need to be replaced.Rear brake
To check rear brake shoe wear, check the position
of the adjusting nut. If the nut is more than 18 mm
(0.71 in) from the end of the bolt, the brake shoes
need to be replaced.
1. Upper adjusting bolt
2. Lower adjusting bolt
3. No more than 12 mm (0.47 in)
3
21
UBW463E0.book Page 23 Monday, January 28, 2019 10:22 AM
Page 104 of 126

8-29
8
EBU36480Cleaning and lubricating the drive
chainThe drive chain must be cleaned and lubricated at
the intervals specified in the periodic maintenance
and lubrication chart, otherwise it will quickly wear
out, especially when riding in dusty or wet areas.
Service the drive chain as follows.NOTICEECB00562The drive chain must be lubricated after wash-
ing the ATV or riding in the rain or wet areas. 1. Remove all dirt and mud from the drive chainwith a brush or cloth.TIPFor a thorough cleaning, have a Yamaha dealer re-
move the drive chain and soak it in solvent. 2. Spray Yamaha chain lubricant or other suit-able chain lubricant on the entire chain, mak-
ing sure that all side plates and rollers have
been sufficiently oiled.
EBU24905Checking and lubricating the cablesThe operation and the condition of all control ca-
bles should be checked before each ride, and the
cables and cable ends should be lubricated if nec-
essary. If a cable is damaged or does not move
smoothly, have a Yamaha dealer check or replace
it.
WARNING
EWB02582Inspect cables frequently and replace if
damaged. Corrosion can result when the ca-
ble sheaths become damaged, and cables
can also become frayed or kinked, which
could restrict the operation of controls and
lead to an accident or injury.
Always make sure all control cables work
smoothly before you begin riding in cold
weather. If the control cables are frozen or Recommended lubricant:
Yamaha cable lubricant or other suitable cable lubricant
UBW463E0.book Page 29 Monday, January 28, 2019 10:22 AM
Page 108 of 126

8-33
8
TIPWear gloves and eye protection in a ventilated
area away from sparks and open flames. Wash
hands after handling.
It is recommended to have the battery serviced
by a Yamaha dealer.
WARNING
EWB02161Battery electrolyte is poisonous and danger-
ous, as it contains sulfuric acid, which can
cause severe burns. Avoid contact with skin,
eyes or clothing. Always shield your eyes when
working near batteries.
Antidote:
EXTERNAL: Flush with water.
INTERNAL: Drink large quantities of water or
milk. Follow with milk of magnesia, beaten egg
or vegetable oil. Call a physician immediately.
EYES: Flush with water for 15 minutes and get
prompt medical attention.
Batteries produce explosive gases. Keep
sparks, flame, cigarettes or other sources of
ignition away. Ventilate when charging or using
in an enclosed space. KEEP OUT OF REACH OF CHILDREN.
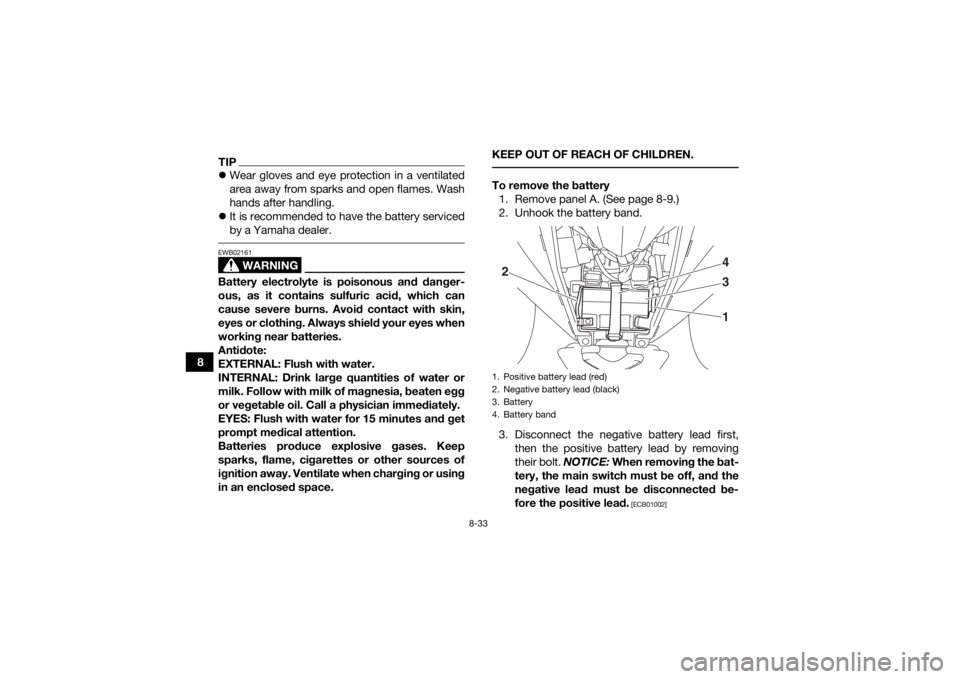
To remove the battery
1. Remove panel A. (See page 8-9.)
2. Unhook the battery band.
3. Disconnect the negative battery lead first, then the positive battery lead by removing
their bolt. NOTICE: When removing the bat-
tery, the main switch must be off, and the
negative lead must be disconnected be-
fore the positive lead.
[ECB01002]
1. Positive battery lead (red)
2. Negative battery lead (black)
3. Battery
4. Battery band2 4
3
1
UBW463E0.book Page 33 Monday, January 28, 2019 10:22 AM
Page 112 of 126

8-37
82. Lower the ATV to the ground.
3. Tighten the wheel bolts to the specified
torques.
EBU25721TroubleshootingAlthough Yamaha ATVs receive a thorough in-
spection before shipment from the factory, trouble
may occur during operation. Any problem in the
fuel, compression, or ignition systems, for exam-
ple, can cause poor starting and loss of power.
The following troubleshooting chart represents a
quick and easy procedure for checking these vital
systems yourself. However, should your ATV re-
quire any repair, take it to a Yamaha dealer, whose
skilled technicians have the necessary tools, ex-
perience, and know-how to service the ATV prop-
erly.
Use only genuine Yamaha replacement parts. Im-
itation parts may look like Yamaha parts, but they
are often inferior, have a shorter service life and
can lead to expensive repair bills.
WARNING
EWB02281Do not smoke when checking the fuel system.
Fuel can ignite or explode, causing severe inju-
ry or property damage. Make sure there are no
open flames or sparks in the area, including pi-
lot lights from water heaters or furnaces.
1. Arrow mark
2. Forward rotating direction
3. Wheel boltTightening torques:Front wheel bolt:45 N·m (4.5 kgf·m, 33 lb·ft)
Rear wheel bolt: 45 N·m (4.5 kgf·m, 33 lb·ft)3
1
2
UBW463E0.book Page 37 Monday, January 28, 2019 10:22 AM