2020 YAMAHA YFZ50 battery
[x] Cancel search: batteryPage 10 of 126

RIDING YOUR ATV ........................................ 7-1GETTING TO KNOW YOUR ATV ................ 7-2
RIDE WITH CARE AND GOOD JUDGMENT .............................................. 7-2
BE CAREFUL WHERE YOU RIDE ............... 7-9
TURNING YOUR ATV................................ 7-12
CLIMBING UPHILL ................................... 7-13
RIDING DOWNHILL .................................. 7-16
CROSSING A SLOPE................................ 7-17
CROSSING THROUGH SHALLOW WATER .................................................... 7-18
RIDING OVER ROUGH TERRAIN ............. 7-20
SLIDING AND SKIDDING .......................... 7-20
WHAT TO DO IF... ..................................... 7-21
WHAT TO DO... ......................................... 7-22
PERIODIC MAINTENANCE AND
ADJUSTMENT................................................ 8-1 Owner’s Manual and tool kit ....................... 8-2
Periodic maintenance chart: Emission control system .......................................... 8-3
Periodic maintenance chart: General maintenance and lubrication..................... 8-5
Removing and installing the panel .............. 8-9
Checking the spark plug ............................. 8-9
Engine oil................................................... 8-11
Why Yamalube .......................................... 8-14 Transmission oil ........................................ 8-15
Cleaning the air filter element ................... 8-16
Cleaning the spark arrester ...................... 8-19
Adjusting the carburetor ........................... 8-20
Adjusting the engine idling speed ............ 8-20
Adjusting the throttle lever free play ......... 8-22
Valve clearance......................................... 8-22
Brakes....................................................... 8-22
Checking the front and rear brake
shoes ...................................................... 8-23
Adjusting the front brake lever free play... 8-24
Adjusting the rear brake lever free play .... 8-26
Drive chain slack....................................... 8-26
Cleaning and lubricating the drive chain ....................................................... 8-29
Checking and lubricating the cables ........ 8-29
Checking and lubricating the front and rear brake levers ..................................... 8-30
Checking the wheel hub bearings ............ 8-30
Lubricating the front arm pivots ............... 8-31
Lubricating the front knuckle pivots ......... 8-31
Lubricating the steering shaft ................... 8-32
Battery ...................................................... 8-32
Replacing the fuse .................................... 8-35
Removing a wheel .................................... 8-36
Installing a wheel ...................................... 8-36
Troubleshooting........................................ 8-37UBW463E0.book Page 2 Monday, January 28, 2019 10:22 AM
Page 22 of 126

2-5
24. Once immediate safety hazards are con-
firmed not to exist, you may remove your hel-
met to more closely inspect your vehicle.
Check for external signs of wear, broken
parts, fluid leaks, cracks in the frame, sus-
pension damage, wheel damage, and so on.
Fuel, oil, and coolant usually give off a notice-
able odor.
5. If your vehicle will not restart or if it is unsafe to ride, then turn off all vehicle systems (en-
gine stop switch, main switch, and fuel cock),
and then signal or go for help.
Aftermarket Parts, Accessories, and Modifica-
tions
While you may find aftermarket products similar in
design and quality to genuine Yamaha accesso-
ries, recognize that some aftermarket accessories
or modifications are not suitable because of po-
tential safety hazards to you or others. Installing
aftermarket products or having other modifica-
tions performed to your vehicle that change any of
the vehicle’s design or operation characteristics
can put you and others at greater risk of serious
injury or death. You are responsible for injuries re-
lated to changes in the vehicle. Keep the following guidelines in mind, as well as those found in the
Loading section (page 6-6) when mounting acces-
sories.
Never install accessories that would impair the
performance of your ATV. Carefully inspect the
accessory before using it to make sure that it
does not in any way reduce ground clearance,
limit suspension travel, steering travel or control
operation.
Accessories fitted to the ATV can create insta-
bility due to improper weight distribution.
Bulky or large accessories may seriously affect
the stability of the ATV.
Certain accessories can displace the operator
from his or her normal riding position. This im-
proper position limits the freedom of movement
of the operator and may limit control ability,
therefore, such accessories are not recom-
mended.
Use caution when adding electrical accesso-
ries. If electrical accessories exceed the capac-
ity of the ATV’s electrical system, an electric
failure could result, which could cause a dan-
gerous loss of lights or engine power. Also, the
battery tends to discharge more quickly if elec-
trical accessories are added.
UBW463E0.book Page 5 Monday, January 28, 2019 10:22 AM
Page 26 of 126

3-1
3
EBU17681
DESCRIPTION
EBU17691Left view
EBU17701Right view
1. Fuel tank cap
2. Fuel cock
3. Air filter
4. Engine stop switch with cord (lanyard)
5. Rear shock absorber
6. Kickstarter lever cap
7. Throttle stop screw
12
4
5
3
6
7
1. Spark arrester
2. Reflector
3. Tool kit
4. Fuse
5. Battery
6. Spark plug
7. Engine oil filler cap
8. Transmission oil filler cap1
23
4,5
6
78
UBW463E0.book Page 1 Monday, January 28, 2019 10:22 AM
Page 34 of 126

4-7
4braking performance which could cause an
accident. You could also wear out the brakes
prematurely.
EBU33893KickstarterUse the kickstarter to start the engine when the
battery voltage is low.
1. Remove the seat (page 4-13), and then re- move the kickstarter lever.
2. Remove the kickstarter lever cap. 3. Install the kickstarter lever.
4. Move the kickstarter lever down lightly with
your foot until the gears engage, and then
push it down smoothly but forcefully.1. Kickstarter lever
1
1. Kickstarter lever cap
1
UBW463E0.book Page 7 Monday, January 28, 2019 10:22 AM
Page 35 of 126

4-8
4
5. When the engine has started, remove the kickstarter lever and store it under the seat.
6. Install the kickstarter lever cap and the seat.
NOTICEECB02300Do not use the kickstarter if the battery is not
installed or if the battery leads are not connect-
ed.
EBU37980Fuel tank capRemove the fuel tank cap by turning it counter-
clockwise.
WARNING
EWB02522Gasoline and gasoline vapors are extremely
flammable. To avoid fires and explosions and
to reduce the risk of injury when refueling, fol-
low these instructions. 1. Before refueling, turn off the engine and be sure that no one is sitting on the vehicle. Nev-
er refuel while smoking, or while in the vicinity
1. Fold out.
2. Push down.
1
2
1. Fuel tank cap
1
UBW463E0.book Page 8 Monday, January 28, 2019 10:22 AM
Page 107 of 126

8-32
8
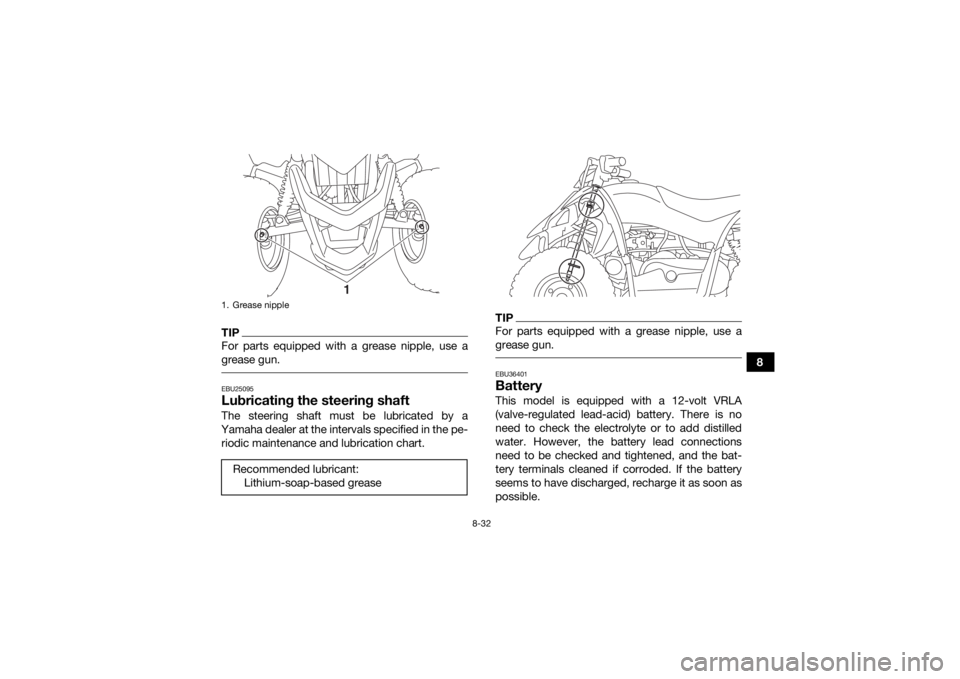
TIPFor parts equipped with a grease nipple, use a
grease gun. EBU25095Lubricating the steering shaftThe steering shaft must be lubricated by a
Yamaha dealer at the intervals specified in the pe- riodic maintenance and lubrication chart.
TIPFor parts equipped with a grease nipple, use a
grease gun. EBU36401BatteryThis model is equipped with a 12-volt VRLA
(valve-regulated lead-acid) battery. There is no
need to check the electrolyte or to add distilled
water. However, the battery lead connections
need to be checked and tightened, and the bat-
tery terminals cleaned if corroded. If the battery
seems to have discharged, recharge it as soon as
possible.
1. Grease nippleRecommended lubricant: Lithium-soap-based grease
1
UBW463E0.book Page 32 Monday, January 28, 2019 10:22 AM
Page 108 of 126

8-33
8
TIPWear gloves and eye protection in a ventilated
area away from sparks and open flames. Wash
hands after handling.
It is recommended to have the battery serviced
by a Yamaha dealer.
WARNING
EWB02161Battery electrolyte is poisonous and danger-
ous, as it contains sulfuric acid, which can
cause severe burns. Avoid contact with skin,
eyes or clothing. Always shield your eyes when
working near batteries.
Antidote:
EXTERNAL: Flush with water.
INTERNAL: Drink large quantities of water or
milk. Follow with milk of magnesia, beaten egg
or vegetable oil. Call a physician immediately.
EYES: Flush with water for 15 minutes and get
prompt medical attention.
Batteries produce explosive gases. Keep
sparks, flame, cigarettes or other sources of
ignition away. Ventilate when charging or using
in an enclosed space. KEEP OUT OF REACH OF CHILDREN.
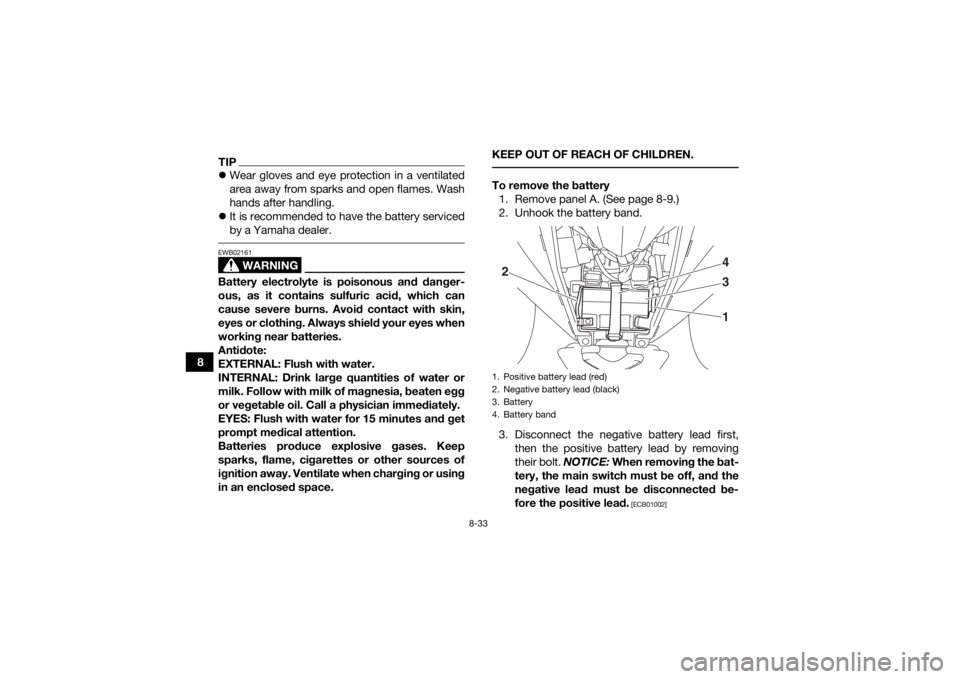
To remove the battery
1. Remove panel A. (See page 8-9.)
2. Unhook the battery band.
3. Disconnect the negative battery lead first, then the positive battery lead by removing
their bolt. NOTICE: When removing the bat-
tery, the main switch must be off, and the
negative lead must be disconnected be-
fore the positive lead.
[ECB01002]
1. Positive battery lead (red)
2. Negative battery lead (black)
3. Battery
4. Battery band2 4
3
1
UBW463E0.book Page 33 Monday, January 28, 2019 10:22 AM
Page 109 of 126

8-34
8
4. Pull the battery out of its compartment.
NOTICEECB00622Never attempt to open the battery or remove
the battery cell seals, as this would permanent-
ly damage the battery. To charge the battery
Confirm the recommended charging rate as
specified on the battery itself.
Select a suitable charger and follow the manu-
facturer’s instructions.NOTICEECB00933To charge a VRLA (valve-regulated lead-acid)
battery, a special battery charger is required.
Using a conventional battery charger will dam-
age the battery. To store the battery
If the ATV will not be used for more than one
month, remove the battery, fully charge it, and
then place it in a cool, dry place.
If the battery will be stored for more than two
months, check it at least once a month and fully
charge it if necessary.
NOTICEECB00942Always keep the battery charged. Storing the
battery in a discharged state for an extended
period of time will cause permanent battery
damage.
Do not store the battery in an excessively
cold or warm place [below freezing or above
30 °C (90 °F)]. To install the battery
1. Place the battery in its compartment.
2. Connect the positive battery lead first, then connect the negative battery lead by installing
their bolt. NOTICE: When installing the bat-
tery, the main switch must be off, and the
positive lead must be connected before
the negative lead.
[ECB01111]
UBW463E0.book Page 34 Monday, January 28, 2019 10:22 AM