Page 73 of 126

7-20
7
RIDING OVER ROUGH TERRAIN
WARNING
EWB01652Riding improperly over obstacles could cause
loss of control or a collision. Before operating
in a new area, check for obstacles. Never at-
tempt to ride over large obstacles, such as
large rocks or fallen trees. When you go over
obstacles, always follow proper procedures as
described in the Owner’s Manual. Riding over rough terrain should be done with
caution. Look out for obstacles which could cause
damage to the ATV or could lead to an upset or accident. Be sure to keep your feet firmly mounted
on the footboards at all times. Avoid jumping the
ATV as loss of control and damage to the ATV may
result.
SLIDING AND SKIDDING
WARNING
EWB01663Skidding or sliding improperly may cause you
to lose control of this ATV. You may also regain
traction unexpectedly, which may cause the
ATV to overturn.
Learn to safely control skidding or sliding by
practicing at low speeds and on level,
smooth terrain.
On extremely slippery surfaces, such as ice,
go slowly and be very cautious in order to re-
duce the chance of skidding or sliding out of
control. Care should be used when riding on loose or slip-
pery surfaces since the ATV may slide. If unex-
pected and uncorrected, sliding could lead to an
accident.
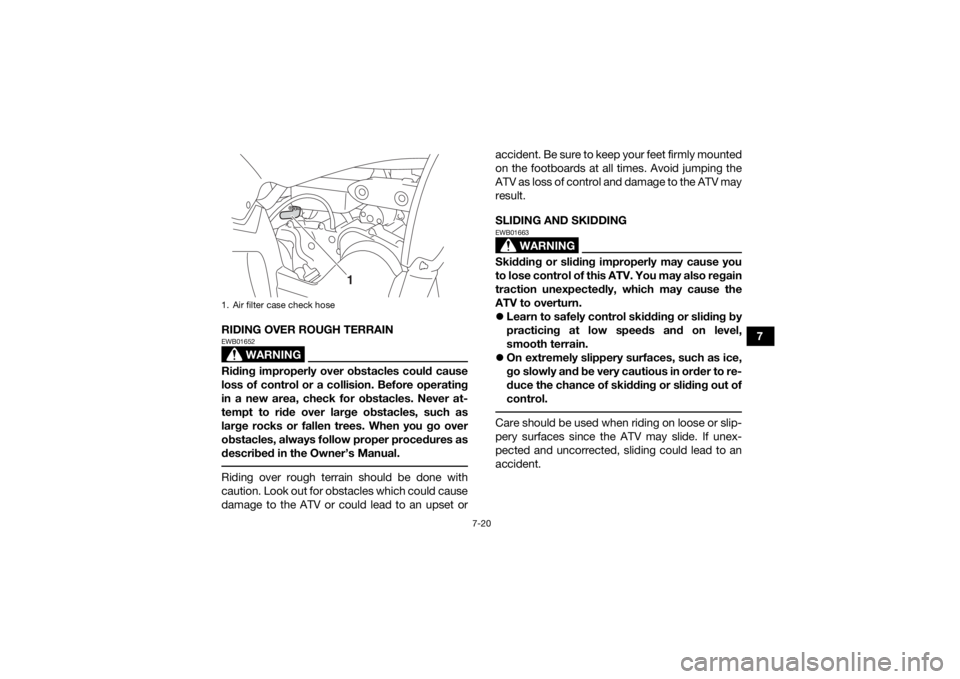
1. Air filter case check hose
1
UBW463E0.book Page 20 Monday, January 28, 2019 10:22 AM
Page 76 of 126

8-1
8
EBU28789
PERIODIC MAINTENANCE AND ADJUSTMENT
EBU21677Periodic inspection, adjustment, and lubrication
will keep your vehicle in the safest and most effi-
cient condition possible. Safety is an obligation of
the vehicle owner and operator. The most impor-
tant points of vehicle inspection, adjustment, and
lubrication are explained on the following pages.
WARNING
EWB01842Failure to properly maintain the vehicle or per-
forming maintenance activities incorrectly may
increase your risk of injury or death during ser-
vice or while using the vehicle. If you are not fa-
miliar with vehicle service, have a Yamaha
dealer perform the service.
WARNING
EWB02563Turn off the engine when performing mainte-
nance unless otherwise specified.
A running engine has moving parts that can
catch on body parts or clothing and electri-
cal parts that can cause shocks or fires.
Running the engine while servicing can lead
to eye injury, burns, fire, or carbon monoxide
poisoning - possibly leading to death. See
page 2-8 for more information about carbon
monoxide.
WARNING
EWB02691Brake discs, calipers, drums, and linings can
become very hot during use. To avoid possible
burns, let brake components cool before
touching them. The intervals given in the periodic maintenance
charts should be considered as a general guide
under normal riding conditions. However, DE-
PENDING ON THE WEATHER, TERRAIN, GEO-
GRAPHICAL LOCATION, AND INDIVIDUAL USE,
THE MAINTENANCE INTERVALS MAY NEED TO
BE SHORTENED.
UBW463E0.book Page 1 Monday, January 28, 2019 10:22 AM
Page 92 of 126
8-17
81. Park the ATV on a level surface.
2. Remove the seat. (See page 4-13.)
3. Remove the air filter case cover by unhooking
the air filter case cover holders. 4. Remove the air filter element, and clean it with
solvent. WARNING! Always use parts
cleaning solvent to clean the air filter ele-
ment. Never use low-flash-point solvents
or gasoline to clean the air filter element
because the engine could catch fire or ex-
plode.
[EWB03540]
1. Air filter case check hose
1
1. Air filter case cover
2. Air filter case cover holder
1
2
UBW463E0.book Page 17 Monday, January 28, 2019 10:22 AM
Page 95 of 126

8-20
8
WARNING
EWB02342Always let the exhaust system cool prior to
touching exhaust components.
Do not start the engine with the spark arrester
removed. Sparks or exhaust particulate can
cause eye injury, burns, or start a fire. 1. Remove the tailpipe bolts.
2. Remove the tailpipe by pulling it out of themuffler, and then remove the gasket.
3. Tap the tailpipe lightly, and then use a wire brush to remove any carbon deposits from
the spark arrester portion of the tailpipe and
inside of the tailpipe housing.
4. Check the gasket for damage. Replace if nec- essary.
5. Install the gasket onto the tailpipe, then insert the tailpipe into the muffler and align the bolt
holes.
6. Install the bolts and tighten to the specified torque.
EBU23941Adjusting the carburetorThe carburetor should be checked and, if neces-
sary, adjusted at the intervals specified in the pe-
riodic maintenance and lubrication chart. The
carburetor is an important part of the engine and
requires very sophisticated adjustment. There-
fore, most carburetor adjustments should be left
to a Yamaha dealer, who has the necessary pro-
fessional knowledge and experience. The adjust-
ment described in the following section, however,
may be performed by the owner as part of routine
maintenance.NOTICEECB00481The carburetor has been set and extensively
tested at the Yamaha factory. Changing these
settings without sufficient technical knowl-
edge may result in poor performance of or
damage to the engine. EBU24001Adjusting the engine idling speedThe engine idling speed must be checked and, if
necessary, adjusted as follows at the intervals
specified in the periodic maintenance and lubrica-
tion chart.
Tightening torque:
Tailpipe bolt:10 N·m (1.0 kgf·m, 7.4 lb·ft)
UBW463E0.book Page 20 Monday, January 28, 2019 10:22 AM
Page 98 of 126
8-23
8
WARNING
EWB02572Operating with improperly serviced or adjust-
ed brakes could lead to a loss in braking ability
and an accident. EBU34511Checking the front and rear brake
shoesThe front and rear brake shoes must be checked
for wear at the intervals specified in the periodic
maintenance and lubrication chart. Without disas-
sembling the brake, this can be performed by
checking the position of the brake lever free play
adjusting bolts or nut.
Front brakes
To check front brake shoe wear, check the posi-
tion of the adjusting bolts. If a bolt extends more
than 12 mm (0.47 in) from its locknut, the brake
shoes need to be replaced.Rear brake
To check rear brake shoe wear, check the position
of the adjusting nut. If the nut is more than 18 mm
(0.71 in) from the end of the bolt, the brake shoes
need to be replaced.
1. Upper adjusting bolt
2. Lower adjusting bolt
3. No more than 12 mm (0.47 in)
3
21
UBW463E0.book Page 23 Monday, January 28, 2019 10:22 AM
Page 104 of 126

8-29
8
EBU36480Cleaning and lubricating the drive
chainThe drive chain must be cleaned and lubricated at
the intervals specified in the periodic maintenance
and lubrication chart, otherwise it will quickly wear
out, especially when riding in dusty or wet areas.
Service the drive chain as follows.NOTICEECB00562The drive chain must be lubricated after wash-
ing the ATV or riding in the rain or wet areas. 1. Remove all dirt and mud from the drive chainwith a brush or cloth.TIPFor a thorough cleaning, have a Yamaha dealer re-
move the drive chain and soak it in solvent. 2. Spray Yamaha chain lubricant or other suit-able chain lubricant on the entire chain, mak-
ing sure that all side plates and rollers have
been sufficiently oiled.
EBU24905Checking and lubricating the cablesThe operation and the condition of all control ca-
bles should be checked before each ride, and the
cables and cable ends should be lubricated if nec-
essary. If a cable is damaged or does not move
smoothly, have a Yamaha dealer check or replace
it.
WARNING
EWB02582Inspect cables frequently and replace if
damaged. Corrosion can result when the ca-
ble sheaths become damaged, and cables
can also become frayed or kinked, which
could restrict the operation of controls and
lead to an accident or injury.
Always make sure all control cables work
smoothly before you begin riding in cold
weather. If the control cables are frozen or Recommended lubricant:
Yamaha cable lubricant or other suitable cable lubricant
UBW463E0.book Page 29 Monday, January 28, 2019 10:22 AM
Page 108 of 126

8-33
8
TIPWear gloves and eye protection in a ventilated
area away from sparks and open flames. Wash
hands after handling.
It is recommended to have the battery serviced
by a Yamaha dealer.
WARNING
EWB02161Battery electrolyte is poisonous and danger-
ous, as it contains sulfuric acid, which can
cause severe burns. Avoid contact with skin,
eyes or clothing. Always shield your eyes when
working near batteries.
Antidote:
EXTERNAL: Flush with water.
INTERNAL: Drink large quantities of water or
milk. Follow with milk of magnesia, beaten egg
or vegetable oil. Call a physician immediately.
EYES: Flush with water for 15 minutes and get
prompt medical attention.
Batteries produce explosive gases. Keep
sparks, flame, cigarettes or other sources of
ignition away. Ventilate when charging or using
in an enclosed space. KEEP OUT OF REACH OF CHILDREN.
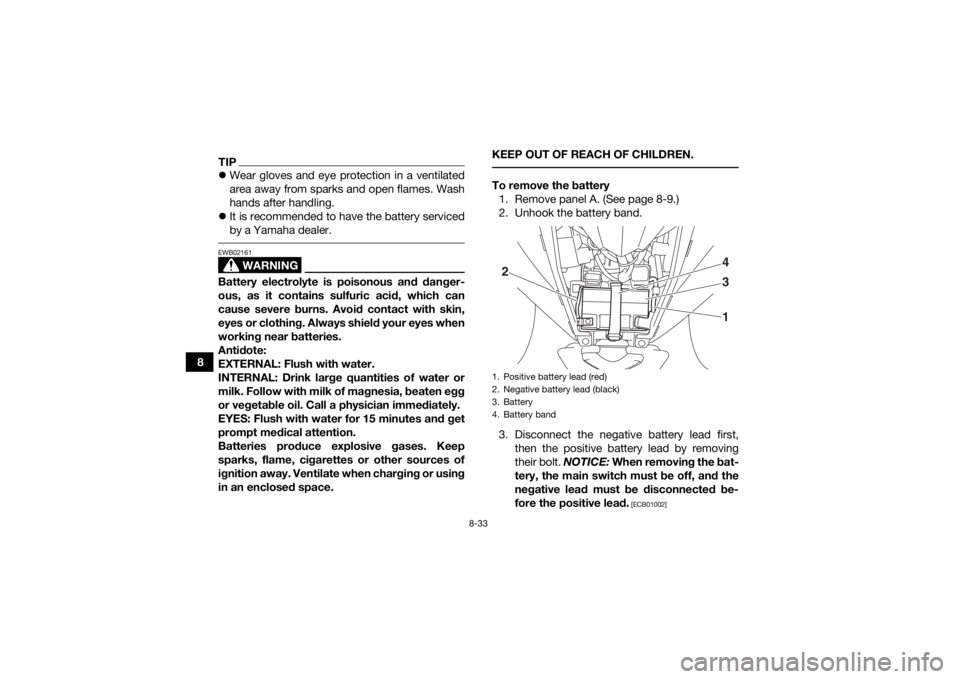
To remove the battery
1. Remove panel A. (See page 8-9.)
2. Unhook the battery band.
3. Disconnect the negative battery lead first, then the positive battery lead by removing
their bolt. NOTICE: When removing the bat-
tery, the main switch must be off, and the
negative lead must be disconnected be-
fore the positive lead.
[ECB01002]
1. Positive battery lead (red)
2. Negative battery lead (black)
3. Battery
4. Battery band2 4
3
1
UBW463E0.book Page 33 Monday, January 28, 2019 10:22 AM
Page 111 of 126
8-36
8
3. Remove the blown fuse, and then install a
new fuse of the specified amperage.
WARNING! Always use a fuse of the spec- ified rating, and never use a substitute ob-
ject in place of the proper fuse. An
improper fuse or a substitute object can
cause damage to the electrical system,
which could lead to a fire.
[EWB02173]
4. Turn on the main switch and start the engine.
5. Install the panel.
6. If the fuse immediately blows again, have a Yamaha dealer check the vehicle.EBU34030Removing a wheel1. Place the ATV on a level surface.
2. Loosen the wheel bolts. 3. Elevate the ATV and place a suitable stand
under the frame.
4. Remove the bolts from the wheel.
5. Remove the wheel.
EBU34042Installing a wheel1. Install the wheel with the arrow mark pointing in the forward rotating direction of the wheel,
and then install the wheel bolts.
Specified fuse:
7.5 A1. Wheel bolt
1
1
UBW463E0.book Page 36 Monday, January 28, 2019 10:22 AM