2020 YAMAHA YFM700R brake light
[x] Cancel search: brake lightPage 61 of 156

7-4
7
Always use the clutch when changing gears.
The engine, transmission and drive train are
not designed to withstand the shock of
forced shifting and can be damaged by shift-
ing without using the clutch.
EBU20503Operating the reverse knob and driving
in reverse
WARNING
EWB00721Improper operation in reverse could make you
hit an obstacle or even a person behind you,
resulting in serious injury. When you shift into
reverse, make sure there are no people or ob-
stacles behind you. When it is safe to proceed,
go slowly. NOTICEECB00171Before shifting, stop the ATV, otherwise the
transmission may be damaged. 1. Bring the ATV to a complete stop, apply the
clutch lever, and then shift the transmission
into first gear. 2. While applying the brake pedal, turn the re-
verse knob clockwise with your right hand.
3. Shift the transmission into reverse by press- ing down on the shift pedal, and then release
the reverse knob.
TIPWhen in reverse, the reverse indicator light should
come on. If the indicator light does not come on,
have a Yamaha dealer check the electrical circuit. 4. Check behind you for people or obstacles,and then release the brake pedal.1. Reverse knob “REV”
2. Shift pedal
2
1
UBCX60E0.book Page 4 Friday, April 19, 2019 9:09 AM
Page 95 of 156

9-8
9
EBU23072TIPSome maintenance items need more frequent service if you are riding in unusually wet, dusty, sandy or
muddy areas, or at full-throttle.23 Cooling system • Check coolant level and ATV for coolant leakage,
and correct if necessary. √√√√√
• Replace coolant. Every 2 years
24 *Moving parts and
cables •Lubricate.
√√√√
25 *Reverse lock re-
lease cable • Check operation and adjust or replace if neces-
sary. √√√
26 *Throttle lever • Check operation.
• Check throttle lever free play, and adjust if neces-
sary.
• Lubricate cable and lever housing. √√√√√
27 *Front and rear
brake switches • Check operation and correct if necessary.
√√√√√
28 *Lights and switches • Check operation and correct if necessary.
• Adjust headlight beams. √√√√√
NO. ITEM
CHECK OR MAINTENANCE
JOB INITIAL EVERY
Whichev- er comes first month136612
km (mi) 320
(200) 1300
(800) 2500
(1600) 2500
(1600) 5000
(3200)
hours 20 80 160 160 320UBCX60E0.book Page 8 Friday, April 19, 2019 9:09 AM
Page 120 of 156
9-33
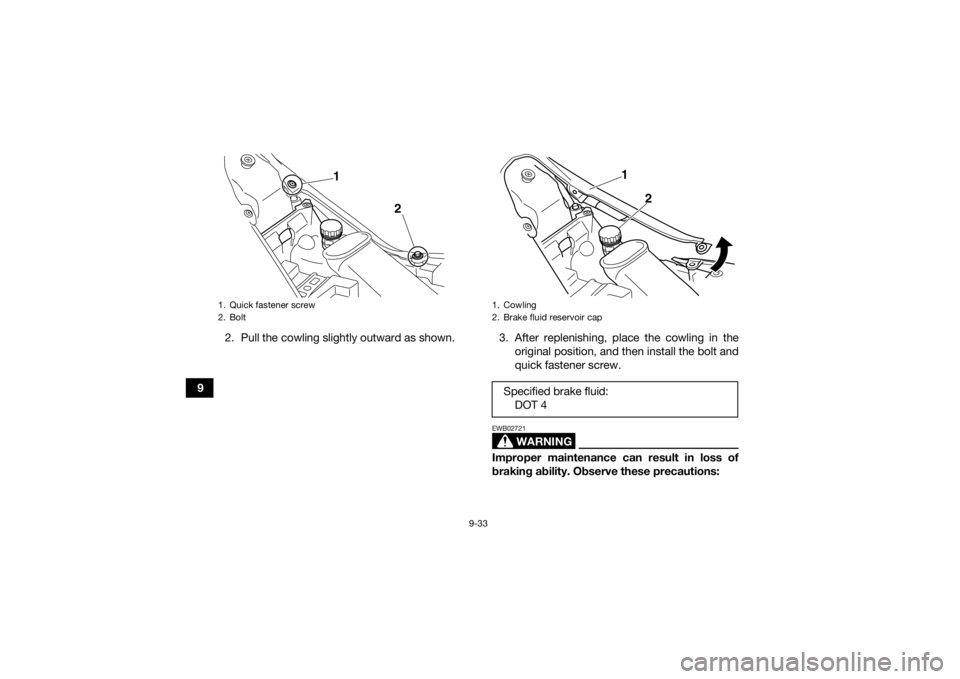
92. Pull the cowling slightly outward as shown. 3. After replenishing, place the cowling in the
original position, and then install the bolt and
quick fastener screw.
WARNING
EWB02721Improper maintenance can result in loss of
braking ability. Observe these precautions:
1. Quick fastener screw
2. Bolt
1
2
1. Cowling
2. Brake fluid reservoir capSpecified brake fluid:DOT 4
1
2
UBCX60E0.book Page 33 Friday, April 19, 2019 9:09 AM
Page 124 of 156
9-37
98. Turn in the adjusting bolt at the rear brake cal-
iper until it feels tight, then turn it out 1/8 turn
and tighten its locknut to the specified torque.
NOTICE: When tightening the locknut,
hold the adjusting bolt with a wrench so
that it does not turn together with the lock-
nut.
[ECB00522]
WARNING
EWB02091Operating with improperly serviced or adjust-
ed brakes could cause the brakes to malfunc-
tion, resulting in reduced braking
performance. This could increase the chance
of a collision or accident. After adjusting the
parking brake free play, block the rear of the
ATV off the ground and spin the rear wheels.
Check to make sure there is no brake drag. If
brake drag is noticed, perform the adjustment
again.
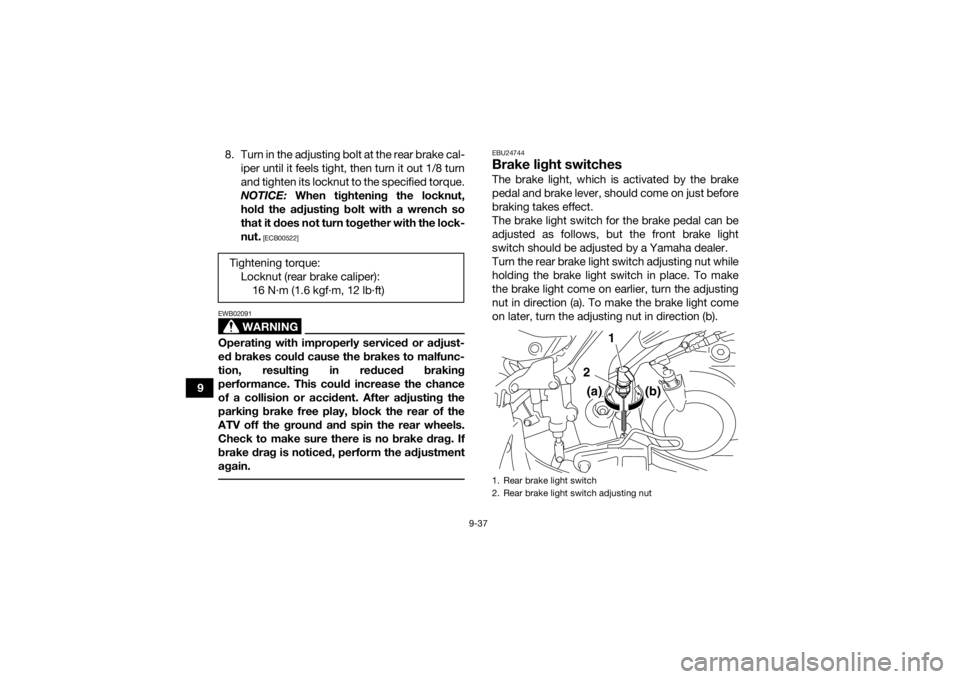
EBU24744Brake light switchesThe brake light, which is activated by the brake
pedal and brake lever, should come on just before
braking takes effect.
The brake light switch for the brake pedal can be
adjusted as follows, but the front brake light
switch should be adjusted by a Yamaha dealer.
Turn the rear brake light switch adjusting nut while
holding the brake light switch in place. To make
the brake light come on earlier, turn the adjusting
nut in direction (a). To make the brake light come
on later, turn the adjusting nut in direction (b).
Tightening torque:
Locknut (rear brake caliper):16 N·m (1.6 kgf·m, 12 lb·ft)1. Rear brake light switch
2. Rear brake light switch adjusting nut
1
2
(a)
(b)
UBCX60E0.book Page 37 Friday, April 19, 2019 9:09 AM
Page 141 of 156

9-54
9
To raise a headlight beam, turn the headlight
beam adjusting bolt in direction (a).
To lower a headlight beam, turn the adjusting bolt
in direction (b).
EBU26922Brake/tail lightThis model is equipped with an LED type of
brake/tail light.
If the brake/tail light does not come on, have a
Yamaha dealer check it.EBU25653Removing a wheel1. Park the ATV on a level surface. 2. Loosen the wheel nuts.
3. Elevate the ATV and place a suitable stand
under the frame.
4. Remove the nuts from the wheel.
5. Remove the wheel.
EBU27484Installing a wheel1. Install the wheel with the arrow mark pointing in the forward rotating direction of the wheel,
and then install the wheel nuts.
1. Headlight beam adjusting bolt1
(a)(b)
1. Wheel nut
UBCX60E0.book Page 54 Friday, April 19, 2019 9:09 AM
Page 151 of 156

11-4
11
Front suspension:Type:Double wishbone
Spring:
Coil spring
Shock absorber: Gas-hydraulic damper
Wheel travel: 230 mm (9.1 in)Rear suspension:Type:Swingarm (link suspension)
Spring: Coil spring
Shock absorber:
Gas-hydraulic damper
Wheel travel: 256 mm (10.1 in)Electrical system:System voltage:
12 V
Ignition system: TCI
Charging system: AC magnetoBattery:Model:GT9B-4
Voltage, capacity: 12 V, 8.0 Ah
Lights:Headlight:T19L, 30.0 W/30.0 W
Brake/tail light:
LED
Neutral indicator light: LED
Fuel level warning light: LED
Reverse indicator light:
LED
Coolant temperature warning light: LED
Engine trouble warning light: LEDFuses:Main fuse:30.0 A
Headlight fuse: 10.0 A
Signaling system fuse:
10.0 A
Ignition fuse: 10.0 A
Fuel injection system fuse: 10.0 A
Radiator fan motor fuse:
20.0 A
UBCX60E0.book Page 4 Friday, April 19, 2019 9:09 AM
Page 153 of 156

12-1
12
INDEX
AAccessories and loading ................................................ 7-6
Air filter element, cleaning ........................................... 9-22BBattery ......................................................................... 9-47
Brake and clutch levers, checking and lubricating ...... 9-43
Brake fluid, changing ................................................... 9-34
Brake fluid level, checking ........................................... 9-31
Brake lever ..................................................................... 5-6
Brake lever free play, checking the front ..................... 9-35
Brake light switches ..................................................... 9-37
Brake pads, checking the front and rear ..................... 9-30
Brake pedal .................................................................... 5-7
Brake pedal, checking and lubricating ........................ 9-43
Brake pedal height, checking ...................................... 9-35
Brakes .......................................................................... 9-30
Brakes, front and rear .................................................... 6-4
Brake/tail light .............................................................. 9-54CCables, checking and lubricating ................................ 9-42
Chassis fasteners .......................................................... 6-7
Cleaning ....................................................................... 10-1
Clutch lever .................................................................... 5-5
Clutch lever free play, adjusting .................................. 9-38
Coolant .................................................................6-4, 9-18
Coolant temperature warning light ................................ 5-2DDrive chain ..................................................................... 6-5
Drive chain, lubricating ................................................ 9-41 Drive chain slack .......................................................... 9-39
EEngine break-in .............................................................. 7-5
Engine idling speed ..................................................... 9-28
Engine oil ....................................................................... 6-4
Engine oil and oil filter element .................................... 9-13
Engine, start ................................................................... 7-1
Engine stop switch ........................................................ 5-4
Engine trouble warning light .......................................... 5-3FFuel ....................................................................... 5-10, 6-4
Fuel level warning light .................................................. 5-2
Fuel tank cap ................................................................. 5-9
Fuses, replacing .......................................................... 9-50HHandlebar switches ....................................................... 5-3
Headlight beam, adjusting ........................................... 9-53
Headlight bulb, replacing ............................................. 9-52IIdentification numbers ................................................... 1-1
Indicator lights and warning lights ................................. 5-1
Instruments, lights and switches ................................... 6-7LLabel locations ............................................................... 2-1
Light switch ................................................................... 5-4MMain switch .................................................................... 5-1
Maintenance and lubrication chart ................................ 9-5
Maintenance chart, emission control system ................ 9-3
UBCX60E0.book Page 1 Friday, April 19, 2019 9:09 AM
Page 154 of 156

12-2
12
Model label ..................................................................... 1-1NNeutral indicator light .....................................................5-1OOwner’s manual and tool kit .......................................... 9-2PPanel, removing and installing ..................................... 9-10
Parking ........................................................................... 7-5
Parking brake free play, adjusting ............................... 9-36
Parking brake lever ........................................................ 5-7
Parking on a slope ......................................................... 7-6
Part locations ................................................................. 4-1RReverse indicator light ................................................... 5-2
Reverse knob ................................................................. 5-9
Reverse knob and driving in reverse .............................. 7-4
Reverse lock release cable, adjusting .......................... 9-30
Riding your ATV ............................................................. 8-1SSafety information .......................................................... 3-1
Seat .............................................................................. 5-12
Self-diagnosis device .....................................................5-3
Shifting ........................................................................... 7-2
Shift pedal ...................................................................... 5-8
Shift pedal, checking ...................................................9-43
Shock absorber, rear (For models equipped with adjustable spring preload and damping force) .......... 5-21
Shock absorber, rear (For models equipped with only adjustable spring preload) .................................. 5-19
Shock absorbers, front (For models equipped with
adjustable spring preload and damping force) .......... 5-14 Shock absorbers, front (For models equipped with
only adjustable spring preload) ................................. 5-13
Spark arrester, cleaning ............................................... 9-26
Spark plug, checking ................................................... 9-10
Specifications .............................................................. 11-1
Speed limiter .................................................................. 5-5
Start switch .................................................................... 5-4
Steering shaft, lubricating ............................................ 9-46
Storage ........................................................................ 10-2
Suspension, lubricating the upper and lower arm
pivots ......................................................................... 9-45
Suspension relay arm and connecting arm pivoting points, lubricating the rear ......................................... 9-44
Swingarm pivots, lubricating ....................................... 9-44
TThrottle lever .......................................................... 5-4, 6-5
Throttle lever free play, adjusting ................................. 9-29
Tires ............................................................................... 6-5
Troubleshooting ........................................................... 9-55
Troubleshooting charts ................................................ 9-56VValve clearance ............................................................ 9-29
Vehicle identification number ......................................... 1-1WWheel hub bearings, checking ..................................... 9-43
Wheel, installing ........................................................... 9-54
Wheel, removing .......................................................... 9-54YYamalube ..................................................................... 9-18
UBCX60E0.book Page 2 Friday, April 19, 2019 9:09 AM