2020 YAMAHA TRACER 900 instrument panel
[x] Cancel search: instrument panelPage 6 of 110

Table of contentsSafety information ............................ 1-1
Description ....................................... 2-1
Left view ......................................... 2-1
Right view ....................................... 2-2
Controls and instruments ............... 2-3
Instrument an d control functions ... 3-1
Immobilizer system......................... 3-1
Main switch/steering lock............... 3-2
Indicator lights and warning lights............................................ 3-3
Multi-function meter unit ................ 3-6
D-mode (drive mode).................... 3-17
Handlebar switches ...................... 3-18
Clutch lever .................................. 3-20
Shift pedal .................................... 3-20
Brake lever.................................... 3-20
Brake pedal .................................. 3-21
ABS .............................................. 3-21
Traction control system ................ 3-22
Fuel tank cap ................................ 3-24
Fuel ............................................... 3-25
Fuel tank overflow hose ............... 3-26
Catalytic converter ....................... 3-27
Seats ............................................ 3-27
Adjusting the rider seat height...... 3-29
Helmet holder ............................... 3-31
Storage compartment .................. 3-31
Windshield ................................... 3-32
Adjusting the headlight beams ..... 3-32 Handlebar position ....................... 3-32
Adjusting the front fork ................. 3-33
Adjusting the shock absorber
assembly.................................... 3-34
Auxiliary DC jack ........................... 3-36
Auxiliary DC connector ................. 3-36
Sidestand ...................................... 3-37
Ignition circuit cut-off system ....... 3-37
For your safety – pre-operation
checks ............................................... 4-1
Operation an d important ri din g
points ................................................. 5-1
Starting the engine .......................... 5-1
Shifting ............................................ 5-2
Tips for reducing fuel consumption ................................ 5-3
Engine break-in ............................... 5-4
Parking ............................................ 5-4
Perio dic maintenance an d
a d justment ........................................ 6-1
Tool kit ............................................ 6-2
Periodic maintenance charts .......... 6-3
Periodic maintenance chart for the emission control system .............. 6-3
General maintenance and lubrication chart ........................... 6-5
Removing and installing the panel ............................................ 6-9 Checking the spark plugs ............. 6-10
Canister ........................................ 6-11
Engine oil ...................................... 6-11
Why Yamalube.............................. 6-13
Coolant ......................................... 6-14
Air filter element ............................ 6-15
Checking the engine idling
speed ........................................ 6-15
Checking the throttle grip free play ............................................ 6-16
Valve clearance............................. 6-16
Tires .............................................. 6-16
Cast wheels .................................. 6-19
Adjusting the clutch lever free
play ............................................ 6-19
Checking the brake lever free play ............................................ 6-20
Brake light switches ..................... 6-20
Checking the front and rear brake pads ................................ 6-21
Checking the brake fluid level ...... 6-21
Changing the brake fluid .............. 6-23
Drive chain slack........................... 6-23
Cleaning and lubricating the drive chain ................................. 6-25
Checking and lubricating the
cables ........................................ 6-25
Checking and lubricating the throttle grip and cable ............... 6-26
Checking and lubricating the brake and shift pedals............... 6-26UB5CE1E0.book Page 1 Monday, August 6, 2018 1:13 PM
Page 28 of 110

Instrument and control functions
3-13
3
Resetting the maintenance counters
1. Use the select switch to highlight“Maintenance”.
2. Push the menu switch, and then push the “RESET” button to select
the item to reset. 3. While the selected item is flashing,
push the “RESET” button for 2
seconds.
4. Push the menu switch to return to the setting mode menu.
Checking and resetting “TIME–2” and
“TIME–3”1. Use the select switch to highlight “Time Trip”. 2. Push the menu switch to display
“TIME–2” and “TIME–3”. To reset
a time trip, push the “RESET” but-
ton to select the item to reset.
3. While the selected item is flashing, push the “RESET” button for 2
seconds.
4. Push the menu switch to return to the setting mode menu.
Selecting the units
1. Use the select switch to highlight “Unit”.
This function allows you to
change the items shown in
3 information displays.
This function allows you to
adjust the brightness of
the multi-function meter
unit panel.
This function allows you to
set the clock.
This function allows you to
reset all items, except the
odometer and the clock.
DisplayBrightnessClockAll Reset
MENUMaintenanceTime TripUnitDisplayBrightnessClockAll Reset
20
OIL km
10
FREE-1km
10
FREE-2kmMaintenanceMENUMaintenanceTime TripUnitDisplayBrightnessClockAll Reset
TIME-2
0:07
TIME-3
0:07
Time Trip
UB5CE1E0.book Page 13 Monday, August 6, 2018 1:13 PM
Page 30 of 110

Instrument and control functions
3-15
3
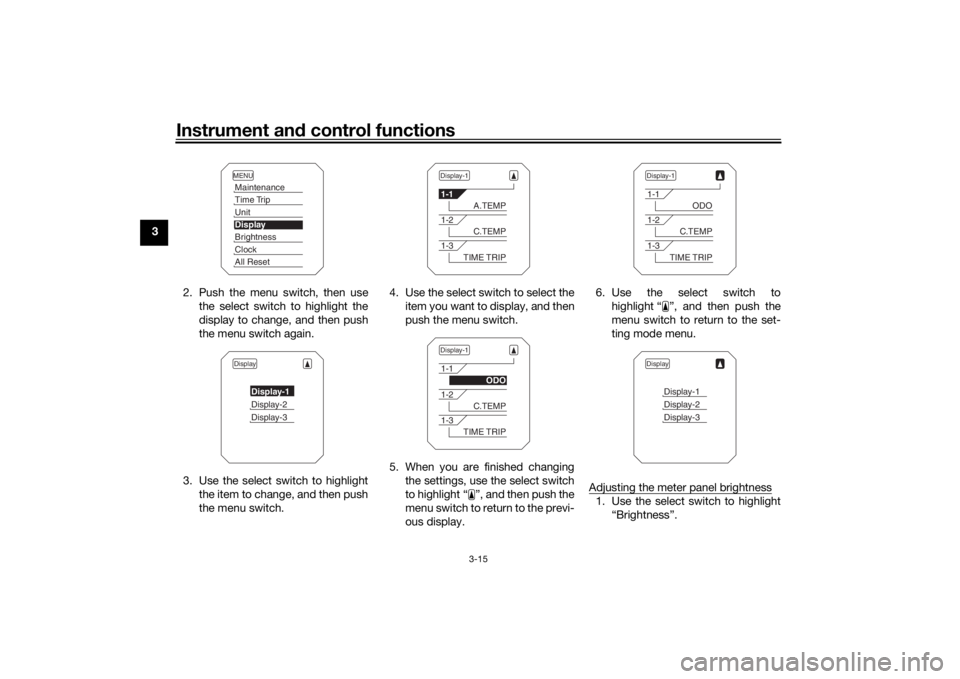
2. Push the menu switch, then usethe select switch to highlight the
display to change, and then push
the menu switch again.
3. Use the select switch to highlight the item to change, and then push
the menu switch. 4. Use the select switch to select the
item you want to display, and then
push the menu switch.
5. When you are finished changing the settings, use the select switch
to highlight “ ”, and then push the
menu switch to return to the previ-
ous display. 6. Use the select switch to
highlight “ ”, and then push the
menu switch to return to the set-
ting mode menu.
Adjusting the meter panel brightness
1. Use the select switch to highlight “Brightness”.
MENUMaintenanceTime TripUnitDisplayBrightnessClockAll ResetDisplay
Display-1Display-2Display-3
Display-11-1
A.TEMP
1-2
C.TEMP
1-3
TIME TRIP
Display-11-1
ODO
1-2
C.TEMP
1-3
TIME TRIP
Display-11-1
ODO
1-2
C.TEMP
1-3
TIME TRIP
Display
Display-1Display-2Display-3
UB5CE1E0.book Page 15 Monday, August 6, 2018 1:13 PM