2020 VOLVO S90 clock
[x] Cancel search: clockPage 144 of 643

||
DISPLAYS AND VOICE CONTROL
* Option/accessory.
142
Calibrating the horizontal positionIf the windshield or display unit has been replaced, the head-up display's horizontalposition may need to be calibrated. Calibrationmeans that the projected image is rotatedclockwise or counterclockwise. 1.
Tap
Settings in the center display's Top
view.
2. Select
My CarDisplaysHead-Up
Display Options
Head-Up Display
Calibration.
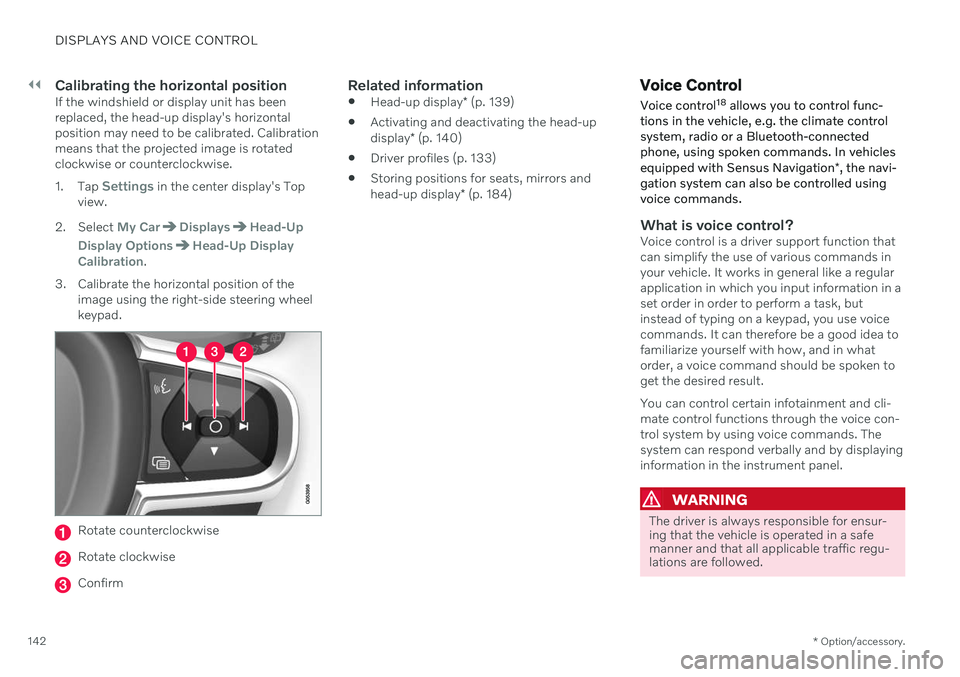
3. Calibrate the horizontal position of the image using the right-side steering wheel keypad.
Rotate counterclockwise
Rotate clockwise
Confirm
Related information
Head-up display
* (p. 139)
Activating and deactivating the head-up display
* (p. 140)
Driver profiles (p. 133)
Storing positions for seats, mirrors andhead-up display
* (p. 184)
Voice Control
Voice control 18
allows you to control func-
tions in the vehicle, e.g. the climate control system, radio or a Bluetooth-connectedphone, using spoken commands. In vehicles equipped with Sensus Navigation *, the navi-
gation system can also be controlled using voice commands.
What is voice control?Voice control is a driver support function that can simplify the use of various commands inyour vehicle. It works in general like a regularapplication in which you input information in aset order in order to perform a task, butinstead of typing on a keypad, you use voicecommands. It can therefore be a good idea tofamiliarize yourself with how, and in whatorder, a voice command should be spoken toget the desired result. You can control certain infotainment and cli- mate control functions through the voice con-trol system by using voice commands. Thesystem can respond verbally and by displayinginformation in the instrument panel.
WARNING
The driver is always responsible for ensur- ing that the vehicle is operated in a safemanner and that all applicable traffic regu-lations are followed.
Page 227 of 643

CLIMATE CONTROL
}}
* Option/accessory.225
Preconditioning timer *
The timer can be set to finish preconditioning at a predetermined time.
The timer can store up to 8 preset times for: A time on a particular date
A time on one or more days of the week, with or without the repeat function.
Related information
Preconditioning
* (p. 224)
Adding and editing timer settings for pre- conditioning
* (p. 225)
Activating and deactivating precondition-ing timer
* (p. 226)
Deleting preconditioning timer settings
*
(p. 227)
Adding and editing timer settings for preconditioning *
The preconditioning timer can store up to 8 preset timer settings.
Adding a timer setting
Button for adding a timer setting in the Parking
climate tab in Climate view.
1. Open Climate view in the center display. 2.
Select the
Parking climate tab.
3. Tap
Add timer.
> A pop-up window will appear.
NOTE
It is not possible to add a time setting if there are already 8 settings for the timer.Delete a time setting to be able to add anew one.
4. Tap Date to set a time for a specific date.
Tap
Days to set a time for one or more
days of the week. With
Days: Activate/deactivate the repeat
function by selecting/deselecting the
Repeat weekly checkbox.
5. With
Date: Select a date for precondition-
ing by scrolling in the date list using the arrows. With
Days: Select days of the week for
preconditioning by tapping the buttons for the days.
6. Set the time at which preconditioning should be completed by scrolling usingthe arrows in the clock.
7. Tap
Confirm to add a timer setting.
> The timer setting will be added to the list and activated.
Editing a timer setting1. Open Climate view in the center display. 2. Select the
Parking climate tab.
3. Tap the timer setting you would like to change.
> A pop-up window will appear.
4. To edit a timer setting, follow the proce- dures described under the heading "Add- ing a timer setting" above.
Page 241 of 643

KEY, LOCKS AND ALARM
}}
239
Turn the key over, move the button to
the side and slide the rear cover slightly upward.
The cover will loosen and can be
removed from the key.
Use a screwdriver or similar object to turn the battery cover counterclockwise so themarkers point to OPEN.
Remove the cover carefully by pressinge.g. a fingernail into the indentation. Pry the cover up.The battery's positive side ( +) faces
upward. Carefully pry out the battery as shown in the illustration.
CAUTION
Avoid touching new batteries and their contact surfaces with your fingers as thiswill impair their function.
7 Included in vehicles equipped with keyless locking/unlocking *.
Page 242 of 643

||
KEY, LOCKS AND ALARM
240
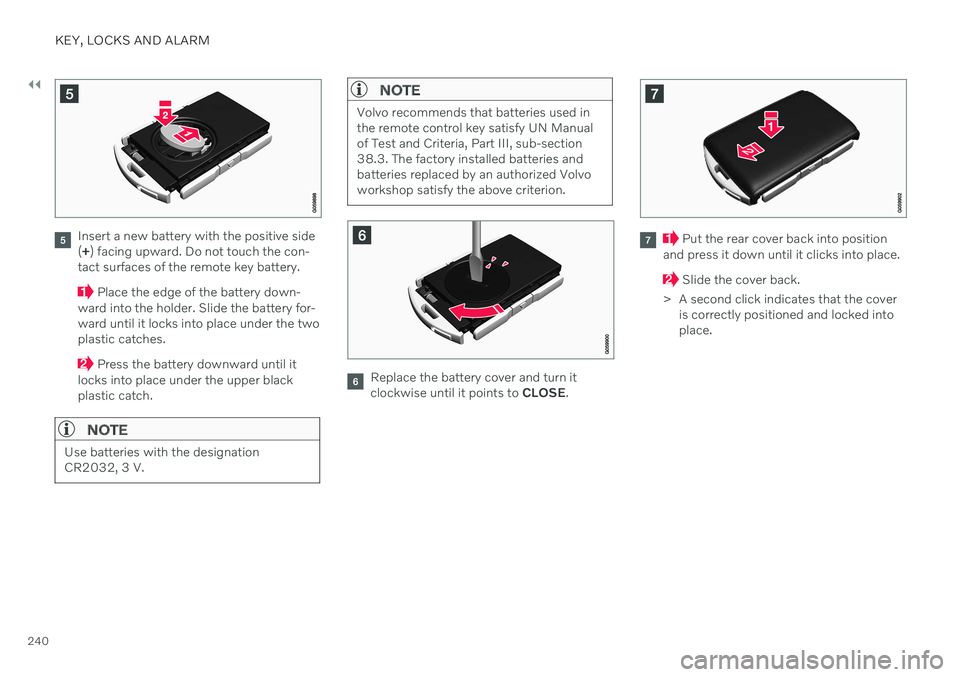
Insert a new battery with the positive side (+ ) facing upward. Do not touch the con-
tact surfaces of the remote key battery.
Place the edge of the battery down-
ward into the holder. Slide the battery for- ward until it locks into place under the twoplastic catches.
Press the battery downward until it
locks into place under the upper black plastic catch.
NOTE
Use batteries with the designation CR2032, 3 V.
NOTE
Volvo recommends that batteries used in the remote control key satisfy UN Manualof Test and Criteria, Part III, sub-section38.3. The factory installed batteries andbatteries replaced by an authorized Volvoworkshop satisfy the above criterion.
Replace the battery cover and turn it clockwise until it points to CLOSE.
Put the rear cover back into position
and press it down until it clicks into place.
Slide the cover back.
> A second click indicates that the cover is correctly positioned and locked into place.
Page 247 of 643

KEY, LOCKS AND ALARM
}}
245
Locking and unlocking with detachable key blade
The detachable key blade can be used to unlock the vehicle from the outside, e.g. if thebattery in the remote key is discharged.
Unlocking
Pull the front left-hand door handle to its end position to access the lock cylinder.
Put the key in the lock cylinder.
Turn the key clockwise 45 degrees so that the key blade is pointing straight rear-ward.
Turn the key blade back 45 degrees to its original position. Remove the key from thelock cylinder and release the handle sothat it returns to its original positionagainst the vehicle.
5. Pull the door handle. > The door will open. Lock the door in the same way, but turn thekey 45 degrees counterclockwise in step (3).
Disarming the alarm and starting the vehicle
NOTE
When the door is unlocked using the detachable key blade and then opened, thealarm will be triggered.
Location of the backup key reader in the cup holder.
Turn off the alarm by:
1. Place the remote control key on the key
symbol in the backup reader in the bottom of the cup holder in the tunnel console.
2. Turn the start knob clockwise and release it.
> The alarm signal will stop and the alarmwill switch off.
LockingThe vehicle can also be locked using the remote key's detachable key blade, e.g. ifeither the vehicle's or remote key's batteriesare discharged. The left-hand front door can be locked by inserting the detachable key into the door'slock cylinder. This is the only door with a lock cylinder. The other doors have lock mechanisms in the sideof the door that must be pushed in using thekey blade. The door will then be lockedmechanically and cannot be opened from theoutside. The doors can still be opened from inside.
Manual door lock. This is not the child lock.
Page 265 of 643

KEY, LOCKS AND ALARM
* Option/accessory.263
Disarming the alarmUnlock and disarm the vehicle alarm by
pressing the unlock button on the remote key
.
grip a door handle or lightly press the trunk lid's rubberized button 16
.
Disarming the alarm without a functioning
remote key
The vehicle can be unlocked and disarmed even if the remote key is not functioning, e.g. ifthe battery is discharged.
1. Open the driver's door using the detacha- ble key blade.
> This will trigger the alarm.
Location of the backup key reader in the cup holder.
2. Place the remote key on the key symbol inthe backup reader in the tunnel console's cup holder. 3. Turn the start knob clockwise and release.
> The alarm will be disarmed.
Turning off a triggered alarm–Press the unlock button on the remote key or put the ignition into mode I by turning
the start knob clockwise and then releas-ing it.
Automatically arming and disarming the alarm
Automatically arming the alarm helps prevent inadvertently leaving the vehicle without alarmprotection. If the vehicle is unlocked using the remote key (and the alarm is disarmed) but none of thedoors or trunk lid is opened within twominutes, the alarm will be automaticallyrearmed. The vehicle will also re-lock. On some markets, the alarm will be automati- cally armed following a slight delay after thedriver's door has been opened and closedwithout being locked. To change this setting:1. Tap
Settings in the center display's Top
view.
2. Tap
My CarLocking.
3. Select
Passive Arming Deactivation to
temporarily deactivate the function.
Related information
Alarm (p. 261)
16
Vehicles with keyless locking and unlocking *.
Page 380 of 643

STARTING AND DRIVING
* Option/accessory.
378
Starting the vehicle
The vehicle can be started using the start knob in the tunnel console when the remotekey is in the passenger compartment.
Start knob in the tunnel console.
WARNING
Before starting:
Buckle your seat belt.
Adjust the seat, steering wheel and mirrors.
Make sure you can fully depress thebrake pedal.
The remote key is not physically used to startthe ignition because the vehicle is equippedwith the keyless Passive Start system. To start the vehicle:
1. The remote key must be inside the vehicle.
For vehicles with Passive Start, the key must be in the front section of the passen-ger compartment. With the optional key- less locking/unlocking function *, the key
can be anywhere in the vehicle.
2. Press and hold down the brake pedal 1
as
far as possible.
3. Turn the start knob clockwise and release. The control will automatically return to the original position.
WARNING
Never use more than one inlay mat at a time on the driver's floor. If any othertype of floor mat is used, remove theoriginal mat from the driver's seat floorbefore driving. All types of mats mustbe securely anchored in the attach-ment points in the floor. Make sure thefloor mat does not impede the move-ment of the brake pedal or acceleratorpedal in any way, as this could be aserious safety hazard.
Volvo's floor mats are specially manu-factured for your vehicle. They must beproperly secured in the attachmentpoints in the floor to help ensure theycannot slide and become trappedunder the pedals.
The starter motor will crank until the enginestarts or until overheating protection is trig-gered.
Error messagesIf the Vehicle key not found message is
shown in the instrument panel at start, place the remote key at the backup reader and thenmake a new start attempt.
1 If the vehicle is moving, it is only necessary to turn the start knob clockwise to start the engine.
Page 382 of 643

||
STARTING AND DRIVING
380
NOTE
With a cold start, idling speed may be con- siderably higher than normal for certainengine types. This is done to get the emis-sions system up to normal operating tem-perature as quickly as possible, which min-imizes exhaust emissions and protects theenvironment.
Related information
Switching off the vehicle (p. 380)
Ignition modes (p. 381)
Adjusting the steering wheel (p. 193)
Jump starting using another battery (p. 420)
Selecting ignition mode (p. 382)
Switching off the vehicle
The vehicle can be switched off using the start knob in the tunnel console.
Start knob in the tunnel console.
To switch off the vehicle:
–Turn the start knob clockwise and release to switch off the vehicle. The control willautomatically return to the original posi-tion.
If the vehicle rolls:
–Turn clockwise and hold the knob until the vehicle switches off.
Related information
Starting the vehicle (p. 378)
Ignition modes (p. 381)
Adjusting the steering wheel (p. 193)
Jump starting using another battery(p. 420)
Selecting ignition mode (p. 382)