2020 VOLVO S60 TWIN ENGINE radio antenna
[x] Cancel search: radio antennaPage 238 of 657

||
KEY, LOCKS AND ALARM
* Option/accessory.
236 approx. 1.5 meter (5 feet) along the sides of the vehicle or approx. 1 meter (3 feet) from thetrunk lid.
NOTE
The functions of the remote control key can be disrupted by ambient radio waves,buildings, topographical conditions, etc.The vehicle can always be locked/unlockedusing the key blade.
If the remote key is removed from the vehicle
If the remote key is removed from the vehicle while the engine is run- ning, the warning message
Vehicle
key not found Removed from
vehicle will be displayed in the instrument
panel and an audible signal will sound when the last door is closed.
The message will disappear when the key is returned to the vehicle and the O button on
the right-side steering wheel keypad ispressed or when the last door is closed again.
Related information
Remote key (p. 232)
Antenna locations for the start and locksystem (p. 249)
Keyless and touch-sensitive surfaces
*
(p. 246)
Replacing the remote key's battery
The battery in the remote key must be replaced when it is discharged.
NOTE
All batteries have a limited service life and must eventually be replaced (does notapply for Key Tag). The battery's service lifevaries depending on how often thevehicle/key is used.
The remote key battery should be replaced if
the information symbol illuminates and the message
Vehicle key bat. low is dis-
played in the instrument panel
the locks do not react after several attempts to lock or unlock the vehicleusing the remote key within approx.20 meter (65 feet) from the vehicle.
NOTE
Move closer to the vehicle and try to unlock it again.
The battery in the smaller key without but- tons 7
(the Key Tag) cannot be replaced. A new key can be ordered from an authorized Volvo workshop.
CAUTION
An end-of-life Key Tag must be turned in to an authorized Volvo workshop. The keymust be deleted from the vehicle becauseit can still be used to start the vehicle viabackup start.
Opening the key and replacing the battery
Hold the remote key with the front side
(with the Volvo logo) facing up and move the button on the key ring section to theright. Slide the front cover slightly upward.
The cover will loosen and can be
removed from the key.
Page 463 of 657

AUDIO, MEDIA AND INTERNET
461
Selecting sub-channels
To listen to a station's sub-channel(s), tap the station on the screen or press the forward/back arrow keys on the right-side steeringwheel keypad or below the screen. Sub-channels can also be saved as radio favorites. If you tap a sub-channel favorite, it may take up to 6 seconds before the channel becomes
audible. If you tap a station while you are out of digital range of the transmitter,
No
reception will be displayed.
Related information
HD Radio
™
(p. 459)
Activating and deactivating the HD Radio
™ (p. 460)
Changing waveband and radio station(p. 456)
Searching for a radio station (p. 456)
HD Radio
™
limitations (p. 461)
HD Radio ™ limitations
Limitations
Main channel vs. sub-channels (FM only)
: The main channel is the only chan-
nel that can receive in hybrid mode (bothdigital and analog). If a frequency has sub-channels, they are broadcast in digitalmode only. The main FM channel will bedisplayed as, for example, "WRIF-FMHD1". The sub-FM channels will be dis-played as"WRIF-FM HD2", "WRIF-FMHD3", etc.
Reception coverage area
: Due to current
IBOC transmitter power limitations, thereception coverage area in digital mode issomewhat more limited than the station'sanalog coverage area. Be aware that, likeall radio transmission technology, terrain,time of day, vegetation and buildings canhave a positive or negative effect on radioreception.
Analog to digital/digital to analogblending
: Analog to digital blending will
occur as the signal strength reaches a pre-set threshold in the receiver. This will benoticeable in fringe areas (areas with weakreception) and is normal.
NOTE
There may be a noticeable difference in sound quality when a change from ana-logue to digital or digital to analogueoccurs, such as:
Volume increase or decrease
Equalizer settings, i.e., Bass/ Mid-range/Treble cut or boost
Time alignment (Digital program mate-rial in extreme cases can be as muchas 8 seconds behind the analogue).This will noticeable as a "stuttering"effect.
The above items are dependant on thebroadcaster's equipment settings anddo not indicate a fault in the vehicle'sradio receiver or antenna systems .
Related information
HD Radio
™ (p. 459)
Activating and deactivating the HD Radio
™ (p. 460)
HD Radio
™ sub-channels (p. 460)
Page 464 of 657

AUDIO, MEDIA AND INTERNET
* Option/accessory.
462
SiriusXM ®
Satellite radio *
The SiriusXM ®
Satellite system broadcasts
from of a number of high elevation satellites in geosynchronous orbit.
Listening to satellite radioThe digital signals from the satellites are line- of-sight, which means that physical obstruc-tions such as bridges, tunnels, etc, may tem-porarily interfere with signal reception. Avoid any obstructions, such as metallic objects transported on roof racks or in a skibox, or other antennas that may impede sig- nals from the SiriusXM ®
satellites.
Selecting SiriusXM ®
Satellite radio
mode
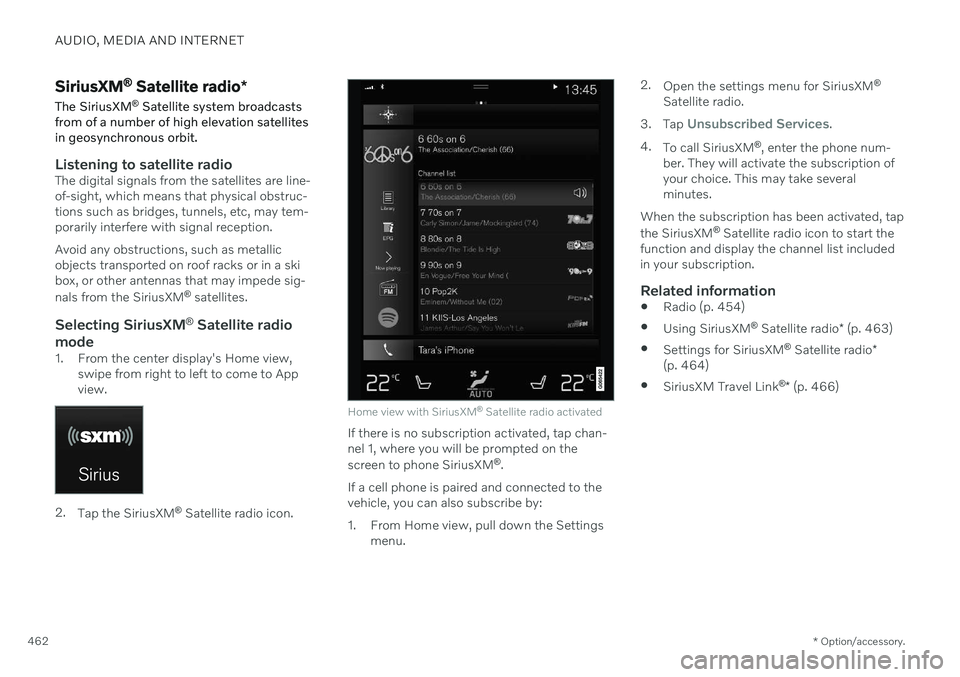
1. From the center display's Home view, swipe from right to left to come to App view.
2.Tap the SiriusXM ®
Satellite radio icon.
Home view with SiriusXM ®
Satellite radio activated
If there is no subscription activated, tap chan- nel 1, where you will be prompted on the screen to phone SiriusXM ®
.
If a cell phone is paired and connected to the vehicle, you can also subscribe by:
1. From Home view, pull down the Settings menu. 2.
Open the settings menu for SiriusXM ®
Satellite radio.
3. Tap
Unsubscribed Services.
4. To call SiriusXM ®
, enter the phone num-
ber. They will activate the subscription of your choice. This may take severalminutes.
When the subscription has been activated, tap the SiriusXM ®
Satellite radio icon to start the
function and display the channel list included in your subscription.
Related information
Radio (p. 454)
Using SiriusXM ®
Satellite radio * (p. 463)
Settings for SiriusXM ®
Satellite radio *
(p. 464)
SiriusXM Travel Link ®
* (p. 466)
Page 639 of 657

INDEX
637
1, 2, 3 ...
4WD 411
A
ABSanti-lock brakes 397
AC (Air conditioning) 219
Accessories and extra equipment 35 installation 36
Accessory installation warning 36, 37
Active Bending Lights 157
Adapting driving characteristics 413
Adaptive Cruise Control 270 activating 272
auto-brake 292
change cruise control functionality 276
limitations 275
manage speed 290
passing 296
set time interval 291
standby mode 274
switching target vehicles 289
Symbols and messages 277
troubleshooting 275
turn off 273
WARNING 288
Adjusting the steering wheel 195
Adjustment of headlight pattern 152
Airbag 52
activation/deactivation 56
driver's side 53
passenger side 53, 56
Air bag, see Airbag 52
Air conditioning 219Air conditioning, fluid volume and grade 634
Air distribution 203 air vents 203, 204
changing 204
defrosting 214
recirculation 213
table showing options 206
Air quality 200, 202 allergy and asthma 201
passenger compartment filter 203
Air recirculation 213
Alarm 256 deactivating 257
Allergy and asthma-inducing sub-
stances 201
All Wheel Drive, AWD 411
All Wheel Drive (AWD) 411
All Wheel Drive (four-wheel drive) 411Android Auto 484, 485, 486 Antenna location 249
Apple CarPlay 480, 481, 483
Approach lighting 160
Apps 452
Assistance at risk of collision 343 activating/deactivating 344
at risk of run-off 344
during collision risks from behind 346 during collision risks from oncoming
traffic 345
limitations 347
Symbols and messages 348
Audio and media 450 Audio system HD digital radio 461 SiriusXM ® Satellite radio 462, 463,
464
Auto-climate 213
Auto hold 404
Auto-hold brakes 404 activating/deactivating 405
after collision 406
driver support 260
Automatic car wash 613
Automatic high beam 155
INDEX