2020 VOLVO S60 TWIN ENGINE lock
[x] Cancel search: lockPage 364 of 657

DRIVER SUPPORT
* Option/accessory.
362
Park Assist Camera symbols and messages
Symbols and messages for the Park Assist Camera may be displayed in the instrument panel and/or the center display. Severalexamples are provided below.
Symbol Message Meaning
The rear Park Assist sensors are
turned off and no acoustic warnings or field markings for
obstacles/objects will be provided.
The camera is not functioning properly.
Park Assist System Sensors blocked, cleaning nee- dedOne or more of the sensors are blocked. Check and clean/remove the obstacle as soon as possible.
Park Assist System Unavailable Service requiredThe system is not functioning as intended. Contact a workshop A
.
A An authorized Volvo workshop is recommended.
A text message can be erased by briefly press- ing the
button in the center of the right-
side steering wheel keypad. If a message cannot be erased, contact a workshop
A
.
Related information
Park Assist Camera
* (p. 354)
Camera/radar sensor limitations (p. 301)
Page 371 of 657

DRIVER SUPPORT
}}
369
The parking sequence is cancelledA parking sequence will be cancelled if: the driver moves the steering wheel
the vehicle's speed exceeds 7 km/h (4 mph)
the driver taps
Cancel in the center dis-
play
when the anti-lock brakes or the Elec- tronic stability control are engaged - e.g.when a wheel loses grip on a slippery road
when speed-dependent power steeringwheel resistance is working at reducedpower – e.g. during cooling due to over-heating.
when, while parking, the parking sensorsdetect a vehicle or pedestrian in the vehi-cle's intended direction of travel behind orin front of the vehicle, the auto-brake func-tion will bring the vehicle to a standstill.
A message in the center display will explainwhy the parking sequence was cancelled.
CAUTION
Under certain circumstances, the function may not be able to find parking spaces –one reason may be that the sensors aredisrupted by external sound sources thatemit the same ultrasonic frequencies thatthe system works with. Examples of such sources include horns, wet tires on asphalt, pneumatic brakes,exhaust noise from motorcycles, etc.
NOTE
Dirt, ice and snow covering the sensors reduce their function and can make meas-urement impossible.
Driver responsibilityThe driver should keep in mind that the func- tion is a parking aid ‒
not an infallible fully
automatic system. The driver must always beprepared to take control and cancel a parkingsequence if necessary. There are a number of things to keep in mindwhen parking, including:
The driver is always responsible for deter-mining if the space suggested by the func-tion is suitable for parking.
Do not use the function when using snowchains or a temporary spare tire.
Do not use the function if there are anyobjects protruding from the vehicle.
Heavy rain or snowfall may inhibit PAP'sability to accurately measure a parkingspace.
While searching and measuring the park-ing space, the function may be unable todetect objects located far into the space.
PAP may not suggest parking spaces onnarrow streets if it does not detect suffi-cient space for maneuvering the vehicle.
Use approved tires 104
inflated to the cor-
rect tire pressure because this affects thefunction's ability to provide parking assis-tance.
The function is based on the way the vehi-cles are parked behind and in front of yourparking space. If they are, for example,parked too close to the curb, there is a riskthat your vehicle's tires or wheel rims
104
"Approved tires" refers to tires of the same type and make as the vehicle's original, factory-installed tires.
Page 373 of 657

DRIVER SUPPORT
* Option/accessory.371
Park Assist Pilot * messages
Messages for Park Assist Pilot (PAP 105
) may
be displayed in the instrument panel and/or the center display. Several examples are pro- vided below.
Message Meaning
Park Assist System Sensors blocked, cleaning neededOne or more of the sensors are blocked. Check and clean/remove the obstacle as soon as possible.
Park Assist System Unavailable Service requiredThe system is not functioning as intended. Contact a workshop
A
.
A An authorized Volvo workshop is recommended.
A text message can be erased by briefly press- ing the
button in the center of the right-
side steering wheel keypad. If a message cannot be erased, contact a workshop A
.
Related information
Park Assist Pilot
* (p. 363)
Park Assist Pilot
* limitations (p. 368)
105
Park Assist Pilot
Page 384 of 657

||
HYBRID INFORMATION
3822. The charging cable handle will lock into
place and charging will begin within 5 seconds. When charging starts, thegreen LED light in the charging socket willbegin to flash. The approximate remainingcharging time or the charging status willbe displayed in the instrument panel. Charging may be temporarily interrupted if the vehicle is unlocked:
and a door is open
‒ charging will
restart within a few minutes.
if no door is opened
‒ the vehicle will
automatically relock. Charging willresume after 1 minute.
CAUTION
Never detach the charging cable from the 120/240 V outlet (AC, alternating current)while charging is in progress – the120/240 V outlet could be damaged insuch circumstances. Always interruptcharging first and then disconnect thecharging cable – first from the vehicle'scharging socket and then from the120/240 V outlet.
During charging, condensation from the air conditioning may form under the vehicle. Thisis normal and is caused by the hybrid batterycooling.
Related information
Charging the hybrid battery (p. 375)
Opening and closing the charging socketcover (p. 380)
Charging status in the vehicle's chargingsocket (p. 382)
Charging status in the instrument panel(p. 384)
Charging status in the charging cable's charging module (p. 383)
Stopping hybrid battery charging (p. 386)
Charging status in the vehicle's charging socket
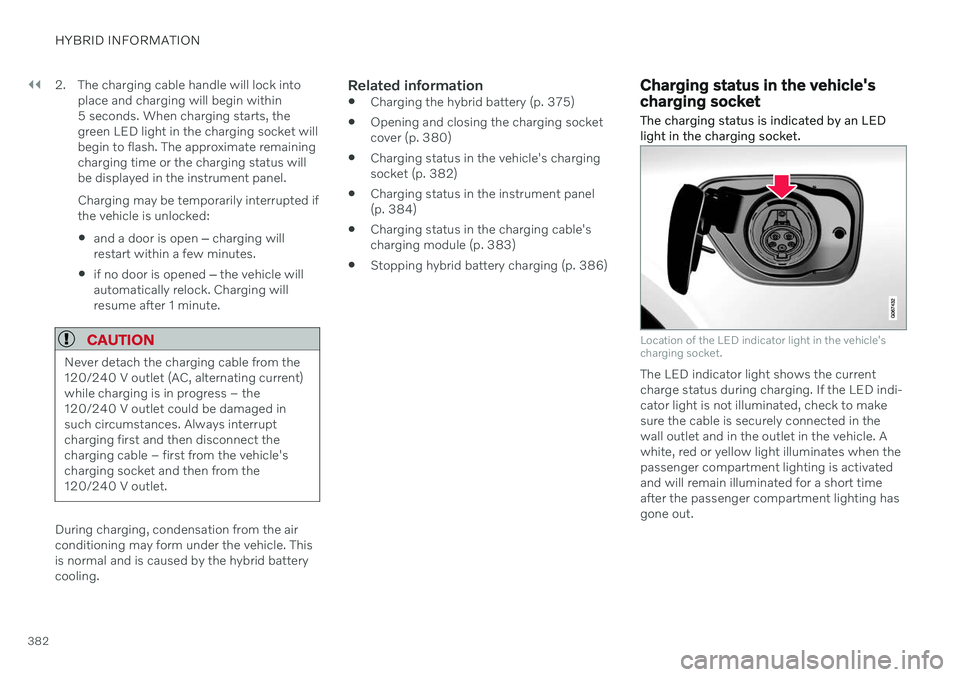
The charging status is indicated by an LED light in the charging socket.
Location of the LED indicator light in the vehicle's charging socket.
The LED indicator light shows the current charge status during charging. If the LED indi-cator light is not illuminated, check to makesure the cable is securely connected in thewall outlet and in the outlet in the vehicle. Awhite, red or yellow light illuminates when thepassenger compartment lighting is activatedand will remain illuminated for a short timeafter the passenger compartment lighting hasgone out.
Page 385 of 657

HYBRID INFORMATION
383
LED indicator light's colorMeaning
White Courtesy light. Yellow Wait modeA
– waiting for
charging to start.
Flashing green Charging is in progress B
.
Green Charging completed C
.
Red Malfunction.
A E.g. after a door has been opened or if the charging cable handle is not locked in place.
B The more slowly the light flashes, the closer the battery is tobeing fully charged.
C The light will go out after a short time.
Related information
Charging the hybrid battery (p. 375)
Charging status in the instrument panel (p. 384)
Charging status in the charging cable'scharging module (p. 383)
Stopping hybrid battery charging (p. 386)
Charging status in the charging cable's charging module
The red and blue lights in the charging mod- ule indicate the status of ongoing and com-pleted charging.
Charge module: 1. Red warning light, 2. Blue status indicator
When the charge module is initially plugged into a wall outlet, the red warning light willflash once to indicate that a startup safetycheck has been performed. When the safetycheck has been completed, the blue statusindicator will glow steadily and the red warn-ing light will be off. The charger is now readyto be used. If the red warning light continuesto flash or glows steadily, a fault has beendetected and the charger will not deliverpower to the vehicle. Contact a Volvo retaileror a certified Volvo service technician. When the charging cable is connected to thevehicle's charging socket, the blue light willflash once. Charging cable connected to the vehicle's charging socket:
Indicator light's color
Meaning
Flashing blue Charging is in progress. Thelight flashes about onceevery other second.
Solid blue Charging completed. This will also be indicated in theinstrument panel.
Related information
Charging the hybrid battery (p. 375)
Charging status in the vehicle's charging socket (p. 382)
Charging status in the instrument panel(p. 384)
Stopping hybrid battery charging (p. 386)
Page 387 of 657

HYBRID INFORMATION
385
NOTE
If the instrument panel is not used, it will go dark after a period of time. To reactivatethe display: depress the brake pedal,
open one of the doors, or
put the ignition in mode
I by turning
the START knob clockwise and then
releasing.
Related information
Charging the hybrid battery (p. 375)
Twin Engine symbols and messages in the instrument panel (p. 388)
Charging status in the vehicle's chargingsocket (p. 382)
Charging status in the charging cable'scharging module (p. 383)
Stopping hybrid battery charging (p. 386)
Page 388 of 657

HYBRID INFORMATION
* Option/accessory.
386
Stopping hybrid battery charging To stop charging of the hybrid battery, unlock the vehicle, unplug the charging cable fromthe vehicle's charging socket and thenunplug the cable from the 120/240 V outlet(alternating current).
CAUTION
Before the charging cable is removed from the vehicle's charging socket, the vehiclemust be unlocked using the unlock buttonon the remote key. This must be done evenif the vehicle's doors are already unlocked.If the vehicle is not unlocked using theunlock button, the charging cable or sys-tem may be damaged.
NOTE
Always unlock the vehicle so that charging is cut off before the connection to the120/240 V outlet (AC, alternating current)is disconnected. Note that the chargingcable must be disconnected from the vehi-cle's charging socket before it is discon-nected from the 120/240 V outlet, partlyto prevent damage to the system and partyto prevent unintentional interruption ofcharging.
Unlock the vehicle with the remote key. Charging will stop.
Press the lock button on the charging cable's handle. The handle will bereleased/unlocked. Unplug the cable fromthe vehicle's charging socket and closethe charger door.
Unplug the cable from the 120/240 V out- let. Stow the charging cable in the storage compartment on the right side of thetrunk.
Charging cable automatically locksIf the charging cable cannot be removed fromthe charging socket, it will automatically lockinto place again after unlocking to maximizecharging and range and to enable precondi-tioning before driving. The charging cable canbe removed again if the vehicle is unlockedusing the remote key. For vehicles with Passive Entry *, the handle can be used to lock
and unlock.
Related information
Opening and closing the charging socket cover (p. 380)
Charge cable (p. 377)
Page 394 of 657

STARTING AND DRIVING
* Option/accessory.
392
Starting the vehicle
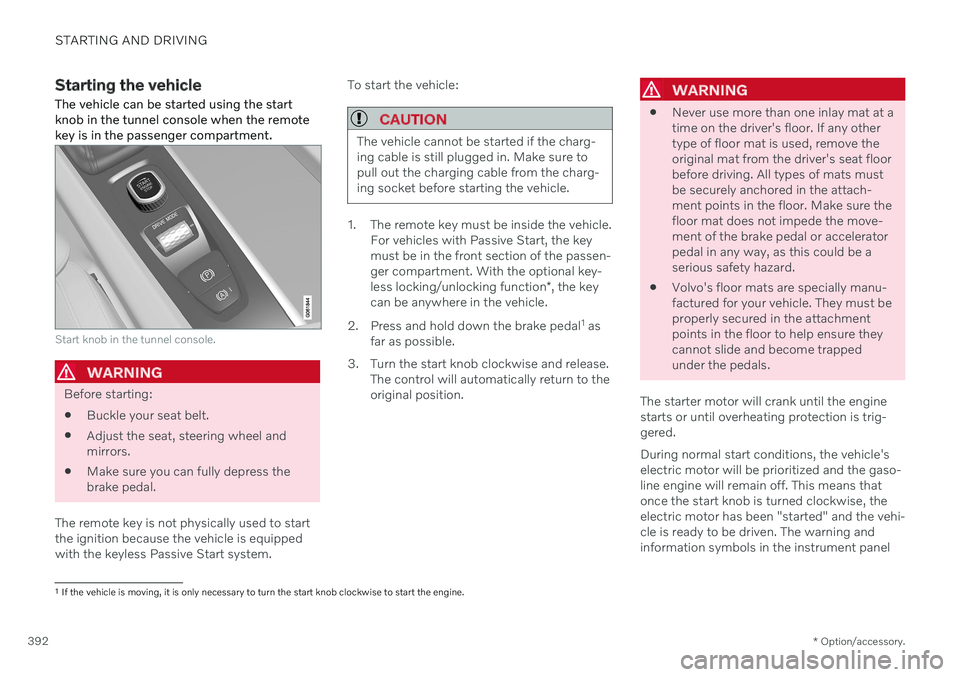
The vehicle can be started using the start knob in the tunnel console when the remotekey is in the passenger compartment.
Start knob in the tunnel console.
WARNING
Before starting:
Buckle your seat belt.
Adjust the seat, steering wheel and mirrors.
Make sure you can fully depress thebrake pedal.
The remote key is not physically used to startthe ignition because the vehicle is equippedwith the keyless Passive Start system. To start the vehicle:
CAUTION
The vehicle cannot be started if the charg- ing cable is still plugged in. Make sure topull out the charging cable from the charg-ing socket before starting the vehicle.
1. The remote key must be inside the vehicle.
For vehicles with Passive Start, the key must be in the front section of the passen-ger compartment. With the optional key- less locking/unlocking function *, the key
can be anywhere in the vehicle.
2. Press and hold down the brake pedal 1
as
far as possible.
3. Turn the start knob clockwise and release. The control will automatically return to the original position.
WARNING
Never use more than one inlay mat at a time on the driver's floor. If any othertype of floor mat is used, remove theoriginal mat from the driver's seat floorbefore driving. All types of mats mustbe securely anchored in the attach-ment points in the floor. Make sure thefloor mat does not impede the move-ment of the brake pedal or acceleratorpedal in any way, as this could be aserious safety hazard.
Volvo's floor mats are specially manu-factured for your vehicle. They must beproperly secured in the attachmentpoints in the floor to help ensure theycannot slide and become trappedunder the pedals.
The starter motor will crank until the enginestarts or until overheating protection is trig-gered. During normal start conditions, the vehicle's electric motor will be prioritized and the gaso-line engine will remain off. This means thatonce the start knob is turned clockwise, theelectric motor has been "started" and the vehi-cle is ready to be driven. The warning andinformation symbols in the instrument panel
1 If the vehicle is moving, it is only necessary to turn the start knob clockwise to start the engine.