Page 90 of 211

After the engine is switched off, the radiator fan in the engine compartment may run on for
some minutes, even if the ignition is switched off or the vehicle key has been removed. The radiator
fan will switch itself off automatically.
Electronic immobilizer
First read and observe the introductoryinformation and safety warnings⇒
Introduction
The immobilizer helps to prevent the engine from being started and driven with an unauthorised
vehicle key.
There is a chip in the key. It automatically deactivates the immobilizer when the vehicle key is
inserted into the ignition lock.
The electronic immobilizer is automatically activated when the vehicle key is removed from the
ignition lock.
The engine can only be started using a genuine Volkswagen vehicle key with the correct code.
Coded vehicle keys are available from a Volkswagen dealership ⇒ Vehicle key set.
If a non-authorised vehicle key has been used, the display in the instrument cluster will show
. The vehicle cannot be used if this occurs. Remove the non-authorised vehicle key from
the ignition lock and used an authorised vehicle key.
The vehicle cannot be operated properly if you do not have a genuine Volkswagen key.
Changing gear
Introduction
This chapter contains information on the followingsubjects:
⇒ Warning and indicator lamp
⇒ Pedals
⇒ Manual gearbox: selecting a gear
⇒ Automated manual gearbox: selecting a gear
⇒ Changing gear with Tiptronic
⇒ Driving with an automated manual gearbox
⇒ Fault in the automated manual gearbox
⇒ Gear-change indicator (manual gearboxyf
The following will occur if reverse gear is selected and the ignition is
switched on:
\f
Page 92 of 211
Several warning and indicator lamps will light up briefly as a functional check when the ignition is
switched on. They will switch off after a few seconds.
Pedals
Fig. 94 Pedals in vehicles with a manual gearbox: ① accelerator, ② brake pedal, ③ clutch pedal
Fig. 95 Pedals in vehicles with an automated manual gearbox: ① accelerator, ② brake pedal
First read and observe the introductoryinformation and safety warnings⇒
Introduction
The operation and freedom of movement of all pedals must never be impaired by objects or floor
mats.
Only use floor mats that leave the pedal area free and can be securely fastened in the footwell.
If a brake circuit fails, you will have to depress the brake pedal further than normal in order to bring
the vehicle to a stop.
Manual gearbox: selecting a gear
Failure to observe illuminated warning lamps and text messages can lead to your vehicle
breaking down in traffic, and can cause accident and serious injury.
\f
Page 94 of 211

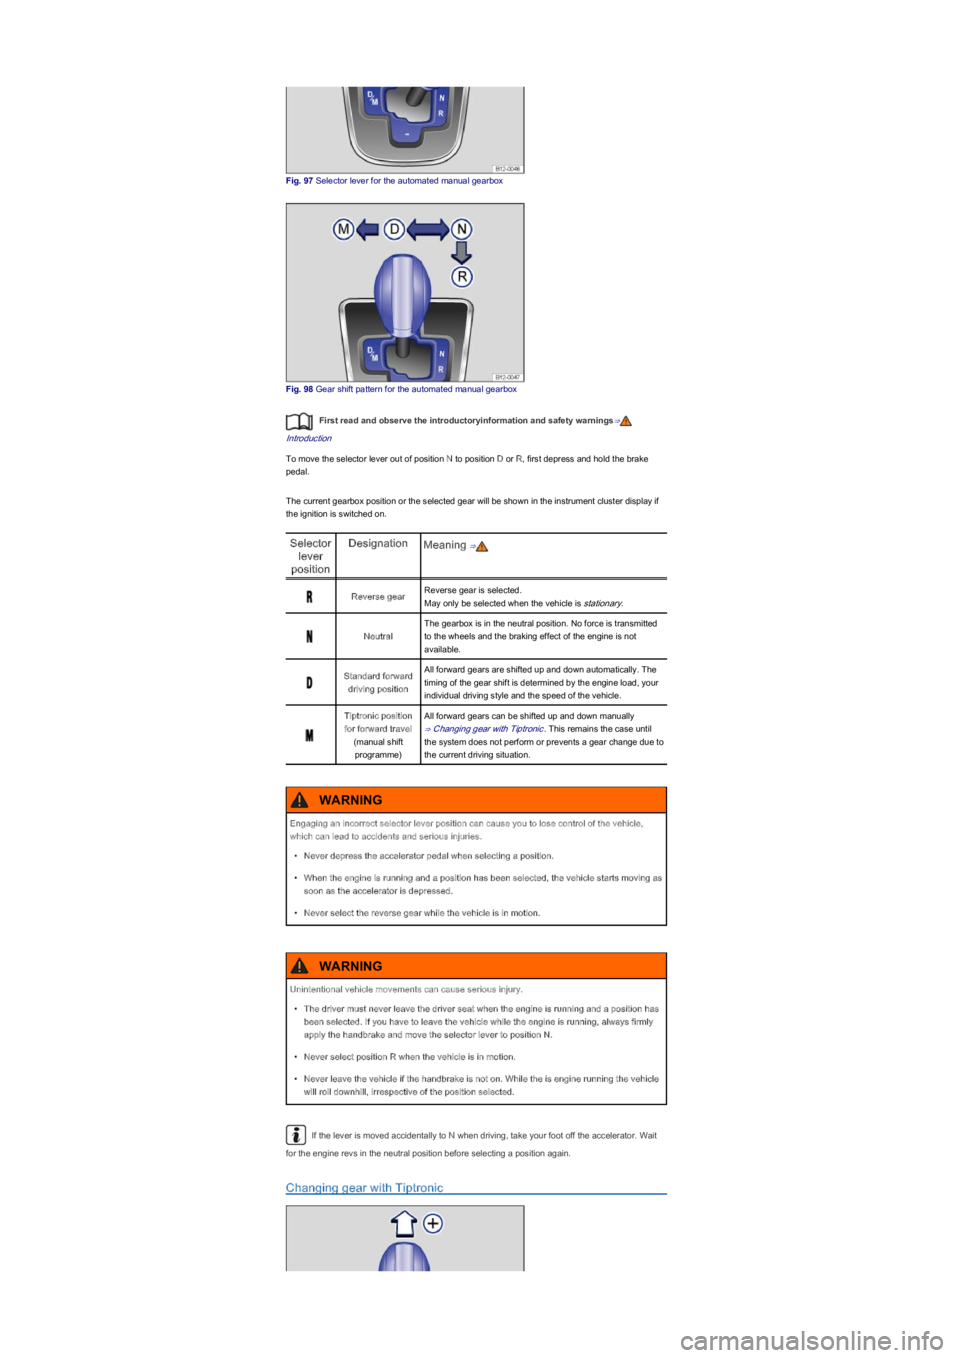
Fig. 97 Selector lever for the automated manual gearbox
Fig. 98 Gear shift pattern for the automated manual gearbox
First read and observe the introductoryinformation and safety warnings⇒
Introduction
To move the selector lever out of position N to position D or R, first depress and hold the brake
pedal.
The current gearbox position or the selected gear will be shown in the instrument cluster display if
the ignition is switched on.
Selector
lever
position
DesignationMeaning ⇒
Reverse gearReverse gear is selected.
May only be selected when the vehicle is stationary.
Neutral
The gearbox is in the neutral position. No force is transmitted
to the wheels and the braking effect of the engine is not
available.
Standard forward
driving position
All forward gears are shifted up and down automatically. The
timing of the gear shift is determined by the engine load, your
individual driving style and the speed of the vehicle.
Tiptronic position
for forward travel
(manual shift
programmeyf
All forward gears can be shifted up and down manually
⇒ Changing gear with Tiptronic. This remains the case until
the system does not perform or prevents a gear change due to
the current driving situation.
If the lever is moved accidentally to N when driving, take your foot off the accelerator. Wait
for the engine revs in the neutral position before selecting a position again.
Changing gear with Tiptronic
Engaging an incorrect selector lever position can cause you to lose control of the vehicle,
which can lead to accidents and serious injuries.
\f
Page 98 of 211
Warning and indicator lamps
First read and observe the introductoryinformation and safety warnings⇒
Introduction
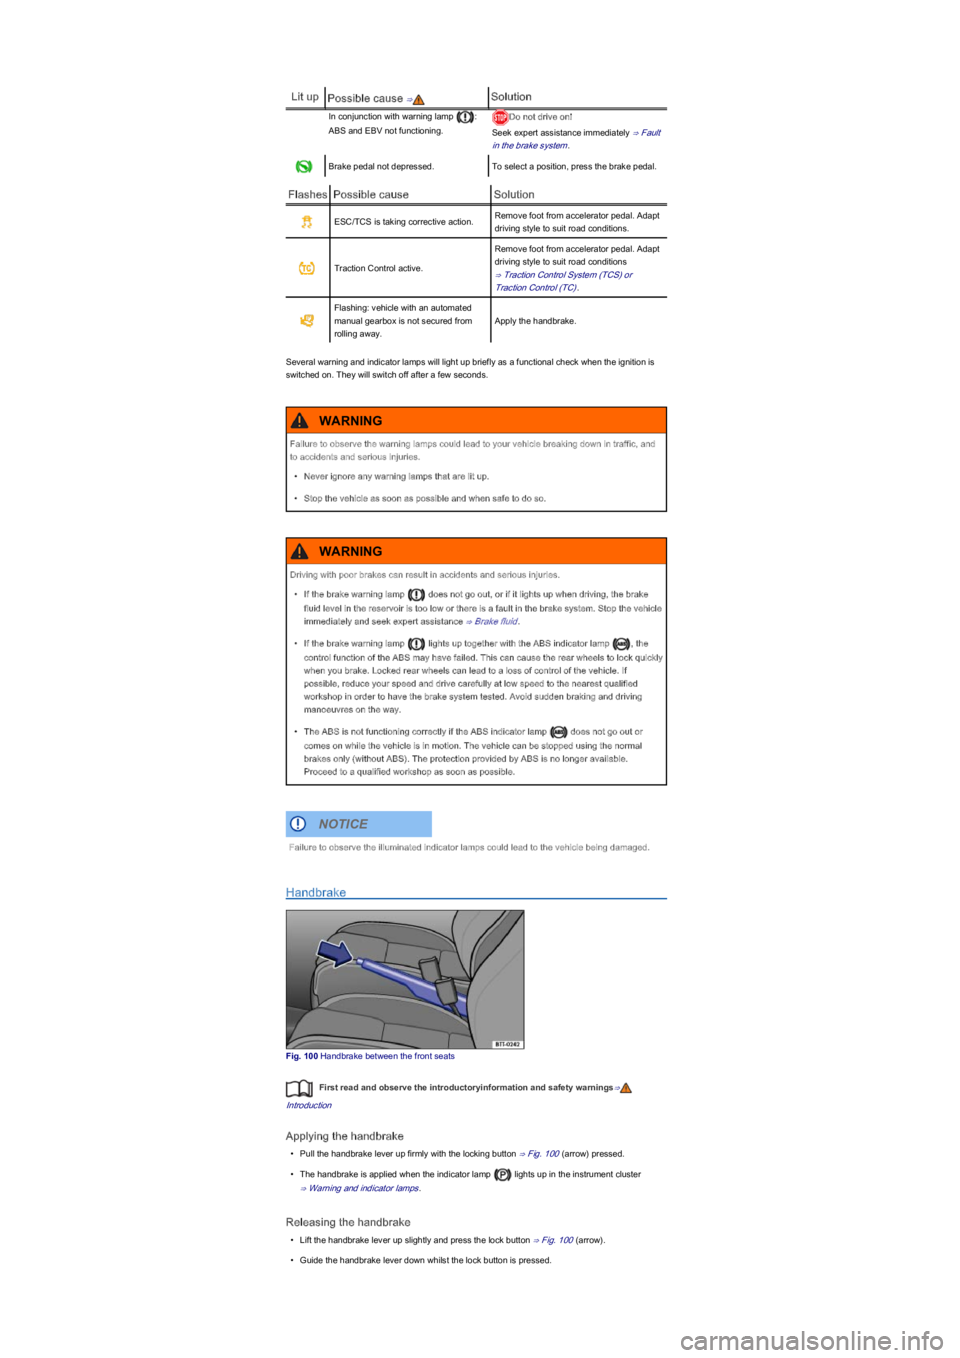
Lit upPossible cause ⇒Solution
Handbrake is applied.⇒ Handbrake.
Brake system fault.
Do not drive on!
Seek expert assistance immediately ⇒ Fault
in the brake system.
Brake fluid level is too low.Do not drive on!
Check brake fluid level ⇒ Brake fluid level.
In conjunction with ABS indicator lamp
: ABS and EDV not functioning.
Do not drive on!
Seek expert assistance immediately ⇒ Fault
in the brake system.
ESC switched off by the system.Switch the ignition on and off. If necessary,
drive a short distance.
ESC fault.Proceed to a qualified workshop.
In conjunction with ABS indicator lamp
: ABS fault.
Proceed to a qualified workshop. The
vehicle can be braked without ABS.
Vehicle battery has been reconnected.
Drive a short distance at a speed of
15 \f
Page 99 of 211

Lit upPossible cause ⇒Solution
In conjunction with warning lamp :
ABS and EBV not functioning.
Do not drive on!
Seek expert assistance immediately ⇒ Fault
in the brake system.
Brake pedal not depressed.To select a position, press the brake pedal.
FlashesPossible causeSolution
ESC/TCS is taking corrective action.Remove foot from accelerator pedal. Adapt
driving style to suit road conditions.
Traction Control active.
Remove foot from accelerator pedal. Adapt
driving style to suit road conditions
⇒ Traction Control System (TCSyf���R�U�
Traction Control (TCyf.
Flashing: vehicle with an automated
manual gearbox is not secured from
rolling away.
Apply the handbrake.
Several warning and indicator lamps will light up briefly as a functional check when the ignition is
switched on. They will switch off after a few seconds.
Handbrake
Fig. 100 Handbrake between the front seats
First read and observe the introductoryinformation and safety warnings⇒
Introduction
Applying the handbrake
\f
Page 109 of 211

Information on steering
First read and observe the introductoryinformation and safety warnings⇒
Introduction
The steering should be locked every time you leave the vehicle to make it more difficult for the
vehicle to be stolen.
Mechanical steering column lock
The steering column is locked if the vehicle key is removed from the ignition lock when the vehicle
is stationary.
Activating the steering lockDeactivating the steering lock
Park the vehicle ⇒ Braking, stopping and
parking.Insert the vehicle key into the ignition lock.
Remove the vehicle key.Turn the steering wheel slightly to take the load
off the steering lock mechanism.
Turn the steering wheel slightly until the
steering lock clicks into place.
Hold the steering wheel in this position and turn
the ignition on.
Electromechanical steering
The power steering provided by the electromechanical steering system automatically adjusts to the
vehicle speed, steering wheel torque and steering wheel angle. The electromechanical steering
only functions when the engine is running.
You will need considerably more strength than normal to steer the vehicle if the power steering is
reduced or has failed completely.
Driver assist systems
Pull-away assist systems
Introduction
This chapter contains information on the followingsubjects:
⇒ Indicator lamps
⇒ Start/stop system
⇒ Hill Hold Assist
Additional information and warnings:
\f
Page 110 of 211

Indicator lamps
First read and observe the introductoryinformation and safety warnings⇒
Introduction
Lit upPossible causeSolution
The start/stop system is not available.
Automatic engine stop active.
The start/stop system is available, but an
automatic engine stop is not possible.
Check whether all technical requirements
have been fulfilled. If not, remedy any
shortfalls ⇒ Start/stop system.
Start/stop system cannot start the engine.
Start the engine again manually using the
vehicle key ⇒ Starting and stopping the
engine.
Fault in the alternator.⇒ Vehicle battery
FlashesPossible causeSolution
Start/stop system not available.Proceed to a qualified workshop.
Several warning and indicator lamps will light up briefly as a functional check when the ignition is
switched on. They will switch off after a few seconds.
Start/stop system
Fig. 103 In the upper part of the centre console: button for the start/stop system
First read and observe the introductoryinformation and safety warnings⇒
Introduction
When the start/stop system is active, the engine is switched off whenever the vehicle is stationary.
The engine then restarts automatically as soon as it is required.
The function is automatically activated every time the ignition is switched on. The instrument cluster
display shows information about the current status ⇒ Indicator lamps.
Always switch off the start/stop system manually when driving through water.
Vehicles with a manual gearbox
\f
Page 113 of 211
Please contact a qualified workshop if there is a fault in the system. Volkswagen
recommends using a Volkswagen dealership for this purpose.
Volkswagen recommends that drivers practise using the ParkPilot in a traffic-calmed area or
car park to allow them to familiarise themselves with the system and its functions.
Operating ParkPilot
Fig. 104 Ultrasound ParkPilot sensors in the rear bumper
First read and observe the introductoryinformation and safety warnings⇒
Introduction
The ParkPilot uses ultraound sensors to determine the distance between the rear bumper and an
obstacle. There are 3 ultrasound sensors in the rear bumper ⇒ Fig. 104 (arrowsyf�.
Switching ParkPilot on and off
FunctionWhat to do when the ignition is switched on
Switching on the
ParkPilot
automatically:
Select reverse gear or move the selector lever to position R.
The ParkPilot cannot replace the full concentration of the driver.
\f