2020 TOYOTA RAV4 fuel
[x] Cancel search: fuelPage 14 of 240

141-1. Basic function
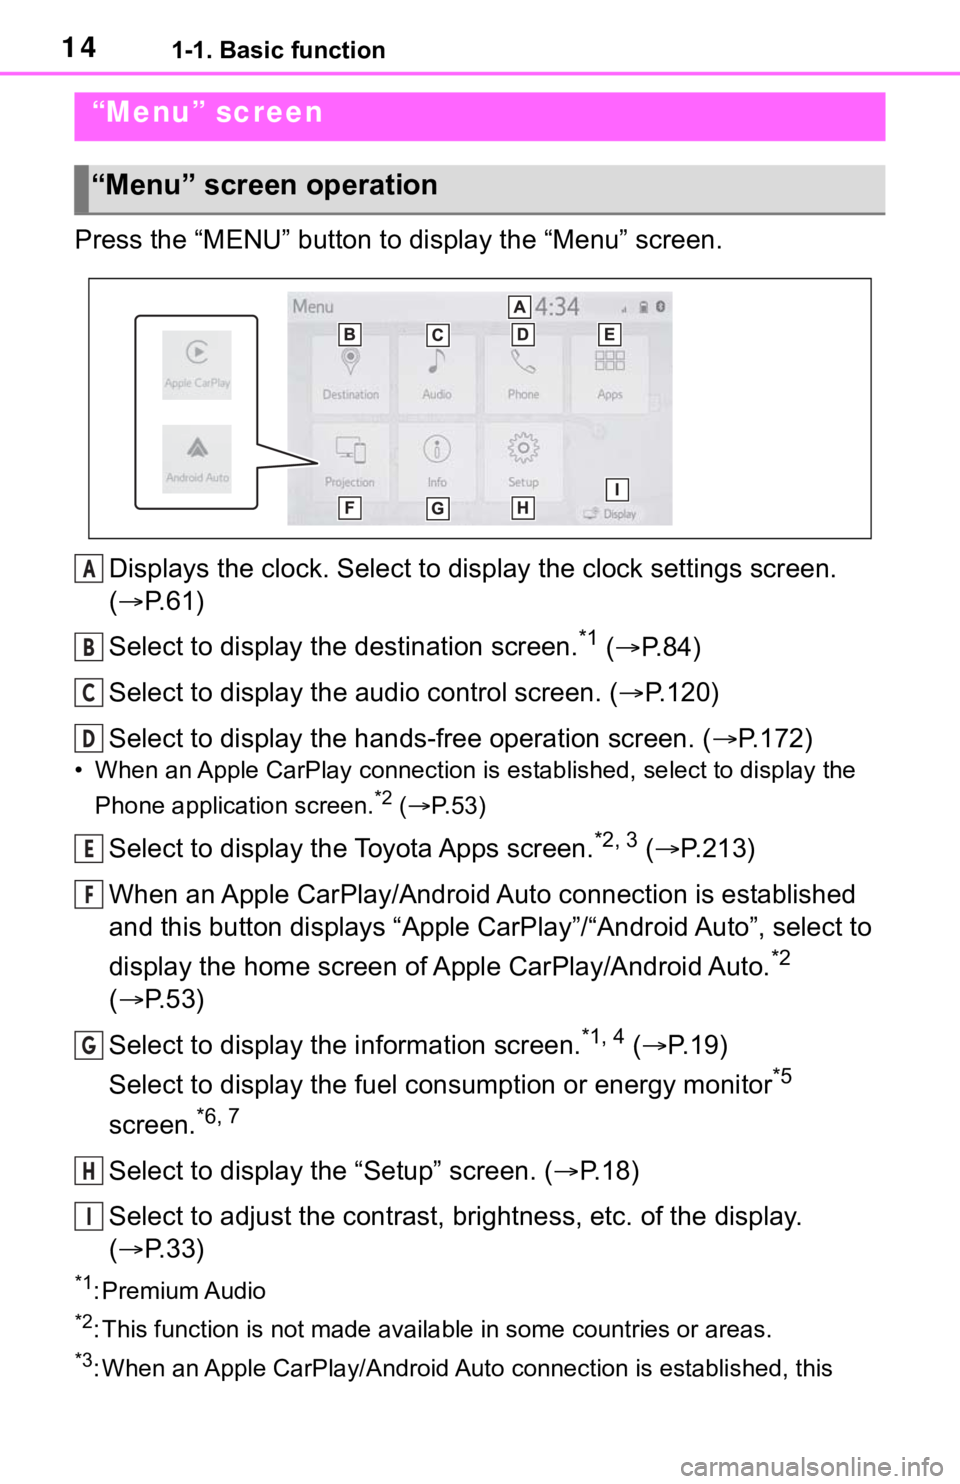
Press the “MENU” button to display the “Menu” screen.
Displays the clock. Select to display the clock settings screen.
( P. 6 1 )
Select to display the destination screen.
*1 ( P. 8 4 )
Select to display the audio control screen. ( P.120)
Select to display the hands-free operation screen. ( P.172)
• When an Apple CarPlay connection is established, select to display the
Phone application screen.
*2 ( P. 5 3 )
Select to display the Toyota Apps screen.*2, 3 ( P.213)
When an Apple CarPlay/Android Auto connection is established
and this button displays “Apple CarPlay”/“Android Auto”, select to
display the home screen of Apple CarPlay/Android Auto.
*2
( P. 5 3 )
Select to display the information screen.
*1, 4 ( P. 1 9 )
Select to display the fuel consumption or energy monitor
*5
screen.
*6, 7
Select to display the “Setup” screen. ( P.18)
Select to adjust the contrast, brightness, etc. of the display.
( P. 3 3 )
*1: Premium Audio
*2: This function is not made available in some countries or areas .
*3: When an Apple CarPlay/Android Auto connection is established, this
“Menu” screen
“Menu” screen operation
A
B
C
D
E
F
G
H
I
Page 19 of 240

191-1. Basic function
1
Quick guide
Select to set audio settings.
(P.146)
Select to set the phone
sound, contacts, message
settings, etc. ( P.188)
Select to set the voice set-
tings. ( P.64)
Select to set vehicle informa-
tion such as maintenance
information. ( P.66)
Select to set memory points
(home, favorites entries,
areas to avoid), or naviga-
tion details.
*1 ( P.102)
Select to set Wi-Fi
® connec-
tion settings.
*2, 3 ( P.49)
Select to set Toyota Apps
settings.
*3 ( P.218)
Select to set traffic informa-
tion settings.
*1, 3 ( P.109)
Select to set data services
settings.
*1, 3 ( P.170)
*1: Premium Audio only
*2: Vehicles equipped with DCM
*3: This function is not made avail-
able in some countries or areas.
*: Audio Plus with DCM/Premium Audio only
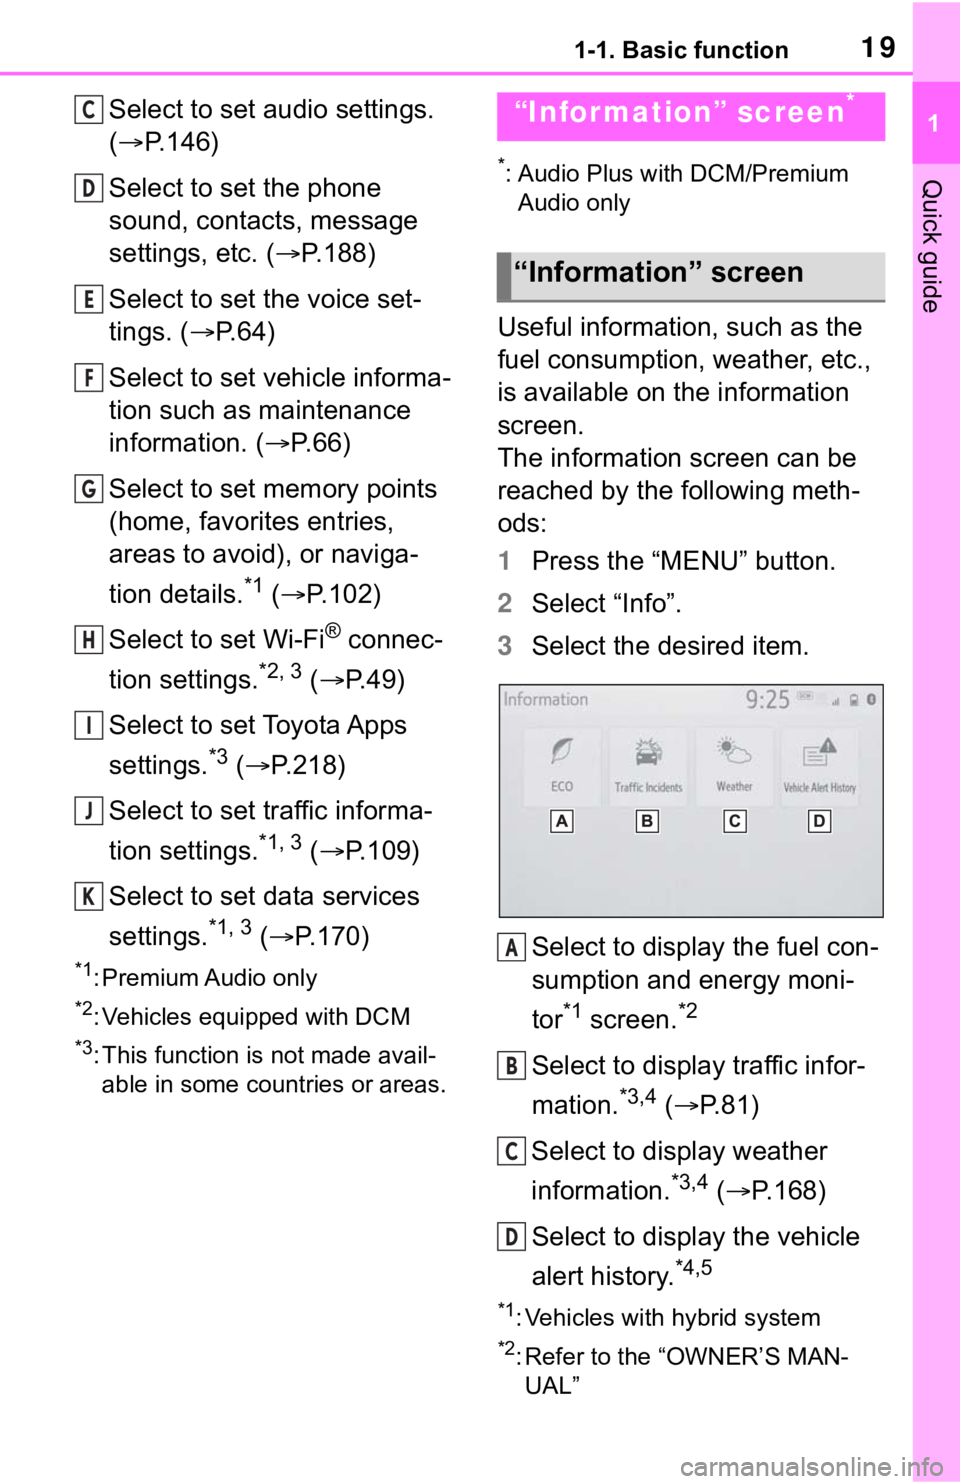
Useful information, such as the
fuel consumption, weather, etc.,
is available on the information
screen.
The information screen can be
reached by the following meth-
ods:
1 Press the “MENU” button.
2 Select “Info”.
3 Select the desired item.
Select to display the fuel con-
sumption and energy moni-
tor
*1 screen.*2
Select to display traffic infor-
mation.
*3,4 ( P.81)
Select to display weather
information.
*3,4 ( P.168)
Select to display the vehicle
alert history.
*4,5
*1: Vehicles with hybrid system
*2: Refer to the “OWNER’S MAN- UAL”
C
D
E
F
G
H
I
J
K
“Information” screen*
“Information” screen
A
B
C
D
Page 60 of 240

602-4. Other settings
2-4.Other settings
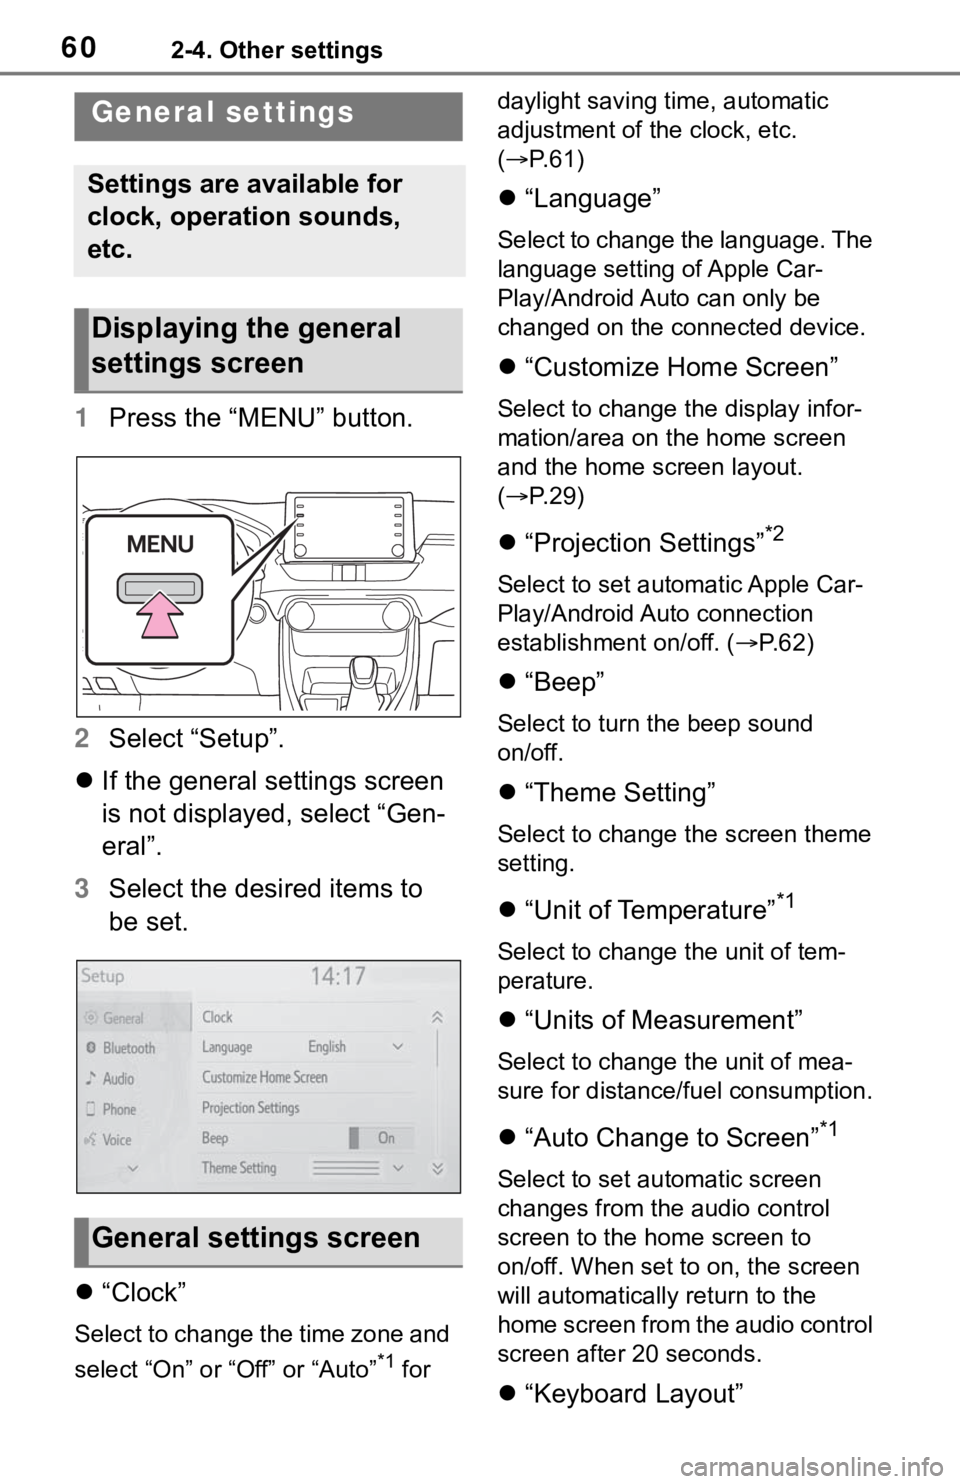
1Press the “MENU” button.
2 Select “Setup”.
If the general settings screen
is not displayed, select “Gen-
eral”.
3 Select the desired items to
be set.
“Clock”
Select to change the time zone and
select “On” or “Off” or “Auto”
*1 for daylight saving time, automatic
adjustment of the clock, etc.
(
P. 6 1 )
“Language”
Select to change the language. The
language setting of Apple Car-
Play/Android Auto can only be
changed on the connected device.
“Customize Home Screen”
Select to change the display infor-
mation/area on the home screen
and the home screen layout.
( P. 2 9 )
“Projection Settings”*2
Select to set automatic Apple Car-
Play/Android Auto connection
establishment on/off. ( P.62)
“Beep”
Select to turn the beep sound
on/off.
“Theme Setting”
Select to change the screen theme
setting.
“Unit of Temperature”*1
Select to change the unit of tem-
perature.
“Units of Measurement”
Select to change the unit of mea-
sure for distance/fuel consumption.
“Auto Change to Screen”*1
Select to set automatic screen
changes from the audio control
screen to the home screen to
on/off. When set to on, the screen
will automatically r eturn to the
home screen from the audio control
screen after 20 seconds.
“Keyboard Layout”
General settings
Settings are available for
clock, operation sounds,
etc.
Displaying the general
settings screen
General settings screen
Page 106 of 240

1063-4. Setup
1Press the “MENU” button.
2 Select “Setup”.
3 Select “Navigation”.
4 Select “Detailed Navi. Set-
tings”.
5 Select the desired items to
be set.
“Unverified Roads Guidance
Warning”
Select to set unverified roads guid-
ance warning on/off.
“Guidance on Unverified
Roads”
Select to set IPD road (roads that
are not completely digitized in our
database) guidance on/off.
“Guidance with Street Names”
Select to set the voice guidance for
the next street name on/off.
“Favorite POI Categories”
Select to set favorite POI catego-
ries that are used for POI selection
to display on the map screen.
( P.107)
“Calibration”
Select to adjust the current position
mark manually or to adjust miscal-
culation of the distance caused by
tire replacement. ( P.107)
“Adaptive Route”
Select to enable/disable adaptive
routes. When enabled, the naviga-
tion system will provide frequently
used routes.
“Reset Adaptive Route”
Select to erase adaptive route data.
“Automatic Destination List
Info”
Select to set automatic destination
list information on/off. When set to
on, the estimated time of arrival to
the registered ho me and preset
Detailed navigation
settings
Settings are available for
pop-up information, favor-
ite POI categories, low fuel
warning, etc.
Displaying the detailed
navigation settings
screen
Detailed navigation set-
tings screen
Page 108 of 240

1083-4. Setup
the accuracy of a current
position: P. 1 1 4
When driving, the current posi-
tion mark will be automatically
corrected by GPS signals. If
GPS reception is poor due to
location, the current position
mark can be adjusted manually.
1 Select “Position/Direction”.
2 Scroll the map to the desired
point ( P.75) and select
“OK”.
3 Select an arrow to adjust the
direction of the current posi-
tion mark and select “OK”.
The tire change calibration func-
tion will be used when replacing
the tires. This function will adjust
miscalculation caused by the
circumference difference
between the old and new tires.
1 Select “Select after a Tire
Change”.
The message appears and
the quick distance calibration
starts automatically.
●If this procedure is not performed
when the tires are replaced, the
current position mark may be
incorrectly displayed.
*1: Vehicles with hybrid system
*2: This function does not operate
outside the cont iguous United
States (Example: Alaska and
Hawaii).
*3: Refer to the “OWNER’S MAN- UAL”
This system operates based on
the driving situation and traffic
information to enhance fuel
economy.
The system automatically stores
and registers support points
where the driver always deceler-
ates or stops based on pedal
operation and the vehicle speed
of the driver.
The registered points are shown
on the map as icons for use
as predictive deceleration sup-
port points.
Depending on the system or
driving situation, the engine
brake amount increases after
releasing the accelerator pedal.
As a result, the battery charge
amount can be increased when
decelerating or stopping the
vehicle to enhance fuel econ-
omy.
The predictive efficient drive
Position/Direction calibra-
tion
Tire change calibration
Predictive efficient drive*1,
2, 3
Predictive deceleration sup-
port
Page 131 of 240

1314-2. Radio operation
4
Audio/visual system
●ABOUT SiriusXM Services
• Most in-car trial subscriptions today include SiriusXM’s best
package All Access. It includes
every channel available on your
radio, plus streaming.
●SiriusXM All Access Subscription
• Listen everywhere with All Access. You get every channel
available in your ride, plus you can
listen on the app and online so
you can enjoy the best SiriusXM
has to offer, anywhere life takes
you. It’s the only package that
gives you all of our premium pro-
gramming, including Howard
Stern, every NFL, MLB
® and NBA
game, every NASCAR® race,
NHL® games, 24/7 talk channels
dedicated to the biggest leagues,
and more. You get all kinds of
commercial-free m usic, including
artist-dedicated channels and
more, plus sports, news, talk and
entertainment. Did you know? SiriusXM also
delivers a wide variety of services
to certain vehicle
s’ entertainment
and navigation systems such as
Traffic, Weather, Sports Scores,
Movie Listings, Fuel Prices, Stock
Prices and more . For a list of
available features in your vehicle,
visit siriusxm.com/infotainment
and get the most out of your driv-
ing experience.
●RADIO OPERATION
• Look for the Sirius, XM, SiriusXM, Band, SAT, AUX, Radio or Source
button and you’re in. If you can’t
hear us, it’s easy to get started:
Locate your Radio ID by turning to
Channel 0. If you don’t see your
number there, go to siri-
usxm.com/activationhelp to find it.
Visit siriusxm.com/refresh
or call
1-855-MYREFRESH (697-3373)
to send a refresh signal to your
radio.
Canadian Customers:
Locate your Radio ID by turning to
Channel 0.
Visit siriusxm.ca/refresh
to send a
refresh signal to your radio or call
1-888-539-7474 for service.
Each SiriusXM tuner is identified
with a unique radio ID. The radio
ID is required when activating a
SiriusXM satellite service or
when reporting a problem.
If “Ch 000” is selected using
the “TUNE SCROLL” knob,
the ID code, which is 8 alpha-
numeric characters, will be
displayed. If another channel
is selected, the ID code will no
longer be displayed. The
channel (000) alternates
between displaying the radio
NOTICE
●It is prohibited to copy, decom-
pile, disassemble , reverse engi-
neer, hack, manipulate, or
otherwise make available any
technology or software incorpo-
rated in receivers compatible
with the SiriusXM Satellite
Radio System or that support
the SiriusXM website, the
streaming service or any of its
content. Furthermore, the
AMBE
® voice compression soft-
ware included in this product is
protected by intellectual prop-
erty rights including patent
rights, copyright s, and trade
secrets of Digital Voice Sys-
tems, Inc.
●Note: this applies to SiriusXM
Satellite Radio receivers only
and not SiriusXM Ready
devices.
Displaying the radio ID
Page 225 of 240

Alphabetical Index225
using DCM and the system . 208Before using the function ..... 208
Type C: Function achieved by using DCM ............................ 209
Type D: Function achieved by using DCM and a smartphone............................................... 211 Remote Connect .................. 211
Service Connect ................... 212
Typical voice guidance prompts ................................................. 99
U
USB memory ........................... 134 Overview .............................. 134
Use of information accumulated by navigation system (Vehicles
equipped with DCM) ............. 114Displaying the useful navigation information settings screen 114
V
“Vehicle Alert History” button (“Information” screen) ........... 19
“Vehicle” button (“Setup” screen) .............................. 18, 66
Vehicle settings ........................ 66 Displaying the vehicle settings screen .................................. 66
Maintenance........................... 66
Setting dealer information ...... 69
Setting the valet mode ........... 68
Vehicle settings screen .......... 66
“Voice” button (“Setup” screen) ........................................... 18, 64
Voice command system......... 158 Using the voice command sys-tem ..................................... 158
Voice settings ........................... 64 Displaying the voice settings screen .................................. 64 Voice settings screen .............64
W
“Weather” button (“Information”
screen) .............................19, 168
What to do if... ........................198
Wi-Fi
® Hotspot ..........................48
Changing the Wi-Fi
® settings .49
Connecting a device to the in- vehicle access point .............48
Wi-Fi
® function operating hints
.............................................51
“Wi-Fi” button (“Setup” screen) ...........................................18, 49
For more infor mation about the following items, see
the “OWNER’S MANUAL”.
· Fuel consumption
· Energy monitor (RAV4
HYBRID)
· Vehicle customization set-
tings
· Rear view monitor system
· Toyota parking assist monitor
· Panoramic view monitor