Page 292 of 418
292
F Access to the spare wheel is from the rear.F Open the rear wing doors with glass windows or the rear tailgate, according to the configuration of your vehicle.
F Access the carrier bolt, located on the rear door sill.
F Turn the bolt anti-clockwise using the wheelbrace (about 14 turns) until the carrier is low enough to allow the carrier hook to be disengaged.
Access to the spare wheel
F If your vehicle is fitted with a towbar, raise the rear of the vehicle using the jack (must be at jacking point B) to allow sufficient space to remove the spare wheel.
Removing
To avoid any unwanted opening of the electric side door(s), deactivate the "Hands-Free Access" function in the vehicle configuration menu.For more information on the Kick-activated side doors opening and locking, refer to the corresponding
section.
In the event of a breakdown
Page 305 of 418

305
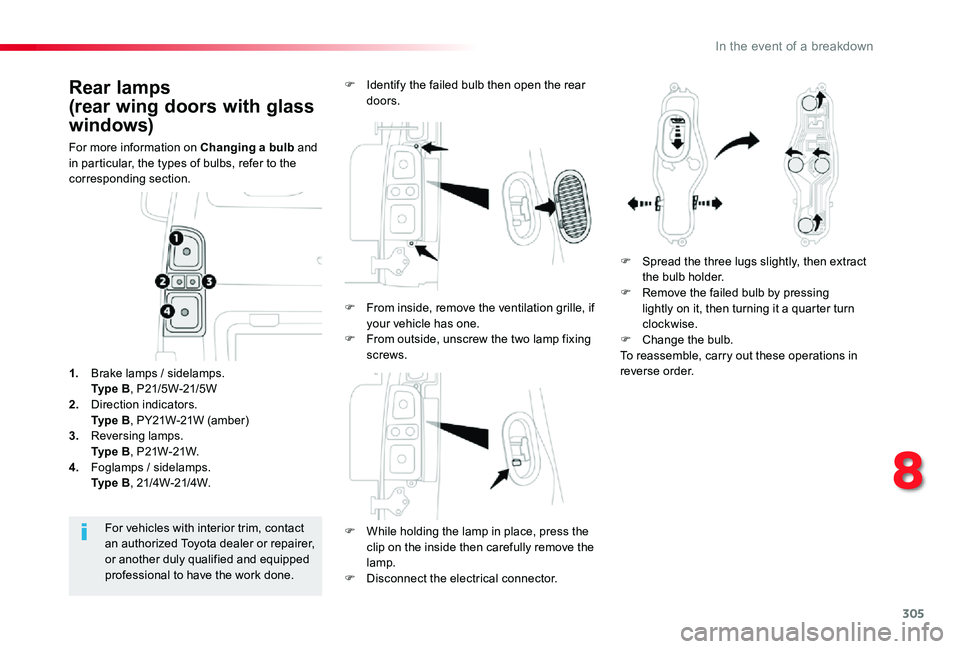
Rear lamps
(rear wing doors with glass
windows)
For more information on Changing a bulb and in particular, the types of bulbs, refer to the corresponding section.
F While holding the lamp in place, press the
clip on the inside then carefully remove the lamp.F Disconnect the electrical connector.
For vehicles with interior trim, contact an authorized Toyota dealer or repairer, or another duly qualified and equipped professional to have the work done.
1. Brake lamps / sidelamps. Ty p e B, P21/5W-21/5W2. Direction indicators. Ty p e B, PY21W-21W (amber)3. Reversing lamps. Ty p e B, P21W-21W.4. Foglamps / sidelamps. Ty p e B, 21/4W-21/4W.
F Identify the failed bulb then open the rear doors.
F Spread the three lugs slightly, then extract the bulb holder.F Remove the failed bulb by pressing lightly on it, then turning it a quarter turn clockwise.F Change the bulb.To reassemble, carry out these operations in reverse order.
F From inside, remove the ventilation grille, if your vehicle has one.F From outside, unscrew the two lamp fixing screws.
8
In the event of a breakdown
Page 306 of 418
306
Number plate lamps(rear wing doors with glass windows)Ty p e A, W5W-5W
F Remove the plastic cover using a small screwdriver.F Using a screwdriver through the aperture, push the lamp towards the outside.F Disconnect the electrical connector.F Remove the lamp.F Turn the bulb holder a quarter turn anti-clockwise.F Change the failed bulb.To refit, press on the lamp to clip it in place.
Third brake lamp(rear wing doors with glass windows)Ty p e A, W5W-5W
To refit, press on the lens to clip it in place.
F Open the left hand rear door.F Insert a thin screwdriver into one of the cut-outs in the lens.F Push it outwards to unclip it.F Remove the lens.F Change the failed bulb.
In the event of a breakdown
Page 313 of 418

313
FuseN°Rating(A)Functions
F110Electric power steering, clutch switch
F415Horn.
F520Front/rear screenwash pump.
F620Front/rear screenwash pump.
F710Rear 12 V accessory socket.
F820Single or double rear wipers.
F10/F1130Front and rear, exterior, interior locks.
F1310Front air conditioning controls, radio controls, gear lever, head-up display.
F145Alarm, ER A-GLONASS emergency call system.
F175Instrument panel.
F193Steering mounted controls.
F213Smart Entry & Start System or ignition switch.
F223Rain and sunshine sensor, multifunction detection camera.
F235Seat belt unfastened or not fastened display screen.
F245Touch screen, reversing camera and parking sensors.
F255Airbags.
F2920Audio system, touch screen, CD player, navigation.
F3115Audio system (battery +).
F3215Front 12 V accessory socket.
F345Blind spot monitoring system, door mirror electric controls.
F355Heated washer jets, headlamp beam height control.
F365Rear courtesy lamp.
Version 1 (Eco)
The fuses described hereafter vary according to the equipment in your vehicle.
8
In the event of a breakdown
Page 314 of 418

314
FuseN°Rating(A)Functions
F13Smart Entry & Start System or ignition switch.
F55Touch screen, reversing camera and parking sensors.
F710Rear air conditioning controls, Hi-Fi amplifier.
F820Single or double rear wiper.
F10/F1130Front and rear, exterior, interior locks.
F123Alarm.
F1710Rear 12 V accessory socket.
F185ER A-GLONASS emergency call system.
F213Rear courtesy lamp.
F223Glove box lamp, rear courtesy lamps.
F235Blind spot monitoring system, door mirror electric controls.
F245Steering mounted controls.
F255Headlamp beam height control.
F263Seat belt unfastened or not fastened display screen.
F273Rain and sunshine sensor, multifunction detection camera.
F2810Front air conditioning controls, radio controls, gear lever, head-up display.
F30A or B15Audio system (battery +).
F315Airbags.
F3315Front 12 V accessory socket.
F355Instrument panel.
F3620Audio system, touch screen, CD player, navigation.
Version 2 (Full)
The fuses described hereafter vary according to the equipment in your vehicle.
In the event of a breakdown
Page 319 of 418

319
Do not force the lever as locking will not be possible if the clamp is not positioned correctly; start the procedure again.
Disconnecting the battery
In order to maintain an adequate state of charge for starting the engine, it is recommended that the battery be disconnected if the vehicle is taken out of ser vice for a long period.Wait 2 minutes after switching off the ignition before disconnecting the battery.
F close the windows and the doors before disconnecting the battery,F switch off all electrical consumers (audio system, wipers, lighting, ...),F switch off the ignition and wait for four minutes.Having exposed the battery, it is only necessary to disconnect the (+) terminal.
Quick release terminal
Disconnecting the (+) terminal
F Raise the lever A fully to release the clamp B.
Following reconnection of the battery
Reconnecting the (+) terminal
F Position the open clamp B of the cable on the positive post (+) of the battery.F Press down on the clamp to position it correctly on the battery post.F Lock the clamp by lowering the lever A.
After reconnecting the battery, switch on the ignition and wait 1 minute before starting to allow initialisation of the electronic systems.However, if minor problems persist following this operation, contact an authorized Toyota dealer or repairer, or another duly qualified and equipped professional.Referring to the corresponding section, you must yourself reinitialise or reset certain
systems, such as:- the remote control or electronic key (depending on version),- the electric windows,- the date and time,- the radio preset stations.
The Stop & Start system may not be operational during the trip following the first engine start.In this case, the system will only be
available again after a continuous period of immobilisation of the vehicle, a period which depends on the ambient temperature and the state of charge of the battery (up to about 8 hours).
8
In the event of a breakdown
Page 323 of 418
323
Mirrors folded
Rear wing doors with glass windowsRear tailgate
Compact (L0)
Standard (L1)
Long (L2)
* Increased payload.** Payload increased with high body.*** Depending on the country of sale.
Dimensions (in mm)
These dimensions have been measured on an unladen vehicle.
9
Technical data
Page 327 of 418

327
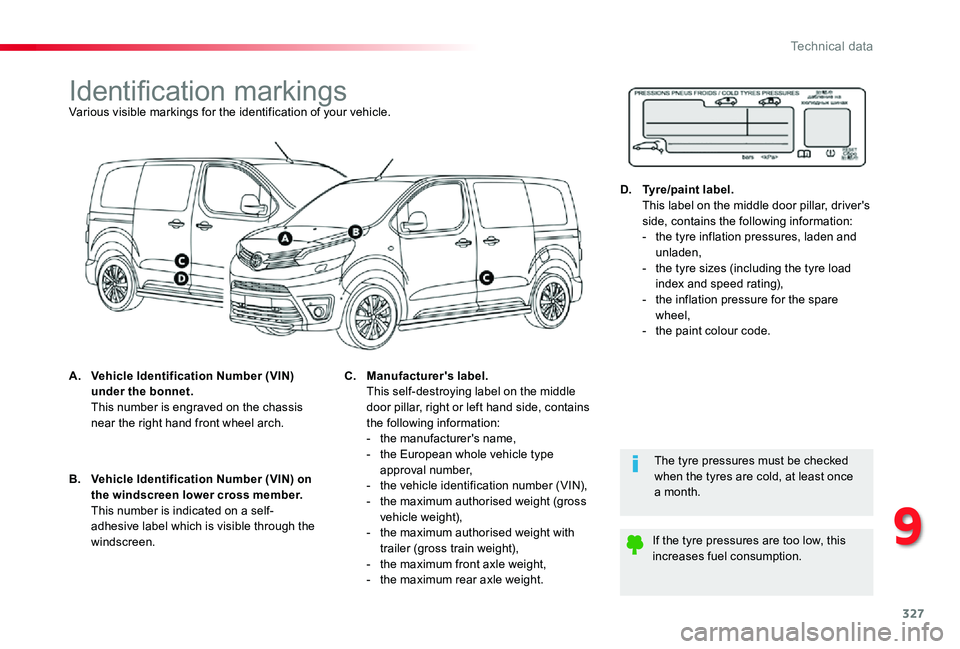
Identification markingsVarious visible markings for the identification of your vehicle.
A. Vehicle Identification Number (VIN) under the bonnet. This number is engraved on the chassis near the right hand front wheel arch.
The tyre pressures must be checked when the tyres are cold, at least once a month.
If the tyre pressures are too low, this increases fuel consumption.
B. Vehicle Identification Number (VIN) on the windscreen lower cross member. This number is indicated on a self-adhesive label which is visible through the windscreen.
C. Manufacturer's label. This self-destroying label on the middle door pillar, right or left hand side, contains the following information:- the manufacturer's name,- the European whole vehicle type approval number,- the vehicle identification number (VIN),- the maximum authorised weight (gross vehicle weight),- the maximum authorised weight with trailer (gross train weight),- the maximum front axle weight,- the maximum rear axle weight.
D. Tyre/paint label. This label on the middle door pillar, driver's side, contains the following information:- the tyre inflation pressures, laden and unladen,- the tyre sizes (including the tyre load index and speed rating),- the inflation pressure for the spare wheel,- the paint colour code.
9
Technical data