2020 TOYOTA PROACE CITY VERSO seats
[x] Cancel search: seatsPage 43 of 272

43
Ease of use and comfort
3
► check that nothing or no person might interfere with the folding of the backrests (clothing, luggage, etc.),► check that the outer seat belts are lying flat on the backrests.
NOTIC E
The folding of the backrest is accompanied by a slight lowering of the corresponding seat
cushion.When the backrest is released, the red indicator is visible in the release grips on the outer seats.
► Turn the backrest release handle 1.► Guide the backrest down to the horizontal
position.
Repositioning the backrests
WARNI NG
First check that the outer seat belts are lying vertically flat alongside the backrest latching rings.
► Put the backrest in the upright position and push it firmly to latch it home.
► Check that the red indicator in the release grip 1 is no longer visible.► Ensure that the outer seat belts are not trapped during the manoeuvre.
Rear seats (row 2)
Folding the backrests
First steps:► lower the head restraints,► if necessary, move the front seats forward,► check that nothing or no person might interfere with the folding of the backrests (clothing, luggage, etc.),► check that the outer seat belts are lying flat on the backrests.
NOTIC E
The folding of the backrest is accompanied by a slight lowering of the corresponding seat cushion.When the backrest is released, the red indicator is visible in the release grips on the outer seats.
Folding from the passenger
compartment
Outer seat (left-hand or right-hand)
► Turn the backrest release handle 1.► Guide the backrest down to the horizontal position.
Page 44 of 272
44
Central seat
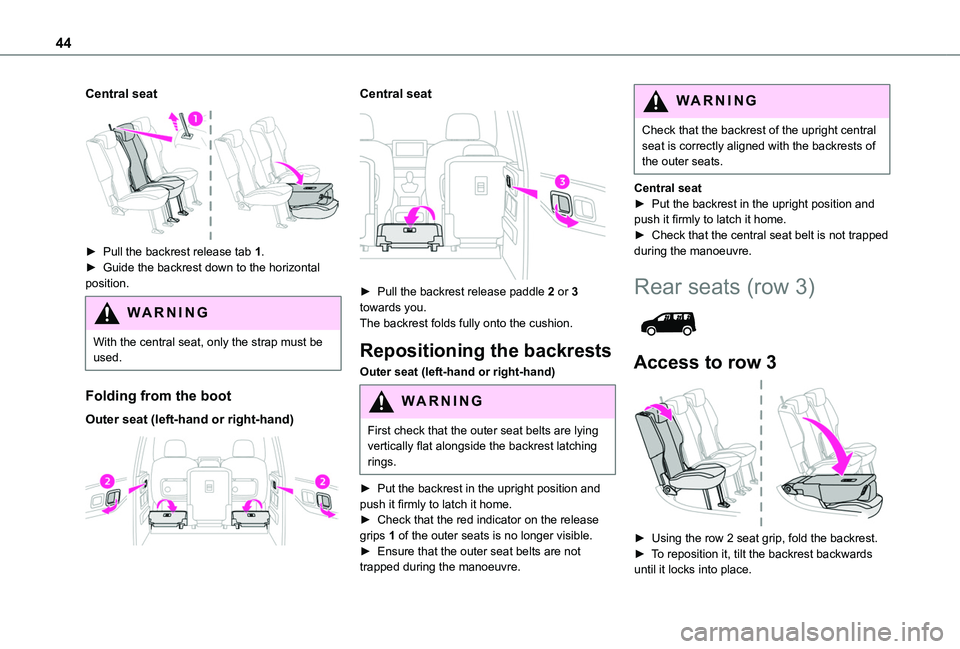
► Pull the backrest release tab 1.► Guide the backrest down to the horizontal position.
WARNI NG
With the central seat, only the strap must be used.
Folding from the boot
Outer seat (left-hand or right-hand)
Central seat
► Pull the backrest release paddle 2 or 3 towards you.The backrest folds fully onto the cushion.
Repositioning the backrests
Outer seat (left-hand or right-hand)
WARNI NG
First check that the outer seat belts are lying vertically flat alongside the backrest latching rings.
► Put the backrest in the upright position and push it firmly to latch it home.► Check that the red indicator on the release grips 1 of the outer seats is no longer visible.
► Ensure that the outer seat belts are not trapped during the manoeuvre.
WARNI NG
Check that the backrest of the upright central seat is correctly aligned with the backrests of the outer seats.
Central seat► Put the backrest in the upright position and push it firmly to latch it home.► Check that the central seat belt is not trapped during the manoeuvre.
Rear seats (row 3)
Access to row 3
► Using the row 2 seat grip, fold the backrest.
► To reposition it, tilt the backrest backwards until it locks into place.
Page 45 of 272
45
Ease of use and comfort
3
Labels in row 3
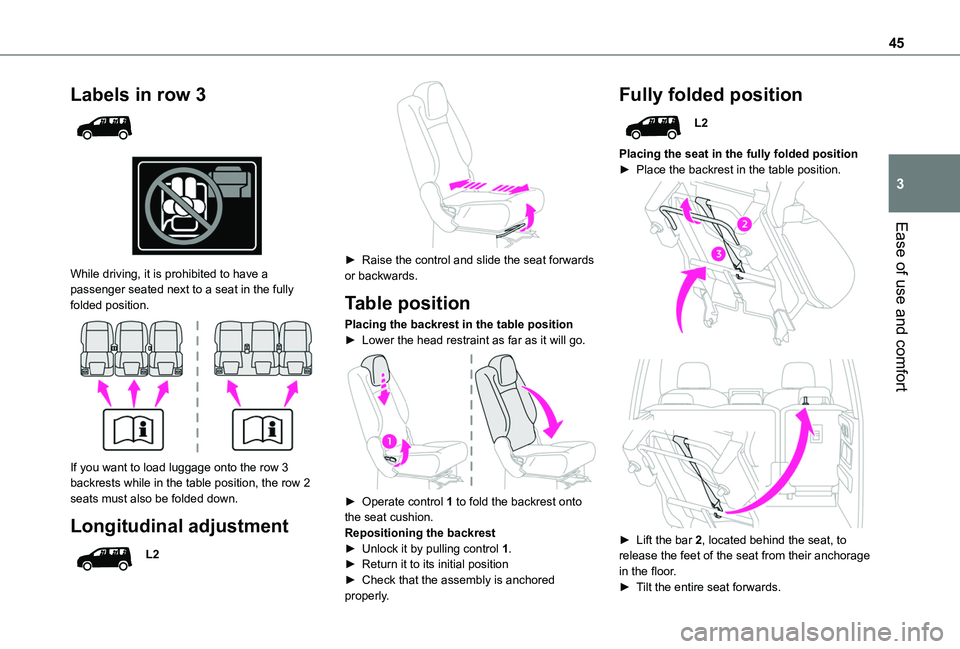
While driving, it is prohibited to have a passenger seated next to a seat in the fully folded position.
If you want to load luggage onto the row 3 backrests while in the table position, the row 2 seats must also be folded down.
Longitudinal adjustment
L2
► Raise the control and slide the seat forwards or backwards.
Table position
Placing the backrest in the table position► Lower the head restraint as far as it will go.
► Operate control 1 to fold the backrest onto the seat cushion.Repositioning the backrest► Unlock it by pulling control 1.► Return it to its initial position► Check that the assembly is anchored properly.
Fully folded position
L2
Placing the seat in the fully folded position► Place the backrest in the table position.
► Lift the bar 2, located behind the seat, to release the feet of the seat from their anchorage in the floor.► Tilt the entire seat forwards.
Page 47 of 272
47
Ease of use and comfort
3
Interior fittings
Mats
Fitting
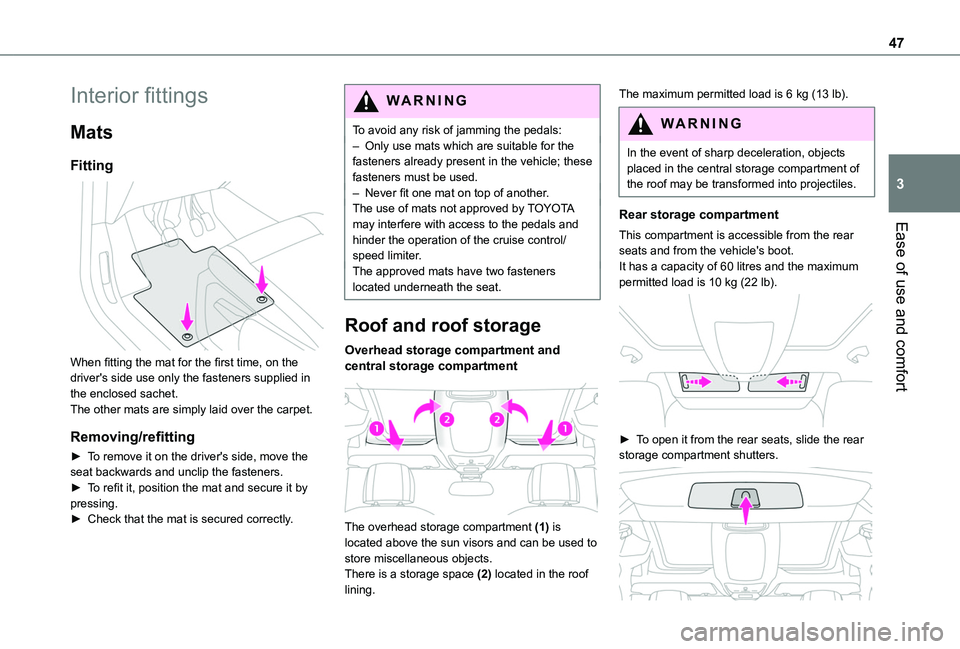
When fitting the mat for the first time, on the driver's side use only the fasteners supplied in the enclosed sachet.The other mats are simply laid over the carpet.
Removing/refitting
► To remove it on the driver's side, move the seat backwards and unclip the fasteners.► To refit it, position the mat and secure it by pressing.► Check that the mat is secured correctly.
WARNI NG
To avoid any risk of jamming the pedals:– Only use mats which are suitable for the fasteners already present in the vehicle; these fasteners must be used.– Never fit one mat on top of another.The use of mats not approved by TOYOTA may interfere with access to the pedals and hinder the operation of the cruise control/speed limiter.The approved mats have two fasteners located underneath the seat.
Roof and roof storage
Overhead storage compartment and central storage compartment
The overhead storage compartment (1) is located above the sun visors and can be used to
store miscellaneous objects.There is a storage space (2) located in the roof lining.
The maximum permitted load is 6 kg (13 lb).
WARNI NG
In the event of sharp deceleration, objects placed in the central storage compartment of the roof may be transformed into projectiles.
Rear storage compartment
This compartment is accessible from the rear
seats and from the vehicle's boot.It has a capacity of 60 litres and the maximum permitted load is 10 kg (22 lb).
► To open it from the rear seats, slide the rear storage compartment shutters.
Page 51 of 272
51
Ease of use and comfort
3
WARNI NG
Do not place hard or heavy objects on the table. Such objects could become projectiles in the event of sudden deceleration.
Side blinds
They are fitted to the windows of the sliding side doors (depending on version).
► To raise or lower the blind, pull it by the tab.
NOTIC E
To avoid damaging the blind:– Guide it slowly, using the tab, while raising or lowering it.– Make sure the tab is securely fastened
before opening the door.
High load retaining net
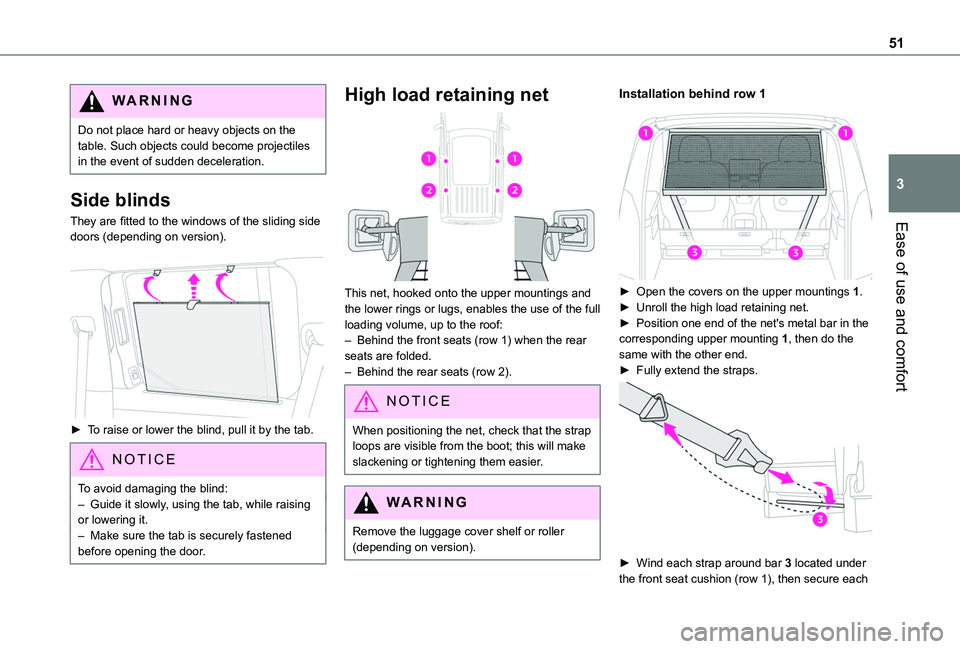
This net, hooked onto the upper mountings and the lower rings or lugs, enables the use of the full loading volume, up to the roof:– Behind the front seats (row 1) when the rear seats are folded.– Behind the rear seats (row 2).
NOTIC E
When positioning the net, check that the strap loops are visible from the boot; this will make slackening or tightening them easier.
WARNI NG
Remove the luggage cover shelf or roller
(depending on version).
Installation behind row 1
► Open the covers on the upper mountings 1.► Unroll the high load retaining net.► Position one end of the net's metal bar in the corresponding upper mounting 1, then do the same with the other end.► Fully extend the straps.
► Wind each strap around bar 3 located under the front seat cushion (row 1), then secure each
Page 52 of 272
52
spring hook to the ring on the corresponding strap.► Fold down the rear seats.► Tighten the straps without raising the bench seat.► Check that the net is hooked and tightened correctly.
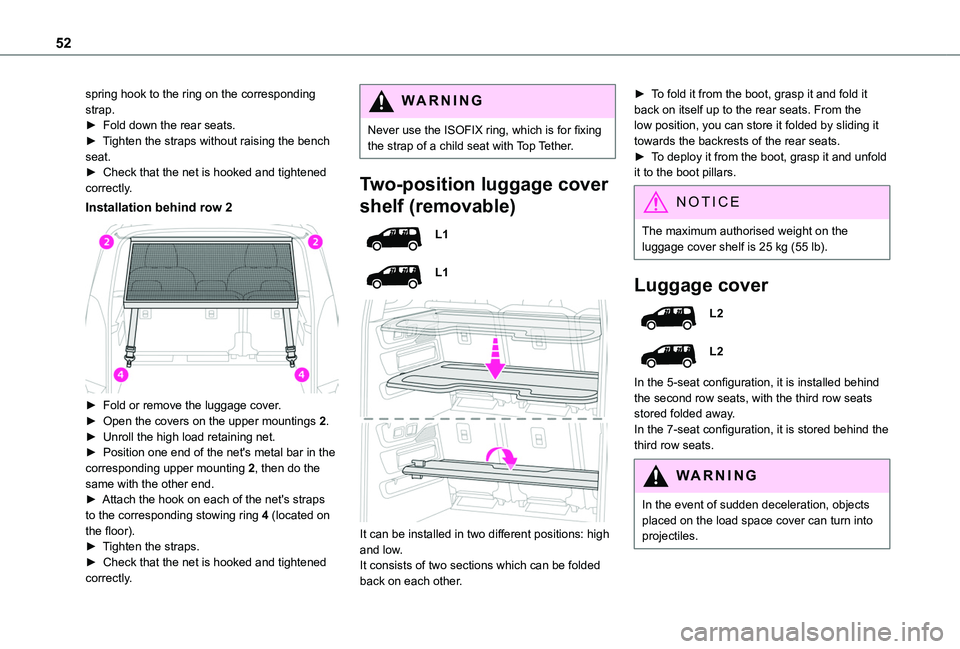
Installation behind row 2
► Fold or remove the luggage cover.► Open the covers on the upper mountings 2.► Unroll the high load retaining net.
► Position one end of the net's metal bar in the corresponding upper mounting 2, then do the same with the other end.► Attach the hook on each of the net's straps to the corresponding stowing ring 4 (located on the floor).► Tighten the straps.► Check that the net is hooked and tightened correctly.
WARNI NG
Never use the ISOFIX ring, which is for fixing the strap of a child seat with Top Tether.
Two-position luggage cover
shelf (removable)
L1
L1
It can be installed in two different positions: high and low.It consists of two sections which can be folded back on each other.
► To fold it from the boot, grasp it and fold it back on itself up to the rear seats. From the low position, you can store it folded by sliding it towards the backrests of the rear seats.► To deploy it from the boot, grasp it and unfold it to the boot pillars.
NOTIC E
The maximum authorised weight on the
luggage cover shelf is 25 kg (55 lb).
Luggage cover
L2
L2
In the 5-seat configuration, it is installed behind the second row seats, with the third row seats stored folded away.In the 7-seat configuration, it is stored behind the third row seats.
WARNI NG
In the event of sudden deceleration, objects placed on the load space cover can turn into projectiles.
Page 79 of 272
79
Safety
5
At speeds above 70 km/h (43 mph), the system is automatically deactivated; the indicator lamp in the button goes off.
Malfunction
In the event of a system malfunction, this warning lamp comes on on the instrument panel, accompanied by an onscreen message.Have the system checked by a TOYOTA dealer or a qualified workshop.
Seat belts
Front seat belts
The front seat belts are fitted with a single pyrotechnic pretensioning system (or double on the driver’s side, depending on equipment) and a force limiter (or progressive force limiter on the driver’s side, depending on equipment options).This system improves safety in the front seats in the event of a front or side impact.Depending on the severity of the impact, the
single pyrotechnic pretensioning system instantly tightens the seat belts against the body of the occupants.The double pyrotechnic pretensionsining system operates the same way, except that it uses two anchor points rather than one, for enhanced effectiveness.The pyrotechnic pretensioning seat belts are enabled when the ignition is on.
The force limiter reduces the pressure of the seat belt on the chest of the occupant, thus improving their protection.The progressive force limiter operates in the same way, except that it takes the driver’s stature into consideration, thus optimising the reduction in the pressure exerted by the seat belt on the occupant’s chest in the event of an impact.
Fastening
► Pull the strap, then insert the tongue in the
buckle.► Check that the seat belt is fastened correctly by pulling the strap.
Unlocking
► Press the red button on the buckle.► Guide the seat belt as it is reeled in.
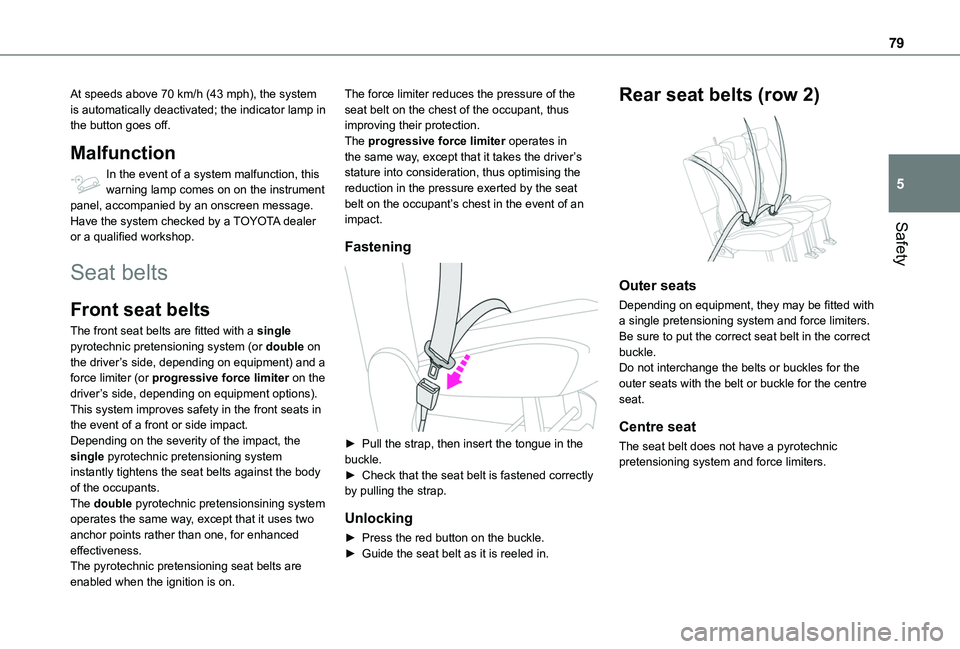
Rear seat belts (row 2)
Outer seats
Depending on equipment, they may be fitted with a single pretensioning system and force limiters.Be sure to put the correct seat belt in the correct buckle.Do not interchange the belts or buckles for the outer seats with the belt or buckle for the centre seat.
Centre seat
The seat belt does not have a pyrotechnic pretensioning system and force limiters.
Page 80 of 272
80
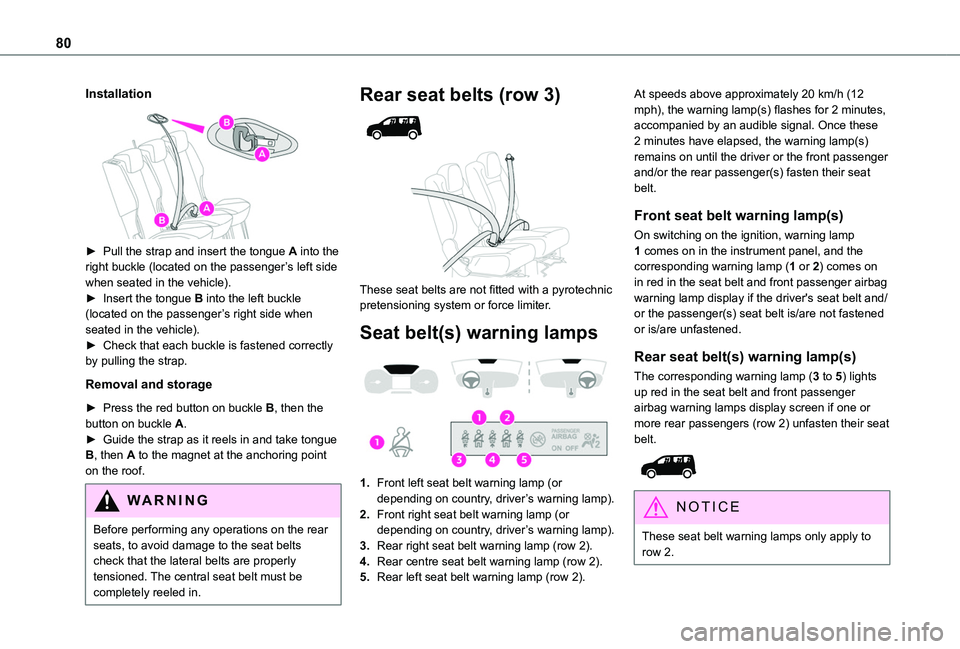
Installation
► Pull the strap and insert the tongue A into the right buckle (located on the passenger’s left side when seated in the vehicle).► Insert the tongue B into the left buckle (located on the passenger’s right side when seated in the vehicle).► Check that each buckle is fastened correctly by pulling the strap.
Removal and storage
► Press the red button on buckle B, then the button on buckle A.► Guide the strap as it reels in and take tongue
B, then A to the magnet at the anchoring point on the roof.
WARNI NG
Before performing any operations on the rear seats, to avoid damage to the seat belts check that the lateral belts are properly tensioned. The central seat belt must be completely reeled in.
Rear seat belts (row 3)
These seat belts are not fitted with a pyrotechnic pretensioning system or force limiter.
Seat belt(s) warning lamps
1.Front left seat belt warning lamp (or depending on country, driver’s warning lamp).
2.Front right seat belt warning lamp (or depending on country, driver’s warning lamp).
3.Rear right seat belt warning lamp (row 2).
4.Rear centre seat belt warning lamp (row 2).
5.Rear left seat belt warning lamp (row 2).
At speeds above approximately 20 km/h (12 mph), the warning lamp(s) flashes for 2 minutes, accompanied by an audible signal. Once these 2 minutes have elapsed, the warning lamp(s) remains on until the driver or the front passenger and/or the rear passenger(s) fasten their seat belt.
Front seat belt warning lamp(s)
On switching on the ignition, warning lamp 1 comes on in the instrument panel, and the corresponding warning lamp (1 or 2) comes on in red in the seat belt and front passenger airbag warning lamp display if the driver's seat belt and/or the passenger(s) seat belt is/are not fastened or is/are unfastened.
Rear seat belt(s) warning lamp(s)
The corresponding warning lamp (3 to 5) lights up red in the seat belt and front passenger airbag warning lamps display screen if one or more rear passengers (row 2) unfasten their seat belt.
NOTIC E
These seat belt warning lamps only apply to row 2.