2020 TOYOTA PROACE CITY wipers
[x] Cancel search: wipersPage 177 of 272
177
In the event of a breakdown
8
Lead-acid starter batteries
ECO
Batteries contain harmful substances such as sulphuric acid and lead.They must be disposed of in accordance with regulations and must not, in any circumstances, be discarded with household waste.
Take used remote control batteries and vehicle batteries to a special collection point.
WARNI NG
Protect your eyes and face before handling the battery.All operations on the battery must be carried out in a well ventilated area and away from naked flames and sources of sparks, so as to avoid the risk of explosion or fire.Wash your hands afterwards.
WARNI NG
Versions equipped with Stop & Start are fitted with a 12 V lead-acid battery with special technology and specifications.
It should only be replaced by a TOYOTA dealer or a qualified workshop.
Access to the battery
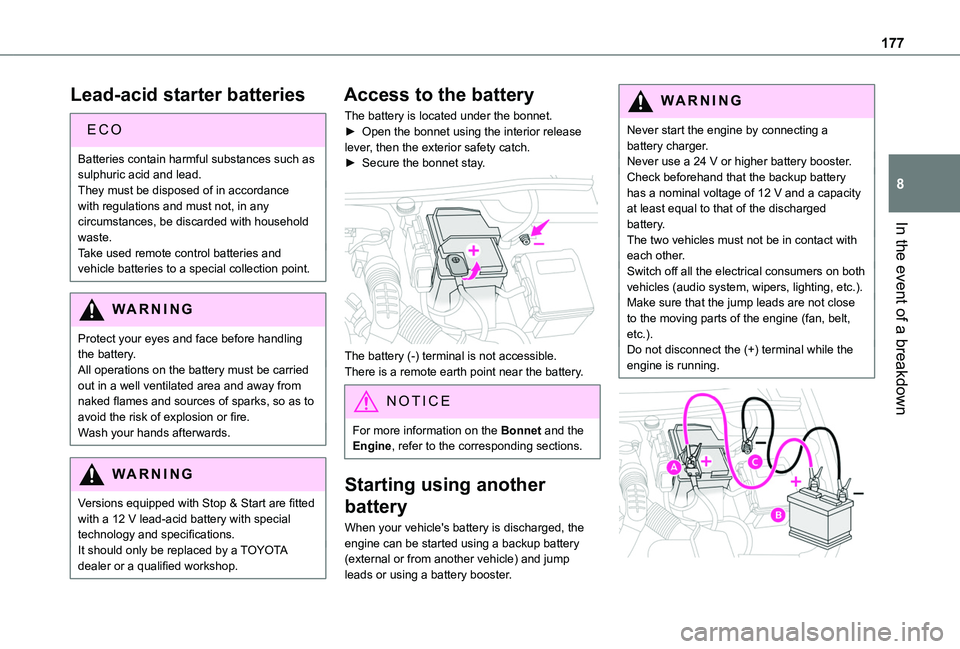
The battery is located under the bonnet.► Open the bonnet using the interior release lever, then the exterior safety catch.► Secure the bonnet stay.
The battery (-) terminal is not accessible.There is a remote earth point near the battery.
NOTIC E
For more information on the Bonnet and the Engine, refer to the corresponding sections.
Starting using another
battery
When your vehicle's battery is discharged, the engine can be started using a backup battery
(external or from another vehicle) and jump leads or using a battery booster.
WARNI NG
Never start the engine by connecting a battery charger.Never use a 24 V or higher battery booster.Check beforehand that the backup battery has a nominal voltage of 12 V and a capacity at least equal to that of the discharged battery.The two vehicles must not be in contact with each other.Switch off all the electrical consumers on both vehicles (audio system, wipers, lighting, etc.).Make sure that the jump leads are not close to the moving parts of the engine (fan, belt, etc.).Do not disconnect the (+) terminal while the engine is running.
Page 178 of 272
178
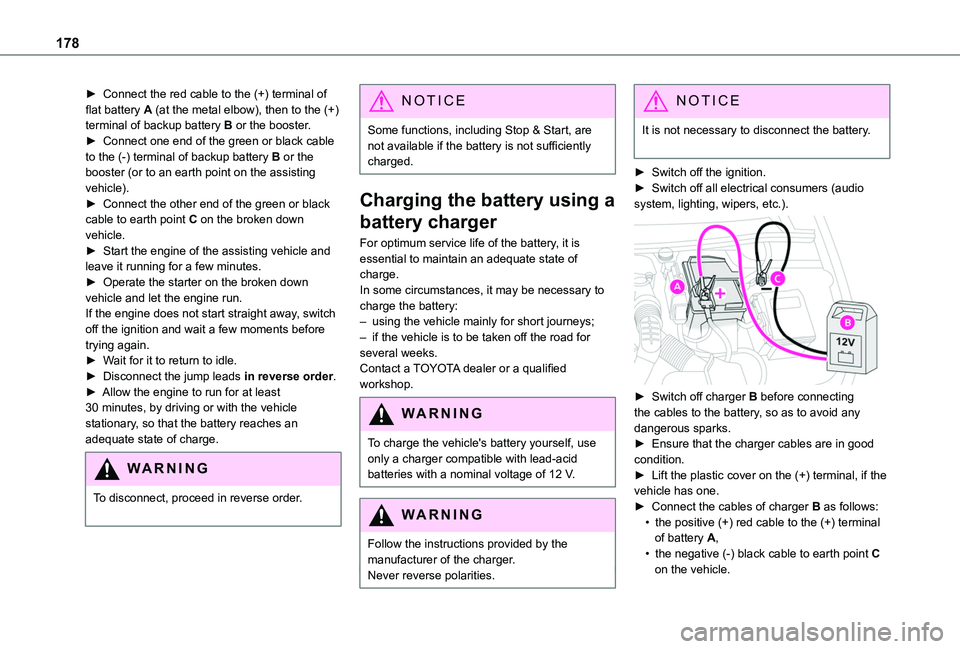
► Connect the red cable to the (+) terminal of flat battery A (at the metal elbow), then to the (+) terminal of backup battery B or the booster.► Connect one end of the green or black cable to the (-) terminal of backup battery B or the booster (or to an earth point on the assisting vehicle).► Connect the other end of the green or black cable to earth point C on the broken down vehicle.► Start the engine of the assisting vehicle and leave it running for a few minutes.► Operate the starter on the broken down vehicle and let the engine run.If the engine does not start straight away, switch off the ignition and wait a few moments before trying again.► Wait for it to return to idle.► Disconnect the jump leads in reverse order.► Allow the engine to run for at least 30 minutes, by driving or with the vehicle stationary, so that the battery reaches an adequate state of charge.
WARNI NG
To disconnect, proceed in reverse order.
NOTIC E
Some functions, including Stop & Start, are not available if the battery is not sufficiently charged.
Charging the battery using a
battery charger
For optimum service life of the battery, it is essential to maintain an adequate state of charge.In some circumstances, it may be necessary to charge the battery:– using the vehicle mainly for short journeys;– if the vehicle is to be taken off the road for several weeks.Contact a TOYOTA dealer or a qualified workshop.
WARNI NG
To charge the vehicle's battery yourself, use only a charger compatible with lead-acid batteries with a nominal voltage of 12 V.
WARNI NG
Follow the instructions provided by the
manufacturer of the charger.Never reverse polarities.
NOTIC E
It is not necessary to disconnect the battery.
► Switch off the ignition.► Switch off all electrical consumers (audio system, lighting, wipers, etc.).
► Switch off charger B before connecting the cables to the battery, so as to avoid any dangerous sparks.► Ensure that the charger cables are in good
condition.► Lift the plastic cover on the (+) terminal, if the vehicle has one.► Connect the cables of charger B as follows:• the positive (+) red cable to the (+) terminal of battery A,• the negative (-) black cable to earth point C on the vehicle.
Page 179 of 272
179
In the event of a breakdown
8
► At the end of the charging operation, switch off charger B before disconnecting the cables from battery A.
24v 12v
WARNI NG
If this label is present, use only a 12 V charger to avoid causing irreversible damage to the electrical components related to the Stop & Start system.
WARNI NG
Never try to charge a frozen battery - risk of explosion!If the battery has frozen, have it checked by a TOYOTA dealer or by a qualified workshop who will verify that the internal components have not been damaged and that the case has not cracked, which would mean a risk of toxic and corrosive acid leaking.
Disconnecting the battery
In order to maintain an adequate state of charge for starting the engine, we recommend
disconnecting the battery if the vehicle is to be unused for an extended period.Before disconnecting the battery:► close all doors, windows and the tailgate and sunroof,► switch off all electricity consuming devices (audio system, wipers, headlamps, etc.),► switch off the ignition and wait for four minutes.At the battery, it is only necessary to disconnect the (+) terminal.
Quick-release terminal clamp
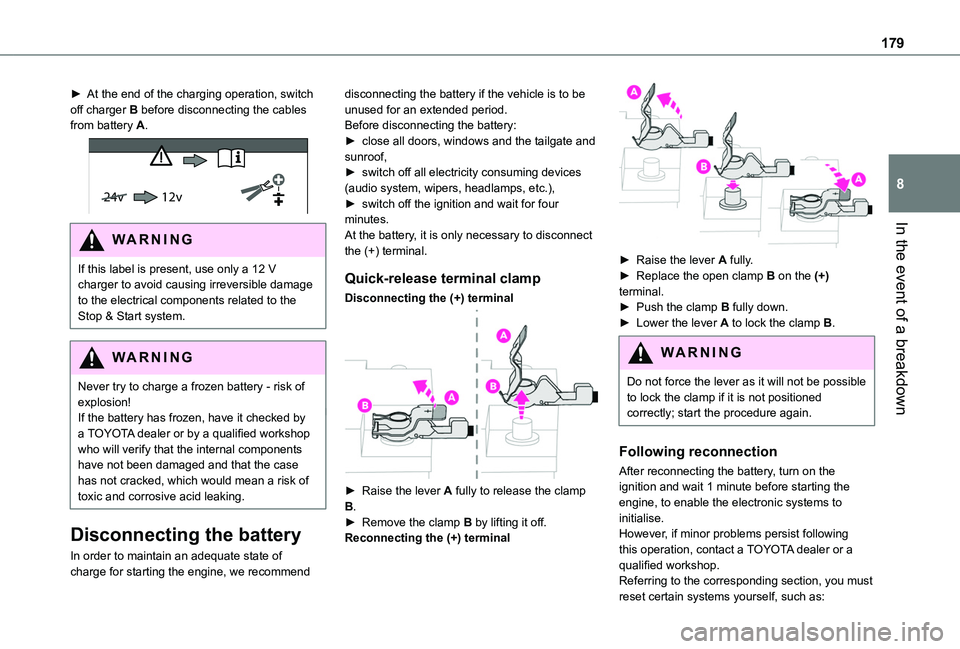
Disconnecting the (+) terminal
► Raise the lever A fully to release the clamp B.► Remove the clamp B by lifting it off.Reconnecting the (+) terminal
► Raise the lever A fully.► Replace the open clamp B on the (+) terminal.► Push the clamp B fully down.► Lower the lever A to lock the clamp B.
WARNI NG
Do not force the lever as it will not be possible to lock the clamp if it is not positioned correctly; start the procedure again.
Following reconnection
After reconnecting the battery, turn on the ignition and wait 1 minute before starting the engine, to enable the electronic systems to initialise.However, if minor problems persist following this operation, contact a TOYOTA dealer or a qualified workshop.Referring to the corresponding section, you must reset certain systems yourself, such as:
Page 246 of 272
246
Child lock 93Children 84, 92Children (safety) 93Child seats 84, 88–89, 91–92Child seats, conventional 91Cleaning (advice) 160–161Closing the doors 24, 28Collision Risk Alert 128–129Connected applications 231Connection, Bluetooth 199, 212–214, 231–232, 236–237Connection, MirrorLink 2 11–212, 230Connection, Wi-Fi network 232Connectivity 230Container, AdBlue® 158Control, emergency boot release 31Control, emergency door 23, 30Control, heated seats 43Control lever, lighting 67, 69Control lever, wipers 71–74Courtesy lamp 66Courtesy lamp, front 66
Courtesy lamp, rear 66Courtesy lamps 66Cruise control 11 8–11 9, 121, 123–124, 128Cruise control, adaptive 124Cruise control by speed limit recognition 11 8–11 9Cruise control, dynamic with Stop function 11 8–11 9Cup holder 48
D
DAB (Digital Audio Broadcasting) - Digital radio 194–195, 209, 234Date (setting) 216, 240Daytime running lamps 69, 170–171Deactivating the passenger airbag 85–86, 90–91Deactivation of DSC (ESC) 79Deadlocking 29Defrosting 45, 62Demisting 62Demisting, rear 44, 63Demisting, rear screen 44, 63Dimensions 182Dipstick 153Direction indicators 68–69, 170, 172–173Display, head-up 11 3–11 4Doors, side 35Doors, side-hinged 28–29Driver’s attention warning 136–137Driving 95–96
Driving abroad 68Driving aids camera (warnings) 11 5Driving aids (recommendations) 11 4Driving economically 7Dynamic stability control (DSC) 79, 81
E
EBFD 78
Eco-driving (advice) 7Economy mode 150Electric windows 39Electronic brake force distribution (EBFD) 78–79Emergency braking assistance (EBA) 79Emergency call 75–77Emergency warning lamps 78Emissions control system, SCR 157Energy economy mode 150Engine compartment 152Engine, Diesel 144, 152, 162, 189Engine, petrol 152, 188Engines 187–189Environment 7, 32, 65ESC (electronic stability control) 78Expanded traffic sign recognition 11 9
F
Fatigue detection 136–137Filling the AdBlue® tank 155, 158
Filling the fuel tank 144–145Filter, air 155Filter, oil 155Filter, particle 155–156Filter, passenger compartment 58, 155Finisher 169Fitting a wheel 166–169Fitting roof bars 150–151Fittings, interior 48Flap, fuel filler 144–145
Page 250 of 272
250
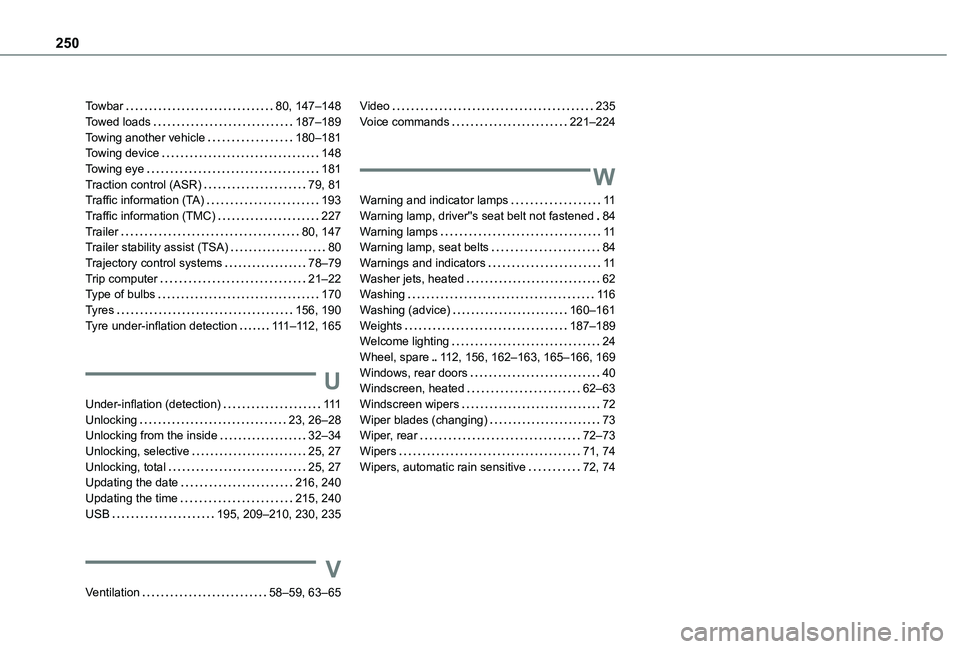
Towbar 80, 147–148Towed loads 187–189Towing another vehicle 180–181Towing device 148Towing eye 181Traction control (ASR) 79, 81Traffic information (TA) 193Traffic information (TMC) 227Trailer 80, 147Trailer stability assist (TSA) 80Trajectory control systems 78–79Trip computer 21–22Type of bulbs 170Tyres 156, 190Tyre under-inflation detection 111–11 2, 165
U
Under-inflation (detection) 111Unlocking 23, 26–28Unlocking from the inside 32–34
Unlocking, selective 25, 27Unlocking, total 25, 27Updating the date 216, 240Updating the time 215, 240USB 195, 209–210, 230, 235
V
Ventilation 58–59, 63–65
Video 235Voice commands 221–224
W
Warning and indicator lamps 11Warning lamp, driver''s seat belt not fastened 84Warning lamps 11Warning lamp, seat belts 84Warnings and indicators 11Washer jets, heated 62Washing 11 6Washing (advice) 160–161Weights 187–189Welcome lighting 24Wheel, spare 11 2, 156, 162–163, 165–166, 169Windows, rear doors 40Windscreen, heated 62–63Windscreen wipers 72Wiper blades (changing) 73Wiper, rear 72–73
Wipers 71, 74Wipers, automatic rain sensitive 72, 74