2020 TOYOTA PROACE CITY warning
[x] Cancel search: warningPage 15 of 272

15
Instruments
1
Fixed, on switching on the ignition, accompanied by an audible signal and a message indicating the driving range.The driving range is between 800 and 100 km (500 and 62 miles).Promptly top up the AdBlue®, or carry out (3).Flashing, accompanied by an audible signal and a message indicating the driving range.The driving range is less than 100 km (62 miles).You must top up the AdBlue® to avoid engine starting being prevented, or carry out (3).Flashing, accompanied by an audible signal and a message indicating that starting is prevented.The AdBlue® tank is empty: the legally required engine immobiliser system prevents the engine from starting.To restart the engine, top up the AdBlue® or carry out (2).It is essential to add at least 5 litres of AdBlue® to the tank.
SCR emissions control system (Diesel)
Fixed when the ignition is switched on, accompanied by an audible signal and a message.A malfunction involving the SCR emissions control system has been detected.This alert disappears once the exhaust emissions return to normal levels.Flashing AdBlue® warning lamp on switching on the
ignition, with the Service and Engine
self-diagnostics warning lamps on fixed, accompanied by an audible signal and a message indicating the driving range.Depending on the message displayed, it may be possible to drive for up to 1,100 km (685 miles) before the engine immobiliser is triggered.Carry out (3) without delay, to avoid starting being prevented.Flashing AdBlue® warning lamp on switching on the ignition, with the Service and Engine self-diagnostics warning lamps on fixed, accompanied by an audible signal and a message indicating that starting is prevented.The engine immobiliser prevents the engine from restarting (over the authorised driving limit after confirmation of an emissions control system malfunction).To start the engine, carry out (2).
ServiceTemporarily on, accompanied by the display of a message.One or more minor faults have been detected for
which there is no specific warning lamp.Identify the cause of the fault using the message displayed in the instrument panel.You can deal with certain anomalies yourself, for example an open door or the start of saturation of the particle filter.For any other problems, such as a fault with the tyre under-inflation detection system, carry out (3).
Fixed, accompanied by the display of a message.One or more major faults for which there is no specific warning lamp have been detected.Identify the cause of the anomaly using the message displayed in the instrument panel, then carry out (3).Fixed, accompanied by the message ‘Parking brake fault’.Automatic release of the electric parking brake is unavailable.Carry out (2).Service warning lamp fixed and service spanner flashing then fixed.The servicing interval has been exceeded.The vehicle must be serviced as soon as possible.Only with Diesel engines.
Rear foglampFixed.The lamp is on.
Green warning/indicator lamps
Stop & StartFixed.When the vehicle stops the Stop & Start puts the engine into STOP mode.Flashing temporarily.STOP mode is momentarily unavailable or START mode is automatically triggered.
Page 16 of 272

16
Hill Assist Descent ControlFixed.The system has been activated, but the conditions for regulation are not met (gradient, speed too high, gear engaged).Flashing indicator.The function is starting regulation.The vehicle is being braked; the brake lamps come on during the descent.
Eco modeFixed.ECO mode is active.Certain parameters are adjusted with a view to reducing fuel consumption.
Automatic wipingFixed.Automatic windscreen wiping is activated.
Front foglampsFixed.The front foglamps are lit.
SidelampsFixed.
The lamps are on.
Direction indicatorsDirection indicators with audible signal.The direction indicators are on.
Dipped beam headlampsFixed.The lamps are on.
Automatic headlamp dippingFixed.The function has been activated via the touch screen (Driving / Vehicle menu).The lighting control lever is in the "AUTO" position.
Blue warning/indicator lamps
Main beam headlampsFixed.The lamps are on.
Black/white warning lamps
Foot on brakeFixed.Omission or insufficient pressure on the brake pedal.With an automatic gearbox, with the engine running, before releasing the parking brake, to move out of position P.
Foot on the clutchFixed.Stop & Start: the change to START mode
is rejected because the clutch pedal is not fully depressed.Fully depress the clutch pedal.
Automatic wipingFixed.Automatic front wiping is activated.
Indicators
Service indicator
The service indicator is displayed on the instrument panel. Depending on the vehicle version:– the distance recorder display line indicates the distance remaining before the next service is due, or the distance travelled since it was due preceded by the sign “-”.– an alert message indicates the distance remaining, as well as the period before the next service is due or how long it is overdue.
Service spannerLights up temporarily when the ignition is switched on.Between 3,000 km (1,800 miles) and 1,000 km (600 miles) remain before the next service is due.Fixed, when the ignition is switched on.The service is due in less than 1,000 km (600 miles).
Have your vehicle serviced very soon.
Service spanner flashingFlashing then fixed, when the ignition is switched on.(With Diesel engines, combined with the Service warning lamp.)The servicing interval has been exceeded.Have your vehicle serviced as soon as possible.
Page 18 of 272

18
Trip distance recorder
This recorder measures the distance travelled since it was last reset by the driver.Resetting the trip recorder
► With the ignition on, press the button until zeros appear.
Engine coolant temperature
With the engine running, when the needle or bar graph (depending on version) is:– in zone A, the engine coolant temperature is correct,
– in zone B, the engine coolant temperature is too high; the maximum temperature and central STOP warning lamps come on, accompanied by an audible signal and a warning message.You MUST stop as soon as it is safe to do so.Wait a few minutes before switching off the engine.Contact a TOYOTA dealer or a qualified workshop.
Checking
After driving for a few minutes, the temperature and pressure in the cooling system increase.To top up the level:► wait at least one hour for the engine to cool,► unscrew the cap by two turns to allow the pressure to drop,► when the pressure has dropped, remove the cap,► top up the level to the "MAX" mark.For more information on Checking levels, refer to the corresponding section.
WARNI NG
Be aware of the risk of scalding when topping up the coolant. Do not fill above the maximum level (indicated on the reservoir).
Engine oil level indicator
On versions fitted with an electric oil gauge, the state of the engine oil level is displayed on the
instrument panel for a few seconds when the ignition is switched on, at the same time as the servicing information.
NOTIC E
The level read will only be correct if the vehicle is on level ground and the engine has been off for more than 30 minutes.
Oil level correct
This is indicated by a message on the instrument panel.
Low oil level
This is indicated by a message on the instrument panel.If the low oil level is confirmed by a check using the dipstick, the level must be topped up to avoid
damaging the engine.
Page 19 of 272

19
Instruments
1
Oil level gauge fault
This is indicated by a message on the instrument panel. Contact a TOYOTA dealer or a qualified workshop.
AdBlue® range indicators
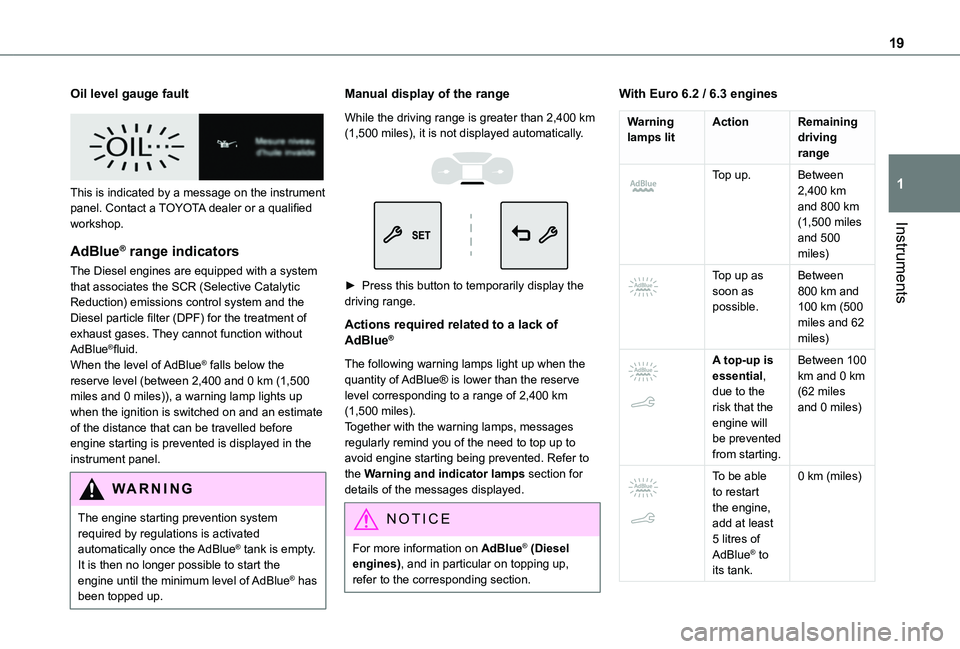
The Diesel engines are equipped with a system that associates the SCR (Selective Catalytic Reduction) emissions control system and the Diesel particle filter (DPF) for the treatment of exhaust gases. They cannot function without AdBlue®fluid.When the level of AdBlue® falls below the reserve level (between 2,400 and 0 km (1,500 miles and 0 miles)), a warning lamp lights up when the ignition is switched on and an estimate of the distance that can be travelled before engine starting is prevented is displayed in the
instrument panel.
WARNI NG
The engine starting prevention system required by regulations is activated
automatically once the AdBlue® tank is empty. It is then no longer possible to start the engine until the minimum level of AdBlue® has been topped up.
Manual display of the range
While the driving range is greater than 2,400 km (1,500 miles), it is not displayed automatically.
► Press this button to temporarily display the driving range.
Actions required related to a lack of AdBlue®
The following warning lamps light up when the quantity of AdBlue® is lower than the reserve level corresponding to a range of 2,400 km (1,500 miles).Together with the warning lamps, messages regularly remind you of the need to top up to avoid engine starting being prevented. Refer to the Warning and indicator lamps section for details of the messages displayed.
NOTIC E
For more information on AdBlue® (Diesel engines), and in particular on topping up, refer to the corresponding section.
With Euro 6.2 / 6.3 engines
Warning lamps litActionRemaining driving range
Top up.Between 2,400 km and 800 km (1,500 miles and 500
miles)
Top up as soon as possible.
Between 800 km and 100 km (500 miles and 62 miles)
A top-up is essential, due to the risk that the engine will be prevented from starting.
Between 100 km and 0 km (62 miles and 0 miles)
To be able to restart the engine, add at least 5 litres of AdBlue® to its tank.
0 km (miles)
Page 20 of 272

20
Malfunction of the SCR emissions control system
Malfunction detection
If a malfunction is detected, these warning lamps come on, accompanied by an audible signal and an "Emissions fault” or “NO START IN” message.
The alert is triggered while driving, when the fault is detected for the first time, and thereafter when switching on the ignition for subsequent journeys, while the cause of the fault persists.
NOTIC E
If the fault is temporary, the alert disappears during the next journey, after self-diagnostic checks of the SCR emissions control system.
Malfunction confirmed during the permitted driving phase (between 1,100 km and 0 km (685 miles and 0 miles))
If the fault indication is still displayed permanently after 50 km (31 miles) of driving, the fault in the SCR system is confirmed.The AdBlue warning lamp flashes, and an "Emissions fault: Starting prevented in X miles" or "NO START IN X miles" message is
displayed, indicating the driving range in miles or kilometres.While driving, the message is displayed every 30 seconds. The alert is repeated when switching on the ignition.You can continue driving for up to 1,100 km (685 miles) before the engine immobiliser system is triggered.
WARNI NG
Have the system checked by a TOYOTA dealer or a qualified workshop as soon as possible.
Starting prevented
Whenever the ignition is switched on, the "Emissions fault: Starting prevented" or "NO START IN" message is displayed.
WARNI NG
To be able to restart the engine, contact a TOYOTA dealer or a qualified workshop.
Lighting dimmer
This control lets you manually adjust the brightness of the instrument panel according to
the exterior light level.
With the lamps on (not in the AUTO position) ,
press button A to increase the brightness of the lighting, or button B to decrease it.Release the button when the desired brightness is reached.
Touch screen lighting
dimmer
► In the Settings menu, select "Brightness".
Or select "OPTIONS", "Screen configuration" then "Brightness".
Page 29 of 272

29
Access
2
NOTIC E
If your vehicle is fitted with an alarm, pressing and holding the locking button enables the windows to be closed. The window stops in position when you release the button.
WARNI NG
Driving with the doors locked could make it more difficult for the emergency services to enter the vehicle in an emergency.As a safety measure, never leave the vehicle, even for a short time, without taking the remote control with you.
If a door is not properly closed (except the right-hand door with side-hinged rear doors):– when the vehicle is stationary and engine running, this warning lamp comes on, accompanied by a warning message for a few seconds, – when the vehicle is moving (at speeds above 10 km/h (6 mph)), this warning lamp comes on, accompanied by an audible signal and a warning message for a few seconds.
Deadlocking
WARNI NG
Deadlocking renders the exterior and interior door controls inoperative.It also deactivates the manual central control button.Therefore, never leave anyone inside the vehicle when it is deadlocked.
With the key
► To deadlock the vehicle, turn the key in the driver's door lock towards the rear of the vehicle.► Then within five seconds, turn the key towards the rear again.
With the remote control
► To deadlock the vehicle, press this button.► Then press this button again within five seconds after locking.
NOTIC E
At the same time, depending on version, the electric door mirrors fold in.
NOTIC E
If your vehicle is fitted with an alarm, pressing and holding the locking button enables the windows to be closed. The window stops in position when you release the button.
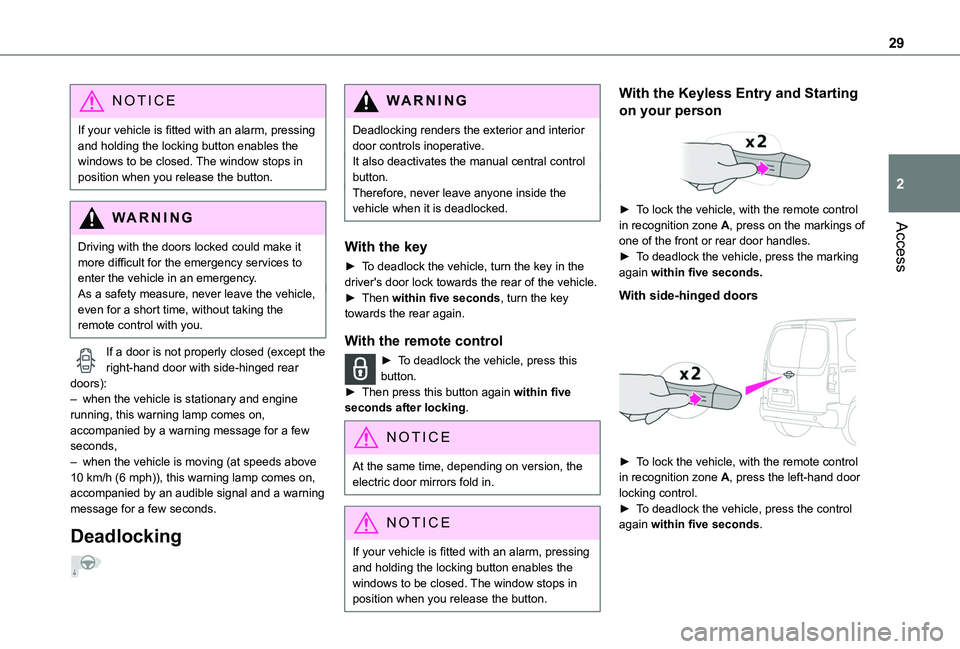
With the Keyless Entry and Starting
on your person
► To lock the vehicle, with the remote control in recognition zone A, press on the markings of one of the front or rear door handles.► To deadlock the vehicle, press the marking again within five seconds.
With side-hinged doors
► To lock the vehicle, with the remote control in recognition zone A, press the left-hand door locking control.► To deadlock the vehicle, press the control again within five seconds.
Page 31 of 272

31
Access
2
Unlocking of one part of the vehicle
(front passenger door/sliding side
door/side-hinged doors)
► Use the interior opening handle.or► With side-hinged doors, insert the integral key in the (left-hand) door lock, then turn it.
NOTIC E
For more information on the Child lock on a sliding side door or side-hinged doors, refer to the corresponding section.
Unlocking the tailgate
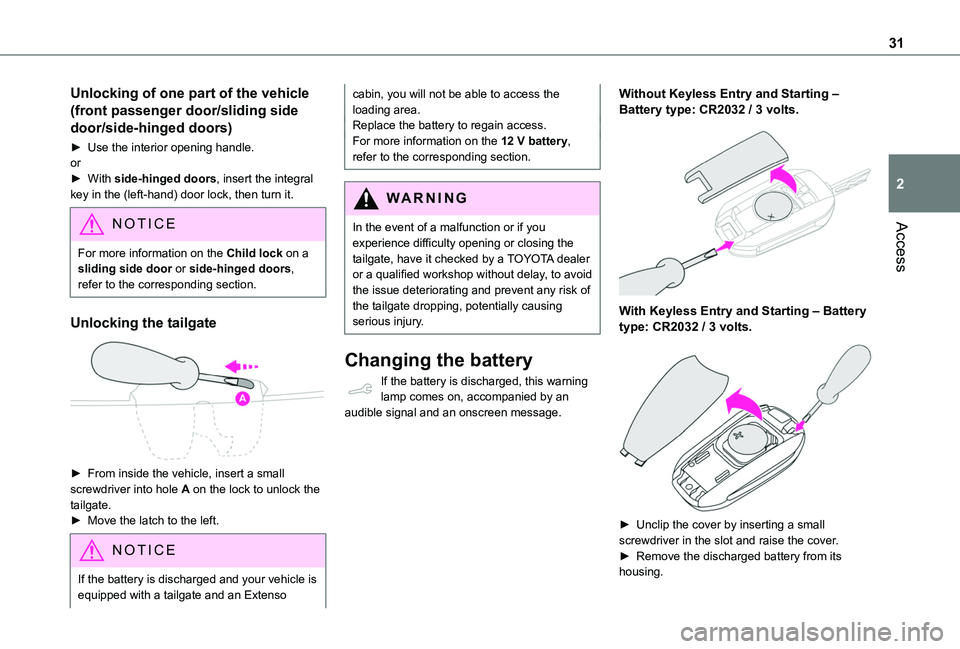
► From inside the vehicle, insert a small screwdriver into hole A on the lock to unlock the tailgate.► Move the latch to the left.
NOTIC E
If the battery is discharged and your vehicle is equipped with a tailgate and an Extenso
cabin, you will not be able to access the loading area.Replace the battery to regain access.For more information on the 12 V battery, refer to the corresponding section.
WARNI NG
In the event of a malfunction or if you experience difficulty opening or closing the tailgate, have it checked by a TOYOTA dealer or a qualified workshop without delay, to avoid the issue deteriorating and prevent any risk of the tailgate dropping, potentially causing serious injury.
Changing the battery
If the battery is discharged, this warning lamp comes on, accompanied by an audible signal and an onscreen message.
Without Keyless Entry and Starting ‒ Battery type: CR2032 / 3 volts.
With Keyless Entry and Starting ‒ Battery type: CR2032 / 3 volts.
► Unclip the cover by inserting a small screwdriver in the slot and raise the cover.
► Remove the discharged battery from its housing.
Page 34 of 272

34
Automatic mode
The loading area is always locked when driving.
NOTIC E
To deactivate the automatic locking function, go to a TOYOTA dealer or a qualified workshop.
Anti-intrusion security
This system allows automatic simultaneous locking of the doors and boot as soon as the speed of the vehicle exceeds 10 km/h (6 mph).
Operation
If one of the doors or the boot is open, the automatic central locking does not take place.This is signalled by the sound of the locks rebounding, accompanied by illumination of this warning lamp in the instrument panel, an audible signal and the display of an alert message.
Activation/Deactivation
You can activate or deactivate this function permanently.► With the ignition on, press the central locking button until an audible signal is triggered and a corresponding message of confirmation is displayed.
The state of the system stays in the memory when the ignition is switched off.
WARNI NG
Driving with the doors locked may render access by the emergency services to the interior difficult in an emergency.
NOTIC E
Carrying long or voluminous objectsIf you want to drive with the boot open, you should press the central locking button to lock the doors. Otherwise, every time the speed of the vehicle exceeds 10 km/h (6 mph), the locks will rebound and the alerts mentioned above will appear.Pressing the central locking button unlocks the vehicle.Above 10 km/h (6 mph), this unlocking is temporary.
Side-hinged doors
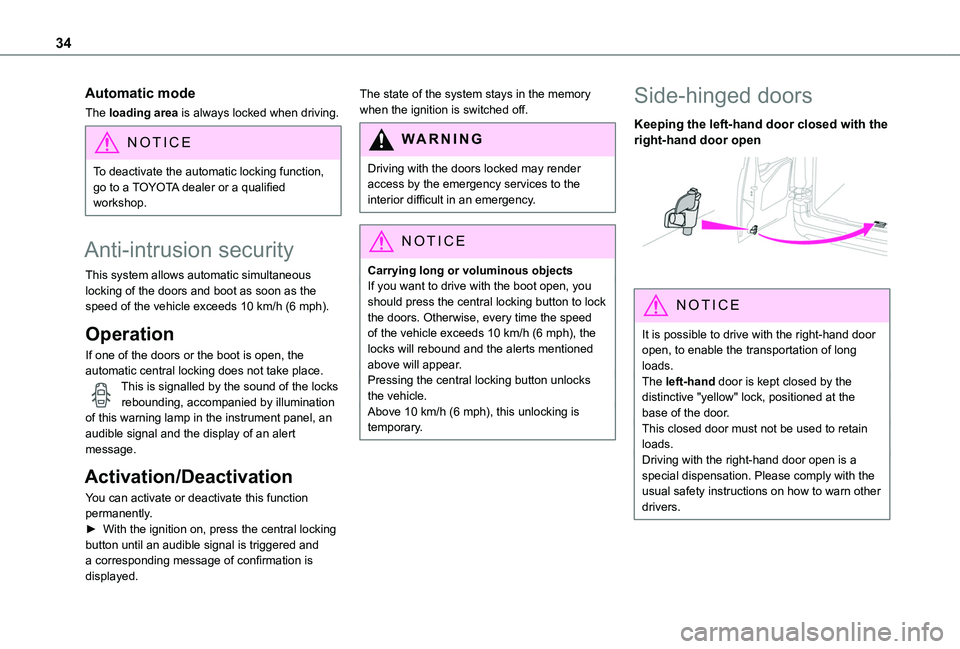
Keeping the left-hand door closed with the right-hand door open
NOTIC E
It is possible to drive with the right-hand door open, to enable the transportation of long loads.The left-hand door is kept closed by the distinctive "yellow" lock, positioned at the base of the door.This closed door must not be used to retain loads.
Driving with the right-hand door open is a special dispensation. Please comply with the usual safety instructions on how to warn other drivers.