2020 TOYOTA PROACE CITY bonnet
[x] Cancel search: bonnetPage 152 of 272
152
WARNI NG
Cooling of the engine when stoppedThe engine cooling fan may start after the engine has been switched off.Take care with objects or clothing that could be caught in the blades of the fan!
Opening
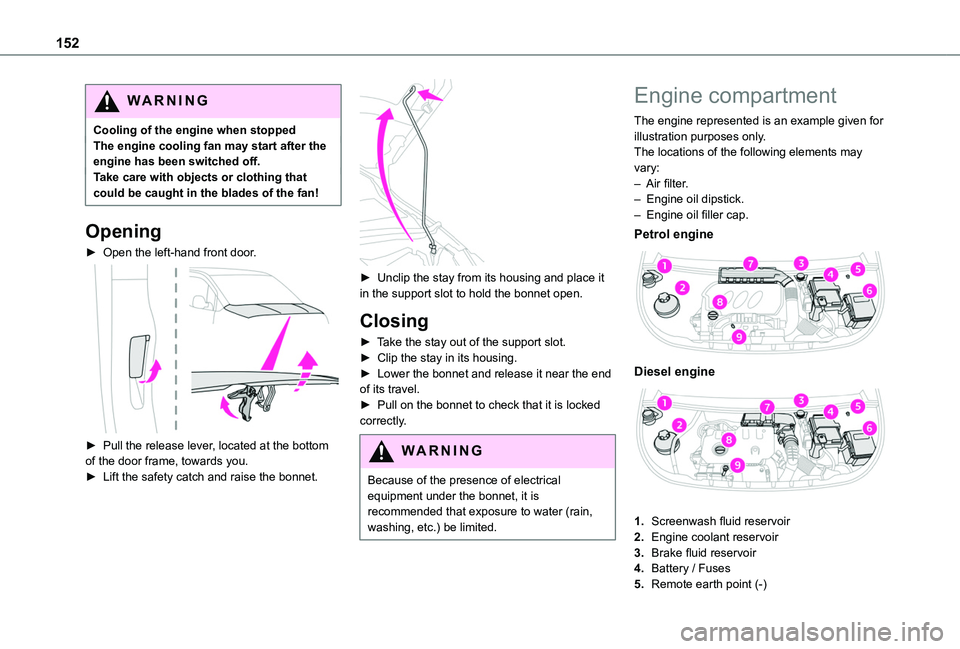
► Open the left-hand front door.
► Pull the release lever, located at the bottom of the door frame, towards you.► Lift the safety catch and raise the bonnet.
► Unclip the stay from its housing and place it in the support slot to hold the bonnet open.
Closing
► Take the stay out of the support slot.► Clip the stay in its housing.► Lower the bonnet and release it near the end of its travel.► Pull on the bonnet to check that it is locked correctly.
WARNI NG
Because of the presence of electrical equipment under the bonnet, it is recommended that exposure to water (rain, washing, etc.) be limited.
Engine compartment
The engine represented is an example given for illustration purposes only.The locations of the following elements may vary:– Air filter.– Engine oil dipstick.– Engine oil filler cap.
Petrol engine
Diesel engine
1.Screenwash fluid reservoir
2.Engine coolant reservoir
3.Brake fluid reservoir
4.Battery / Fuses
5.Remote earth point (-)
Page 153 of 272
153
Practical information
7
6.Fusebox
7.Air filter
8.Engine oil filler cap
9.Engine oil dipstick
WARNI NG
The Diesel fuel system operates under very high pressure.All work on this circuit must be carried out only by a TOYOTA dealer or a qualified workshop.
Checking levels
Check all of the following levels regularly in accordance with the manufacturer's service schedule. Top them up if required, unless otherwise indicated.If a level drops significantly, have the corresponding system checked by a TOYOTA dealer or a qualified workshop.
WARNI NG
The fluids must comply with the manufacturer's requirements and with the vehicle's engine.
WARNI NG
Take care when working under the bonnet, as certain areas of the engine may be extremely hot (risk of burns) and the cooling fan could start at any time (even with the ignition off).
Used products
WARNI NG
Avoid prolonged contact of used oil or fluids with the skin.Most of these fluids are harmful to health and very corrosive.
ECO
Do not discard used oil or fluids into sewers or onto the ground.Empty used oil into the containers reserved for this purpose at a TOYOTA dealer or a qualified workshop.
Engine oil
The level is checked, with the engine having been switched off for at least 30
minutes and on level ground, either using the oil level indicator in the instrument panel when the ignition is switched on (for vehicles equipped with an electric gauge), or using the dipstick.
It is normal to top up the oil level between two services (or oil changes). It is recommended that you check the level, and top up if necessary, every 5,000 km (3,000 miles).
WARNI NG
In order to maintain the reliability of the engine and emissions control system, never use additives in the engine oil.
Checking using the dipstick
For the location of the dipstick, please refer to the illustration of the corresponding engine compartment.► Grasp the dipstick by its coloured grip and pull it out completely.► Wipe the end of the dipstick using a clean, lint-free cloth.
► Reinsert the dipstick and push fully down, then pull it out again to visually check the oil level: the correct level is between marks A (max) and B (min).Do not start the engine if the level is:– above mark A: contact a TOYOTA dealer or a qualified workshop.
Page 154 of 272
154
– below mark B: top up the engine oil immediately.
WARNI NG
Oil gradeBefore topping up or changing the engine oil, check that the oil is suitable for the engine and complies with the recommendations in the service schedule supplied with the vehicle
(or available from your TOYOTA dealer and qualified workshops).Use of non-recommended oil may invalidate the contractual warranty in the event of engine failure.
Topping up the engine oil level
The location of the oil filler cap is shown in the corresponding underbonnet layout view.► Add oil in small quantities, avoiding any spills on engine components (risk of fire).► Wait a few minutes before checking the level again using the dipstick.► Add more oil if necessary.► After checking the level, carefully refit the oil filler cap and the dipstick in its tube.
NOTIC E
During the 30 minutes after topping up the oil, the check performed with the oil level indicator in the instrument panel when the ignition is switched on is not valid.
Brake fluid
The level of this fluid should be close to the "MAX" mark. If not, check the brake pad wear.To know how often the brake fluid should be replaced, refer to the manufacturer's servicing schedule.
WARNI NG
If topping up, clean the cap before replacing it. Use only DOT4 brake fluid from a sealed canister.
Engine coolant
Check the engine coolant level regularly.It is normal to top up this fluid between two services.The check and top-up must only be done with the engine cold.A low level presents a risk of serious damage to the engine.The level of this fluid should be close to the "MAX" mark but should never exceed it.If the level is close to or below the "MIN” mark, it is essential to top up.When the engine is hot, the temperature of this fluid is regulated by the fan.In addition, as the cooling system is pressurised, wait at least one hour after switching off the engine before carrying out any work.
To avoid the risk of scalding if you need to top up in an emergency, wrap a cloth around the cap and unscrew the cap by two turns to allow the pressure to drop.Once the pressure has dropped, remove the cap and top up to the required level.
Screenwash fluid
Top up to the required level when necessary.Capacity of the tank:– 5.3 litres for "very cold climate" versions.– 2.2 litres for other versions.
Fluid specification
The fluid must be topped up with a ready-to-use mixture.In winter (temperatures below zero), a liquid containing an agent to prevent freezing must be used which is appropriate for the prevailing conditions, in order to protect the elements of the system (pump, tank, ducts, jets, etc.).
WARNI NG
Filling with pure water is prohibited under all circumstances (risk of freezing, limestone deposits, etc.).
Page 169 of 272
169
In the event of a breakdown
8
WARNI NG
After changing a wheelStow the punctured wheel in the carrier.Go to a TOYOTA dealer or a qualified workshop as soon as possible.Have the punctured tyre examined. After inspection, the technician will advise you on whether the tyre can be repaired or if it must be replaced.
NOTIC E
Some driving aid functions should be disabled, e.g. the Active Safety Brake.
NOTIC E
If your vehicle has tyre under-inflation detection, check the tyre pressures and reinitialise the system.For more information on Under-inflation detection, refer to the corresponding section.
NOTIC E
Wheel with wheel trimWhen refitting the wheel, refit the wheel
trim, starting by aligning the cutout with the valve and then pushing the trim into place all round its edge with the palm of your hand.
NOTIC E
The tyre inflation pressures are given on this label.
Changing a bulb
NOTIC E
In some weather conditions (e.g. low temperature or humidity), misting on the internal surface of the glass of the headlamps and rear lamps is normal, and will disappear after the lamps have been on for a few minutes.
WARNI NG
The headlamps have polycarbonate lenses with a protective coating:► do not clean them with a dry or abrasive cloth, nor with detergent or solvent products,
► use a sponge and soapy water or a pH neutral product,► when using a high-pressure washer on persistent marks, do not keep the lance directed towards the lamps or their edges for too long, so as not to damage their protective coating and seals.
WARNI NG
Changing a bulb must only be done with the ignition off and after the lamp has been switched off for several minutes - risk of serious burns!Do not touch the bulb directly with your fingers, use a lint-free cloth.It is essential only to use anti-ultraviolet (UV) type bulbs, so as not to damage the headlamp.Always replace a failed bulb with a new bulb of the same type and specification.
WARNI NG
Opening the bonnet / Accessing the bulbsWith the engine warm, proceed with caution - risk of burns!
Page 177 of 272
177
In the event of a breakdown
8
Lead-acid starter batteries
ECO
Batteries contain harmful substances such as sulphuric acid and lead.They must be disposed of in accordance with regulations and must not, in any circumstances, be discarded with household waste.
Take used remote control batteries and vehicle batteries to a special collection point.
WARNI NG
Protect your eyes and face before handling the battery.All operations on the battery must be carried out in a well ventilated area and away from naked flames and sources of sparks, so as to avoid the risk of explosion or fire.Wash your hands afterwards.
WARNI NG
Versions equipped with Stop & Start are fitted with a 12 V lead-acid battery with special technology and specifications.
It should only be replaced by a TOYOTA dealer or a qualified workshop.
Access to the battery
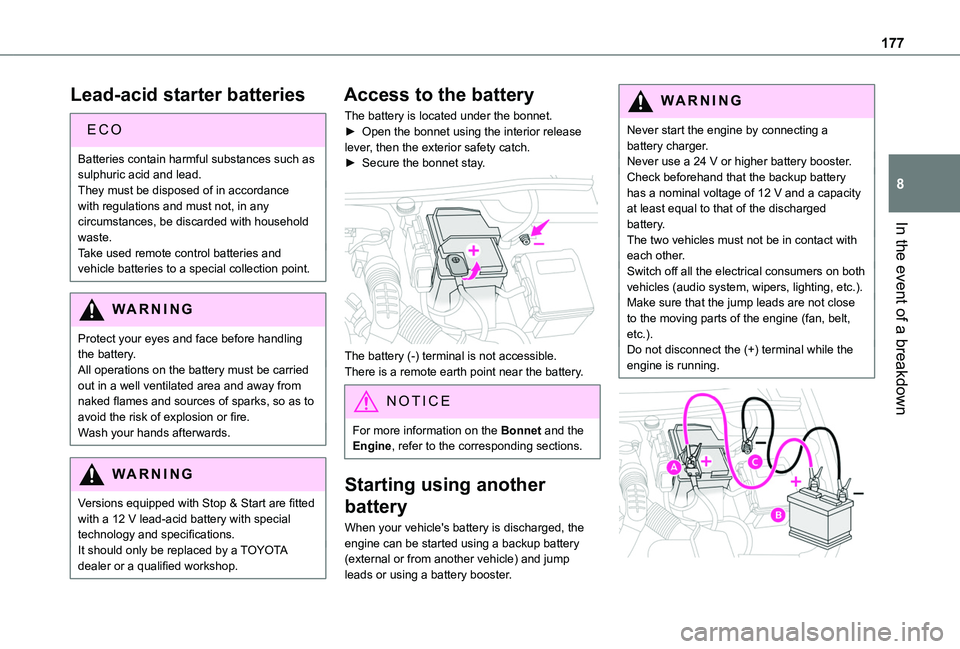
The battery is located under the bonnet.► Open the bonnet using the interior release lever, then the exterior safety catch.► Secure the bonnet stay.
The battery (-) terminal is not accessible.There is a remote earth point near the battery.
NOTIC E
For more information on the Bonnet and the Engine, refer to the corresponding sections.
Starting using another
battery
When your vehicle's battery is discharged, the engine can be started using a backup battery
(external or from another vehicle) and jump leads or using a battery booster.
WARNI NG
Never start the engine by connecting a battery charger.Never use a 24 V or higher battery booster.Check beforehand that the backup battery has a nominal voltage of 12 V and a capacity at least equal to that of the discharged battery.The two vehicles must not be in contact with each other.Switch off all the electrical consumers on both vehicles (audio system, wipers, lighting, etc.).Make sure that the jump leads are not close to the moving parts of the engine (fan, belt, etc.).Do not disconnect the (+) terminal while the engine is running.
Page 190 of 272
190
Identification markings
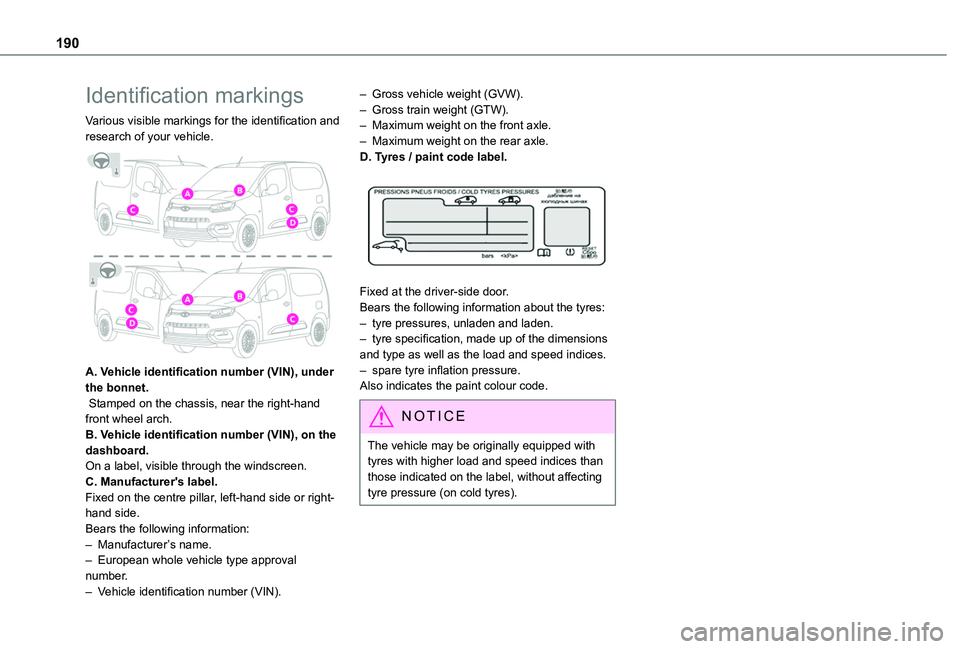
Various visible markings for the identification and research of your vehicle.
A. Vehicle identification number (VIN), under the bonnet. Stamped on the chassis, near the right-hand front wheel arch.B. Vehicle identification number (VIN), on the dashboard.On a label, visible through the windscreen.C. Manufacturer's label.Fixed on the centre pillar, left-hand side or right-hand side.Bears the following information:– Manufacturer’s name.
– European whole vehicle type approval number.– Vehicle identification number (VIN).
– Gross vehicle weight (GVW).– Gross train weight (GTW).– Maximum weight on the front axle.– Maximum weight on the rear axle.D. Tyres / paint code label.
Fixed at the driver-side door.Bears the following information about the tyres:– tyre pressures, unladen and laden.– tyre specification, made up of the dimensions and type as well as the load and speed indices.– spare tyre inflation pressure.Also indicates the paint colour code.
NOTIC E
The vehicle may be originally equipped with tyres with higher load and speed indices than those indicated on the label, without affecting tyre pressure (on cold tyres).
Page 245 of 272
245
Alphabetical index
A
ABS 78Accessories 75, 100Access to the spare wheel 166Active Safety Brake 128–130AdBlue® 157AdBlue® tank 158Additive, Diesel 155–156Adjusting headlamps 71Adjusting head restraints 48Adjusting seat 42Adjusting the air distribution 60Adjusting the air flow 60Adjusting the date 216, 240Adjusting the height and reach of the steering wheel 44Adjusting the lumbar support 42Adjusting the temperature 60Adjusting the time 215, 240Advanced Grip Control 80–81Advice on care and maintenance 160
Advice on driving 7, 95–96Airbags 85, 87–88, 90Airbags, curtain 86–88Airbags, front 85–87, 91Airbags, lateral 86–87Air conditioning 58, 61Air conditioning, digital 62Air conditioning, dual-zone automatic 60Air conditioning, manual 59, 62Air intake 60
Air vents 58Alarm 37–39Alarm, volumetric 37Android Auto connection 231Anti-lock braking system (ABS) 78–79Antitheft / Immobiliser 24Apple CarPlay connection 2 11, 230Applications 231Area, loading 25, 33–34, 52Armrest 42Armrest, front 48Assistance call 75–77Assistance, emergency braking 79, 130Audible warning 78Audio streaming (Bluetooth) 197, 210, 235
B
Battery 150, 177, 179Battery, 12 V 155, 176–178Battery, charging 178–179
Battery, remote control 31–32, 65Blind spot monitoring system 135Blind spot monitoring system, active 136Blind spot sensors 134, 136Bluetooth (hands-free) 198–199, 212–213, 236–237Bluetooth (telephone) 212–214, 236–237Bodywork 161Bonnet 151–152Boot lid 28, 31
Bottle holder 48Brake discs 156Brake lamps 173Brakes 156Braking assistance system 78–79Braking, automatic emergency 128–130Braking, dynamic emergency 102–103Brightness 215Bulbs 170Bulbs (changing) 169–170Bulbs (changing, type) 170
C
Capacity, fuel tank 144–145Cap, fuel filler 144–145Care of the bodywork 161CD 196, 210CD, MP3 196–197, 210Central locking 24, 28Changing a bulb 169–170
Changing a fuse 174–176Changing a wheel 163, 165Changing a wiper blade 73Changing the remote control battery 31Charger, induction 50Charger, wireless 50Checking the levels 153–154Checking tyre pressures (using the kit) 163, 165Checks 152, 155–156Checks, routine 155–156
Page 248 of 272
248
Level, AdBlue® 155Level, brake fluid 154Level, Diesel additive 155–156Level, engine coolant 16, 154Level, engine oil 153Levels and checks 152–154Level, screenwash fluid 72, 154Light-emitting diodes - LEDs 69, 170Lighting 67Lighting, exterior 67Lighting, guide-me home 69Lighting, welcome 70Loading 52, 150Load reduction mode 150Load restraint 51Locating your vehicle 24Locking 23–24, 28Locking from the inside 32–34Long load support bar 36Low fuel level 144–145Lumbar 42
M
Maintenance (advice) 160Maintenance, routine 11 6, 155Manoeuvring aids (recommendations) 11 4Markings, identification 190Mat 48, 11 6Memorising a speed 128Menu 2 11
Menu, main 193Menus (audio) 206–207, 219–220Messages 238Messages, quick 238Mirror, rear view 45Mirrors, door 44–45, 63, 134Misfuel prevention 145–146MP3 CD 197
N
Navigation 225–227Navigation, connected 227–229Number plate lamps 174
O
Obstacle detection 137Oil change 153Oil consumption 153
OIl, engine 153On-board tools 162–163Opening the bonnet 151–152Opening the boot 23Opening the doors 23Overhead storage 49
P
Pads, brake 156Paint 161, 190Paint colour code 190Parking brake 100, 156Parking brake, electric 101–103, 156Parking sensors, audible and visual 137Parking sensors, front 138Parking sensors, rear 138Plates, identification 190Player, Apple® 197, 210, 235Player, MP3 CD 196–197Player, USB 195, 209, 235Port, USB 49, 195, 209, 230, 235Pressures, tyres 156, 165, 169, 190Pre-tensioning seat belts 84Priming the fuel system 162Profiles 214, 239Programmable cruise control 122Protecting children 85–86, 88–89, 91–92Puncture 163, 165
R
Radar (warnings) 11 5Radio 193–194, 207–208, 210, 233Radio, digital (Digital Audio Broadcasting - DAB) 194, 209, 234Range, AdBlue 155RDS 208, 233–234