Page 179 of 792
PRIUS PRIME_OM_OM47C77U_(U)
1792-2. Charging
2
Plug-in hybrid system
■When the power switch is turned off
The next charge schedule (“Next
Charging Event”) can be checked on the
ending screen
* that is displayed when the
power switch is turned off.
*: The ending screen may not be dis-
played during charging.
WARNING
■ Cautions performing the setting operation
As the hybrid system needs to be operating during setting up the display,
ensure that the vehicle is parked in a place with adequate vent ilation. In a
closed area such as a garage, exhaust gases including harmful c arbon
monoxide (CO) may collect and enter the vehicle. This may lead to death or
a serious health hazard.
NOTICE
■ While performing the setting operation
To prevent 12-volt battery discharge, ensure that the hybrid sy stem is oper-
ating while setting up the display features.
Page 180 of 792

180
PRIUS PRIME_OM_OM47C77U_(U)
2-2. Charging
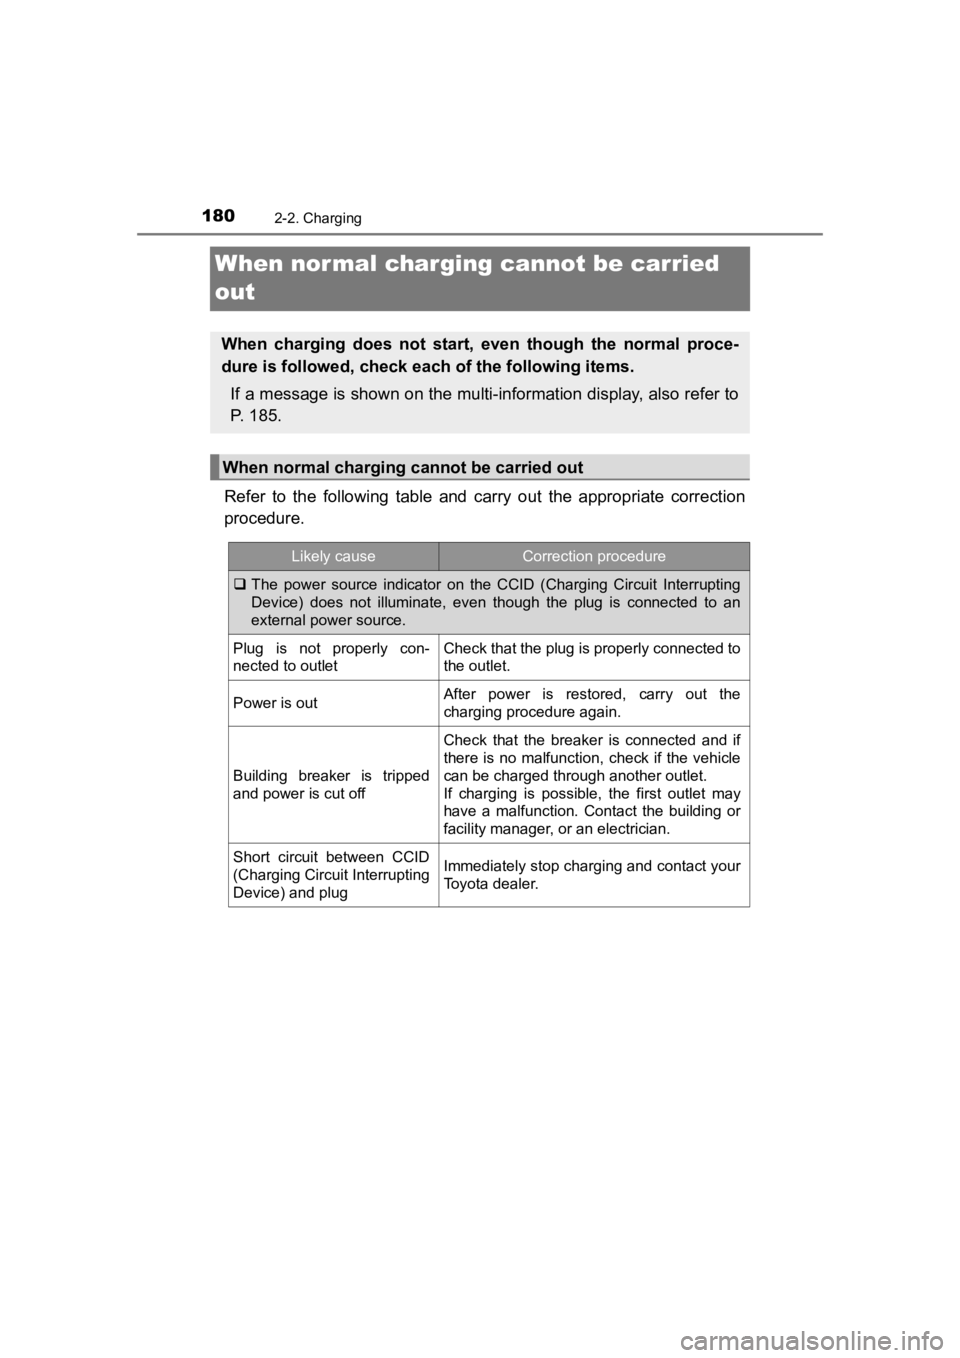
When normal charging cannot be carried
out
Refer to the following table and carry out the appropriate corr ection
procedure.
When charging does not start, even though the normal proce-
dure is followed, check each of the following items.
If a message is shown on the multi-information display, also re fer to
P. 185.
When normal charging cannot be carried out
Likely causeCorrection procedure
The power source indicator on the CCID (Charging Circuit Interr upting
Device) does not illuminate, even though the plug is connected to an
external power source.
Plug is not properly con-
nected to outletCheck that the plug is properly connected to
the outlet.
Power is outAfter power is restored, carry out the
charging procedure again.
Building breaker is tripped
and power is cut off
Check that the breaker is connected and if
there is no malfunction, check if the vehicle
can be charged through another outlet.
If charging is possible, the first outlet may
have a malfunction. Contact the building or
facility manager, or an electrician.
Short circuit between CCID
(Charging Circuit Interrupting
Device) and plugImmediately stop charging and contact your
Toyota dealer.
Page 182 of 792

182
PRIUS PRIME_OM_OM47C77U_(U)
2-2. Charging
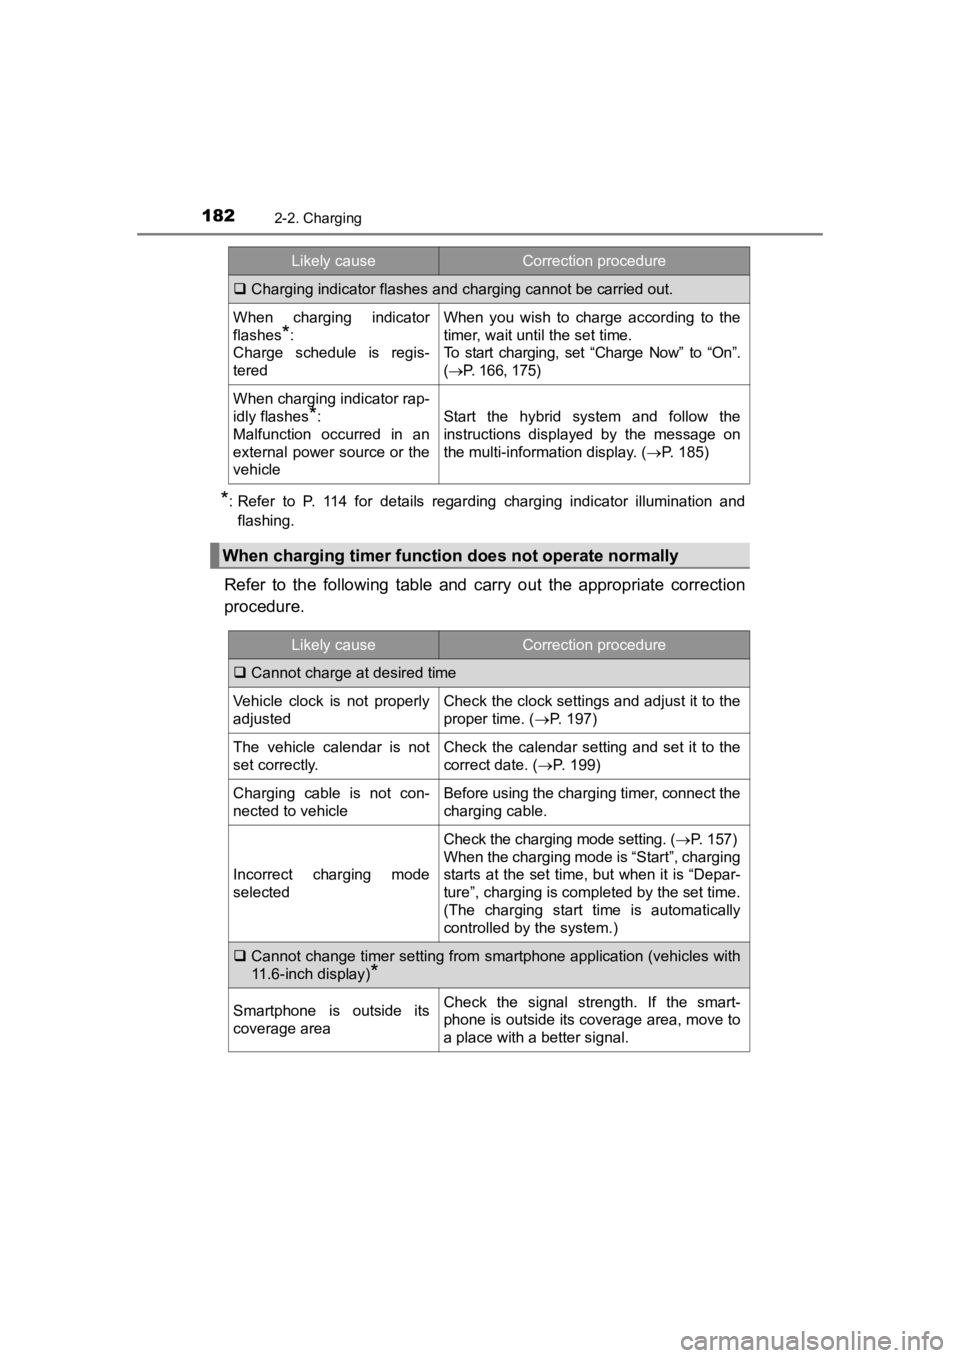
*: Refer to P. 114 for details regarding charging indicator illumination and
flashing.
Refer to the following table and carry out the appropriate corr ection
procedure.
Charging indicator flashes and charging cannot be carried out.
When charging indicator
flashes
*:
Charge schedule is regis-
tered
When you wish to charge according to the
timer, wait until the set time.
To start charging, set “Charge Now” to “On”.
( P. 166, 175)
When charging indicator rap-
idly flashes
*:
Malfunction occurred in an
external power source or the
vehicleStart the hybrid system and follow the
instructions displayed by the message on
the multi-information display. ( P. 185)
When charging timer function does not operate normally
Likely causeCorrection procedure
Cannot charge at desired time
Vehicle clock is not properly
adjustedCheck the clock settings and adjust it to the
proper time. ( P. 197)
The vehicle calendar is not
set correctly.Check the calendar setting and set it to the
correct date. ( P. 199)
Charging cable is not con-
nected to vehicleBefore using the charging timer, connect the
charging cable.
Incorrect charging mode
selected
Check the charging mode setting. ( P. 1 5 7 )
When the charging mode is “Start”, charging
starts at the set time, but when it is “Depar-
ture”, charging is completed by the set time.
(The charging start time is automatically
controlled by the system.)
Cannot change timer setting from smartphone application (vehicl es with
11.6-inch display)
*
Smartphone is outside its
coverage areaCheck the signal strength. If the smart-
phone is outside its coverage area, move to
a place with a better signal.
Likely causeCorrection procedure
Page 185 of 792

PRIUS PRIME_OM_OM47C77U_(U)
1852-2. Charging
2
Plug-in hybrid system
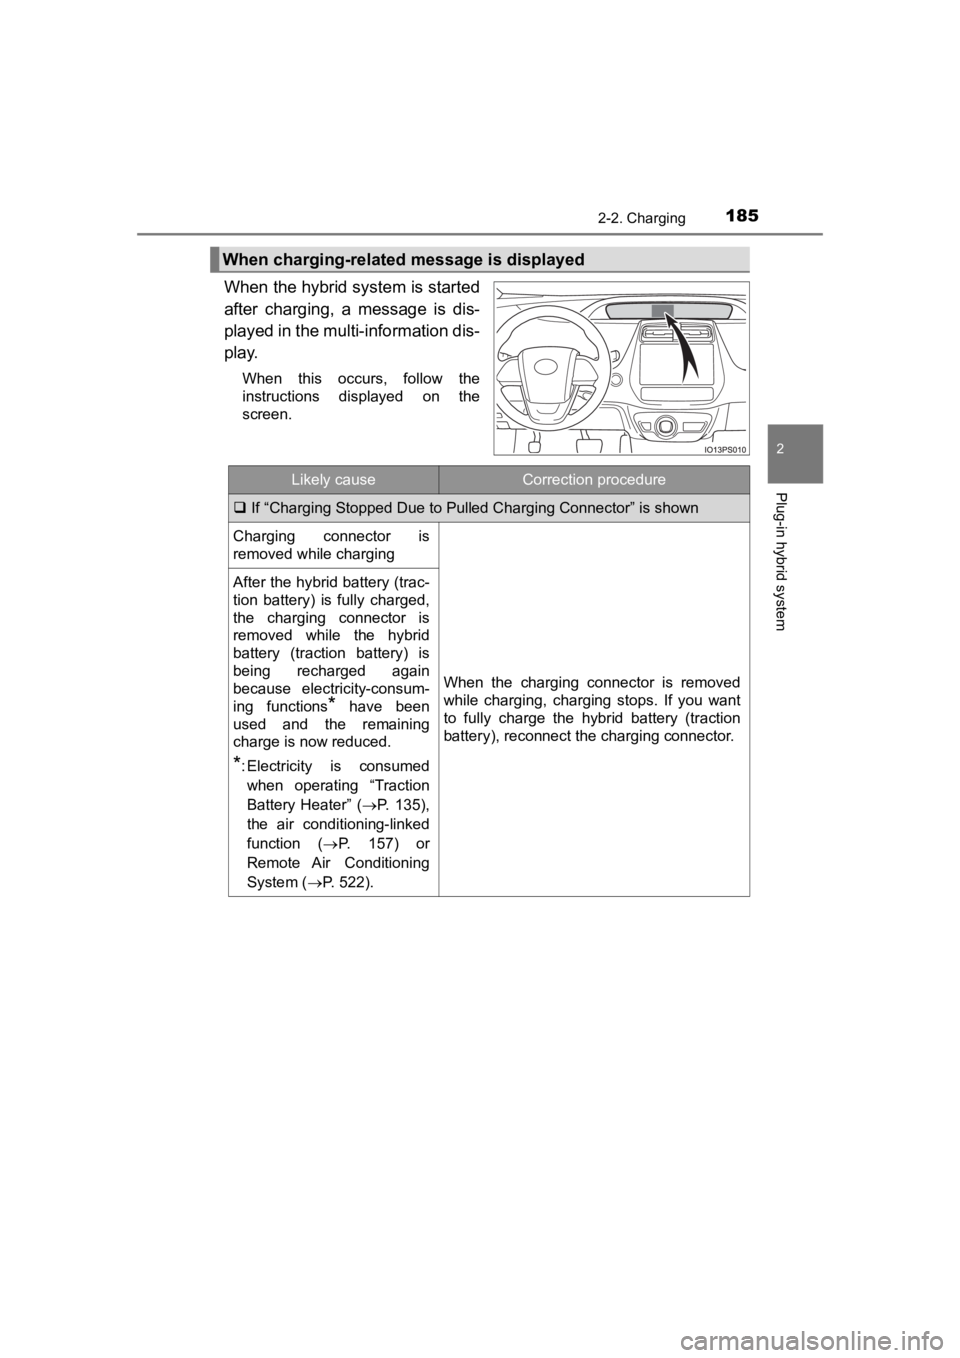
When the hybrid system is started
after charging, a message is dis-
played in the multi-information dis-
play.
When this occurs, follow the
instructions displayed on the
screen.
When charging-related message is displayed
Likely causeCorrection procedure
If “Charging Stopped Due to Pulled Charging Connector” is shown
Charging connector is
removed while charging
When the charging connector is removed
while charging, charging stops. If you want
to fully charge the hybrid battery (traction
battery), reconnect the charging connector.
After the hybrid battery (trac-
tion battery) is fully charged,
the charging connector is
removed while the hybrid
battery (traction battery) is
being recharged again
because electricity-consum-
ing functions
* have been
used and the remaining
charge is now reduced.
*: Electricity is consumed
when operating “Traction
Battery Heater” (P. 135),
the air conditioning-linked
function ( P. 157) or
Remote Air Conditioning
System ( P. 522).
Page 191 of 792
191
PRIUS PRIME_OM_OM47C77U_(U)
Instrument cluster3
3. Instrument clusterCombination meter............ 192
Warning lights and indicators ........................ 201
Main display ...................... 209
Multi-information display............................. 218
Head-up display ................ 251
Energy monitor/ consumption screen
(vehicles with 7-inch
display) ........................... 259
Energy monitor/ consumption screen/
detail screen (vehicles
with 11.6-inch display) .... 265
Page 192 of 792

192
PRIUS PRIME_OM_OM47C77U_(U)
3. Instrument cluster
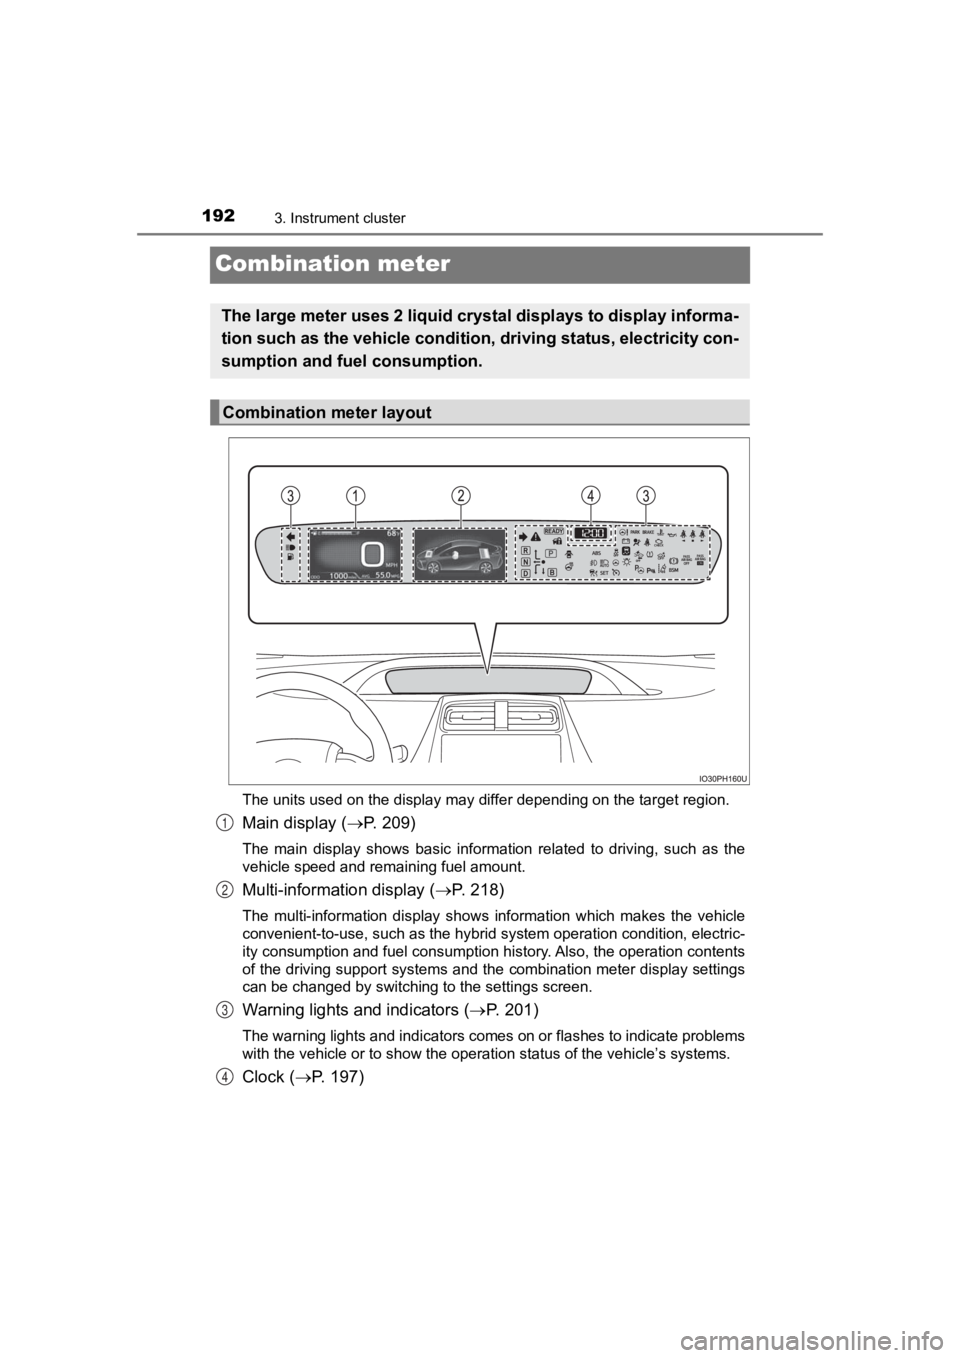
Combination meter
The units used on the display may differ depending on the target region.
Main display (P. 209)
The main display shows basic information related to driving, su ch as the
vehicle speed and remaining fuel amount.
Multi-information display ( P. 218)
The multi-information display shows information which makes the vehicle
convenient-to-use, such as the hybrid system operation condition, electric-
ity consumption and fuel consumption history. Also, the operati on contents
of the driving support systems and the combination meter display settings
can be changed by switching to the settings screen.
Warning lights and indicators ( P. 2 0 1 )
The warning lights and indicators comes on or flashes to indicate problems
with the vehicle or to show the operation status of the vehicle ’s systems.
Clock (P. 197)
The large meter uses 2 liquid crystal displays to display infor ma-
tion such as the vehicle condition , driving status, electricity con-
sumption and fuel consumption.
Combination meter layout
1
2
3
4
Page 193 of 792
PRIUS PRIME_OM_OM47C77U_(U)
1933. Instrument cluster
3
Instrument cluster
The meter control switches equipped on the steering wheel can be
used to switch the screen displa y and change settings related to func-
tions displayed on the screen.
Each time the button is
pressed, the mileage display
switches among odometer, trip
meters, etc., and the fuel con-
sumption information for each
distance switches as well.
( P. 211)
Pressing , , or
performs such operations as
scrolling the screen
*, switching
the contents of the display
* and
moving the cursor.
This button is used to perform s uch operations as selecting the cur-
rent item or switching between on and off.
When pressed, the display returns to the previous screen.
*: On screens where the screen can be scrolled and the display ca n be
switched, marks are displayed to indicate the direction of oper ation (such
as and ).
Operations related to the combination meter
1
2
3
4
Page 194 of 792
194
PRIUS PRIME_OM_OM47C77U_(U)
3. Instrument cluster
When the switches are pressed, the instrument cluster light changes
as follows.
The instrument cluster brightness levels that can be selected differ
depending on whether the tail lights are on and surrounding bri ghtness lev-
els. ( P. 199)
Darker
Brighter
When the switches are pressed,
the adjustment level check screen
(pop-up display
*) is displayed on
the main display.
When the instrument cluster light is
adjusted, the brightness of the
instrument panel light also
changes.
*: A short time after the operation is completed, the pop-up disp lay turns off.
Furthermore, the pop-up display can be turned on and off in the “Meter
Customize” settings. ( P. 246)
Instrument cluster light control
1
2