Page 360 of 744

3604-5. Using the driving support systems
HILUX_OM_OM0K321E_(EE)
■ Warning message
If the following warning message is displayed on the multi-information dis-
play, and the LDA indicator illuminates in yellow, follow the appropriate trou-
bleshooting procedure. Also, if a different warning message is displayed,
follow the instructions displayed on the screen.
● “LDA Malfunction Visit Your Dealer”
The system may not be operating properly. Have the vehicle inspected by
any authorized Toyota retailer or Toyota authorized repairer, or any reliable
repairer.
● “Lane Departure Alert Unavailable”
• The system is temporarily canceled due to a malfunction in a sensor
other than the front camera. Turn the LDA system off, wait for a little
while, and then turn the LDA system back on.
• The system is temporarily unavaila ble as the vehicle repeatedly departs
from its lane or course* in a short period of time. Turn the engine switch
to the “LOCK” position (vehicles without smart entry & start system) or off
(vehicles with smart entry & start system), and then turn it to the “ON”
position (vehicles without smart entry & start system) or IGNITION ON
mode (vehicles with smart entry & start system) again.
● “LDA Unavailable at Current Speed”
The function cannot be used as the vehicle speed exceeds the LDA opera-
tion range. Drive slower.
*: Boundary between asphalt and the side of the road, such as grass, soil, or
a curb
■ Customization
Function settings can be changed.
( P. 722)
Page 366 of 744

3664-5. Using the driving support systems
HILUX_OM_OM0K321E_(EE)
● Even if it is a sign not appropriate for the currently traveled lane, such a sign
exists directly after a freeway branches, or in an adjacent lane just before
merging.
● Stickers are attached to the rear of the preceding vehicle.
● A sign resembling a system compatible sign is recognized.
● Side road speed signs may be detected and displayed (if positioned in sight
of the camera sensor) while the vehicle is traveling on the main road.
● Roundabout exit road speed signs may be detected and displayed (if posi-
tioned in sight of the camera sensor) while traveling on a roundabout.
● The front of the vehicle is raised or lowered due to the carried load.
● The surrounding brightness is not sufficient or changes suddenly.
● When a sign intended for trucks, etc. is recognized.
● The vehicle is driven in a country with a different direction of traffic.
● The navigation system map data is old.
● The navigation system is not operating.
● The speed information displayed on the meter and that displayed on the
navigation system may be different due to the navigation system using map
data.
■ Speed limit sign display
If the engine switch was last turned to the “LOCK” position (vehicles without
smart entry & start system) or off (vehicles with smart entry & start system)
while a speed limit sign was displayed on the multi-information display, the
same sign displays again when the engine switch is turned to the “ON” posi-
tion (vehicles without smart entry & start system) or IGNITION ON mode
(vehicles with smart entry & start system).
■ If “RSA Malfunction Visit Your Dealer” is shown
The system may be malfunctioning. Have the vehicle inspected by any autho-
rized Toyota retailer or Toyota authorized repairer, or any reliable repairer.
■ Customization
Some functions can be customized.
( P. 723)
Page 375 of 744

3754-5. Using the driving support systems
4
Driving
HILUX_OM_OM0K321E_(EE)
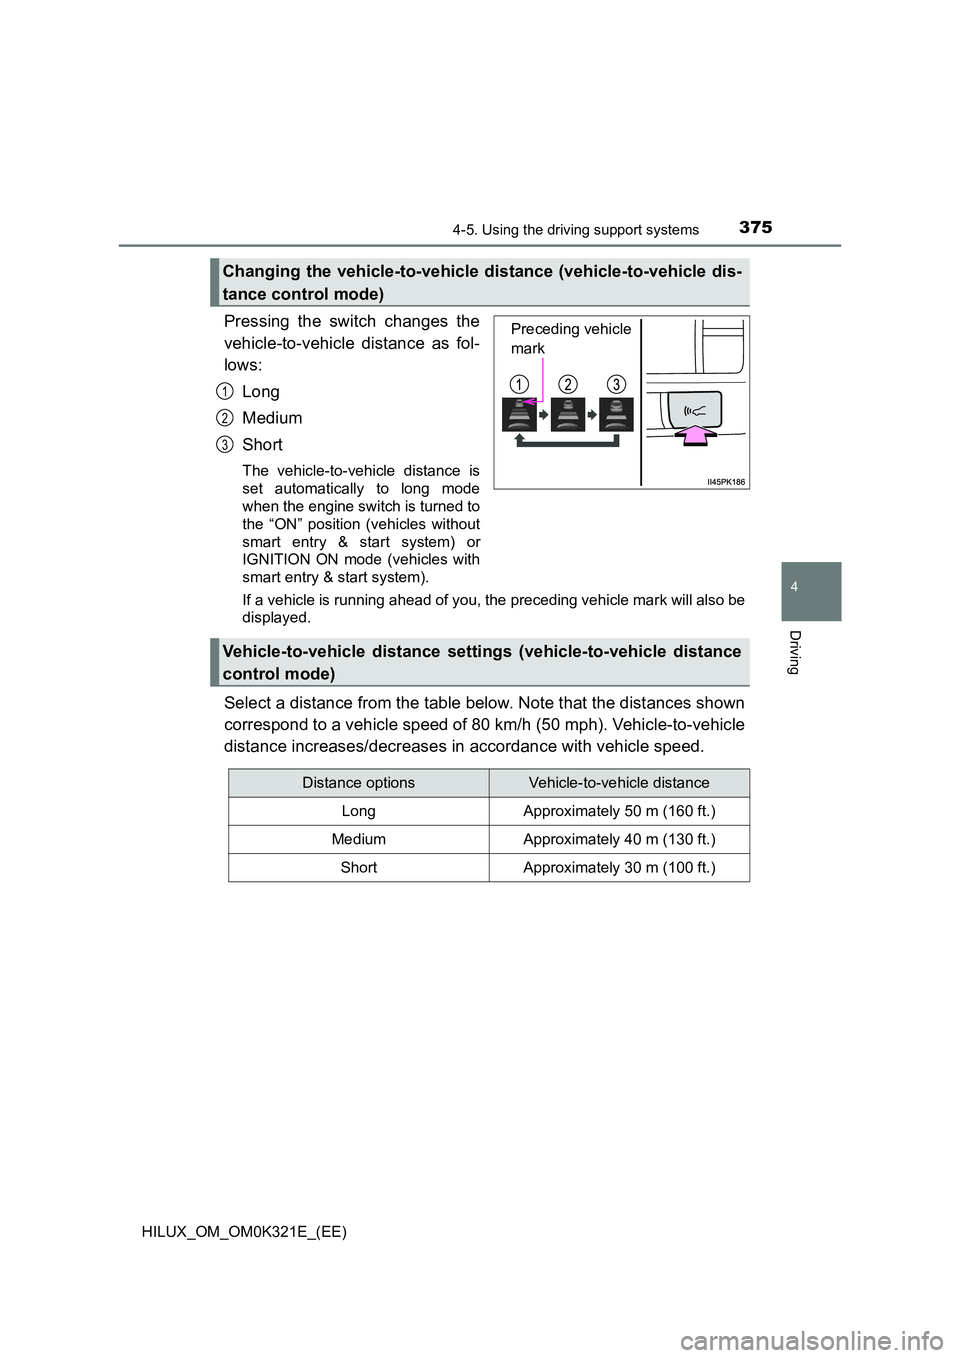
Pressing the switch changes the
vehicle-to-vehicle distance as fol-
lows:
Long
Medium
Short
The vehicle-to-vehicle distance is
set automatically to long mode
when the engine switch is turned to
the “ON” position (vehicles without
smart entry & start system) or
IGNITION ON mode (vehicles with
smart entry & start system).
If a vehicle is running ahead of you, the preceding vehicle mark will also be
displayed.
Select a distance from the table below. Note that the distances shown
correspond to a vehicle speed of 80 km/h (50 mph). Vehicle-to-vehicle
distance increases/decreases in accordance with vehicle speed.
Changing the vehicle-to-vehicle distance (vehicle-to-vehicle dis-
tance control mode)
Preceding vehicle
mark
1
2
3
Vehicle-to-vehicle distance settings (vehicle-to-vehicle distance
control mode)
Distance optionsVehicle-to-vehicle distance
LongApproximately 50 m (160 ft.)
MediumApproximately 40 m (130 ft.)
ShortApproximately 30 m (100 ft.)
Page 388 of 744

3884-5. Using the driving support systems
HILUX_OM_OM0K321E_(EE)
■Screen description
Vehicles without smart entry & start system
The rear view monitor system screen will be displayed if the shift
lever is shifted to R while the engine switch is in the “ON” position.
Vehicles with smart entry & start system
The rear view monitor system screen will be displayed if the shift
lever is shifted to R while the engine switch is in IGNITION ON
mode.
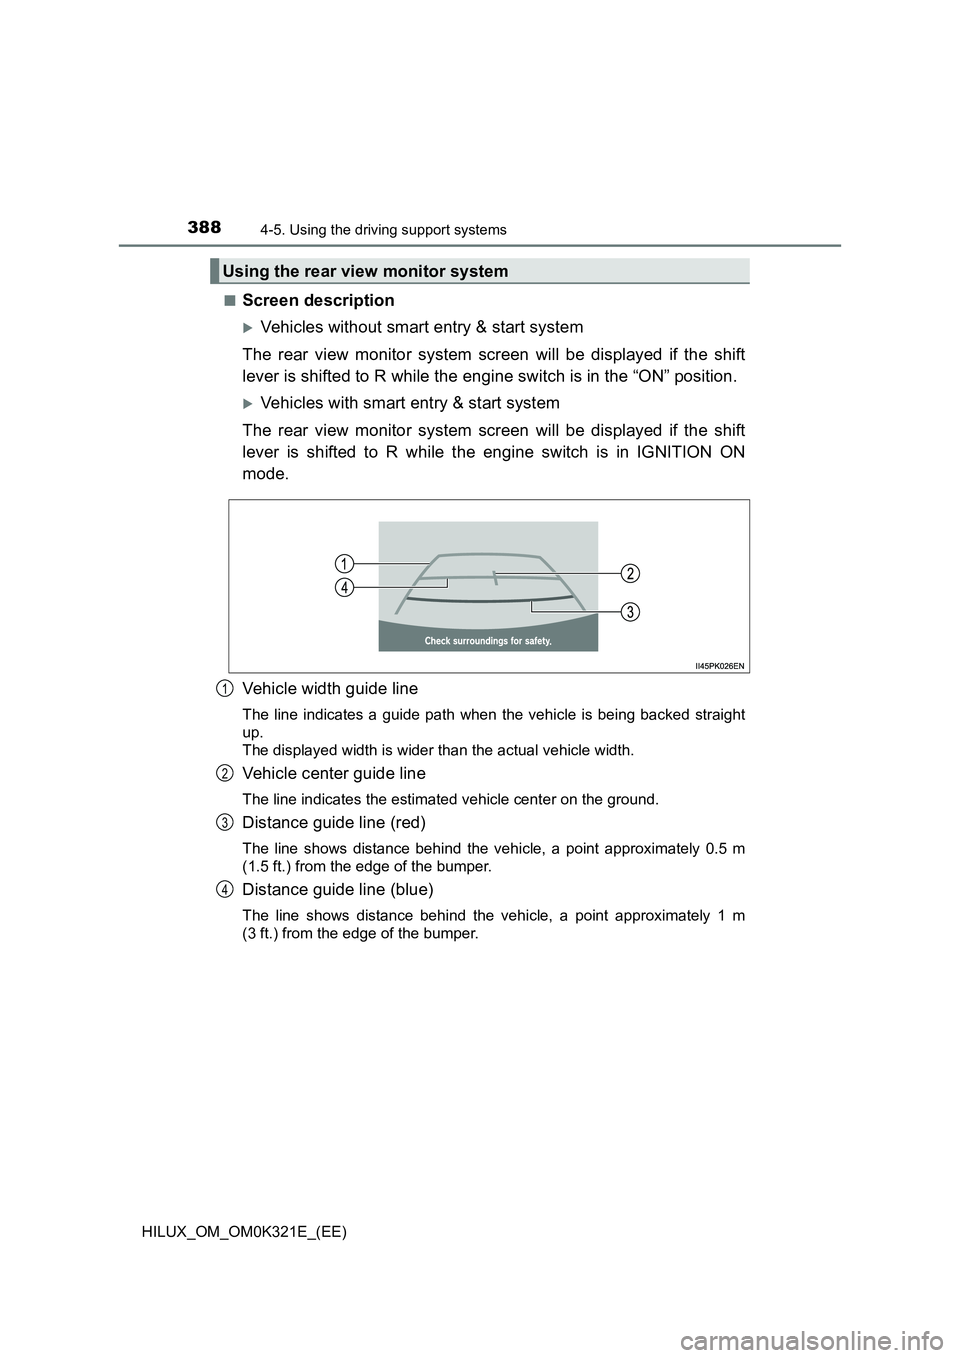
Vehicle width guide line
The line indicates a guide path when the vehicle is being backed straight
up.
The displayed width is wider than the actual vehicle width.
Vehicle center guide line
The line indicates the estimated vehicle center on the ground.
Distance guide line (red)
The line shows distance behind the vehicle, a point approximately 0.5 m
(1.5 ft.) from the edge of the bumper.
Distance guide line (blue)
The line shows distance behind the vehicle, a point approximately 1 m
(3 ft.) from the edge of the bumper.
Using the rear view monitor system
1
2
3
4
Page 417 of 744

4174-5. Using the driving support systems
4
Driving
HILUX_OM_OM0K321E_(EE)
■ If an odor comes from the air conditioning system while the engine is
stopped by the Stop & Start system
Vehicles with manual air conditioning system:
If the idling stop time is set to “Long”, change the setting to “Normal”. If an
odor occurs even when “Normal” is selected, press the Stop & Start cancel
switch to deactivate the Stop & Start system.
Vehicles with automatic air conditioning system:
Press the Stop & Start cancel switch to deactivate the Stop & Start system.
■ Changing the idling stop time with the air conditioning system on
The length of time the Stop & Start system will operate when the air condition-
ing system is on can be changed by performing the following operation. (The
length of time the Stop & Start system will operate when the air conditioning
system is off cannot be changed.)
Use the meter control switches to select while the vehicle is stopped
and press , and select and press .
Select “Normal” or “Long”, and then press .
■ The Stop & Start system protection function
● When an excessively loud sound is being projected by the audio system,
the audio system may be automatically cut off in order to reduce battery
consumption. If this occurs, turn the engine switch to the “LOCK” position
(vehicles without smart entry & start sy stem) or off (vehicles with smart entry
& start system), wait for 3 seconds or longer and then turn it to the “ACC” or
“ON” position (vehicles without smart entry & start system), or ACCES-
SORY mode or IGNITION ON mode (vehicles with smart entry & start sys-
tem) to re-enable the audio system.
● The audio system may not be activated when the battery terminals are dis-
connected and then reconnected. If this occurs, turn the engine switch to
the “LOCK” position (vehicles without smart entry & start system) or off
(vehicles with smart entry & start system), and then repeat the following
operation twice to activate the audio system normally.
• Turn the engine switch to the “ON” position (vehicles without smart entry
& start system), or IGNITION ON mode (vehicles with smart entry & start
system), and then to the “LOCK” position (vehicles without smart entry &
start system) or off (vehicles with smart entry & start system).
■ When exchanging the battery
P. 675
1
2
Page 432 of 744

4324-5. Using the driving support systems
HILUX_OM_OM0K321E_(EE)
■ System malfunction
In the following cases, have your vehicle checked by any authorized Toyota
retailer or Toyota authorized repairer, or any reliable repairer.
● The downhill assist control system indicator does not come on when the
engine switch is turned to the “ON” position (vehicles without smart entry &
start system) or IGNITION ON mode (vehicles with smart entry & start sys-
tem).
● The downhill assist control system indicator does not come on when the
“DAC” switch is pressed.
● The slip indicator comes on.
WARNING
■When using downhill assist control system
● Do not rely overmuch on the downhill assist control system. This function
does not extend the vehicle’s performance limitations. Always thoroughly
check the road conditions, and drive safely.
● Vehicles with manual transmission: Drive in a low gear. Driving in a high
gear when using downhill assist control system may cause the engine to
stall, which may lose the brake effectiveness and lock the tires, resulting in
an accident.
● Vehicles with manual transmission: On a steep slope, use the engine brak-
ing efficiently. If the vehicle is driven in N or with the clutch pedal
depressed on a steep slope, the load on the brake increases and con-
trolling the vehicle speed may be impossible, resulting in an accident.
■ The system may not operate on the following surfaces, which may lead
to an accident causing death or serious injury
● Slippery surfaces such as wet or muddy roads
● Icy surface
● Unpaved roads
Page 536 of 744
5366-1. Using the air conditioning system and defogger
HILUX_OM_OM0K321E_(EE)
Turns the steering wheel heater
on/off
The indicator light comes on when
the heater is operating.
The heated steering wheel can be used when the engine switch is in the “ON”
position (vehicles without smart entry & start system) or IGNITION ON mode
(vehicles with smart entry & start system).
Turns on the front left seat
heater
The indicator light comes on.
Turns on the front right seat
heater
The indicator light comes on.
● The seat heaters can be used when the engine switch is in the “ON” position
(vehicles without smart entry & start system) or IGNITION ON mode (vehi-
cles with smart entry & start system).
● When not in use, press the seat heater switch to turn the seat heater off.
The indicator light turns off.
Heated steering wheel
Seat heaters
1
2
Page 549 of 744
5496-4. Using the other interior features
HILUX_OM_OM0K321E_(EE)
6
Interior features
The clock can be adjusted by pressing the buttons.
Adjusts the hours
Adjusts the minutes
Rounds to the nearest hour*
*: e.g. 1:00 to 1:29 1:00
1:30 to 1:59 2:00
●The clock is displayed when:
Vehicles without smart entry & start system
The engine switch is in the “ACC” or “ON” position.
Vehicles with smart entry & start system
The engine switch is in ACCESSORY or IGNITION ON mode.
● When disconnecting and reconnecting battery terminals:
The time display will automatically be set to 1:00.
Clock
1
2
3