Page 307 of 744
307
4
4-2. Driving procedures
Driving
HILUX_OM_OM0K321E_(EE)
Parking brake
Sets the parking brake
Fully pull the parking brake while
depressing the brake pedal.
At this time, the parking brake indi-
cator light will come on.
Releases the parking brake
Slightly raise the lever and lower it
completely while pressing the but-
ton.
At this time, the parking brake indi-
cator light will go off.
■ Parking the vehicle
P. 255
■ Parking brake engaged warning buzzer
P. 639
■ Usage in winter time
P. 438
1
2
NOTICE
■Before driving
Fully release the parking brake.
Driving the vehicle with the parking brake set will lead to brake components
overheating, which may affect braking performance and increase brake
wear.
Page 319 of 744

3194-3. Operating the lights and wipers
4
Driving
HILUX_OM_OM0K321E_(EE)
Washer/wiper dual
operation
Pulling the lever operates the
wipers and washer.
The wipers will automatically
operate a couple of times after
the washer squirts.
If the headlights are on, the
headlight cleaners will operate
once.
And then, the headlight cleaners
will operate every five times you
pull the lever. (if equipped)
■ The windshield wipers and washer can be operated when
The engine switch is in the “ON” position (vehicles without smart entry & start
system) or IGNITION ON mode (vehicles with smart entry & start system).
■ If no windshield washer fluid sprays
Check that the washer nozzles are not blocked if there is washer fluid in the
windshield washer fluid reservoir.
7
WARNING
■ Caution regarding the use of washer fluid
When it is cold, do not use the washer fluid until the windshield becomes
warm. The fluid may freeze on the windshield and cause low visibility. This
may lead to an accident, resulting in death or serious injury.
NOTICE
■ When the windshield is dry
Do not use the wipers, as they may damage the windshield.
■ When the washer fluid tank is empty
Do not operate the switch continually as the washer fluid pump may over-
heat.
■ When a nozzle becomes blocked
In this case, contact any authorized Toyota retailer or Toyota authorized
repairer, or any reliable repairer.
Do not try to clear it with a pin or other object. The nozzle will be damaged.
Page 321 of 744

3214-4. Refueling
4
Driving
HILUX_OM_OM0K321E_(EE)
WARNING
■When refueling the vehicle
Observe the following precautions while refueling the vehicle. Failure to do
so may result in death or serious injury.
● After exiting the vehicle and before opening the fuel cap, touch an
unpainted metal surface to discharge any stat ic electricity. It is important to
discharge static electricity before re fueling because sparks resulting from
static electricity can cause fuel vapors to ignite while refueling.
● Type A (P. 322) only: Always hold the grips on the fuel tank cap and turn
it slowly to remove it.
A whooshing sound may be heard when the fuel tank cap is loosened.
Wait until the sound cannot be heard before fully removing the cap. In hot
weather, pressurized fuel may spray out the filler neck and cause injury.
● Do not allow anyone that has not discharged static electricity from their
body to come close to an open fuel tank.
● Do not inhale vaporized fuel.
Fuel contains substances that are harmful if inhaled.
● Do not smoke while refueling the vehicle.
Doing so may cause the fuel to ignite and cause a fire.
● Do not return to the vehicle or touch any person or object that is statically
charged.
This may cause static electricity to build up, resulting in a possible ignition
hazard.
■ When refueling
Observe the following precautions to pr event fuel overflowing from the fuel
tank:
● Securely insert the fuel nozzle into the fuel filler neck.
● Stop filling the tank after the fuel nozzle automatically clicks off.
● Do not top off the fuel tank.
Page 324 of 744
3244-4. Refueling
HILUX_OM_OM0K321E_(EE)
■Ty p e B
Close the fuel tank cap
Make sure to put the fuel tank
cap with the arrow upward and
turn it slowly to close.
When turning the fuel tank cap,
do not hold and turn the key.
Lock the fuel cap
Turning the fuel cap key clock-
wise.
Arrow
1
2
WARNING
■ When replacing the fuel tank cap
Do not use anything but a genuine Toyota fuel tank cap designed for your
vehicle. Doing so may cause a fire or other incident which may result in
death or serious injury.
Page 325 of 744

325
4
4-5. Using the driving support systems
Driving
HILUX_OM_OM0K321E_(EE)
Toyota Safety Sense
■PCS (Pre-Collision System)
P. 3 3 9
■LDA (Lane Departure Alert with Yaw Assist Function)
P. 3 5 0
■RSA (Road Sign Assist)
P. 3 6 1
■Dynamic radar cruise control
P. 3 6 7
: If equipped
The Toyota Safety Sense consists of the following drive assist
systems and contributes to a safe and comfortable driving expe-
rience:
Driving assist system
WARNING
■ Toyota Safety Sense
The Toyota Safety Sense is designed to operate under the assumption that
the driver will drive safely, and is designed to help reduce the impact to the
occupants and the vehicle in the case of a collision or assist the driver in
normal driving conditions.
As there is a limit to the degree of recognition accuracy and control perfor-
mance that this system can provide, do not overly rely on this system. The
driver is always responsible for paying attention to the vehicle’s surround-
ings and driving safely.
Page 327 of 744

3274-5. Using the driving support systems
4
Driving
HILUX_OM_OM0K321E_(EE)
WARNING
■To avoid malfunction of the radar sensor
Observe the following precautions.
Otherwise, the radar sensor may not operate properly, possibly leading to
an accident resulting in death or serious injury.
● Keep the radar sensor and the grille cover clean at all times.
● Do not attach accessories, stickers (including transparent stickers) or
other items to the radar sensor, grille cover or surrounding area.
● Do not subject the radar sensor or its surrounding area to a strong impact.
If the radar sensor, front grille, or front bumper has been subjected to a
strong impact, have the vehicle inspected by any authorized Toyota
retailer or Toyota authorized repairer, or any reliable repairer.
● Do not disassemble the radar sensor.
● Do not modify or paint the radar sensor or grille cover.
● If the radar sensor, front grille, or front bumper needs to be removed and
installed, or replaced, contact any authorized Toyota retailer or Toyota
authorized repairer, or any reliable repairer.
Radar sensor
Grille cover
If the front of the radar sensor or the
front or back of the grille cover is dirty
or covered with water droplets, snow,
etc., clean it.
Clean the radar sensor and grille cover
with a soft cloth to avoid damaging
them.
1
2
Page 328 of 744

3284-5. Using the driving support systems
HILUX_OM_OM0K321E_(EE)
WARNING
■To avoid malfunction of the front camera
Observe the following precautions.
Otherwise, the front camera may not operate properly, possibly leading to
an accident resulting in death or serious injury.
● Keep the windshield clean at all times.
• If the windshield is dirty or cover ed with an oily film, water droplets,
snow, etc., clean the windshield.
• If a glass coating agent is applied to t he windshield, it will still be neces-
sary to use the windshield wipers to remove water droplets, etc. from
the area of the windshield in front of the front camera.
• If the inner side of the windshield where the front camera is installed is
dirty, contact any authorized Toyota retailer or Toyota authorized
repairer, or any reliable repairer.
● If the part of the windshield in front of the front camera is fogged up or cov-
ered with condensation, or ice, use the windshield defogger to remove the
fog, condensation, or ice. ( P. 519, 528)
● If water droplets cannot be properly removed from the area of the wind-
shield in front of the front camera by the windshield wipers, replace the
wiper insert or wiper blade.
If the wiper inserts or wiper blades need to be replaced, contact any autho-
rized Toyota retailer or Toyota authorized repairer, or any reliable repairer.
● Do not attach window tint to the windshield.
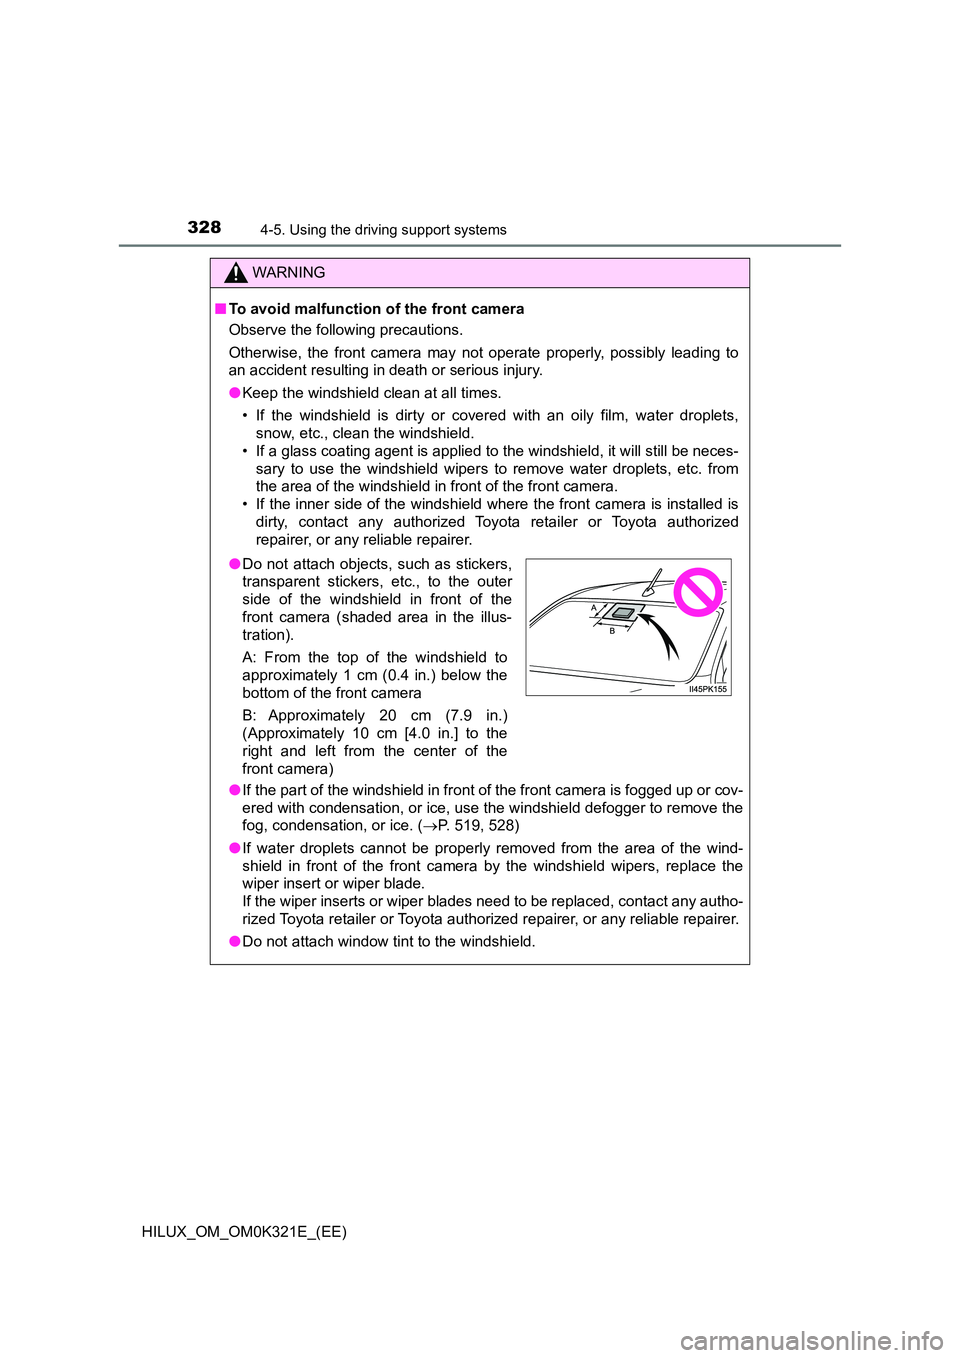
●Do not attach objects, such as stickers,
transparent stickers, etc., to the outer
side of the windshield in front of the
front camera (shaded area in the illus-
tration).
A: From the top of the windshield to
approximately 1 cm (0.4 in.) below the
bottom of the front camera
B: Approximately 20 cm (7.9 in.)
(Approximately 10 cm [4.0 in.] to the
right and left from the center of the
front camera)
Page 329 of 744

3294-5. Using the driving support systems
4
Driving
HILUX_OM_OM0K321E_(EE)
WARNING
●Replace the windshield if it is damaged or cracked.
If the windshield needs to be replaced, contact any authorized Toyota
retailer or Toyota authorized repairer, or any reliable repairer.
● Do not allow liquids to contact the front camera.
● Do not allow bright lights to shine into the front camera.
● Do not dirty or damage the front camera.
When cleaning the inside of the windshi eld, do not allow glass cleaner to
contact the lens of the front camera. Also, do not touch the lens.
If the lens is dirty or damaged, contact any authorized Toyota retailer or
Toyota authorized repairer, or any reliable repairer.
● Do not subject the front camera to a strong impact.
● Do not change the installation position or direction of the front camera or
remove it.
● Do not disassemble the front camera.
● Do not modify any components of the vehicle around the front camera
(inside rear view mirror, etc.) or ceiling.
● Do not attach any accessories to the hood, front grille or front bumper that
may obstruct the front camera. Contact any authorized Toyota retailer or
Toyota authorized repairer, or any reliable repairer for details.
● If a surfboard or other long object is to be mounted on the roof, make sure
that it will not obstruct the front camera.
● Do not modify the headlights or other lights.