Page 325 of 536
325
6Maintenance and care
C-HR_OM_USA_OM10634U6-1. Maintenance and care
Cleaning and protecting the vehicle exterior .......... 326
Cleaning and protecting the vehicle interior ........... 330 6-2. Maintenance
Maintenance requirements ................... 333
General maintenance........ 336
Emission inspection and maintenance (I/M)
programs......................... 340
6-3. Do-it-yourself maintenance
Do-it-yourself service precautions ..................... 341
Hood ................................. 344
Positioning a floor jack ...... 346
Engine compartment ......... 347
Tires .................................. 362
Tire inflation pressure ....... 372
Wheels .............................. 376
Air conditioning filter.......... 379
Wireless remote control/electronic key
battery ............................. 383
Checking and replacing fuses ............................... 387
Headlight aim (vehicles with front fog lights) ......... 391
Light bulbs......................... 393
Page 339 of 536
3396-2. Maintenance
6
Maintenance and care
C-HR_OM_USA_OM10634U
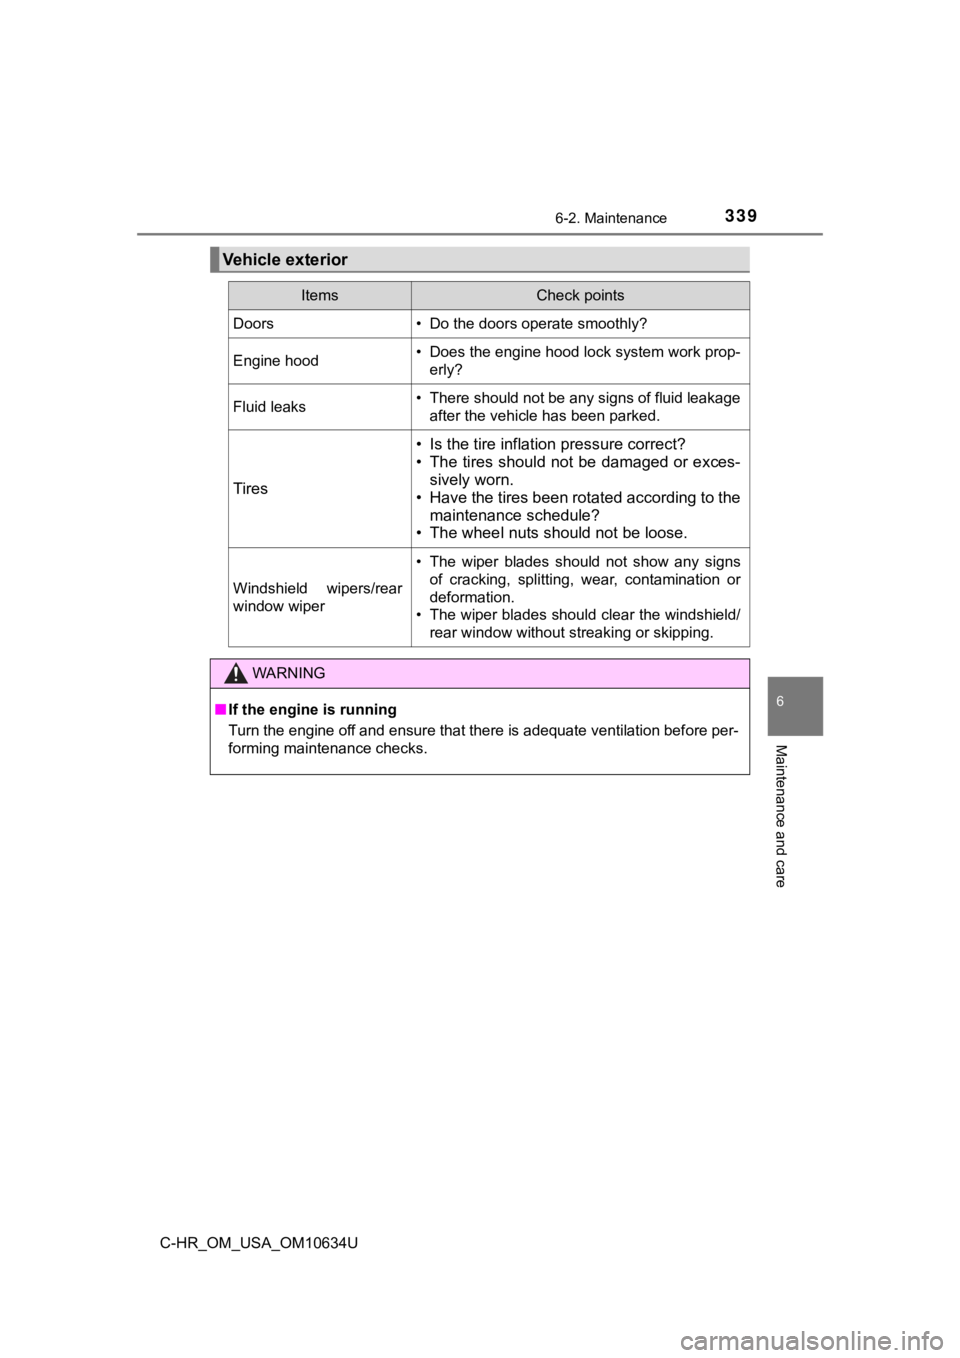
Vehicle exterior
ItemsCheck points
Doors• Do the doors operate smoothly?
Engine hood• Does the engine hood lock system work prop-erly?
Fluid leaks• There should not be any signs of fluid leakageafter the vehicle has been parked.
Tires
• Is the tire inflati on pressure correct?
• The tires should not be damaged or exces- sively worn.
• Have the tires been rotated according to the
maintenance schedule?
• The wheel nuts should not be loose.
Windshield wipers/rear
window wiper
• The wiper blades should not show any signs
of cracking, splitting, wear, contamination or
deformation.
• The wiper blades should clear the windshield/
rear window without streaking or skipping.
WARNING
■If the engine is running
Turn the engine off and ensure that there is adequate ventilati on before per-
forming maintenance checks.
Page 342 of 536

3426-3. Do-it-yourself maintenance
C-HR_OM_USA_OM10634U
Light bulbs
( P. 3 9 3 )
• Bulb with same number and wattage rating as origi-
nal
• Phillips-head screwdriver
• Flathead screwdriver• Wrench
Radiator and con-
denser (
P. 352)
Tire inflation
pressure
( P. 372)• Tire pressure gauge
• Compressed air source
Washer fluid
( P. 3 5 9 )• Water or washer fluid containing antifreeze (for win-
ter use)
• Funnel (used only for adding water or washer fluid)
WARNING
The engine compartment contains many mechanisms and fluids that may
move suddenly, become hot, or become electrically energized. To avoid death
or serious injury, observe the following precautions.
■When working on the engine compartment
● Keep hands, clothing and tools away from the moving fan and eng ine
drive belt.
● Be careful not to touch the engine, radiator, exhaust manifold, etc., right
after driving as they may be hot. Oil and other fluids may also be hot.
● Do not leave anything that may burn easily, such as paper and r ags, in the
engine compartment.
● Do not smoke, cause sparks or expose an open flame to fuel or t he bat-
tery. Fuel and battery fumes are flammable.
● Be extremely cautious when working on the battery. It contains poisonous
and corrosive sulfuric acid.
ItemsParts and tools
Page 362 of 536
3626-3. Do-it-yourself maintenance
C-HR_OM_USA_OM10634U
Tires
Check if the treadwear indicators are showing on the tires. Also check
the tires for uneven wear, such as excessive wear on one side o f the
tread.
Check the spare tire condition and pressure if not rotated.
New tread
Worn tread
Treadwear indicator
The location of treadwear indicators is shown by a “TWI” or “” mark,
etc., molded into the s idewall of each tire.
Replace the tires if the treadwear indicators are showing on a tire.
Rotate the tires in the order
shown.
To equalize tire wear and extend
tire life, Toyota recommends that
tire rotation is carried out at the
same interval as tire inspection.
Replace or rotate tires in accordance with maintenance sched-
ules and treadwear.
Checking tires
Tire rotation
Front
Page 363 of 536

3636-3. Do-it-yourself maintenance
6
Maintenance and care
C-HR_OM_USA_OM10634U
Your vehicle is equipped with a tire pressure warning system that uses
tire pressure warning valves and transmitters to detect low tire infla-
tion pressure before serious problems arise.
If the tire pressure drops below a predetermined level, the dri ver is
warned by a warning light. ( P. 424)
◆Installing tire pressure warn ing valves and transmitters
When replacing tires or wheels, tire pressure warning valves an d
transmitters must also be installed.
When new tire pressure warning valves and transmitters are
installed, new ID codes must be registered in the tire pressure
warning computer and the tire pressure warning system must be
initialized. Have tire pressure warning valves and transmitter ID
codes registered by your Toyota dealer. ( P. 365)
◆Initializing the tire pressure warning system
When the tire size is changed, the tire pressure warning system
must be initialized.
When the tire pressure warning sy stem is initialized, the current tire
inflation pressure is set as the benchmark pressure.
Tire pressure warning system
Page 364 of 536

3646-3. Do-it-yourself maintenance
C-HR_OM_USA_OM10634U■
How to initialize the tire pressure warning system
Park the vehicle in a safe plac e and turn the engine switch to the
“LOCK” position (vehicles with out a smart key system) or off
(vehicles with a sm art key system).
Initialization cannot be perfo rmed while the vehicle is moving.
Adjust the tire inflation pressure to the specified cold tire i nflation
pressure level. ( P. 470)
Make sure to adjust the tire pre ssure to the specified cold tire infla-
tion pressure level. The tire pressure warning system will oper ate
based on this pr essure level.
Turn the engine switch to the “ON” position (vehicles without a
smart key system) or IGNITION ON mode (vehicles with a smart
key system).
Press “” or “ ” of the meter control switch to select .
( P. 98)
Press “ ” or “ ” of the meter control switch to select the “Vehicle
Settings” and then press to display the menu.
Press “ ” or “ ” of the meter
control switch to select
and then press
.
Press “ ” or “ ” of the meter control switch to select “SET” and
then press and hold .
When initialization completes, a message is displayed on the
multi-information display and the tire pressure warning light w ill
blink 3 times.
1
2
3
4
5
6
7
8
Page 365 of 536

3656-3. Do-it-yourself maintenance
6
Maintenance and care
C-HR_OM_USA_OM10634U
◆Registering ID codes
The tire pressure warning valve and transmitter is equipped with a
unique ID code. When replacing a tire pressure warning valve an d
transmitter, it is necessary to register the ID code. Have the ID code
registered by your Toyota dealer.
■When to replace your vehicle’s tires
Tires should be replaced if:
●The treadwear indicators are showing on a tire.
●You have tire damage such as cuts, splits, cracks deep enough t o
expose the fabric, and bulges indicating internal damage
●A tire goes flat repeatedly or c annot be properly repaired due to the size
or location of a cut or other damage
If you are not sure, consult with your Toyota dealer.
■Replacing tires and wheels
If the ID code of the tire press ure warning valve and transmitt er is not reg-
istered, the tire pressure warni ng system will not work properly. A f t e r d r i v -
ing for about 20 minutes, the tire pressure warning light blink s for 1
minute and stays on to indi cate a system malfunction.
■Tire life
Any tire over 6 years old must be checked by a qualified techni cian even
if it has seldom or never been u se, or damage is not obvious.
■Routine tire inflation pressure checks
The tire pressure warning system does not replace routine tire inflation
pressure checks. Make sure to chec k tire inflation pressure as part of
your routine of daily vehicle checks.
Page 366 of 536

3666-3. Do-it-yourself maintenance
C-HR_OM_USA_OM10634U■
Maximum load of tire
Check that the maximum load of t
he replacement tire is greater than 1/2
of the Gross Axle Weight Ratings (GAWR) of either the front axl e or the
rear axle, whichever is greater.
■Tire types
●Summer tires
Summer tires are high-speed performance tires best suited to hi ghway
driving under dry conditions. Si nce summer tires do not have th e same
traction performance as snow tires, summer tires are inadequate for
driving on snow-covered or icy ro ads. For driving on snow-covered
roads or icy roads, the use of snow tires is recommended. When install-
ing snow tires, be sure to replace all four tires.
●All season tires
All season tires are designed to provide better traction in sno w and to
be adequate for driving in most winter conditions as well as fo r use
year-round. All season tires, however, do not have adequate tra ction
performance compared with snow tires in heavy or loose snow. Al so, all
season tires fall short in acceleration and handling performanc e com-
pared with summer tires in highway driving.
●Snow tires
For driving on snow-covered roads or icy roads, we recommend us ing
snow tires. If you need snow tires, select tires of the same si ze, con-
struction and load capacity as t he originally installed tires. Since your
vehicle has radial tires as original equipment, make sure your snow
tires also have radial construct ion. Do not install studded tires without
first checking local regulations for possible restrictions. Sno w tires
should be install ed on all wheels. ( P. 292)
■If the tread on snow tires wea rs down below 0.16 in. (4 mm)
The effectiveness of the tires as snow tires is lost. For the GAWR, see the Certification
Label. For the maximum load of the tire,
see the load limit at maximum cold tire
inflation pressure mentioned on the
sidewall of the tire. ( P. 4 7 5 )