2020 TOYOTA AVALON HYBRID USB
[x] Cancel search: USBPage 115 of 326

115
6. TIPS FOR OPERATING THE AUDIO/VISUAL SYSTEM
AUDIO/VISUAL SYSTEM
3
The following iPod®, iPod nano®, iPod
classic®, iPod touch® and iPhone® devic-
es can be used wit h this system.
Made for
• iPod touch (6th generation)
• iPod touch (5th generation)
• iPod nano (7th generation)
• iPhone SE
• iPhone 6s Plus
• iPhone 6s
• iPhone 6 Plus
• iPhone 6
• iPhone 5s
• iPhone 5c
• iPhone 5
• iPhone 4s
This system only supports audio playback.
Depending on differences between mod-
els or software versions etc., some models
might be incompatible with this system. This device supports high-resolution
sound sources.
The definition of high-resolution is based
on the standards of groups such as the
CTA (Consumer Technology Association).
Supported formats and playable media are
as follows.
■SUPPORTED FORMATS
WAV, FLAC, ALAC
■PLAYABLE MEDIA
USB memory
COMPATIBLE MODELSHIGH-RESOLUTION SOUND
SOURCE
Page 116 of 326

116
6. TIPS FOR OPERATING THE AUDIO/VISUAL SYSTEM
■COMPATIBLE USB DEVICES
■COMPATIBLE COMPRESSED
FILES
*: USB video only
■CORRESPONDING SAMPLING
FREQUENCYFILE INFORMATION
USB communication
formatsUSB 2.0 HS (480
Mbps)
File formatsFAT 16/32
Correspondence classMass storage
class
ItemUSB
Compatible file for-
mat (audio)MP3/WMA/AAC
WAV(LPCM)/FLAC/
ALAC/OGG Vorbis
Compatible file for-
mat (video)*MP4/AVI/WMV
Folders in the de-
viceMaximum 3000
Files in the deviceMaximum 9999
Files per
folderMaximum 255
File typeFrequency (kHz)
MP3 files:
MPEG 1 LAYER 332/44.1/48
MP3 files:
MPEG 2 LSF LAYER 316/22.05/24
WMA files:
Ver. 7, 8, 9*1 (9.1/9.2)32/44.1/48
AAC files:
MPEG4/AAC-LC11.025/12/16/
22.05/24/32/
44.1/48
WAV (LPCM) files*2
8/11.025/12/16/
22.05/24/32/
44.1/48/88.2/96/
176.4/192
FLAC*2
8/11.025/12/16/
22.05/24/32/
44.1/48/88.2/96/
176.4/192
ALAC*2
8/11.025/12/16/
22.05/24/32/
44.1/48/64/88.2/
96
OGG Vorbis*28/11.025/16/
22.05/32/44.1/
48
*1: Only compatible with Windows Media
Audio Standard
*
2: Sound source of 48kHz or more is down-
converted to 48kHz/24bit.
Page 117 of 326

117
6. TIPS FOR OPERATING THE AUDIO/VISUAL SYSTEM
AUDIO/VISUAL SYSTEM
3
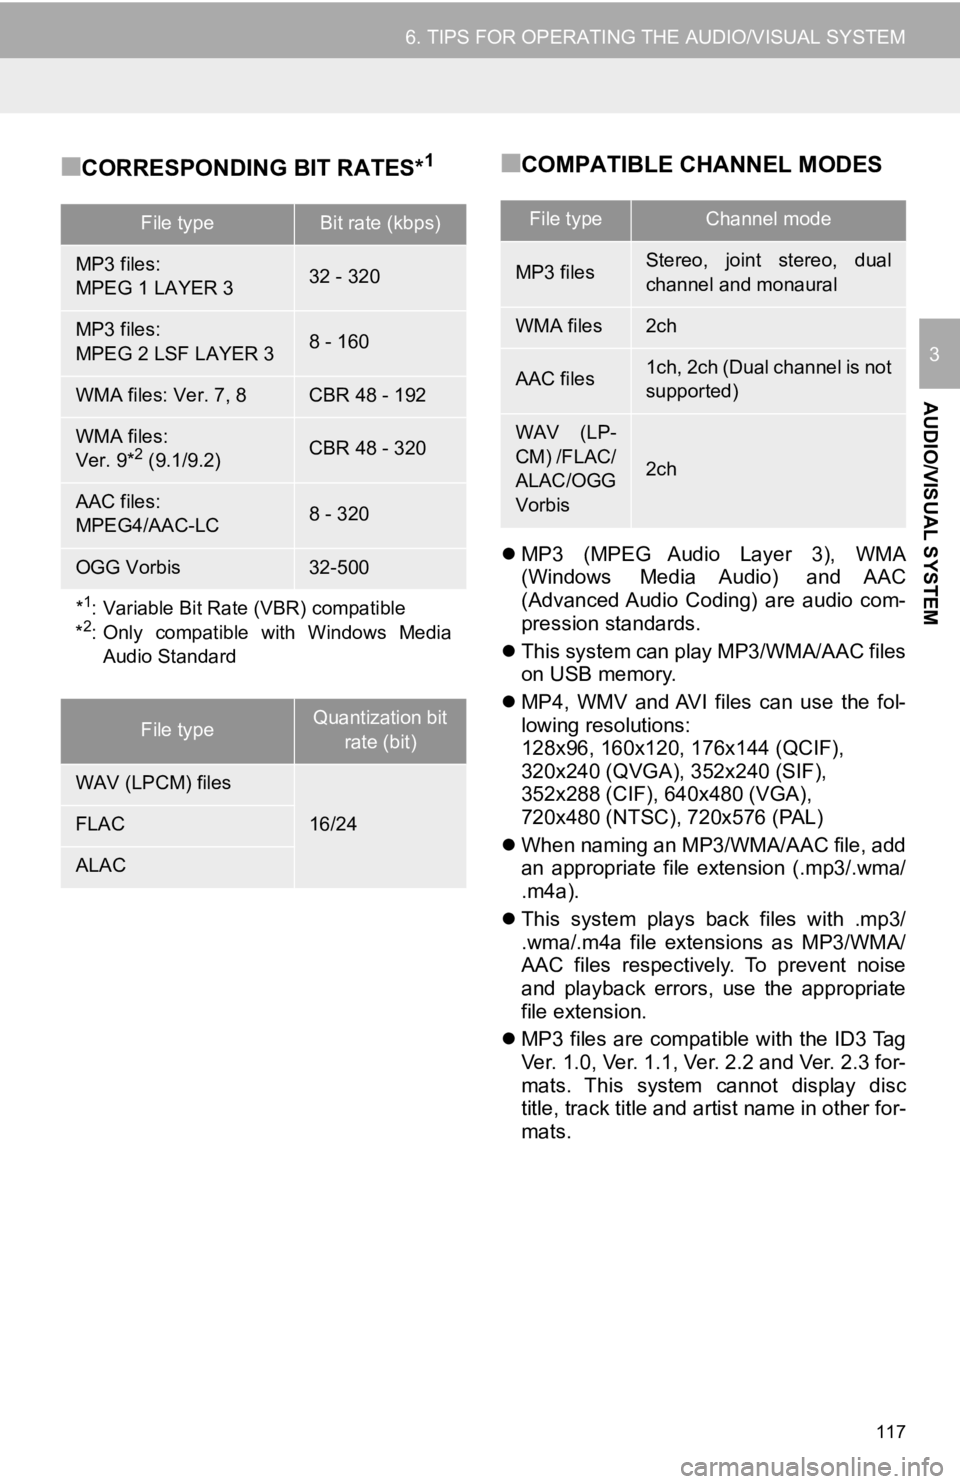
■CORRESPONDING BIT RATES*1■COMPATIBLE CHANNEL MODES
MP3 (MPEG Audio Layer 3), WMA
(Windows Media Audio) and AAC
(Advanced Audio Coding) are audio com-
pression standards.
This system can play MP3/WMA/AAC files
on USB memory.
MP4, WMV and AVI files can use the fol-
lowing resolutions:
128x96, 160x120, 176x144 (QCIF),
320x240 (QVGA), 352x240 (SIF),
352x288 (CIF), 640x480 (VGA),
720x480 (NTSC), 720x576 (PAL)
When naming an MP3/WMA/AAC file, add
an appropriate file extension (.mp3/.wma/
.m4a).
This system plays back files with .mp3/
.wma/.m4a file extensions as MP3/WMA/
AAC files respectively. To prevent noise
and playback errors, use the appropriate
file extension.
MP3 files are compatible with the ID3 Tag
Ver. 1.0, Ver. 1.1, Ver. 2.2 and Ver. 2.3 for-
mats. This system cannot display disc
title, track title and artist name in other for-
mats.
File typeBit rate (kbps)
MP3 files:
MPEG 1 LAYER 332 - 320
MP3 files:
MPEG 2 LSF LAYER 38 - 160
WMA files: Ver. 7, 8CBR 48 - 192
WMA files:
Ver. 9*2 (9.1/9.2)CBR 48 - 320
AAC files:
MPEG4/AAC-LC8 - 320
OGG Vorbis32-500
*1: Variable Bit Rate (VBR) compatible
*2: Only compatible with Windows Media Audio Standard
File typeQuantization bit
rate (bit)
WAV (LPCM) files
16/24FLAC
ALAC
File typeChannel mode
MP3 filesStereo, joint stereo, dual
channel and monaural
WMA files2ch
AAC files1ch, 2ch (Dual channel is not
supported)
WAV (LP-
CM) /FLAC/
ALAC/OGG
Vorbis
2ch
Page 118 of 326

118
6. TIPS FOR OPERATING THE AUDIO/VISUAL SYSTEM
WMA/AAC files can contain a WMA/AAC
tag that is used in the same way as an ID3
tag. WMA/AAC tags carry information
such as track title and artist name.
The emphasis function is available only
when playing MP3 files.
This system can play back AAC files
encoded by iTunes.
The sound quality of MP3/WMA files gen-
erally improves with higher bit rates.
m3u playlists are not compatible with the
audio player.
MP3i (MP3 interactive) and MP3PRO for-
mats are not compatible with the audio
player.
The player is compatible with VBR (Vari-
able Bit Rate).
When playing back files recorded as VBR
(Variable Bit Rate) files, the play time will
not be correctly displayed if the fast for-
ward or reverse operations are used.
It is not possible to check folders that do
not include MP3/WMA/AAC files.
MP3/WMA/AAC files in folders up to 8 lev-
els deep can be played. However, the
start of playback may be delayed when
using USB memory containing numerous
levels of folders. For this reason, we rec-
ommend creating USB memory with no
more than 2 levels of folders.
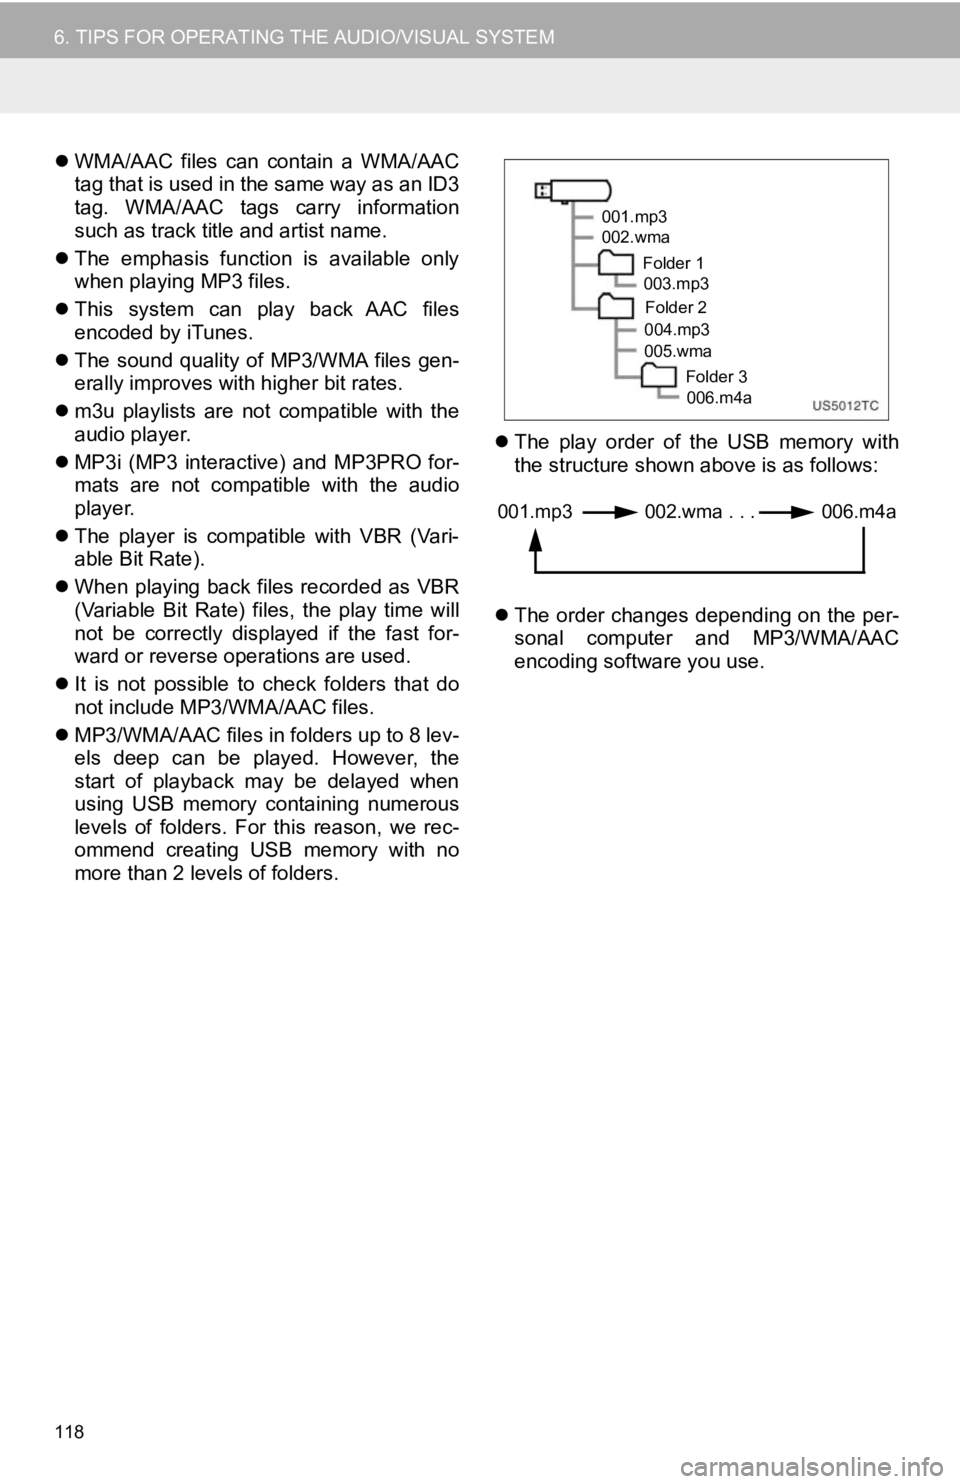
The play order of the USB memory with
the structure shown above is as follows:
The order changes depending on the per-
sonal computer and MP3/WMA/AAC
encoding software you use.
001.mp3
002.wma
Folder 1003.mp3
Folder 2
004.mp3
005.wma
Folder 3006.m4a
001.mp3 002.wma . . . 006.m4a
Page 121 of 326

121
6. TIPS FOR OPERATING THE AUDIO/VISUAL SYSTEM
AUDIO/VISUAL SYSTEM
3
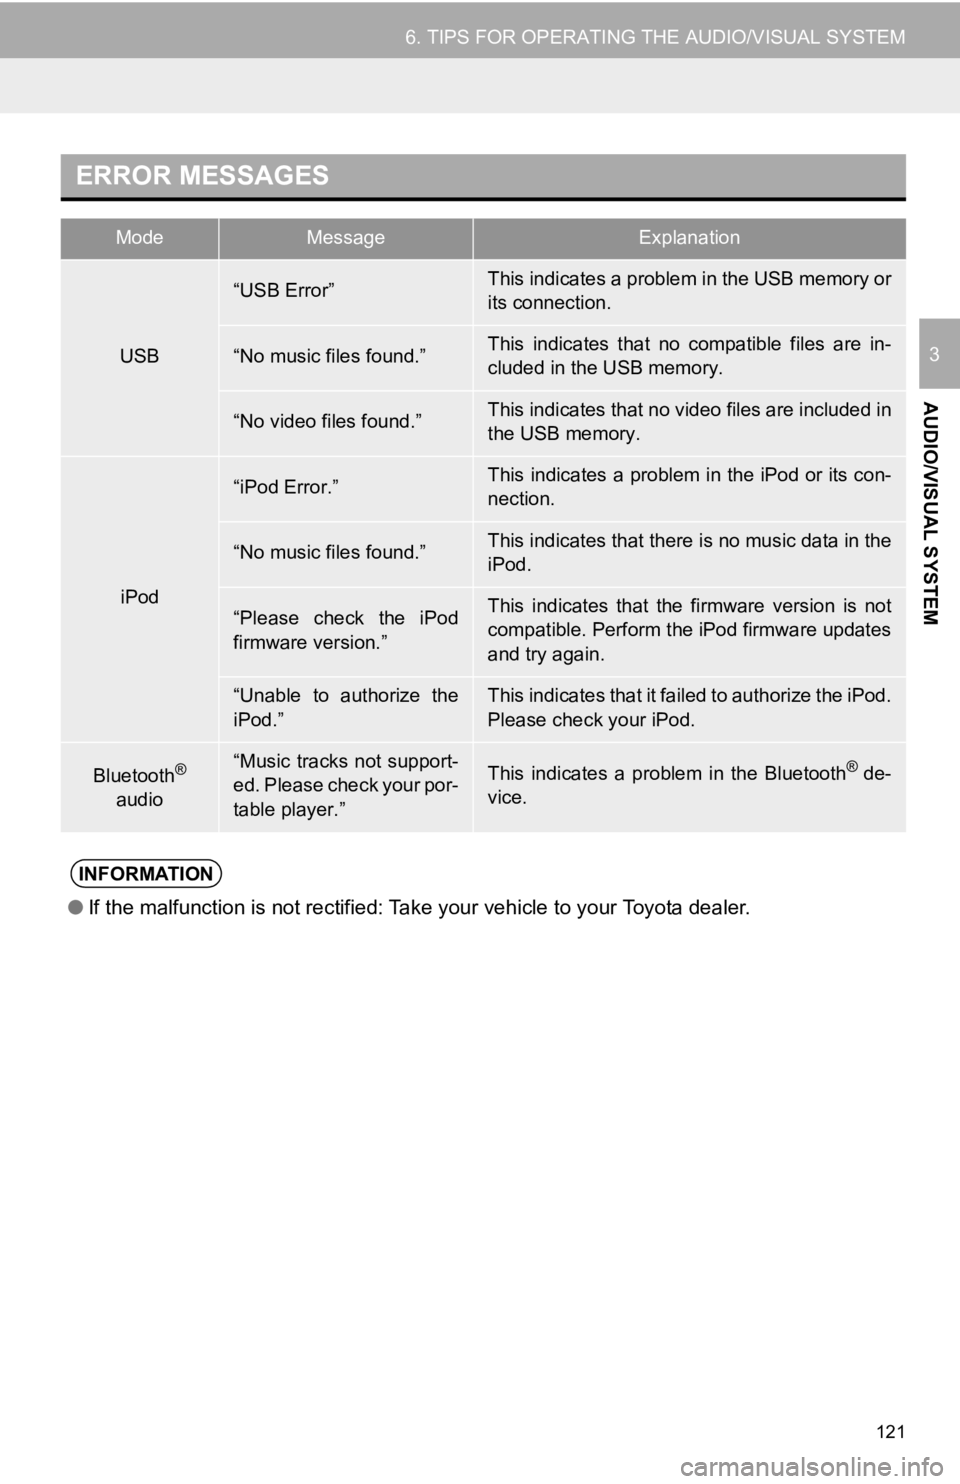
ERROR MESSAGES
ModeMessageExplanation
USB
“USB Error”This indicates a problem in the USB memory or
its connection.
“No music files found.”This indicates that no compatible files are in-
cluded in the USB memory.
“No video files found.”This indicates that no video files are included in
the USB memory.
iPod
“iPod Error.”This indicates a problem in the iPod or its con-
nection.
“No music files found.”This indicates that there is no music data in the
iPod.
“Please check the iPod
firmware version.”This indicates that the firmware version is not
compatible. Perform the iPod firmware updates
and try again.
“Unable to authorize the
iPod.”This indicates that it failed to authorize the iPod.
Please check your iPod.
Bluetooth®
audio“Music tracks not support-
ed. Please check your por-
table player.”This indicates a problem in the Bluetooth® de-
vice.
INFORMATION
● If the malfunction is not rectified: Take your vehicle to your Toyota dealer.
Page 132 of 326

132
1. VOICE COMMAND SYSTEM OPERATION
Radio
Audio*
1
CommandAction
“Tune to
“Tune to
“Play a
genre*1
“Tune to preset <1-36>”Changes the radio to the specified preset radio station
“Tune to a
station” Changes the radio to a satellite radio channel of the spec-
ified genre*2
“Tune to
specified name*2
“Tune to channel
XM” Changes the radio to a satellite radio channel of the spec-
ified number*2
*1: A station list must be built fi rst using the radio screen (P.82)
*2: Requires a satellite radio subscription
CommandAction
“Play playlist
“Play artist
“Play song
“Play album
“Play genre
“Play composer
“Play podcast
“Play audiobook
“Audio on”Turns the audio/visual system on
“Audio off”Turns the audio/visual system off
“Change the audio source to
*
1: The audio device must be connected via a USB cable to use the functionality in this section
*2: When an Apple CarPlay connection is established, this voice commands will be unavailable.
Page 201 of 326

201
1. PHONE OPERATION (HANDS-FREE SYSTEM FOR CELLULAR PHONES)
PHONE
7
■FOR PBAP COMPATIBLE
Bluetooth
® PHONES
When “Automatic Transfer” is set to on
( P.214)
Contacts are transferred automatically.
When “Automatic Transfer” is set to off
( P.214)
1Select the desired item.
2Check that a confirmation screen is
displayed when the operation is com-
plete.
■FOR PBAP INCOMPATIBLE BUT
OPP COMPATIBLE Bluetooth
®
PHONES
1Select the desired item.
WHEN THE CONTACT LIST IS
EMPTY
No.Function
Select to transfer new contacts from
a cellular phone, select “Always”
and then enable “Automatic Trans-
fer”.
Select to transfer all the contacts
from a connected cellular phone
only once.
Select to cancel transferring.
No.Function
Select to transfer the contacts from
the connected cellular phone.
Transfer the contact data to the sys-
tem using a Bluetooth
® phone.
Select to add a new contact manual-
ly.
Follow the steps in “REGISTERING
A NEW CONTACT TO THE CON-
TACT LIST” from “STEP 2”.
( P.218)
Select to cancel transferring.
INFORMATION
● If your cellular phone is neither PBAP
nor OPP compatible, the contacts can-
not be transferred using Bluetooth
®. But
the contacts can be transferred from
USB device. ( P.217)
● Depending on the type of Bluetooth
®
phone:
• It may be necessary to perform addi-
tional steps on the phone when trans-
ferring contact data.
• The registered image in the contact list may not transfer depending on the
type of Bluetooth
® phone connected.
Page 215 of 326

215
2. SETUP
PHONE
7
1Select “Automatic Transfer”.
2Select the desired item to be set.
No.FunctionPage
For PBAP compatible
Bluetooth® phones: Select
to change the contact/ his-
tory transfer settings.215
Select to update contacts
from the connected phone
or a USB memory.
216
Select to sort contacts by
the first name or last name
field.
Select to add contacts to
the favorites list. 219
Select to delete contacts
from the favorites list. 219
*Select to clear the call his-
tory.
*Select to add new contacts
to the contact list.218
*Select to edit contacts in
the contact list.218
*Select to delete contacts
from the contact list.218
Select to set the voice tags.220
Select to reset all setup
items.
*: For PBAP compatible Bluetooth
® phones,
this function is available when “Automatic
Transfer” is set to off. ( P.214)
INFORMATION
●Depending on the type of phone, certain
functions may not be available.
● Contact data is managed independently
for every registered phone. When one
phone is connected, another phone’s
registered data cannot be read.
SETTING AUTOMATIC
CONTACT/HISTORY
TRANSFER
The automatic contact/history function
is available for PBAP compatible
Bluetooth
® phones only.
No.Function
Select to set automatic contact/his-
tory transfer on/off.
When set to on, the phone’s contact
data and history are automatically
transferred.
Select to update contacts from the
connected phone. ( P.216)
Select to set the transferred contact
image display on/off.
Select to reset all setup items.