2020 TOYOTA 4RUNNER spare wheel
[x] Cancel search: spare wheelPage 267 of 596
2674-5. Using the driving support systems
4
Driving
4RUNNER (U)
WARNING
■Before using LDA system
Do not rely solely upon the LDA system. The LDA system does not auto-
matically drive the vehicle or reduce the amount of attention that must be
paid to the area in front of the vehicle. The driver must always assume full
responsibility for driving safely by paying careful attention to the surround-
ing conditions and operating the steering wheel to correct the path of the
vehicle. Also, the driver must take adequate breaks when fatigu ed, such as
from driving for a long period of time.
Failure to perform appropriate driving operations and pay careful attention
may lead to an accident, resulting in death or serious injury.
■ To avoid operating LDA system by mistake
When not using the LDA system, use the LDA switch to turn the s ystem off.
■ Situations unsuitable for LDA system
Do not use the LDA system in the following situations.
The system may not operate properly and lead to an accident, re sulting in
death or serious injury.
● A spare tire, tire chains, etc. are equipped.
● Objects or patterns that could be mistaken for white (yellow) l ines are
present on the side of the road (guardrails, curbs, reflective poles, etc.).
● Vehicle is driven on a snow-covered road.
● White (yellow) lines are difficult to see due to rain, snow, fo g, dust, etc.
● Asphalt repair marks, white (yellow) line marks, etc. are prese nt due to
road repair.
● Vehicle is driven in a temporary lane or restricted lane due to construction
work.
● Vehicle is driven in a construction zone.
■ Preventing LDA system malfunctio ns and operations performed by
mistake
● Do not modify the headlights or place stickers, etc. on the sur face of the
lights.
● Do not modify the suspension etc. If the suspension etc. needs to be
replaced, contact your Toyota dealer.
● Do not install or place anything on the hood or grille. Also, d o not install a
grille guard (bull bars, kangaroo bar, etc.).
● If your windshield needs repairs, contact your Toyota dealer.
Page 428 of 596

4286-3. Do-it-yourself maintenance
4RUNNER (U)■
Situations in which the tire pressure warning system may not op
er-
ate properly
●In the following cases, the tire pressure warning system may no t operate
properly.
• If non-genuine Toyota wheels are used.
• A tire has been replaced with a tire that is not an OE (Original Equip-
ment) tire.
• A tire has been replac ed with a tire that is not of the specif ied size.
• Tire chains etc . are equipped.
• If a window tint that affects the radio wave signals is instal led.
• If there is a lot of snow or ice on the vehicle, particularly around the
wheels or wheel housings.
• If the tire inflation pressure is extremely higher than the sp ecified
level.
• If the spare tire is in a location subject to poor radio wave signal
reception.
• If a large metallic object whic h can interfere with signal reception is
put near the spare tire.
• If tires not equipped with the tire pressure warning valves an d trans-
mitters are used.
• If the ID code on the tire pressure warning valves and transmi tters is
not registered in the tire pressure warning computer.
●Performance may be affected in the following situations.
• Near a TV tower, electric power plant, gas station, radio stat ion, large
display, airport or other facilit y that generates strong radio waves or
electrical noise
• When carrying a portable radio, cellular phone, cordless phone or
other wireless communication device
●When the vehicle is parked, the time taken for the warning to s tart or go
off could be extended.
●When tire inflation pressure declines rapidly for example when a tire has
burst, the warning may not function.
Page 484 of 596

4847-2. Steps to take in an emergency
4RUNNER (U)■
If the tire pressure warning system is not functioning
The tire pressure warning syst
em will be disabled in the follow ing condi-
tions:
(When the condition becomes normal, the system will work properly.)
●If tires not equipped with tire pressure warning valves and tra nsmitters
are used
●If the ID code on the tire pressure warning valves and transmit ters is not
registered in the tire pr essure warning computer
●If the tire inflation pressure is 73 psi (500 kPa, 5.1 kgf/cm2 or bar) or
higher
The tire pressure warning system may be disabled in the followi ng condi-
tions:
(When the condition becomes normal, the system will work properly.)
●If electronic devices or facilitie s using similar radio wave frequencies are
nearby
●If a radio set at a similar frequency is in use in the vehicle
●If a window tint that affects the radio wave signals is installed
●If there is a lot of snow or ice on the vehicle, particularly around the
wheels or wheel housings
●If non-genuine Toyota wheels are used (Even if you use Toyota wheels,
the tire pressure warning system may not work properly with som e types
of tires.)
●If tire chains are used
●Vehicles with P245/60R20 tires: If the spare tire is in a locat ion subject
to poor radio wave signal reception
●Vehicles with P245/60R20 tires : If a large metallic object whic h can
interfere with signal reception is put in the luggage compartme nt
■If the tire pressure warning light frequently comes on after bl inking
for 1 minute
If the tire pressure warning light frequently comes on after bl inking for 1
minute when the engine switch is turned on, have it checked by your
Toyota dealer.
■ Customization that can be configured at Toyota dealer
The vehicle speed linked seat belt reminder buzzer can be disab led.
(Customizable features P. 547) However, Toyota recommends that the seat
belt reminder buzzer be operational to alert the driver and fro nt passenger
when seat belts are not fastened.
Page 485 of 596
4857-2. Steps to take in an emergency
7
When trouble arises
4RUNNER (U)
WARNING
■If the tire pressure warning light comes on
Be sure to observe the following precautions. Failure to do so could
cause a loss of vehicle control and result in death or serious injury.
●Stop your vehicle in a safe place as soon as possible. Adjust t he tire
inflation pressure immediately.
●If the tire pressure warning light comes on even after tire inf lation pres-
sure adjustment, it is probable that you have a flat tire. Chec k the tires.
If a tire is flat, change it with the spare tire and have the f lat tire
repaired by the nearest Toyota dealer.
●Avoid abrupt maneuvering and braking. If the vehicle tires dete riorate,
you could lose control of the steering wheel or the brakes.
■If a blowout or sudden air leakage should occur
The tire pressure warning system may not activate immediately.
■Maintenance of the tires
Each tire, including the spare (if provided), should be checked monthly
when cold and inflated to the inflation pressure recommended by the
vehicle manufacturer on the vehicle placard or tire inflation p ressure
label (tire and load information label). (If your vehicle has t ires of a dif-
ferent size than the size indica ted on the vehicle placard or tire inflation
pressure label [tire and load information label], you should de termine
the proper tire inflation p ressure for those tires.)
As an added safety feature, your vehicle has been equipped with a tire
pressure monitoring system (TPMS -tire pressure warning system) that
illuminates a low tire pressure telltale (tire pressure warning light) when
one or more of your tires is significantly under-inflated. Acco rdingly,
when the low tire pressure telltale (tire pressure warning ligh t) illumi-
nates, you should stop and check your tires as soon as possible , and
inflate them to the proper pressure. Driving on a significantly under-
inflated tire causes the tire to overheat and can lead to tire failure.
Under-inflation also reduces fuel efficiency and tire tread lif e, and may
affect the vehicle’s handl ing and stopping ability.
Please note that the TPMS (tire pressure warning system) is not a sub-
stitute for proper tire maintena nce, and it is the driver’s responsibility to
maintain correct tire pressure, even if under-inflation has not reached
the level to trigger illumination of the TPMS low tire pressure telltale (tire
pressure warning light).
Page 492 of 596

4927-2. Steps to take in an emergency
4RUNNER (U)
●Phillips screwdriver
● Stop the vehicle in a safe place on a hard, flat surface.
● Set the parking brake.
● Shift the shift lever to P.
● Stop the engine.
● Turn on the emergency flashers. ( P. 464)
If you have a flat tire
Your vehicle is equipped with a spare tire. The flat tire can b e
replaced with the spare tire.
For details about tires: P. 4 2 0
WARNING
■If you have a flat tire
Do not continue driving with a flat tire.
Driving even a short distance wit h a flat tire can damage the tire and the
wheel beyond repair, which cou ld result in an accident.
You will need the following item:
Before jacking up the vehicle
Page 501 of 596
5017-2. Steps to take in an emergency
7
When trouble arises
4RUNNER (U)
WARNING
■Replacing a flat tire
●Observe the following precautions.
Failure to do so may result in serious injury:
• Lower the spare tire completely to the ground before removing it
from under the vehicle.
• Do not try to remove the wheel ornament by hand. Take due care in
handling the ornament to avoi d unexpected personal injury.
• Do not attach a heavily damaged wheel ornament, as it may fly off
the wheel while the vehicle is moving.
• Do not touch the disc wheels or the area around the brakes imm edi-
ately after the vehicle has been driven.
After the vehicle has been driven the disc wheels and the area
around the brakes will be extreme ly hot. Touching these areas with
hands, feet or other body parts while changing a tire, etc. may result
in burns.
●Failure to follow these precautions could cause the wheel nuts to
loosen and the t ire to fall off, resulting in death or serious injury.
• Have the wheel nuts tightened with a torque wrench to 83 ft•lbf (112
N•m, 11.4 kgf•m) steel wheels, 7 6 ft•lbf (103 N•m, 10.5 kgf•m) alumi-
num wheels, as soon as possi ble after changing wheels.
• When installing a tire, only use wheel nuts that have been spe cifi-
cally designed for that wheel.
• If there are any cracks or deformations in the bolt screws, nu t
threads or bolt holes of the wheel, have the vehicle inspected by
your Toyota dealer.
• When installing the wheel nuts, b e sure to install them with the
tapered ends facing inward. ( P. 438)
Page 502 of 596
5027-2. Steps to take in an emergency
4RUNNER (U)
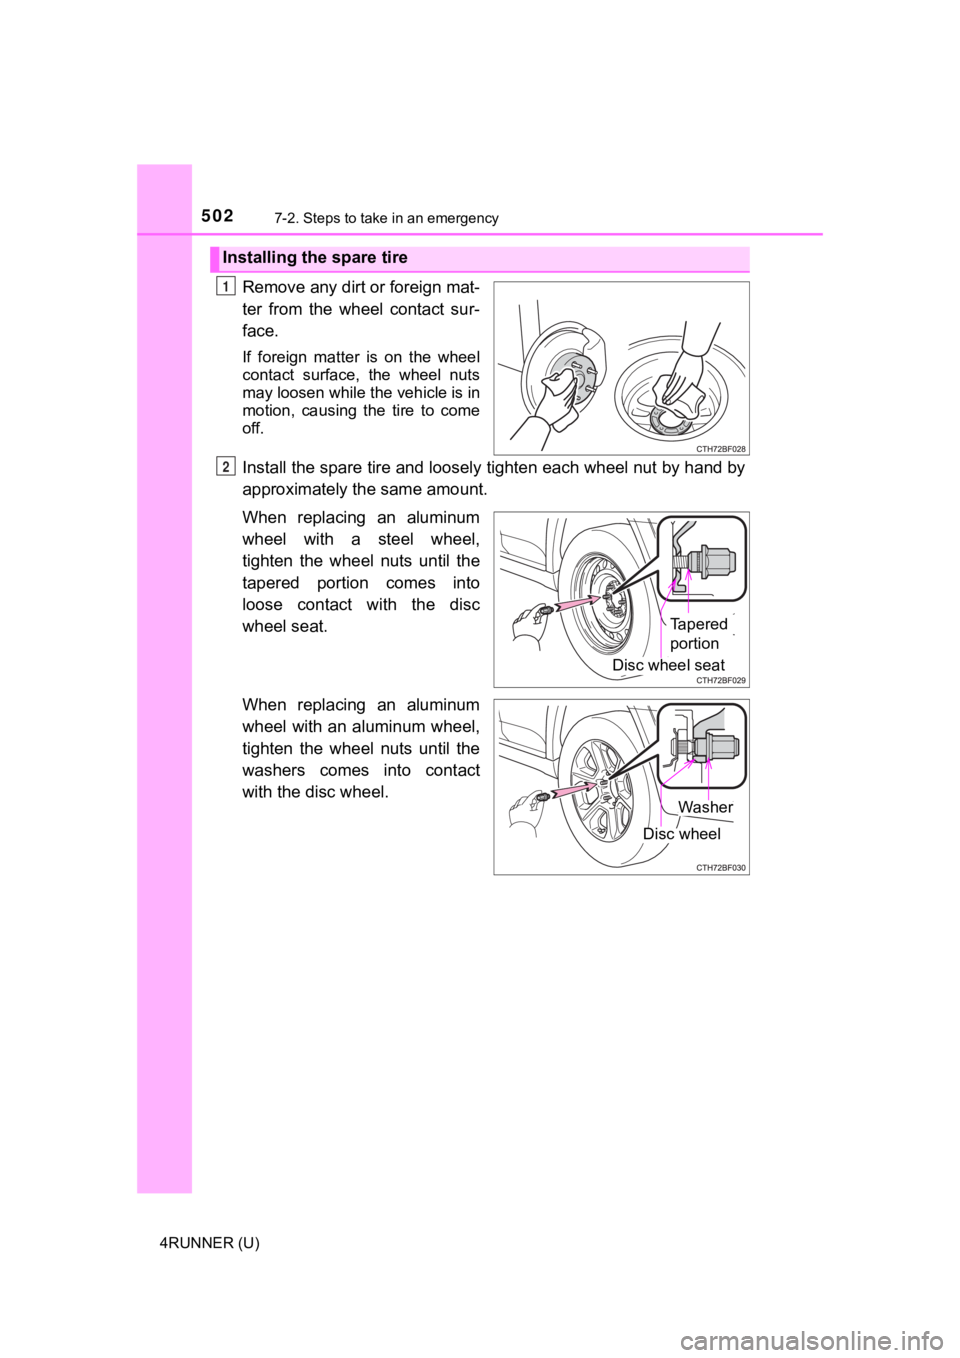
Remove any dirt or foreign mat-
ter from the wheel contact sur-
face.
If foreign matter is on the wheel
contact surface, the wheel nuts
may loosen while the vehicle is in
motion, causing the tire to come
off.
Install the spare tire and loosely tighten each wheel nut by hand by
approximately the same amount.
When replacing an aluminum
wheel with a steel wheel,
tighten the wheel nuts until the
tapered portion comes into
loose contact with the disc
wheel seat.
When replacing an aluminum
wheel with an aluminum wheel,
tighten the wheel nuts until the
washers comes into contact
with the disc wheel.
Installing the spare tire
1
2
Tapered
portion
Disc wheel seat
Washer
Disc wheel
Page 504 of 596
5047-2. Steps to take in an emergency
4RUNNER (U)
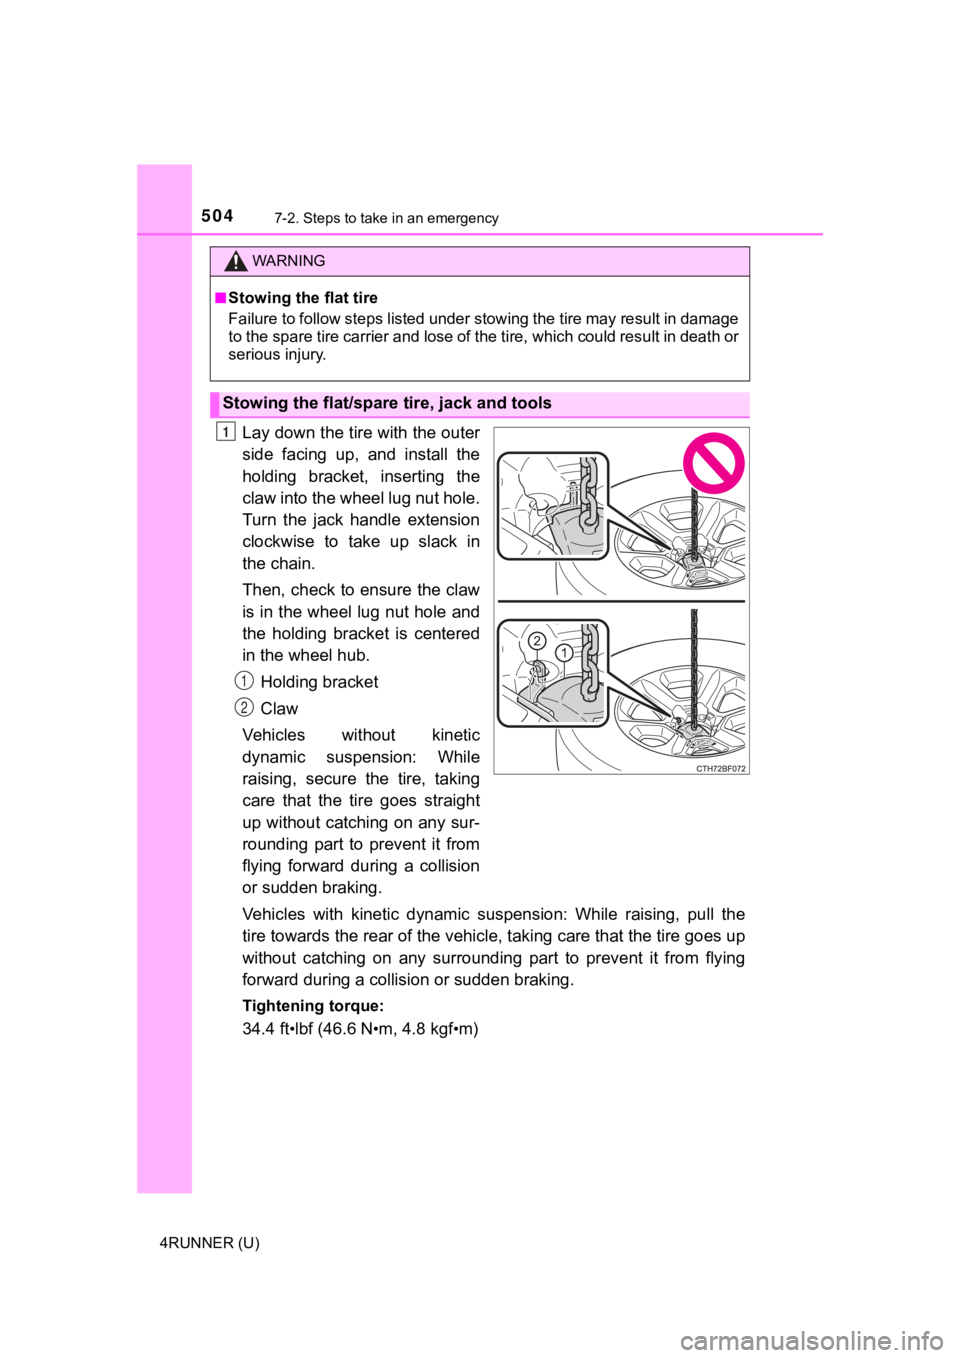
Lay down the tire with the outer
side facing up, and install the
holding bracket, inserting the
claw into the wheel lug nut hole.
Turn the jack handle extension
clockwise to take up slack in
the chain.
Then, check to ensure the claw
is in the wheel lug nut hole and
the holding bracket is centered
in the wheel hub.
Holding bracket
Claw
Vehicles wit hout kinetic
dynamic suspension: While
raising, secure the tire, taking
care that the tire goes straight
up without catching on any sur-
rounding part to prevent it from
flying forward during a collision
or sudden braking.
Vehicles with kinetic dynamic su spension: While raising, pull the
tire towards the rear of the vehi cle, taking care that the tire goes up
without catching on any surrounding part to prevent it from fly ing
forward during a collis ion or sudden braking.
Tightening torque:
34.4 ft•lbf (46.6 N•m, 4.8 kgf•m)
WARNING
■Stowing the flat tire
Failure to follow steps listed under stowing the tire may resul t in damage
to the spare tire carrier and lose of the tire, which could res ult in death or
serious injury.
Stowing the flat/spare tire, jack and tools
1
1
2