Page 18 of 254

181-1. Basic function
4RUNNER_Navi_(U)
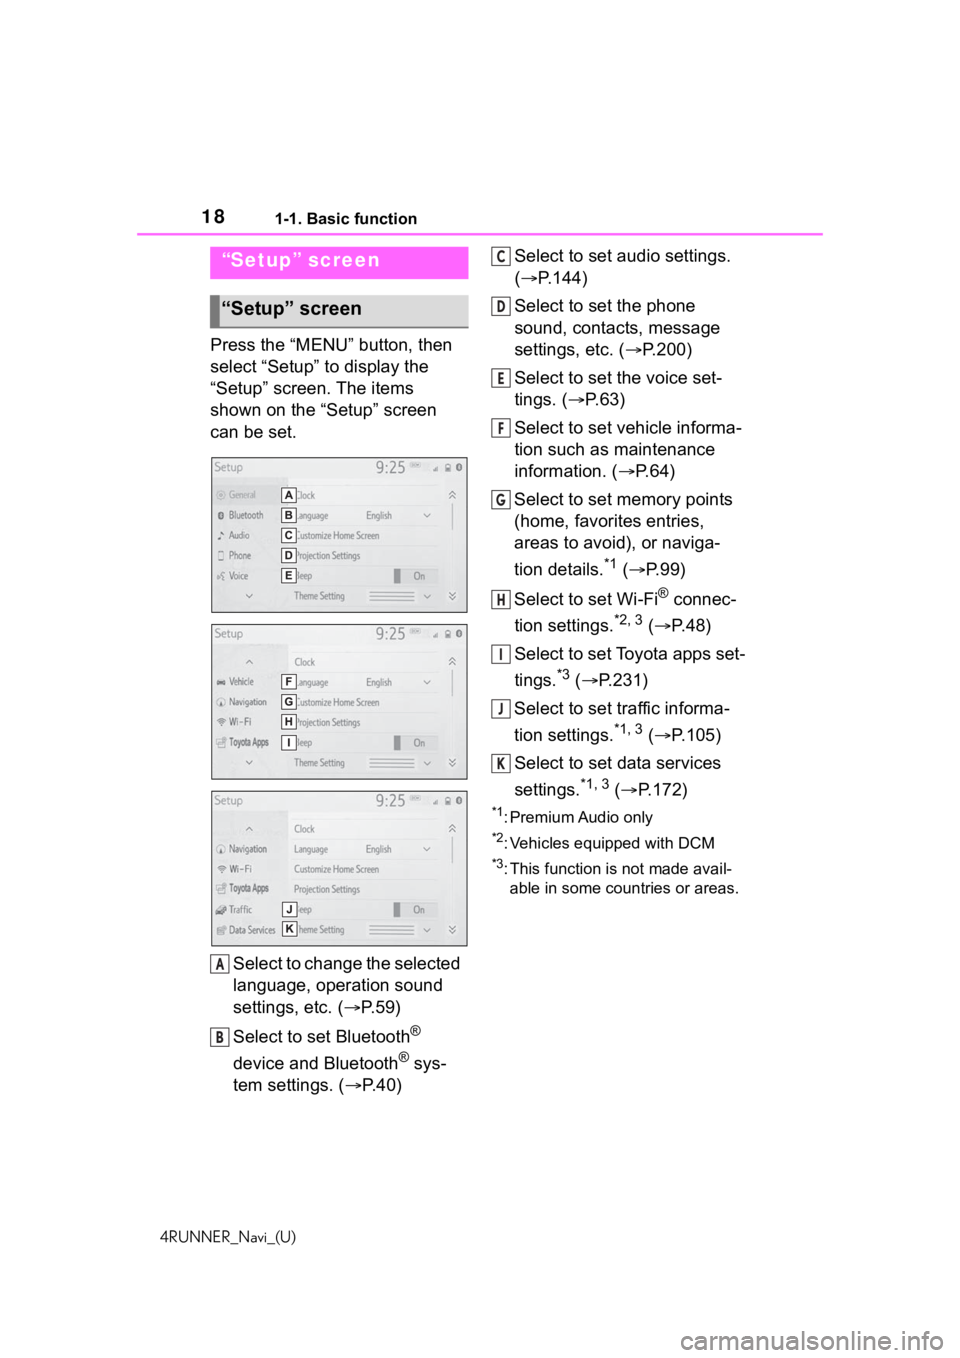
Press the “MENU” button, then
select “Setup” to display the
“Setup” screen. The items
shown on the “Setup” screen
can be set.Select to change the selected
language, operation sound
settings, etc. ( P. 5 9 )
Select to set Bluetooth
®
device and Bluetooth
® sys-
tem settings. ( P. 4 0 ) Select to set audio settings.
(
P.144)
Select to set the phone
sound, contacts, message
settings, etc. ( P.200)
Select to set the voice set-
tings. ( P.63)
Select to set vehicle informa-
tion such as maintenance
information. ( P.64)
Select to set memory points
(home, favorites entries,
areas to avoid), or naviga-
tion details.
*1 ( P.99)
Select to set Wi-Fi
® connec-
tion settings.
*2, 3 ( P. 4 8 )
Select to set Toyota apps set-
tings.
*3 ( P.231)
Select to set traffic informa-
tion settings.
*1, 3 ( P.105)
Select to set data services
settings.
*1, 3 ( P.172)
*1: Premium Audio only
*2: Vehicles equipped with DCM
*3: This function is not made avail-
able in some countries or areas.
“Setup” screen
“Setup” screen
A
B
C
D
E
F
G
H
I
J
K
Page 19 of 254
191-1. Basic function
4RUNNER_Navi_(U)
1
Quick guide
*: Vehicles equipped with DCM
Useful information, such as the
fuel consumption, weather, etc.,
is available on the information
screen.
The information screen can be
reached by the following meth-
ods:
1 Press the “MENU” button.
2 Select “Info”.
3 Select the desired item.
Select to display the fuel con-
sumption screen.
*1
Select to display traffic infor-
mation.
*2, 3 ( P.78)
Select to display weather
information.
*2, 3 ( P.170)
Select to display the vehicle
alert history.
*3
*1: Refer to the “OWNER’S MAN- UAL”
*2: Premium Audio only
*3: This function is not made avail-able in some countries or areas.
Infor mation screen
Information screen*
A
B
C
D
Page 20 of 254
201-2. Navigation operation
4RUNNER_Navi_(U)
1-2.Navigation operation
*: Premium Audio only
1Press the “MAP” button.
The current position of the
vehicle is displayed on the
map screen.
■Displaying the map screen
The following operations can
also be performed.
Changing the map direction
( P. 7 3 )
Displaying 3D map ( P.73)
Changing the map color
( P.103)
Displaying the micro city map (
P.72)
1 Select the desired point on
the map screen.
The map screen can be
scrolled by touching, dragging
or flicking it. ( P. 2 7 )
Press the “MAP” button to
return to the current position.■Zooming in the map
1 Select or pinch out on the
map screen. ( P. 7 2 )
■Zooming out the map
1 Select or pinch in on the
on the map screen. ( P. 7 2 )
Operating the map
screen*
Displaying the current
position of the vehicle on
the map screen
Moving the map screen
Zooming in/out the map
Page 21 of 254
211-2. Navigation operation
4RUNNER_Navi_(U)
1
Quick guide*: Premium Audio only
1 Press the “MAP” button.
2 Select .
3 There are different kinds of
methods to search for a des-
tination. ( P.81)
4 Select “Go”.
Check that the route overview
is displayed. ( P.89) 5
Select “OK”.
Selecting routes other than
the one recommended
( P.89)
Guidance to the destination is
displayed on the screen and
can be heard via voice guid-
ance.
When route guidance is no lon-
ger necessary, such as when
you know the rest of the route to
your destination, the destination
can be deleted.
1 Press the “MAP” button.
2 Select .
3 Select “Yes” when the confir-
mation screen appears.
When more than 1 destination
has been set, a list will be dis-
Guiding the route*
Setting the destination
Deleting destinations
Page 23 of 254
231-2. Navigation operation
4RUNNER_Navi_(U)
1
Quick guide
number and icon
P. 9 9
• Setting home as the destination P.23, 82
1 Press the “MAP” button.
2 Select .
Guidance to the destination is
displayed on the screen and
can be heard via voice guid-
ance.
Setting home as the destina-
tion in a different way P. 9 9
Setting home as the desti-
nation
Page 25 of 254
25
4RUNNER_Navi_(U)
2
2
Basic function
Basic function
.2-1. Basic information before operation
Initial screen ................... 26
Touch screen.................. 27
Home screen.................. 29
Entering letters and num- bers/list screen operation
..................................... 30
Screen adjustment ......... 33
Linking multi-information display and the system..................................... 35
2-2. Connectivity settings Registering/Connecting a Bluetooth
® device ........ 36
Setting Bluetooth
® details
..................................... 40
Wi-Fi
® hotspot ................ 47
2-3. Apple CarPlay/Android Auto
Apple CarPlay/Android Auto ..................................... 52
2-4. Other settings General settings ............. 59
Voice settings ................. 63
Vehicle settings .............. 64
Page 26 of 254

262-1. Basic information before operation
4RUNNER_Navi_(U)
2-1.Basic information before operation
After a few seconds, the caution
screen will be displayed.
After about 5 seconds or select-
ing “Continue”, the caution
screen automatically switches to
the next screen.
*: Premium Audio only
This system reminds users
when to replace certain parts or
components and shows dealer
information (if registered) on the
screen.
When the vehicle reaches a pre-
viously set driving distance or
date specified for a scheduled
maintenance check, the mainte-
nance remainder screen will be
displayed when the system is
turned on.
To prevent this screen from being displayed again, select
“Do Not Tell Me Again”.
To register maintenance infor-
mation: P. 6 5
If is selected, the regis-
tered phone number can be
called.
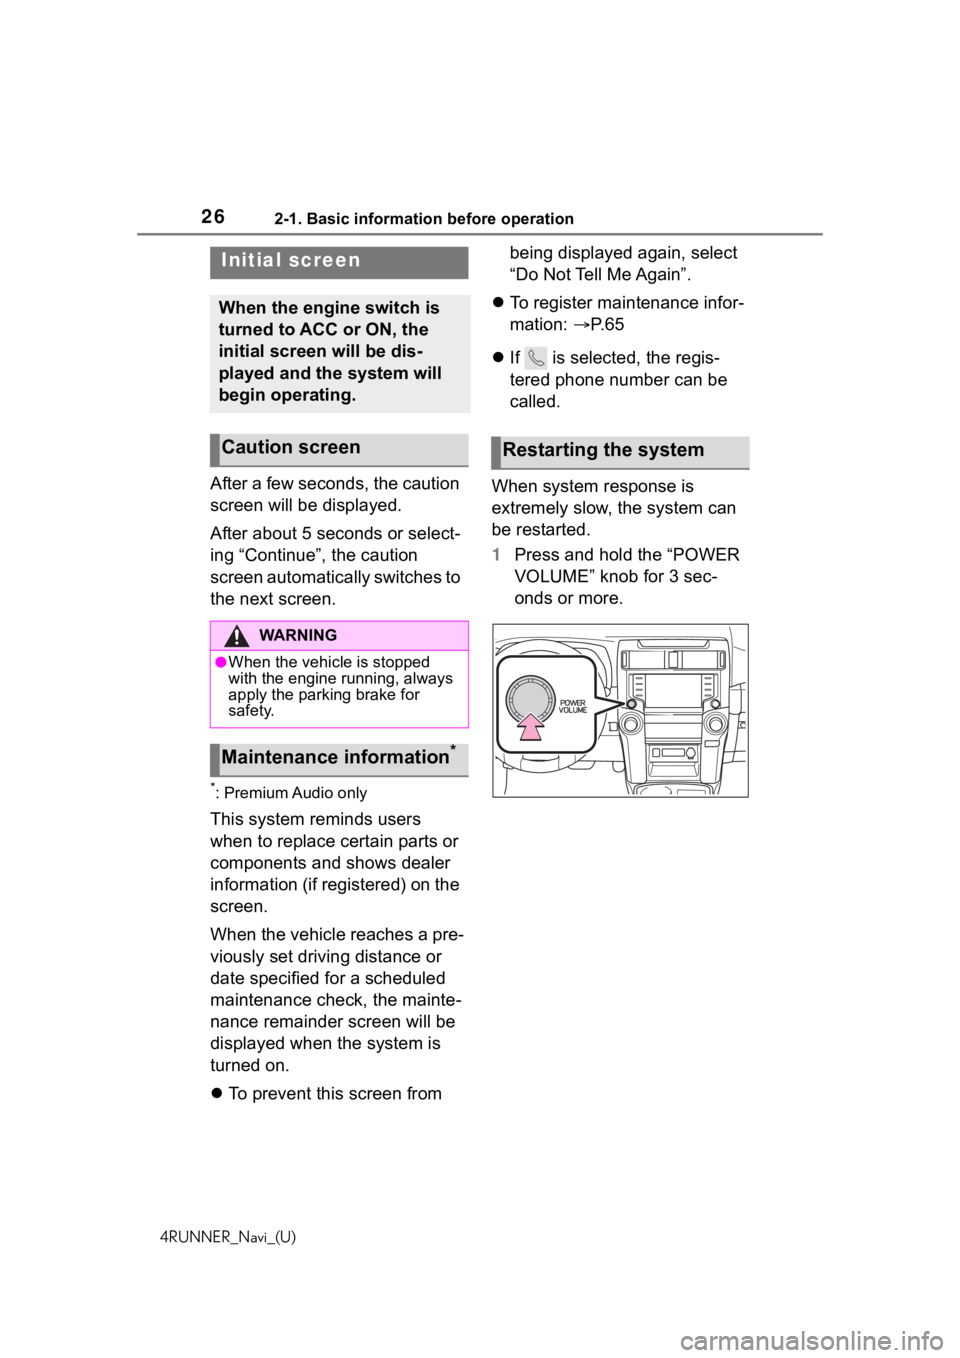
When system response is
extremely slow, the system can
be restarted.
1 Press and hold the “POWER
VOLUME” knob for 3 sec-
onds or more.
Initial screen
When the engine switch is
turned to ACC or ON, the
initial screen will be dis-
played and the system will
begin operating.
Caution screen
WA R N I N G
●When the vehicle is stopped
with the engine running, always
apply the parking brake for
safety.
Maintenance information*
Restarting the system
Page 28 of 254

282-1. Basic information before operation
4RUNNER_Navi_(U)
●Flick operations may not be performed smoothly at high altitude s.
●If the system does not respond to
touching a screen button, move
your finger away from the screen
and then touch it again.
●Dimmed screen buttons cannot be
operated.
●The displayed image may become
darker and moving images may
be slightly distorted when the
screen is cold.
●In extremely cold conditions, the
screen may not be displayed and
the data input by a user may be
deleted. Also, the screen buttons
may be harder than usual to
depress.
●When you look at the screen
through polarized material such as
polarized sunglasses, the screen
may be dark and hard to see. If
so, look at the scr een from differ-
ent angles, adjust the screen set-
tings on the display settings
screen or take off your sun-
glasses.
●When is displayed on the
screen, select to return to
the previous screen.
The operable areas of the
capacitive touch screen buttons
use capacitive touch sensors
and may not operate properly in
the following situations:
If the screen is dirty or wet
If a source of strong electro-
magnetic waves is brought
near the screen
If a glove is worn during oper-
ation
If the screen is touched by a
fingernail
If a stylus is used to operate
the buttons
If your palm touches the oper-
able area of another button
during operation
If a button is touched quickly
If the operable part of a
capacitive touch screen but-
Touch screen operation
This system is operated
mainly by the buttons on
the screen. (Referred to as
screen buttons in this man-
ual.)
When a screen button is
touched, a beep sounds. (To
set the beep sound: P. 5 9 )
NOTICE
●To prevent damaging the
screen, lightly touch the screen
buttons with your finger.
●Do not use objec ts other than
your finger to touch the screen.
●Wipe off fingerprints using a
glass cleaning cloth. Do not use
chemical cleaners to clean the
screen, as they may damage
the touch screen.
Capacitive touch screen
buttons