Page 37 of 232

In the second row, install LATCH child safety seats in the
outboard seating positions only. Use only a seat belt
retained seat in the center position.
To install a LATCH child safety seat, slide the safety seat
latches onto the anchor bars until they click into place. Carefully read and follow the instructions provided by
the child safety seat manufacturer.
Once installed, test the security of the installation before seating a child. Attempt to twist the child safety seat from side to side and try to pull it away from the seat, then check to ensure the anchors remain securely in place.
NOTE: Lower LATCH anchors should not be used with
child seats or booster seats that have an integrated safety belt in situations where the combined weight of
the child plus the child restraint is more than
65 lbs (29.5
kg). In these situations, use the safety belt instead.
Attaching Upper Tether Straps
If an upper tether strap is provided, attach its hook to the anchor point located behind the rear seat.
NOTE: The location of anchor points may not be readily
visible but can be found by identifying a slice in the seat
Page 38 of 232

For a single-strap tether at the center seating position, raise the head support
(see Raising/Lowering the Rear
Center Head Support on page 27) and run the strap
under the head support.
Testing a Child Safety Seat
Before seating a child, always make sure the child safety seat is not loose:
1.
Hold the child safety seat by the belt path and try to slide the safety seat from side to side and front to back.
2.
If the seat moves more than one inch (2.5 cm), it is
too loose. Tighten the belt or reconnect the
LATCH
retained child safety seat.
3.
If you are unable to reduce slack, try a different seat
location or try another child safety seat.
Child Safety Seat WarningsWARNING: Extreme hazard! Do not seat a child
on the front passenger seat even if you are using
a child safety seat. This seat has an airbag in front
of it. Although this airbag is disabled when Model
Y detects a lightweight passenger, do not rely on
technology to protect your child.
WARNING: Child restraint systems are designed
to be secured in vehicle seats by lap belts or the
lap belt portion of a lap-shoulder belt. Children
could be endangered in a crash if their child
restraints are not properly secured in the vehicle.
WARNING: According to collision statistics,
children are safer when properly restrained in the
rear seating positions than in the front seating
positions.
WARNING: Do not use a forward facing child
safety seat until your child weighs over 20 lbs (9
kg) and can sit independently. Up to the age of
two, a child
Page 52 of 232
Power Cycling the Vehicle
If your vehicle demonstrates unusual behavior or a nondescript alert is present, you can try power cycling
the vehicle to potentially resolve the issue.
1.
Shift into Park.
2.
On the touchscreen, touch Controls > Safety &
Security > Power Off.
3.
Wait for at least two minutes without interacting
with the vehicle. Do not open the doors, touch the brake pedal, touch the touchscreen, etc.
4.
After two minutes have passed, press the brake
pedal or open the door to wake the vehicle.
Starting and Powering Off
50MODEL Y OWNER
Page 67 of 232

If chimes are turned on (see Controlling Audible
Feedback on page 65), an audible beep sounds as you
approach an object. You can temporarily mute the chime by pressing the scroll button on the left side of the steering wheel or by touching the mute button on the bottom left corner of the Park Assist view.
NOTE: If a sensor is unable to provide feedback, the
touchscreen displays an alert message.
CAUTION: Keep sensors clean from dirt, debris,
snow, and ice. Avoid using a high pressure power
washer on the sensors and do not clean a sensor
with a sharp or abrasive object that can scratch or
damage its surface.
CAUTION: Do not install accessories or stickers on
or near the parking sensors.
Controlling Audible Feedback
You can use Park Assist with or without audible feedback. To turn chimes on or
off, touch Controls >
Safety & Security > Park Assist Chimes.
To mute the chimes temporarily, press the scroll button on the left side of the steering wheel or touch the mute button in the corner of the Park Assist view. The chimes
are muted until you shift into a
different gear or drive
over
5 mph (8 km/h).
Limitations and False Warnings
The parking sensors may not function correctly in these situations:
Page 79 of 232

To attach a ball mount:
1.
Remove the dust cover from the hitch housing by using a small object, such as a
flat screwdriver, to pry
between the dust cover and hitch housing. Store the dust cover in a secure location.
2.
If necessary, remove the cotter pin from the locking
bolt and slide the locking bolt out of the hitch assembly.
3.
Slide the ball holder into the hitch assembly.
4.
Align the hole in the ball holder with the one in the hitch assembly.
5.
Slide the locking bolt through the hitch assembly/ball holder.
6.
Insert the cotter pin in the hole at the end of the
locking bolt.
To remove a ball mount:
1.
Remove the cotter pin from the locking bolt and slide
the locking bolt out of the ball holder/hitch assembly.
2. Pull the ball holder out of the hitch assembly.3.
Re-install the dust cover for the hitch housing and
store the ball mount in a secure location.
Electrical Connections
Regulations require all trailers to be equipped with tail lights, brake lights, side marker lights, and turn signals.
To provide power for trailer lighting, a built-in 7-pin
wiring connector is provided near the hitch support
Page 121 of 232

OverviewTouch Controls on the bottom corner of
the touchscreen to control features and
customize
Model Y to suit your
preferences. The Controls window
appears over the map. Touch an option on the left side of the window to display the associated controls and settings. By
default,
Quick Controls displays for
quicker access to commonly used
settings.
To close the Controls window, touch the
X in the top left corner, touch Controls
again, or swipe down on the window.
When an information icon displays beside a
specific setting, touch it to display a
popup that provides helpful details about
the associated setting.
NOTE: The following illustrations are for demonstration
purposes only. Depending on vehicle options, software version and market region, the options available may be
different.
Summary of Controls
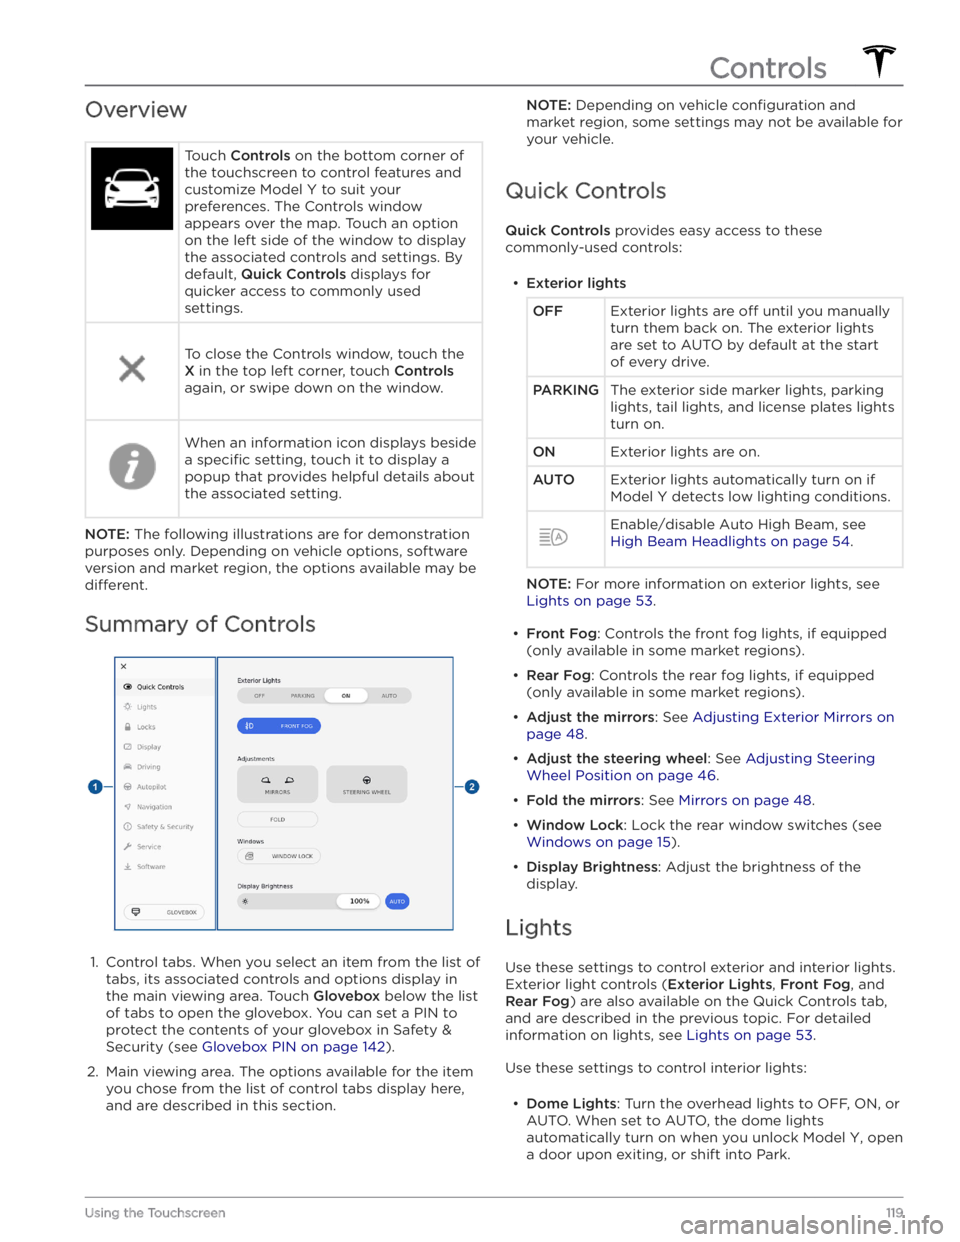
1.
Control tabs. When you select an item from the list of tabs, its associated controls and options display in the main viewing area. Touch
Glovebox below the list
of tabs to open the glovebox. You can set a PIN to
protect the contents of your glovebox in Safety & Security (see
Glovebox PIN on page 142).
2.
Main viewing area. The options available for the item you chose from the list of control tabs display here, and are described in this section.
NOTE: Depending on vehicle configuration and
market region, some settings may not be available for your vehicle.
Quick Controls
Quick Controls provides easy access to these
commonly-used controls:
Page 126 of 232

If your Model Y comes within approximately 3 mph (5
km/h) of the selected maximum speed, a chime sounds
and text appears on the touchscreen above the driving
speed. Additionally, your mobile app sends you a
notification.
To enable Speed Limit Mode:
1.
Ensure the vehicle is in Park.
2.
Touch Controls > Safety & Security > Speed Limit
Mode on the touchscreen or CONTROLS in your
mobile app.
3.
Select the maximum driving speed that you would
like to limit the vehicle to.
4.
Drag the slider to the ON position.
5.
Enter the 4-digit PIN that you want to use to disable and enable Speed Limit Mode.
NOTE: If you forget the PIN, you can disable Speed
Limit Mode by entering the login credentials for your Tesla Account.
NOTE: When Speed Limit Mode is enabled, the
acceleration setting (
Controls > Driving > Acceleration)
is automatically set to
Chill.
WARNING: Driving downhill can increase driving
speed, causing the vehicle to exceed your chosen
maximum speed.
WARNING: Speed Limit Mode is not a
replacement for good judgment, driver training,
and the need to closely monitor roadway speed
limits and driving conditions. Accidents can occur
at any speed.
Erasing Personal Data
You can erase all personal data (saved addresses, music favorites,
HomeLink programming, etc.) and restore all
customized settings to their factory defaults. This is useful when transferring ownership of
Model Y. Touch
Controls > Service > FACTORY RESET. Before erasing,
Model Y verifies your credentials by prompting you to
enter the user name and password associated with your Tesla Account.
Controls
124MODEL Y OWNER
Page 144 of 232
About the Security System
If Model Y does not detect an authenticated phone, key
fob, or key card and a locked door or trunk is opened, an
alarm sounds and the headlights and turn signals
flash.
To deactivate the alarm, press any button on the mobile
app or tap your key card or key fob against the card reader located
approximately one third the way up of
the driver