Page 1 of 220
MODEL
3
2020.4
OWNER'S MANUAL
North America
Page 5 of 220

Touchscreen Overview
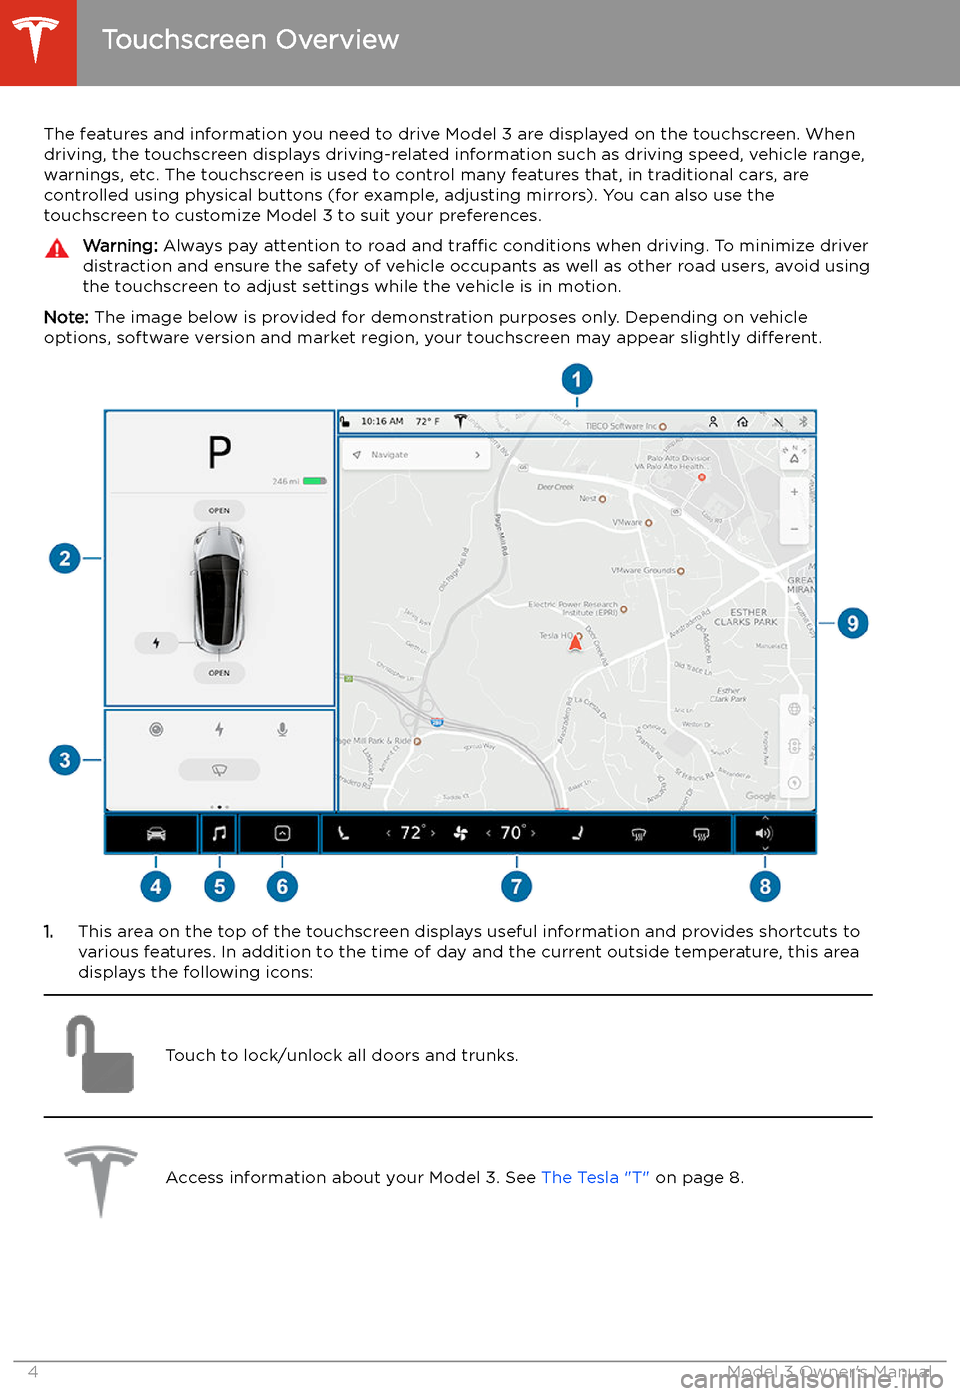
The features and information you need to drive Model 3 are displayed on the touchscreen. When
driving, the touchscreen displays driving-related information such as driving speed, vehicle range, warnings, etc. The touchscreen is used to control many features that, in traditional cars, arecontrolled using physical buttons (for example, adjusting mirrors). You can also use the
touchscreen to customize Model 3 to suit your preferences.
Warning: Always pay attention to road and traffic conditions when driving. To minimize driver
distraction and ensure the safety of vehicle occupants as well as other road users, avoid using
the touchscreen to adjust settings while the vehicle is in motion.
Note: The image below is provided for demonstration purposes only. Depending on vehicle
options, software version and market region, your touchscreen may appear slightly different.
1.This area on the top of the touchscreen displays useful information and provides shortcuts to
various features. In addition to the time of day and the current outside temperature, this area displays the following icons:
Touch to lock/unlock all doors and trunks.Access information about your Model 3. See The Tesla "T" on page 8.Touchscreen Overview
4Model 3 Owner
Page 7 of 220
2.Car Status. This area dynamically displays the current status of Model 3 as you drive, park,
open doors, turn lights on, etc. Monitor this area when driving as it displays important
information such as driving speed and warning messages (see Car Status on page 61). When
the car is in Park, you can open the trunks or charge port door.
3. Cards. This area automatically updates to display information such as incoming calls, seat belt
reminders, current state of the wipers, etc. It also provides easy access to the rear view camera (see Rear View Camera on page 75), charging status (see Charging Instructions on
page 157), voice commands (see Using Voice Commands on page 142), wiper controls (see
Wipers on page 64), and seat belt reminders (see Seat Belt Reminders on page 31). Swipe
to the right or left to access:
Page 8 of 220
6.Touch the app launcher then choose from the following apps:
Call. See Phone on page 139.
Calendar . See Calendar on page 141.
Camera. Display the area behind Model 3. This area also displays automatically
whenever you shift into Reverse. See Rear View Camera on page 75.Energy. See Getting Maximum Range on page 74.Charging. See Charging Instructions on page 157.Web. Access the Internet using the web browser (if equipped with premium
connectivity).
Entertainment . Browse the full library of games and access video streaming
services, all from your vehicle
Page 10 of 220
Opening and Closing
Keys
Three Types of Keys
Model 3 supports three types of keys:
Page 11 of 220
Note: Although Bluetooth typically
communicates over distances of up to approximately 30 feet (9 meters),
performance can vary based on the phone you
are using, environmental interference, etc.
Note: If multiple vehicles are linked to the
Tesla Account, you must switch the mobile
app to the vehicle that you want to access
before you can use the phone as a key.
Key Card Tesla provides you with two Model 3 key
cards, designed to fit in your wallet. Tap your
Model 3 key card on one of its card readers,
located on the driver
Page 12 of 220

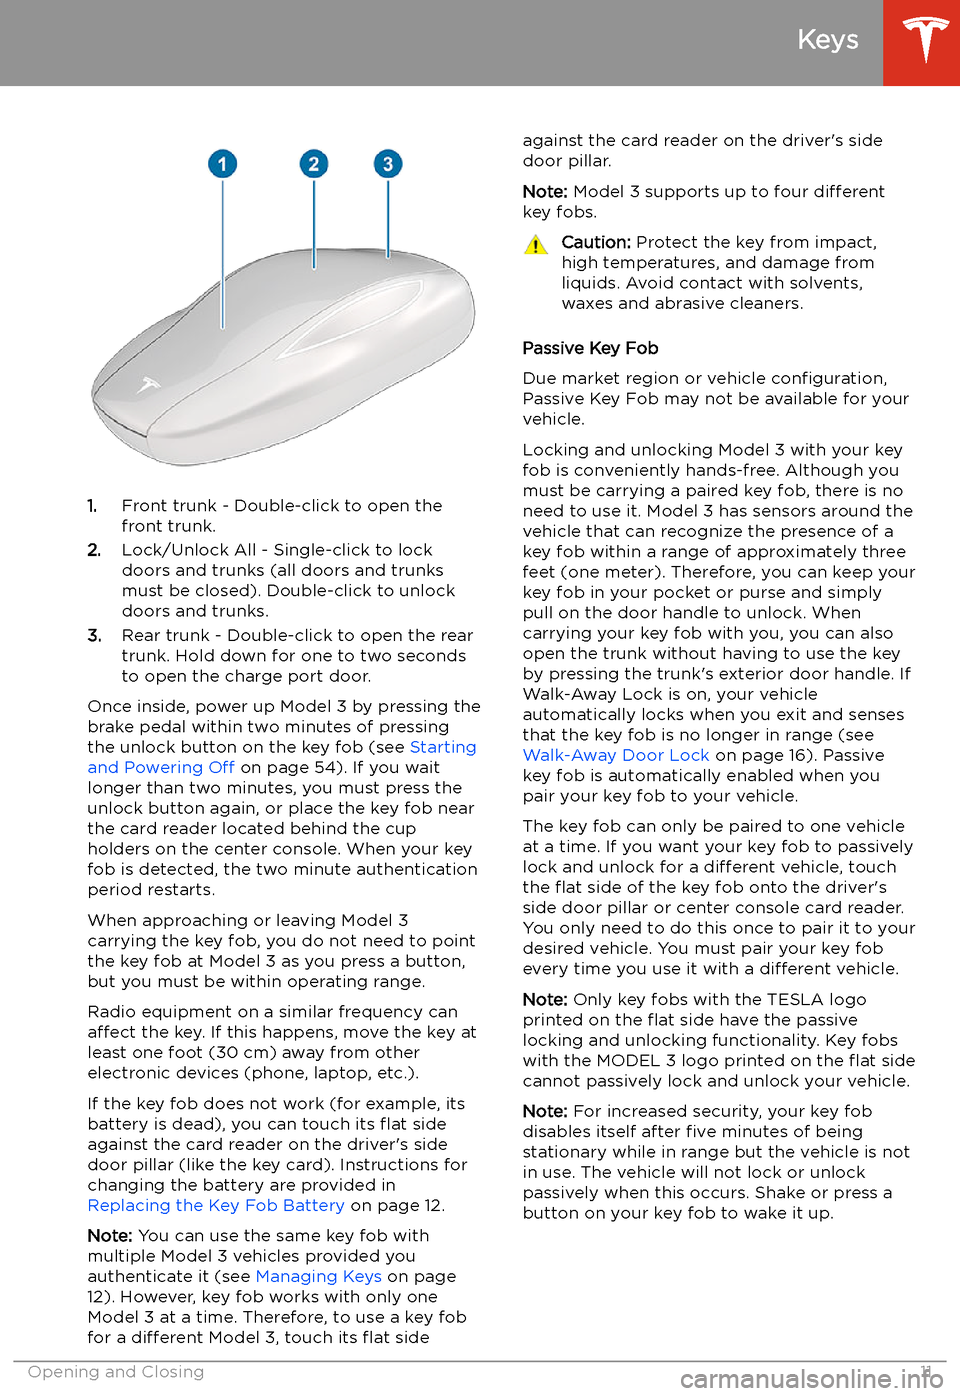
1.Front trunk - Double-click to open the
front trunk.
2. Lock/Unlock All - Single-click to lock
doors and trunks (all doors and trunks
must be closed). Double-click to unlock doors and trunks.
3. Rear trunk - Double-click to open the rear
trunk. Hold down for one to two seconds to open the charge port door.
Once inside, power up Model 3 by pressing the
brake pedal within two minutes of pressing
the unlock button on the key fob (see Starting
and Powering Off on page 54). If you wait
longer than two minutes, you must press the
unlock button again, or place the key fob near
the card reader located behind the cup holders on the center console. When your key
fob is detected, the two minute authentication period restarts.
When approaching or leaving Model 3
carrying the key fob, you do not need to point the key fob at Model 3 as you press a button,
but you must be within operating range.
Radio equipment on a similar frequency can
affect the key. If this happens, move the key at
least one foot (30 cm) away from other electronic devices (phone, laptop, etc.).
If the key fob does not work (for example, its
battery is dead), you can touch its
Page 14 of 220

mobile app installed and connected to the
vehicle’s Tesla account.
1. While sitting in the vehicle, open the Tesla
mobile app and select the appropriate
vehicle (if there are multiple vehicles
associated with the account), then touch
Phone Key > Start .
2. Scan an already-authenticated key card or
key fob on the key reader behind the cup
holders on the top of the center console.
3. When the mobile app notifies you that the
pairing was successful, touch Done. The
key list on the touchscreen ( Controls >
Locks ) displays the new phone key. The
name of the phone key is determined by
the name used in the phone’s settings.
Removing a key:
When you no longer want a key to access your
vehicle (for example, you lost your phone or key card, etc.), you can remove the key.
1. On the touchscreen, touch Controls >
Locks .
2. Find the key that you would like to delete
in the key list, then touch the key’s
associated trash icon.
3. When prompted, scan an already-
authenticated key card or key fob on the
key reader behind the cup holders on the
top of the center console to confirm the
deletion. When complete, the key list no
longer includes the deleted key.
Note: Your vehicle requires at least one
authenticated key card or key fob at all times.
If only one key card is included on the key list,
this key cannot be deleted.
Mobile App
In addition to using it to authenticate a phone
as your Model 3 key, you can use the mobile
app to communicate with Model 3 remotely
using your iPhone