2020 TESLA MODEL 3 display
[x] Cancel search: displayPage 71 of 220

Park Assist
How Park Assist Works
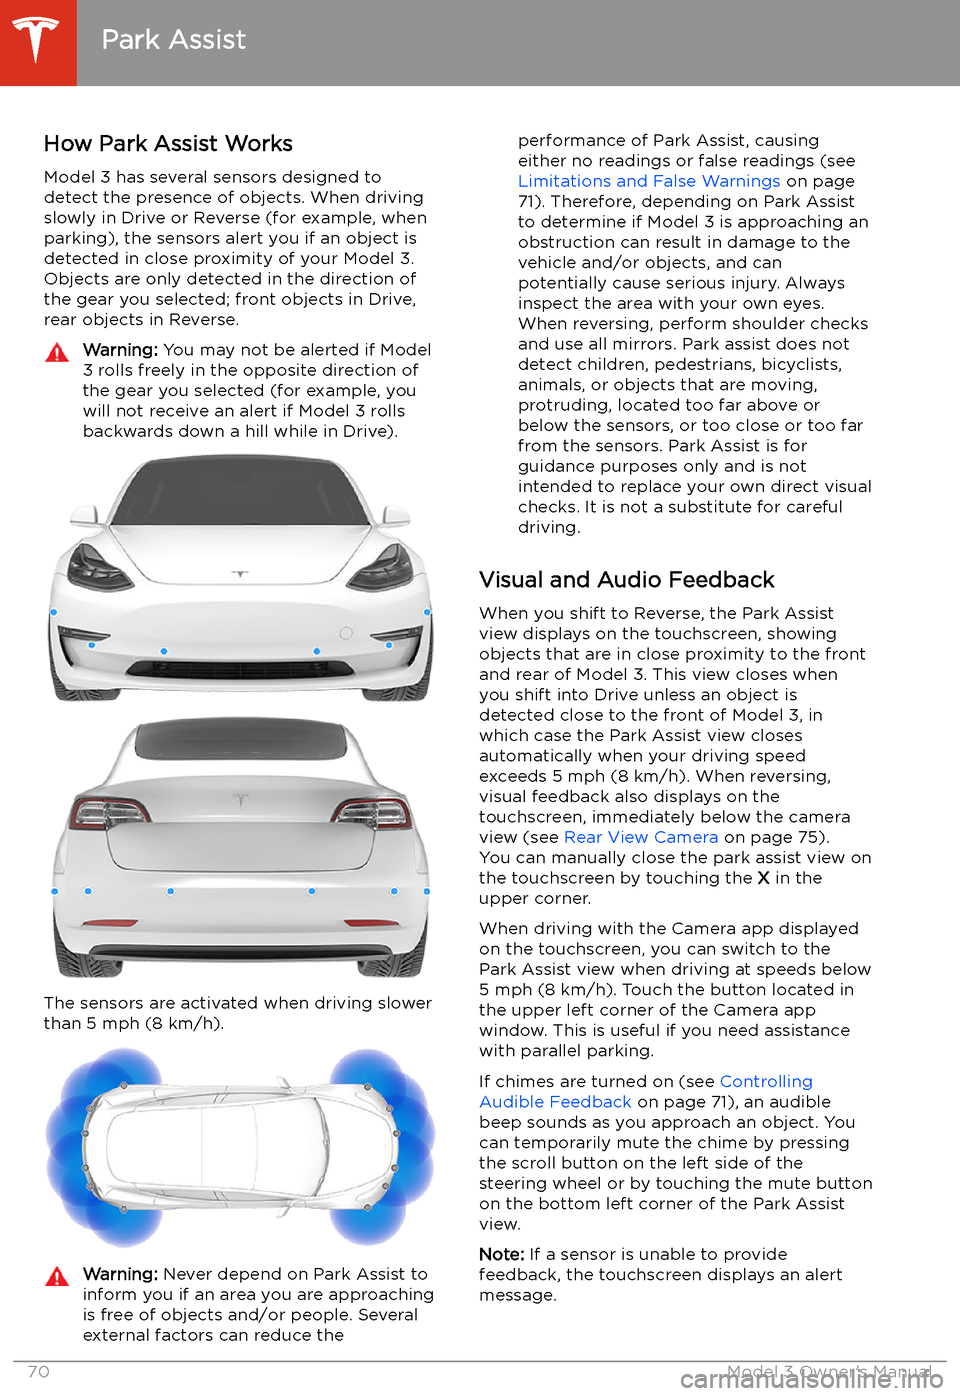
Model 3 has several sensors designed to
detect the presence of objects. When driving
slowly in Drive or Reverse (for example, when
parking), the sensors alert you if an object is
detected in close proximity of your Model 3.
Objects are only detected in the direction of
the gear you selected; front objects in Drive,
rear objects in Reverse.
Warning: You may not be alerted if Model
3 rolls freely in the opposite direction of
the gear you selected (for example, you
will not receive an alert if Model 3 rolls
backwards down a hill while in Drive).
The sensors are activated when driving slower
than 5 mph (8 km/h).
Warning: Never depend on Park Assist to
inform you if an area you are approaching is free of objects and/or people. Several
external factors can reduce theperformance of Park Assist, causing
either no readings or false readings (see
Limitations and False Warnings on page
71). Therefore, depending on Park Assist
to determine if Model 3 is approaching an
obstruction can result in damage to the vehicle and/or objects, and can
potentially cause serious injury. Always
inspect the area with your own eyes.
When reversing, perform shoulder checks and use all mirrors. Park assist does not
detect children, pedestrians, bicyclists,
animals, or objects that are moving, protruding, located too far above or
below the sensors, or too close or too far
from the sensors. Park Assist is for
guidance purposes only and is not intended to replace your own direct visual
checks. It is not a substitute for careful
driving.
Visual and Audio Feedback
When you shift to Reverse, the Park Assist
view displays on the touchscreen, showing objects that are in close proximity to the front
and rear of Model 3. This view closes when you shift into Drive unless an object is
detected close to the front of Model 3, in
which case the Park Assist view closes automatically when your driving speed
exceeds 5 mph (8 km/h). When reversing,
visual feedback also displays on the touchscreen, immediately below the camera
view (see Rear View Camera on page 75).
You can manually close the park assist view on
the touchscreen by touching the X in the
upper corner.
When driving with the Camera app displayed
on the touchscreen, you can switch to the
Park Assist view when driving at speeds below
5 mph (8 km/h). Touch the button located in
the upper left corner of the Camera app
window. This is useful if you need assistance
with parallel parking.
If chimes are turned on (see Controlling
Audible Feedback on page 71), an audible
beep sounds as you approach an object. You
can temporarily mute the chime by pressing
the scroll button on the left side of the
steering wheel or by touching the mute button on the bottom left corner of the Park Assist
view.
Note: If a sensor is unable to provide
feedback, the touchscreen displays an alert
message.
Park Assist
70Model 3 Owner
Page 76 of 220

Rear View Camera
Camera Location
Model 3 is equipped with a rear view camera
located above the rear license plate.
Whenever you shift into Reverse, the
touchscreen displays the view from the
camera. Lines show your driving path based
on the position of the steering wheel. These
lines adjust appropriately as you move the
steering wheel.
Note: Visual feedback from the parking
sensors display on the touchscreen (see Park
Assist on page 70).
To display the view from the camera at any
time:
Touch the camera icon on the
"Cards" area on the touchscreen.Warning: Never depend on the rear view
camera to inform you if the area behind
you is free of objects and/or people when
reversing. The camera may not detect
objects or barriers that can potentially
cause damage or injury. In addition, several external factors can reduce the
performance of the camera, including a
dirty or obstructed lens. Therefore,
depending on the rear view camera to
determine if Model 3 is approaching an
obstruction can result in damage to the vehicle and/or objects, and canpotentially cause serious injury. Always
inspect the area with your own eyes.
When reversing, perform shoulder checks and use all mirrors. Use the camera forguidance purposes only. It is not intendedto replace your own direct visual checks
and is not a substitute for careful driving.
Cleaning the Camera
To ensure a clear picture, keep the camera lens clean, and free of obstructions. Remove any
buildup of dirt by occasionally wiping the
camera lens with a soft damp cloth.
Caution: Do not use chemical-based or
abrasive cleaners. Doing so can damage
the surface of the camera lens.
Rear View Camera
Driving75
Page 80 of 220

Pedestrian Warning System
The Pedestrian Warning System causes Model 3 to emit sound when driving below 20 mph
(32 km/h). Electric vehicles operate quietly
and this sound helps to alert pedestrians of
your oncoming vehicle. The sound, which
activates whenever Model 3 is shifted out of
Park, and gets louder as speed increases.
The touchscreen displays this
indicator when the Pedestrian
Warning System is not active.
Note: The Pedestrian Warning System is not
available in vehicles manufactured prior to
September 1, 2019.
Warning: If sound cannot be heard,
pedestrians may not be aware of your
oncoming vehicle, which may increase the likelihood of a collision resulting in serious
injury or death. If the Pedestrian Warning
System is not operating, immediately
contact Tesla.
Pedestrian Warning System
Driving79
Page 89 of 220

Release the accelerator pedal to allow Traffic-
Aware Cruise Control to maintain your cruising
speed.
When the cruising speed is
set, the speedometer icon on
the touchscreen turns blue
and displays the set cruising
speed.
Note: Moving the gear level fully down twice in
quick succession engages Autosteer
(assuming it has been enabled as described in Autosteer on page 93) and the set speed
changes to either your current driving speed,
or the current set speed (displayed in the
icon), whichever is greater.
Note: The minimum speed you can set is
18 mph (30 km/h) and the maximum is 90
mph (150 km/h). It is the driver
Page 95 of 220

The touchscreen displays a message
indicating that Autosteer is temporarily unavailable if you attempted to engage
Autosteer when driving at a speed that is not
within the speed required for Autosteer to operate. Autosteer may also be unavailable if
it is not receiving adequate data from the
camera(s) or sensors.
If Autosteer is unable to detect lane markings,
the driving lane is determined based on the
vehicle you are following.
In most cases, Autosteer attempts to center Model 3 in the driving lane. However, if the
sensors detect the presence of an obstacle (such as a vehicle or guard rail), Autosteer
may steer Model 3 in a driving path that is
offset from the center of the lane.Warning: Autosteer is not designed to,
and will not, steer Model 3 around objects
partially or completely in the driving lane.
Always watch the road in front of you and
stay prepared to take appropriate action. It is the driver
Page 100 of 220

If Require Lane Change Confirmation is turned
on, you must engage the appropriate turn signal to confirm that you want Navigate on
Autopilot to make the lane change. If you do
not confirm the lane change within three
seconds, a chime sounds to remind you that
Navigate on Autopilot requires your
confirmation to change lanes.
Note: If you ignore a route-based lane change
suggestion (for example, you are driving in the
left lane while approaching an off-ramp on the
right side of the highway), Navigate on
Autopilot will be unable to maneuver onto the off-ramp and as a result, the navigation
system will re-route you to your destination.Warning: Navigate on Autopilot may not
always attempt to exit at an off-ramp or
change lanes, even when an exit or lane
change is determined by the navigation
route. Always remain alert and be prepared to manually steer onto an off-
ramp, or make a lane change to prepare
for, or to exit at, an off-ramp or
interchange.
Be Ready to Assist
When attempting to change lanes or
maneuver Model 3, or when approaching
construction zones, Navigate on Autopilot
may be unable to determine the appropriate
driving lane (for example, complex clover leafs
and multi-lane off-ramps) and the touchscreen
displays an alert indicating that Navigate on
Autopilot is trying to maneuver and may
require assistance. When you see the
message, be prepared to take immediate
action to ensure that it is safe and appropriate
to complete the lane change or maneuver.
Limitations
Autosteer and its associated functions are
particularly unlikely to operate as intended
when:
Page 115 of 220

Speed Assist
How Speed Assist Works
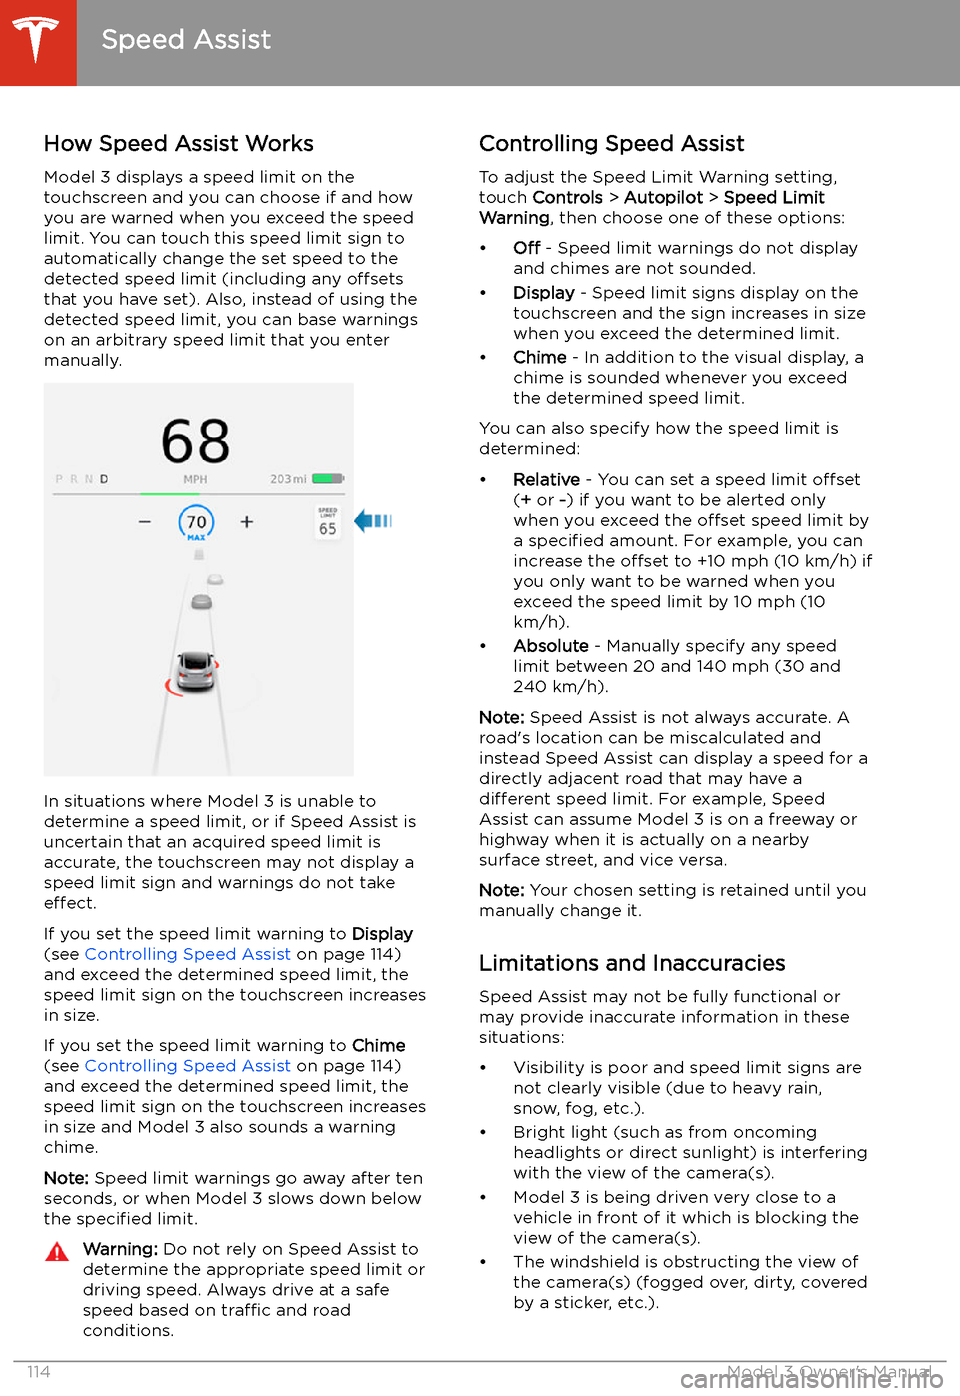
Model 3 displays a speed limit on the
touchscreen and you can choose if and how
you are warned when you exceed the speed
limit. You can touch this speed limit sign to automatically change the set speed to thedetected speed limit (including any offsets
that you have set). Also, instead of using the detected speed limit, you can base warnings
on an arbitrary speed limit that you enter manually.
In situations where Model 3 is unable to
determine a speed limit, or if Speed Assist is
uncertain that an acquired speed limit is
accurate, the touchscreen may not display a
speed limit sign and warnings do not take effect.
If you set the speed limit warning to Display
(see Controlling Speed Assist on page 114)
and exceed the determined speed limit, the
speed limit sign on the touchscreen increases
in size.
If you set the speed limit warning to Chime
(see Controlling Speed Assist on page 114)
and exceed the determined speed limit, the
speed limit sign on the touchscreen increases
in size and Model 3 also sounds a warning
chime.
Note: Speed limit warnings go away after ten
seconds, or when Model 3 slows down below
the specified limit.
Warning:
Do not rely on Speed Assist to
determine the appropriate speed limit or driving speed. Always drive at a safe
speed based on traffic and road
conditions.Controlling Speed Assist
To adjust the Speed Limit Warning setting,
touch Controls > Autopilot > Speed Limit
Warning , then choose one of these options:
Page 117 of 220

Using the Touchscreen
Controls
Overview
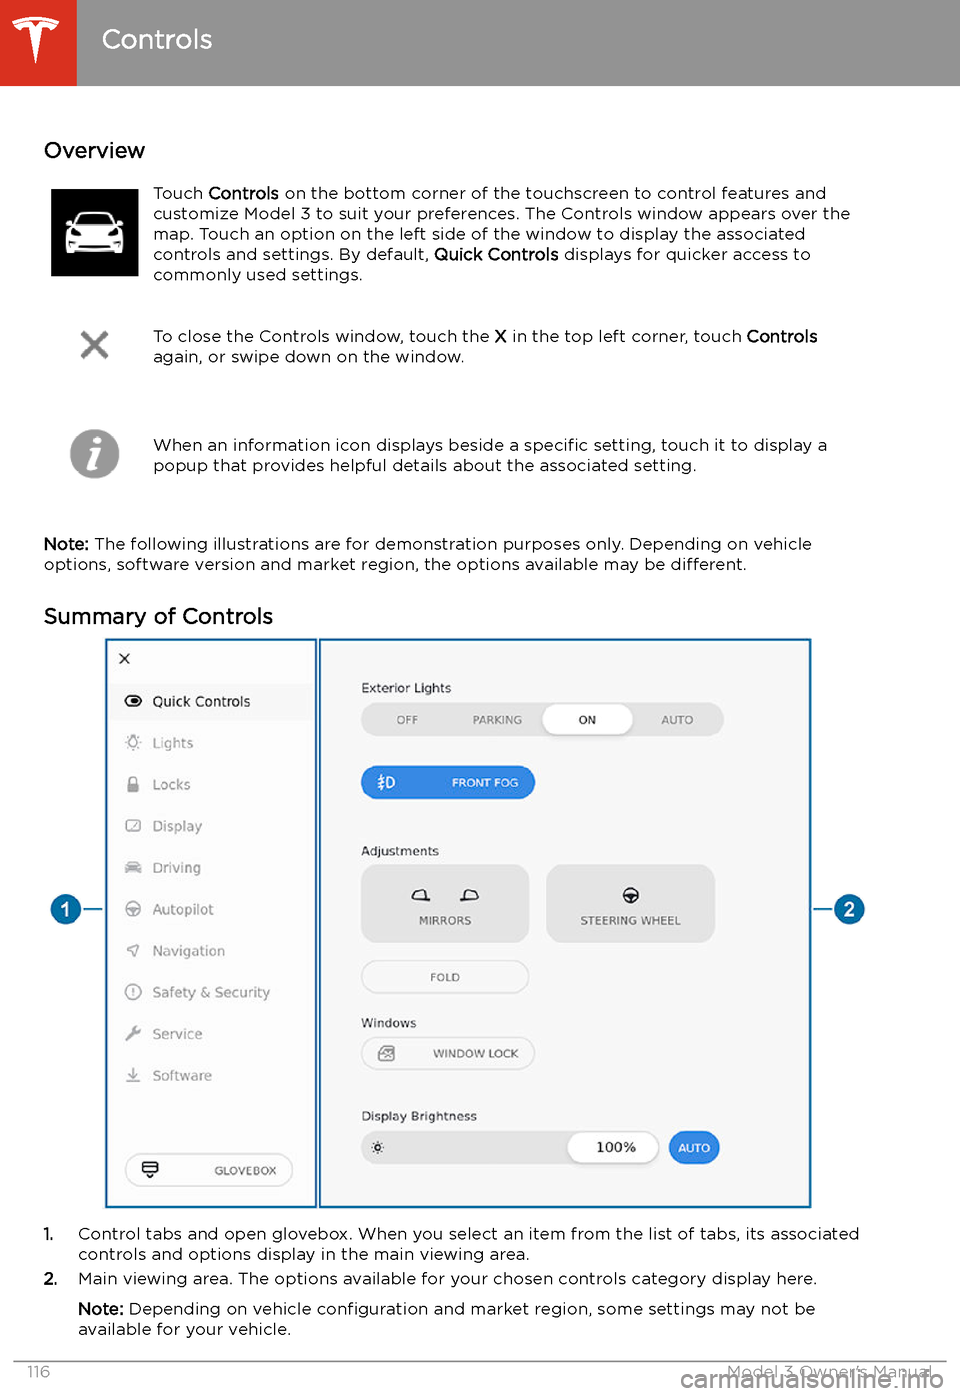
Touch Controls on the bottom corner of the touchscreen to control features and
customize Model 3 to suit your preferences. The Controls window appears over the map. Touch an option on the left side of the window to display the associated
controls and settings. By default, Quick Controls displays for quicker access to
commonly used settings.
To close the Controls window, touch the X in the top left corner, touch Controls
again, or swipe down on the window.When an information icon displays beside a specific setting, touch it to display a
popup that provides helpful details about the associated setting.
Note: The following illustrations are for demonstration purposes only. Depending on vehicle
options, software version and market region, the options available may be different.
Summary of Controls
1. Control tabs and open glovebox. When you select an item from the list of tabs, its associated
controls and options display in the main viewing area.
2. Main viewing area. The options available for your chosen controls category display here.
Note: Depending on vehicle configuration and market region, some settings may not be
available for your vehicle.
Controls
116Model 3 Owner