Page 23 of 220

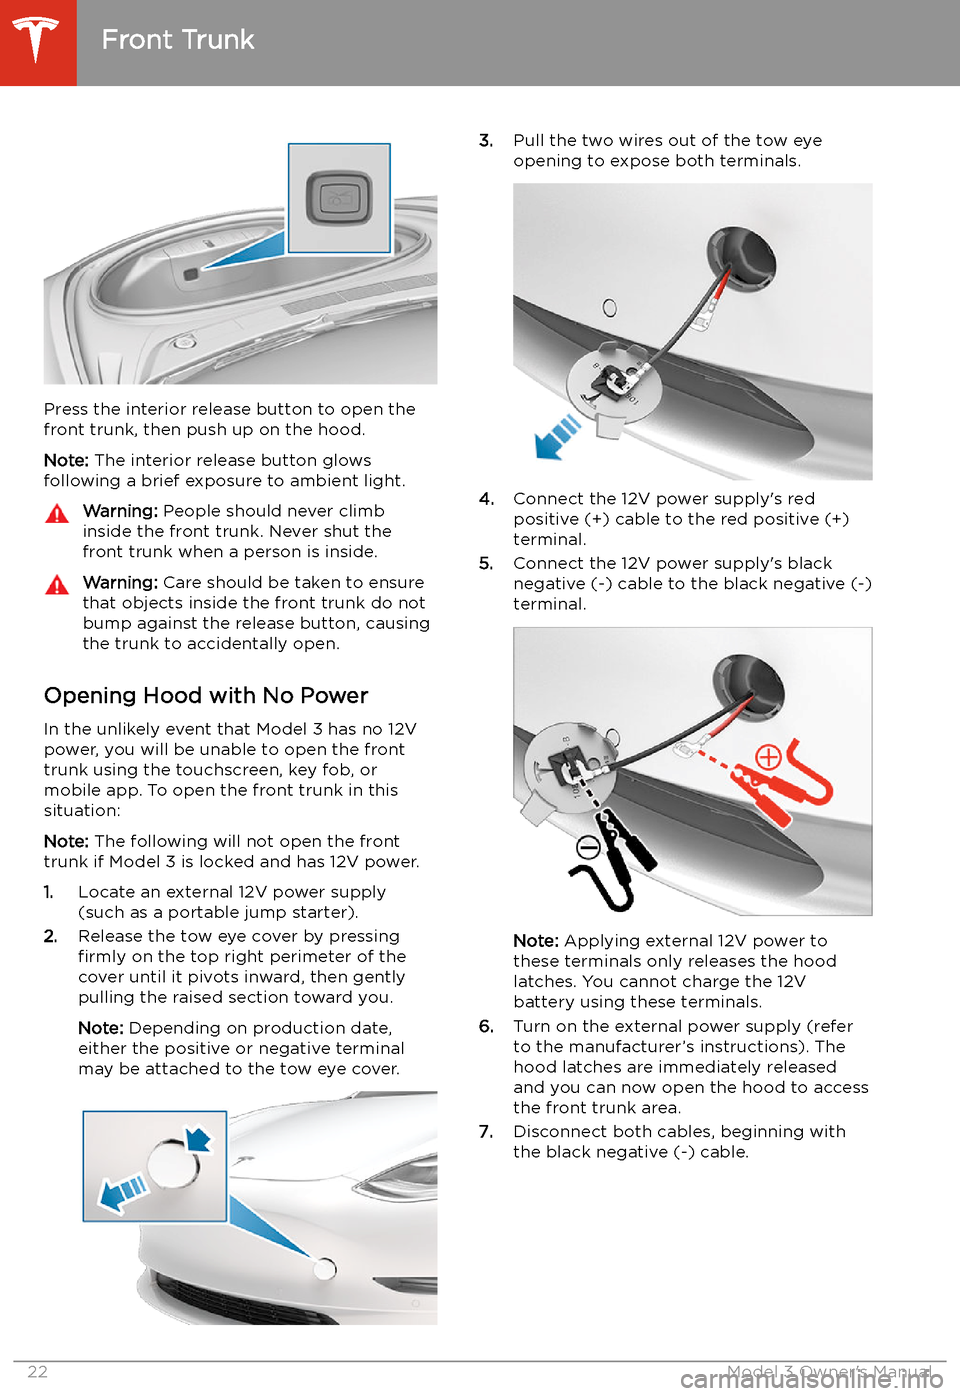
Press the interior release button to open the
front trunk, then push up on the hood.
Note: The interior release button glows
following a brief exposure to ambient light.
Warning: People should never climb
inside the front trunk. Never shut the
front trunk when a person is inside.Warning: Care should be taken to ensure
that objects inside the front trunk do not
bump against the release button, causing the trunk to accidentally open.
Opening Hood with No Power
In the unlikely event that Model 3 has no 12V power, you will be unable to open the front
trunk using the touchscreen, key fob, or
mobile app. To open the front trunk in this situation:
Note: The following will not open the front
trunk if Model 3 is locked and has 12V power.
1. Locate an external 12V power supply
(such as a portable jump starter).
2. Release the tow eye cover by pressing
firmly on the top right perimeter of the
cover until it pivots inward, then gently pulling the raised section toward you.
Note: Depending on production date,
either the positive or negative terminal
may be attached to the tow eye cover.
3. Pull the two wires out of the tow eye
opening to expose both terminals.
4. Connect the 12V power supply
Page 25 of 220

Interior Storage and Electronics
Glovebox
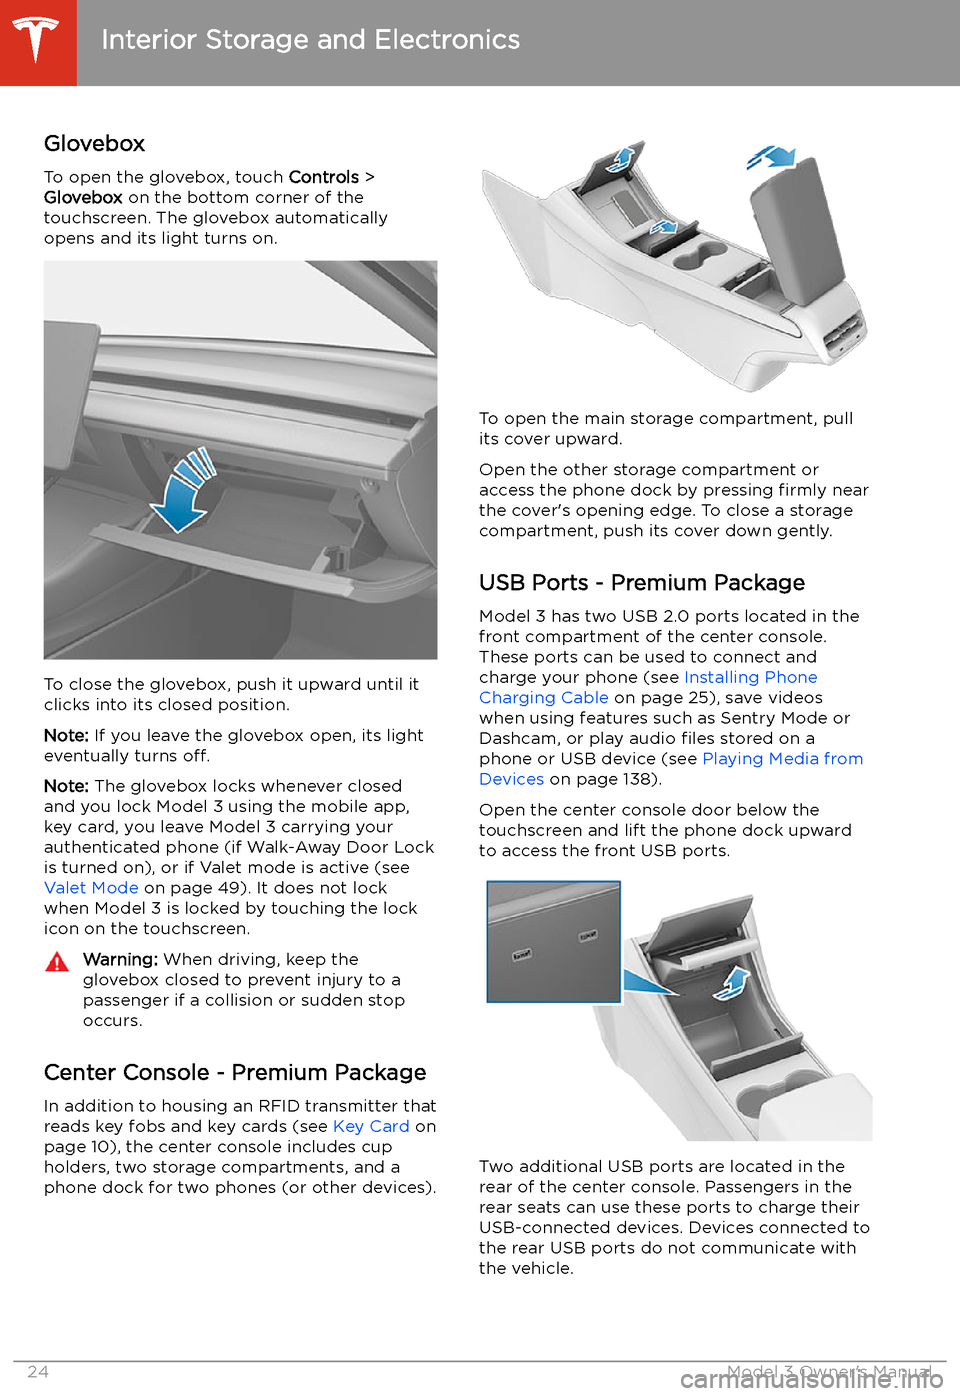
To open the glovebox, touch Controls >
Glovebox on the bottom corner of the
touchscreen. The glovebox automatically
opens and its light turns on.
To close the glovebox, push it upward until it
clicks into its closed position.
Note: If you leave the glovebox open, its light
eventually turns off.
Note: The glovebox locks whenever closed
and you lock Model 3 using the mobile app,
key card, you leave Model 3 carrying your authenticated phone (if Walk-Away Door Lock
is turned on), or if Valet mode is active (see Valet Mode on page 49). It does not lock
when Model 3 is locked by touching the lock
icon on the touchscreen.
Warning: When driving, keep the
glovebox closed to prevent injury to a
passenger if a collision or sudden stop occurs.
Center Console - Premium Package
In addition to housing an RFID transmitter that reads key fobs and key cards (see Key Card on
page 10), the center console includes cup
holders, two storage compartments, and a
phone dock for two phones (or other devices).
To open the main storage compartment, pull its cover upward.
Open the other storage compartment or
access the phone dock by pressing firmly near
the cover
Page 32 of 220

Seat Belts
Wearing Seat Belts
Using seat belts and child safety seats is the
most effective way to protect occupants if a
collision occurs. Therefore, wearing a seat belt is required by law in most jurisdictions.
Both the driver and passenger seats are
equipped with three-point inertia reel seat
belts. Inertia reel belts are automatically
tensioned to allow occupants to move
comfortably during normal driving conditions.
To securely hold child safety seats, all
passenger seating positions are equipped with
an automatic locking retractor (ALR) that, by
pulling the seat belt beyond the length
needed for a typical adult occupant, locks the
belt into place until the seat belt is unbuckled.
The seat belt reel automatically locks to prevent movement of occupants if Model 3
experiences a force associated with hard acceleration, braking, cornering, or an impact
in a collision.
Seat Belt Reminders
The seat belt reminder on the
touchscreen alerts you if a seat belt
for an occupied driver or passenger
seat is unbuckled. If the belt remains
unbuckled, the reminder
Page 33 of 220

2.While holding the button, move the
shoulder anchor up or down as necessary
so that the seat belt is positioned correctly.
3. Release the button on the shoulder
anchor so that it locks into position.
4. Without pressing the button, pull on the
seat belt webbing and attempt to move
the shoulder anchor downwards to check
that it is locked into position.
Warning: Ensure that the seat belt is
positioned correctly and that the
shoulder anchor is locked into position
before driving. Riding in a moving vehicle
with the seat belt positioned incorrectly
or with the shoulder anchor not locked
into position can reduce the effectiveness
of the seat belt in a collision.
To Release a Belt
Hold the belt near the buckle to prevent the
belt from retracting too quickly, then press the
button on the buckle. The belt retracts
automatically. Ensure there is no obstruction
that prevents the belt from fully retracting.
The belt should not hang loose. If a seat belt does not fully retract, contact Tesla.
Wearing Seat Belts When Pregnant
Do not put the lap or shoulder sections of the
seat belt over the abdominal area. Wear the lap section of the belt as low as possibleacross the hips, not the waist. Position theshoulder portion of the belt between the
breasts and to the side of the abdomen.
Consult your doctor for specific guidance.
Warning:
Never place anything between
you and the seat belt to cushion the
impact in the event of a collision.
Seat Belt Pre-tensioners
The front seat belts are equipped with
pre �)tensioners that work in conjunction with
the airbags in a severe frontal collision. The
pre �)tensioners automatically retract both the
seat belt anchor and the seat belt webbing,
reducing slack in both the lap and diagonal portions of the belts, resulting in reduced
forward movement of the occupant.
The outboard seats are equipped with
shoulder pre-tensioners to retract the seat
belt webbing to reduce forward movement of
the occupant.
Seat Belts
32Model 3 Owner
Page 34 of 220

If the pre-tensioners and airbags did not
activate in an impact, this does not mean they
malfunctioned. It usually means that the strength or type of force needed to activate
them was not present.
Warning: Once the seat belt pre-
tensioners have been activated, they must
be replaced. After any collision, have the
airbags, seat belt pre-tensioners and any
associated components checked and, if
necessary, replaced.
Testing Seat Belts
To confirm that seat belts are operating
correctly, perform these three simple checks
on each seat belt.
1. With the seat belt fastened, give the
webbing nearest the buckle a quick pull.
The buckle should remain securely locked.
2. With the belt unfastened, unreel the
webbing to its limit. Check that unreeling
is free from snags, and visually check the
webbing for wear. Allow the webbing to retract, checking that retraction is smooth
and complete.
3. With the webbing half unreeled, hold the
tongue plate and pull forward quickly. The
mechanism should lock automatically and
prevent further unreeling.
If a seat belt fails any of these tests, contact
Tesla immediately.
For information about cleaning seat belts, see
Seat Belts on page 173.
Seat Belt WarningsWarning: Seat belts should be worn by all
occupants at all times, even if driving for
a very short distance. Failure to do so
increases the risk of injury or death if a collision occurs.Warning: Secure small children in a
suitable child safety seat as described in
the Child Safety Seat topic. Always follow
the child safety seat manufacturer
Page 55 of 220

Starting and Powering
Off
Starting When you open a door, Model 3 powers on the
touchscreen and you can operate all controls.
To drive Model 3:
1. PRESS THE BRAKE PEDAL - Model 3
powers on and is ready to drive.
2. SELECT A GEAR - Move the gear lever all
the way down for Drive and all the way up
for Reverse. See Shifting Gears on page
56.
Note: If the PIN to Drive feature is enabled
(see PIN to Drive on page 143), you must also
enter a valid PIN on the touchscreen before
you can drive Model 3.
Note: If Passive Entry is off and you do not
press the brake pedal to start Model 3 within
approximately five minutes, a message
displays on the touchscreen and you must use
the key to lock then unlock Model 3 again before starting the vehicle.
Everything you need to know when driving
Model 3 displays on the touchscreen.
Drive Disabled - Requires Authentication
If Model 3 does not detect a key when you
press the brake (an authenticated phone is not
detected, or 30 seconds has passed since you
used the key card), the touchscreen displays a
message telling you that driving requires
authentication.
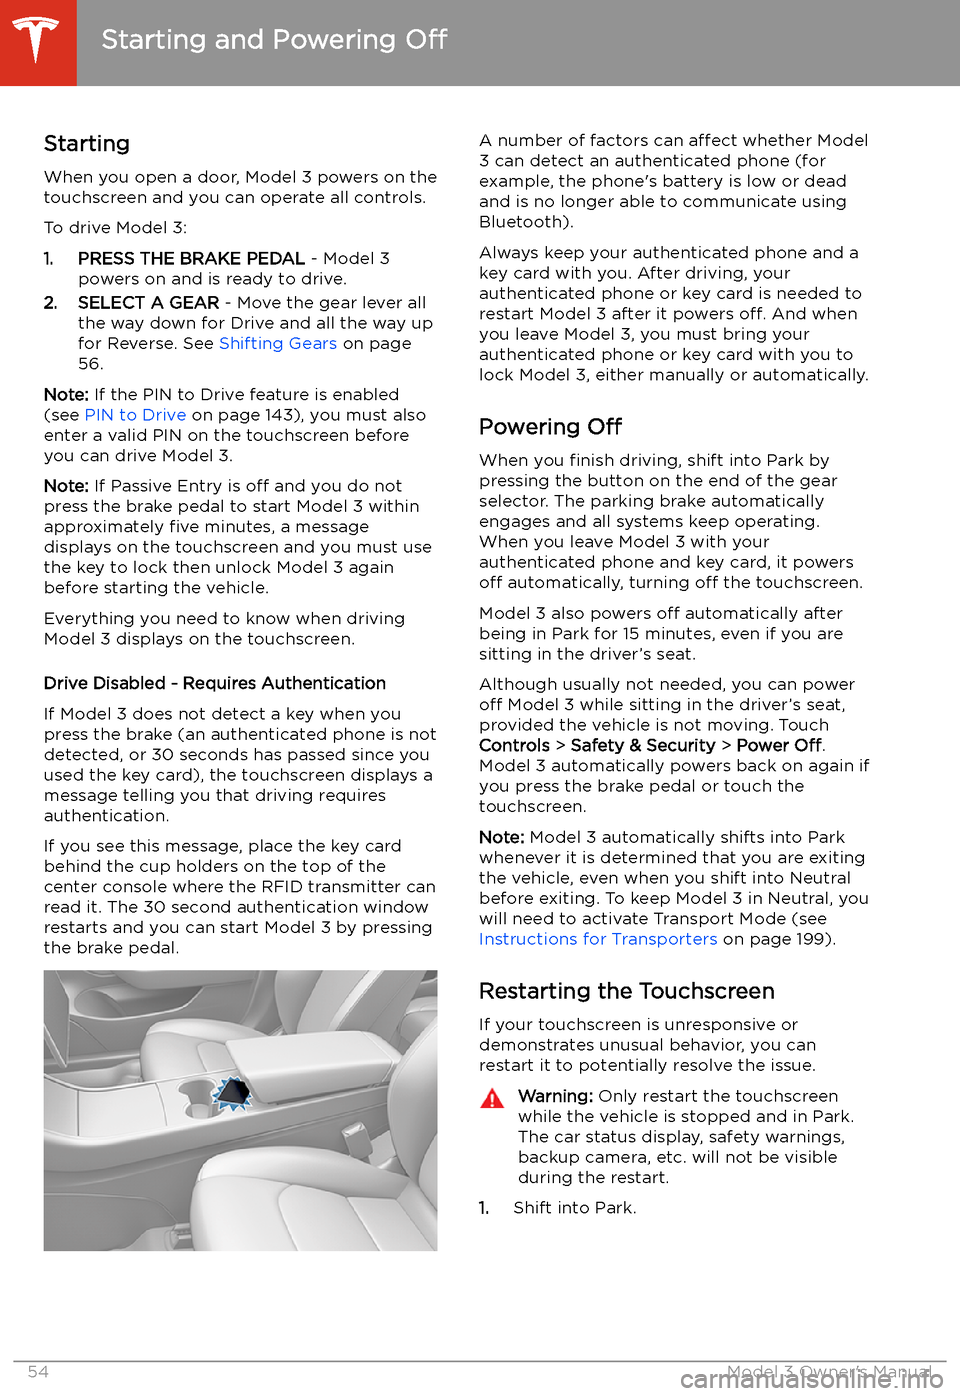
If you see this message, place the key card
behind the cup holders on the top of the center console where the RFID transmitter canread it. The 30 second authentication window
restarts and you can start Model 3 by pressing
the brake pedal.
A number of factors can affect whether Model
3 can detect an authenticated phone (for
example, the phone
Page 58 of 220
To make it convenient to pick up passengers,
you can also unlock all doors at any time by
shifting into Park then pressing the Park
button a second time.
Gears
Driving57
Page 59 of 220

Lights
Controlling Lights Touch Controls > Lights on the touchscreen to
control the lights.
In addition to the lights that you can control
from the touchscreen, Model 3 has
convenience lights that operate automatically
based on what you are doing. For example, in
low ambient lighting conditions, the interior lights, marker lights, tail lights, and puddle
lights turn on when you unlock Model 3, when
you open a door, and when you shift into Park.
They turn off after a minute or two or when
you shift into a driving gear or lock Model 3.
Note: The image below is provided for
demonstration purposes only. Depending on vehicle options, software version and market
region, your touchscreen may appear slightly
different.
1. Exterior lights (headlights, tail lights, side
marker lights, parking lights, and license
plate lights) are set to AUTO each time
you start Model 3. When set to AUTO,
exterior lights automatically turn on when
driving in low lighting conditions. If you
change to a different setting, lights always
revert to AUTO on your next drive.
Touch one of these options to temporarily
change the exterior light setting: