Page 23 of 220

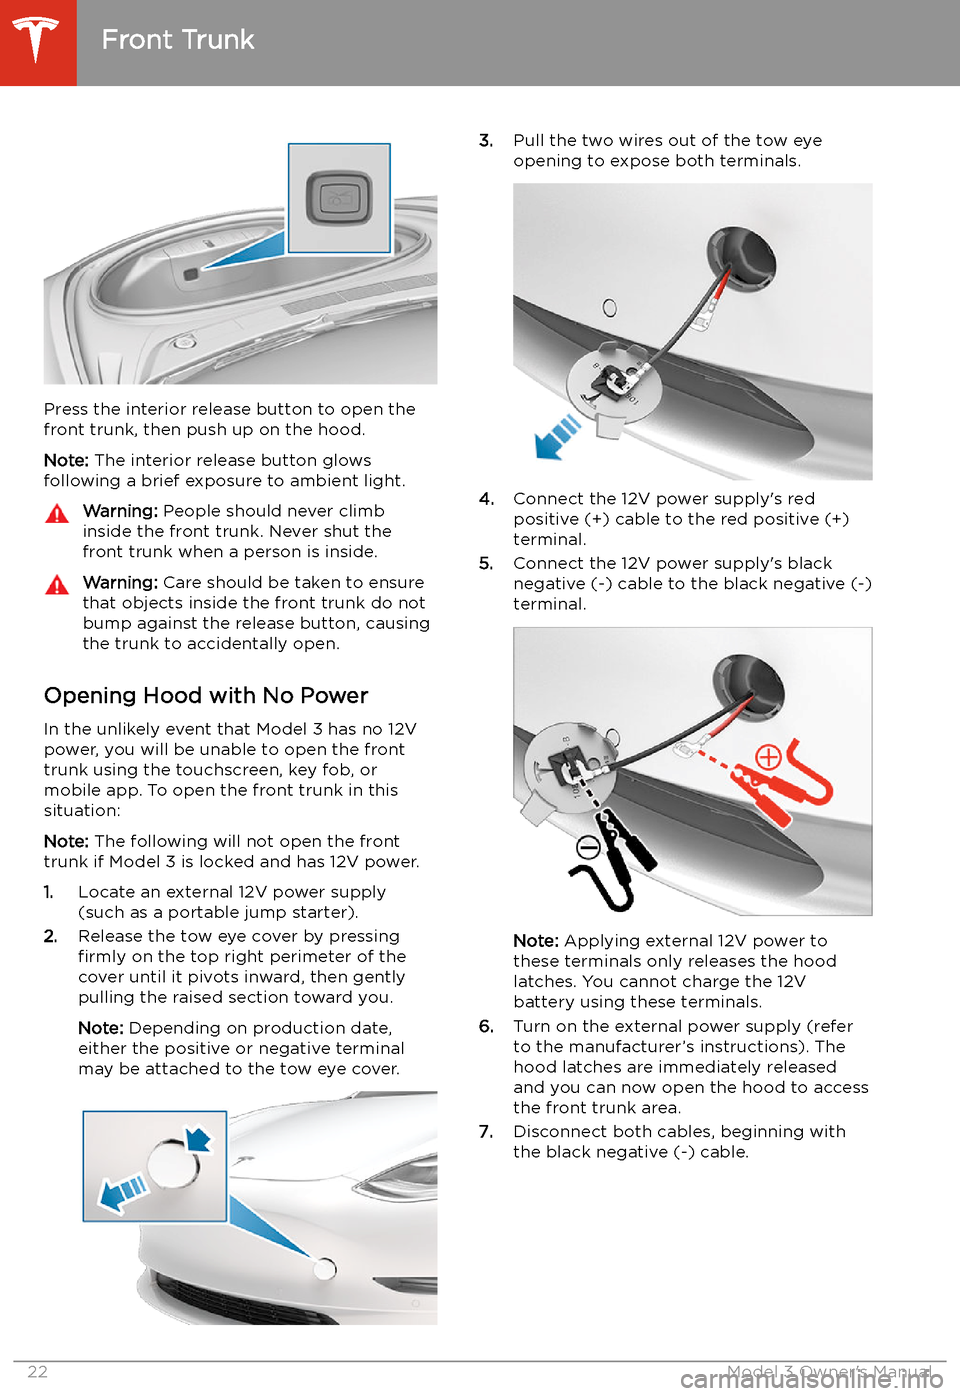
Press the interior release button to open the
front trunk, then push up on the hood.
Note: The interior release button glows
following a brief exposure to ambient light.
Warning: People should never climb
inside the front trunk. Never shut the
front trunk when a person is inside.Warning: Care should be taken to ensure
that objects inside the front trunk do not
bump against the release button, causing the trunk to accidentally open.
Opening Hood with No Power
In the unlikely event that Model 3 has no 12V power, you will be unable to open the front
trunk using the touchscreen, key fob, or
mobile app. To open the front trunk in this situation:
Note: The following will not open the front
trunk if Model 3 is locked and has 12V power.
1. Locate an external 12V power supply
(such as a portable jump starter).
2. Release the tow eye cover by pressing
firmly on the top right perimeter of the
cover until it pivots inward, then gently pulling the raised section toward you.
Note: Depending on production date,
either the positive or negative terminal
may be attached to the tow eye cover.
3. Pull the two wires out of the tow eye
opening to expose both terminals.
4. Connect the 12V power supply
Page 25 of 220

Interior Storage and Electronics
Glovebox
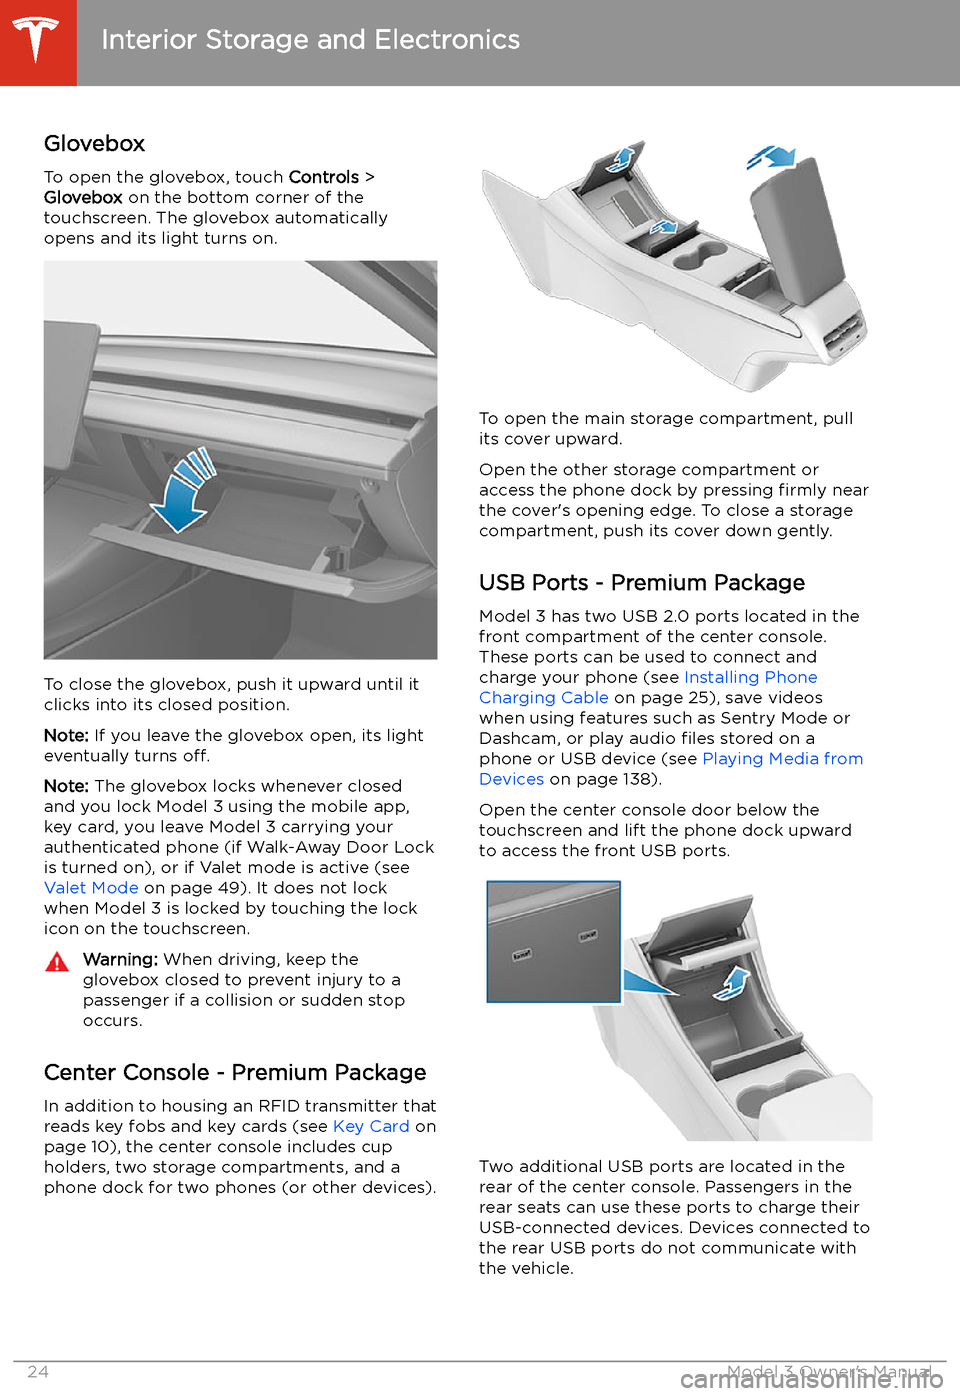
To open the glovebox, touch Controls >
Glovebox on the bottom corner of the
touchscreen. The glovebox automatically
opens and its light turns on.
To close the glovebox, push it upward until it
clicks into its closed position.
Note: If you leave the glovebox open, its light
eventually turns off.
Note: The glovebox locks whenever closed
and you lock Model 3 using the mobile app,
key card, you leave Model 3 carrying your authenticated phone (if Walk-Away Door Lock
is turned on), or if Valet mode is active (see Valet Mode on page 49). It does not lock
when Model 3 is locked by touching the lock
icon on the touchscreen.
Warning: When driving, keep the
glovebox closed to prevent injury to a
passenger if a collision or sudden stop occurs.
Center Console - Premium Package
In addition to housing an RFID transmitter that reads key fobs and key cards (see Key Card on
page 10), the center console includes cup
holders, two storage compartments, and a
phone dock for two phones (or other devices).
To open the main storage compartment, pull its cover upward.
Open the other storage compartment or
access the phone dock by pressing firmly near
the cover
Page 40 of 220

For dual-strap tethers, position a strap oneach side of the head support.
For single-strap tethers at the outboard
seating positions, run the strap over the outside-facing side of the head support (sameside of the head support as the seat belt
retraction mechanism).
For a single-strap tether in the center seating
position, fully lower the head support (see Raising/Lowering the Rear Center HeadSupport on page 29) and run the strap over
the top center of the head support.
Testing a Child Safety Seat
Before seating a child, always make sure the
child safety seat is not loose:
1. Hold the child safety seat by the belt path
and try to slide the safety seat from side
to side and front to back.
2. If the seat moves more than one inch
(2.5 cm), it is too loose. Tighten the belt or
reconnect the LATCH retained child safety
seat.
3. If you are unable to reduce slack, try a
different seat location or try another child
safety seat.
Child Safety Seat Warnings
Warning: Extreme hazard! Do not seat a
child on the front passenger seat even if
you are using a child safety seat. This seat
has an airbag in front of it. Although this airbag is disabled when Model 3 detects a
lightweight passenger, do not rely on technology to protect your child.Warning: Child restraint systems are
designed to be secured in vehicle seats
by lap belts or the lap belt portion of a lap-shoulder belt. Children could be
endangered in a crash if their child restraints are not properly secured in the
vehicle.Warning: According to collision statistics,
children are safer when properly
restrained in the rear seating positions
than in the front seating positions.Warning: Do not use a forward facing
child safety seat until your child weighs
over 20 lbs (9 kg) and can sit
Child Safety Seats
Seating and Safety Restraints39
Page 54 of 220
Vanity Mirrors
To expose and illuminate the vanity mirror,
fold the sun visor downwards, then use the
tab to lower the mirror cover. When you close the mirror cover, the light turns off.
Mirrors
Driving53
Page 59 of 220

Lights
Controlling Lights Touch Controls > Lights on the touchscreen to
control the lights.
In addition to the lights that you can control
from the touchscreen, Model 3 has
convenience lights that operate automatically
based on what you are doing. For example, in
low ambient lighting conditions, the interior lights, marker lights, tail lights, and puddle
lights turn on when you unlock Model 3, when
you open a door, and when you shift into Park.
They turn off after a minute or two or when
you shift into a driving gear or lock Model 3.
Note: The image below is provided for
demonstration purposes only. Depending on vehicle options, software version and market
region, your touchscreen may appear slightly
different.
1. Exterior lights (headlights, tail lights, side
marker lights, parking lights, and license
plate lights) are set to AUTO each time
you start Model 3. When set to AUTO,
exterior lights automatically turn on when
driving in low lighting conditions. If you
change to a different setting, lights always
revert to AUTO on your next drive.
Touch one of these options to temporarily
change the exterior light setting:
Page 60 of 220
6.If you turn on Headlights after Exit , the
exterior lights remain on for a short period of time after you stop driving and parkModel 3 in low lighting conditions. See
Headlights After Exit on page 59.
7. If you turn on Steering Wheel Lights , the
arrows associated with the scroll buttons
are backlit in low ambient lighting
conditions.
High Beam Headlights Push the left-hand steering column lever away
from you and release to turn the high beam
headlights on continuously. To cancel, push the lever away from you again.
To brie
Page 63 of 220
Auto High Beam is enabled and high
beams are on. Model 3 is ready to turn
off the high beams if light is detected.
See High Beam Headlights on page
59.Auto High Beam is enabled but high
beams are not on because light is
detected in front of Model 3. When light is no longer detected, high
beams automatically turn back on. See
High Beam Headlights on page 59.This indicator
Page 64 of 220
Driving StatusWhen Model 3 is driving (or ready to drive),
the touchscreen shows your current driving
status and a real-time visualization of the road
as detected by the Autopilot components (see About Autopilot on page 84). The
visualization automatically zooms in and out
to better utilize touchscreen space and inform
you when a vehicle is detected in your blind
spot.
Note: The following illustration is provided for
demonstration purposes only. Depending on vehicle options, software version, and market
region, the information displayed may be
slightly different.
1.Driving speed.
2. On the energy bar, black (or white in night
brightness) represents energy being used
during acceleration and green indicates
energy being gained through regenerative
braking. A dashed line appears on the
energy bar when power available for
acceleration or power that can be gained
by regenerative braking is being limited. Model 3 limits power for many reasons.
Here are just a few examples: