2020 SUZUKI JIMNY lock
[x] Cancel search: lockPage 77 of 421

Keyless entry system
transmitter (if equipped)
(2)
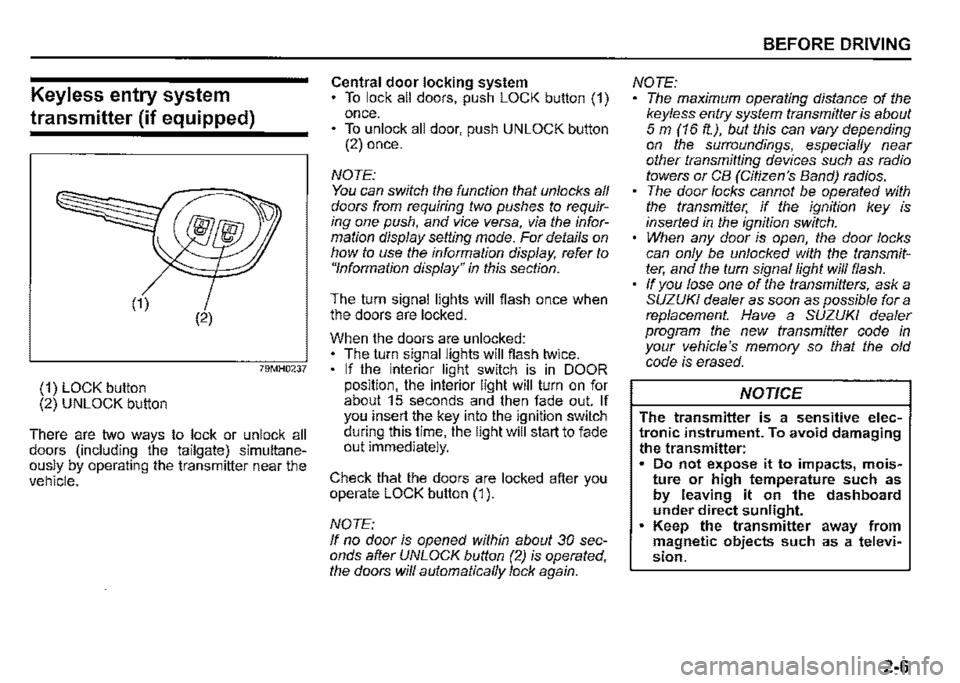
79MH0237
(1) LOCK button (2) UNLOCK button
There are two ways to lock or unlock all doors (including the tailgate) simultaneously by operating the transmitter near the vehicle.
Central door locking system To lock all doors, push LOCK button (1) once. • To unlock all door, push UNLOCK button (2) once.
NOTE: You can switch the function that unlocks all doors from requiring two pushes to requiring one push, and vice versa, via the information display setting mode. For details on how to use the information display, refer to "Information display" in this section.
The turn signal lights will flash once when the doors are locked.
When the doors are unlocked: The turn signal lights will flash twice. If the interior light switch is in DOOR position, the interior light will turn on for about 15 seconds and then fade out. If you insert the key into the ignition switch during this time, the light will start to fade out immediately.
Check that the doors are locked after you operate LOCK button (1 ).
NOTE: If no door is opened within about 30 seconds after UNLOCK button (2) is operated, the doors will automatically lock again.
BEFORE DRIVING
NOTE: The maximum operating distance of the keyless entry system transmitter is about 5 m (16 ft.), but this can vary depending on the surroundings, especially near other transmitting devices such as radio towers or CB (Citizen's Band) radios. The door locks cannot be operated with the transmitter, if the ignition key is inserted in the ignition switch. When any door is open, the door locks can only be unlocked with the transmitter, and the turn signal light will flash. If you lose one of the transmitters, ask a SUZUKI dealer as soon as possible for a replacement. Have a SUZUKI dealer program the new transmitter code in your vehicle's memory so that the old code is erased.
NOTICE
The transmitter is a sensitive electronic instrument. To avoid damaging the transmitter: Do not expose it to impacts, moisture or high temperature such as by leaving it on the dashboard under direct sunlight. Keep the transmitter away from magnetic objects such as a television.
2-6
Page 78 of 421

BEFORE DRIVING
Battery replacement If the transmitter becomes unusable, replace the battery.
To replace the battery of the transmitter:
(2)
68LM248
1) Remove the screw (1), and open the transmitter cover. 2) Remove the transmitter (2).
2-7
68LM249
(3) Lithium disc type battery: CR1616 or equivalent
3) Put the edge of a flat-bladed screwdriver in the slot of the transmitter (2) and pry it open. 4) Replace the battery (3) so its+ terminal faces "+" mark of the transmitter. 5) Close the transmitter and install it into the transmitter holder. 6) Close the transmitter cover, install and tighten the screw (1 ). 7) Check that the door locks can be operated with the transmitter. 8) Dispose of the used battery properly according to applicable rules or regulations. Do not dispose of lithium batteries with ordinary household trash.
A WARNING
Swallowing a lithium battery may cause serious internal injury. Do not allow anyone to swallow a lithium battery. Keep lithium batteries away from children and pets. If swallowed, contact a physician immediately.
NOTICE
• The transmitter is a sensitive elec)ron!c instrument. To avoid damaging ,t, do not expose it to dust or moisture or tamper with internal parts. When replacing the battery by yourself, the transmitter controller could be damaged affected by static electricity. Discharge the static electricity built up in your body by touching metal before replacing the battery.
NOTE: Used batteries must be disposed of properly according to applicable rules or regulations and must not be disposed of with ordinary household trash.
Page 79 of 421

80JM133
(1) Crossed-out wheeled bin symbol
The crossed-out wheeled bin symbol (1) indicates that a used battery should be collected separately from ordinary household trash.
By ensuring the used battery is disposed of or recycled correctly, you will help prevent potential negative consequences for the environment and human health, which could otherwise be caused by inappropriate battery disposal. The recycling of materials will help to conserve natural resources. For more detailed information about disposing of or recycling of the used battery, consult a SUZUKI dealer.
Theft deterrent alarm system
(if equipped)
A theft deterrent alarm system is armed in about 20 seconds after you lock the doors.
Keyless entry system -Use the transmitter. Once the system is armed, any attempt to open a door by using any other means (') than the keyless entry system transmitter or any attempt to open the engine hood will cause the alarm to be triggered. • These means include the following: -The key -The lock knob on a door
NOTICE
Do not modify or remove the theft deterrent alarm system. If modified or removed, the system cannot be properly operated.
BEFORE DRIVING
NOTE: The theft deterrent alarm system generates alarms when any of the predetermined conditions is met. However, the system does not have any function of blocking unauthorized entry into your vehicle. Always use the keyless entry system transmitter to unlock the doors when the theft deterrent alarm system has been armed. Using a key instead will trigger the alarm. If a person who does not know the theft deterrent alarm system is going to drive your vehicle, we recommend you explain the system and its operation to the person, or disable the system beforehand. Mistakenly triggering the alarm may cause a nuisance to others. Even if the theft deterrent alarm system is armed, you should still be careful to guard against theft. Do not leave money or things of value in your vehicle. The theft deterrent alarm system js maintenance-free.
2-8
Page 80 of 421

BEFORE DRIVING
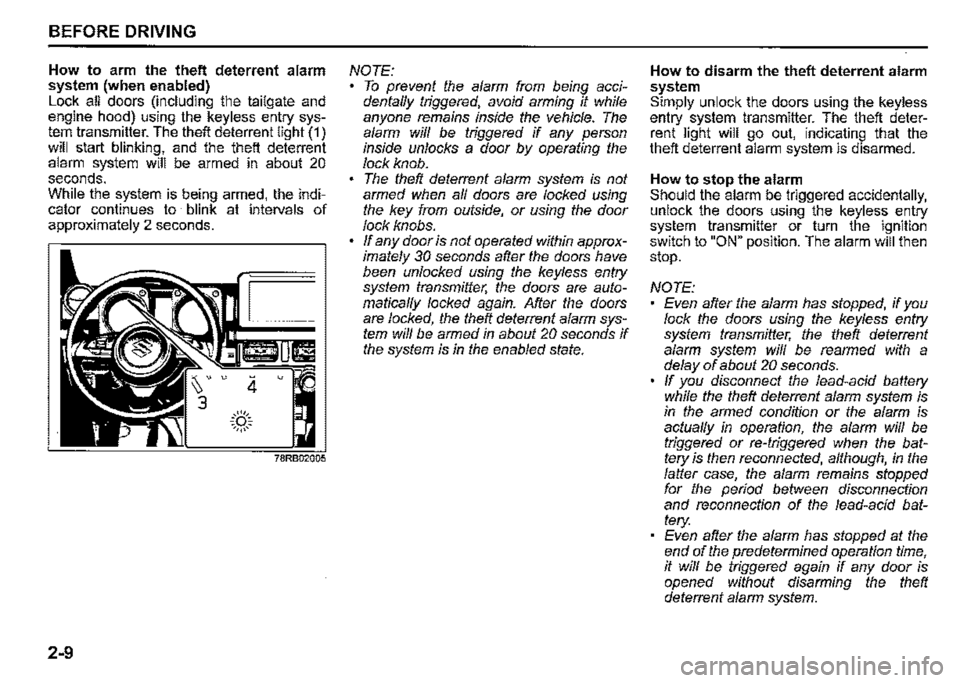
How to arm the theft deterrent alarm system (when enabled) Lock all doors (including the tailgate and engine hood) using the keyless entry system transmitter. The theft deterrent light (1) will start blinking, and the theft deterrent alarm system will be armed in about 20 seconds. While the system is being armed, the indicator continues to blink at intervals of approximately 2 seconds.
2-9
4 u
.::(')::. ~,,,,,~
NOTE: To prevent the alarm from being accidentaffy triggered, avoid arming it while anyone remains inside the vehicle. The alarm wiff be triggered if any person inside unlocks a door by operating the lock knob. The theft deterrent alarm system is not armed when af/ doors are locked using the key from outside, or using the door lock knobs. ff any door is not operated within approximately 30 seconds after the doors have been unlocked using the keyless entry system transmitter, the doors are automaticaf/y locked again. After the doors are locked, the theft deterrent alarm system wiff be armed in about 20 seconds if the system is in the enabled state.
How to disarm the theft deterrent alarm system Simply unlock the doors using the keyless entry system transmitter. The theft deterrent light will go out, indicating that the theft deterrent alarm system is disarmed.
How to stop the alarm Should the alarm be triggered accidentally, unlock the doors using the keyless entry system transmitter or turn the ignition switch to "ON" position. The alarm will then stop.
NOTE: Even after the alarm has stopped, if you lock the doors using the keyless entry system transmitter, the theft deterrent alarm system wiff be rearmed with a delay of about 20 seconds. ff you disconnect the lead-acid battery while the theft deterrent alarm system is in the armed condition or the alarm is actuaf/y in operation, the alarm will be triggered or re-triggered when the battery is then reconnected, although, in the falter case, the alarm remains stopped for the period between disconnection and reconnection of the lead-acid battery: Even after the alarm has stopped at the end of the predetermined operation time, it wiff be triggered again if any door is opened without disarming the theft deterrent alarm system.
Page 81 of 421

Checking whether the alarm has been triggered during parking If the alarm was triggered due to an unauthorized entry into the vehicle and you then turn the ignition switch to "ON" position, the theft deterrent light will blink rapidly for about 8 seconds and a buzzer will beep 4 times during this period. If this happens, check whether your vehicle has been broken into while you were away from it.
Theft deterrent light
(if equipped)
This light will blink with the ignition switch in "LOCK" or "ACC" position. The blinking light is intended to deter theft by leading others to believe that the vehicle is equipped with a security system.
BEFORE DRIVING
Windows
Manual window control
(if equipped)
~
{J
60G010A
Raise or lower the door windows by turning the handle located on the door panel.
2-10
Page 88 of 421

BEFORE DRIVING
Brightness control
000000_
78RB02091
,:!>J 100-16□ MPH ,.
(1)
78RB02031
2-17
When the ignition switch is turned "ON", the instrument panel lights come on.
Your vehicle has a system to automatically dim the brightness of the instrument panel lights when the position lights or headlights
are on.
When the position lights and/or head lights are turned "ON", you can adjust the brightness of the instrument cluster lights in seven levels of intensity.
To increase the brightness of the instrument panel lights, turn the indicator selector knob (1) clockwise.
To reduce the brightness of the instrument panel lights, turn the indicator selector knob (1) counterclockwise.
A WARNING
Do not adjust the brightness of the instrument panel lights while driving. Otherwise, you could lose control of
the vehicle.
NOTE: ff you do not tum the knob within several seconds, the brightness control display will be cance/ed automatically. When you reconnect the lead-acid battery, the brightness of the instrument panel fights wi/1 be reinitialized. Readjust the brightness according to your prefer
ence.
NOTE: If you adjust to the maximum brightness level when the position fights or headlights are on, the following functions will be cancelled. The function which automatically dims the brightness of instrument panel fights The function which operates with the brightness control, except maximum brightness level
Page 89 of 421

Information display
Information display is shown when the ignition switch is turned to "ON" position.
,□
~
~ 160
(1) t=
(1) Trip meter selector knob (2) Indicator selector knob
(2)
78RB02032
~ I (A) (B) 0
= (C)
~
(D)
(E)
(F)
(3) Information display
~(3)
BEFORE DRIVING
The information display shows the following information.
Display (A) Temperature
Display (B) Clock
Display (C) Speed limiter (if equipped)
Display (D) . Selector position (for Automatic transmission vehicles) I Gearshift indicator (if equipped) I Rear passenger's seat belt 1asso20,a reminder (if equipped)
Display (E) Trip meter I Odometer I Fuel consumption I Driving range
Display (F) Fuel gauge
2-18
Page 90 of 421

BEFORE DRIVING
Clock
The display (B) shows the time.
To change the lime indication: 1) Push the trip meter selector knob (1) and the indicator selector knob (2) together. 2) To change the hour indication, turn _the indicator selector knob (2) left or nght repeatedly when the hour indication · blinks. To change the hour indication quickly, turn and hold the indicator selector knob (2). To set the hour indication, push the indicator selector knob (2) and the minute indication will blink. 3) To change the minute indication, turn the indicator selector knob (2) left or right repeatedly when the minute indication blinks. To change the minute indication quickly, turn and hold the indicator selector knob (2). To set the minute indication, push the indicator selector knob (2).
To select 12124H format, refer to "Setting mode"-in this section.
A WARNING
If you attempt to adjust the display while driving, you could lose control of the vehicle. Do not attempt to adjust the display while driving.
2-19
Thermometer
The display (A) shows the thermometer. The thermometer indicates the outside temperature.
, ,:la)
Cocl#}
78RB02089
If the outside temperature drops to freezing condition, the mark (a) will appear on the display.
NOTE: The outside temperature indication is not the actual outside temperature when driving at low speed, or when stopped. If there is something wrong with the thermometer, or just after the ignition switch is tumed to "ON" position, the display may not indicate the outside temperature.
When the display (E) shows the driving range, you can change the unit of temperature. To change the unit of temperature, while pushing and holding the trip meter selector knob (1 ), turn the indicator selector knob (2).
-----------
2 5 oc (Initial setting)
78RB02092
Selector position (for Automatic
transmission vehicles)/ Gearshift
indicator (if equipped)/ Rear pas
senger's seat belt reminder (if equipped)
I EXAMPLE
□ 52RM21360