2020 SUZUKI JIMNY Type c
[x] Cancel search: Type cPage 62 of 421

FOR SAFE DRIVING
80J110
• Vehicle rollover
NOTE: For vehicle equipped with the "Emergency
road assistance -global navigation satellite system (ERA-GLONASS)", refer to "Emergency Road Assistance -Global Navigation Satellite System (ERA-GLONASS)" in "For Russia and other countries adopting ERA-GLONASS" in the "SUPPLEMENT" section for further information.
1-41
Side airbags and side curtain air
bags
68KM090
Side airbags and side curtain airbags are designed to inflate in severe side impact collisions when the ignition switch is in "ON" position.
Side airbags and side curtain airbags are not designed to inflate in frontal or rear collisions, rollovers or minor side collisions, since they would offer no protection in those types of accidents. Only the side airbag and side curtain airbag on the side of the vehicle that is struck will inflate. However, in a frontal angle collision, the side airbags and side curtain airbags may inflate. Since an airbag deploys only one time during an accident, seat belts are needed to restrain occupants from further movements during the accident.
Therefore, an airbag is not a substitute for seat belts. To maximize your protection, always fasten your seat belts. Be aware that no system can prevent all possible injuries that may occur in an accident.
Side airbags
78RB02025
Side airbags are located in the part of the front seatbacks closest to the doors. The "SRS AIRBAG" labels are attached to the seatbacks to identify the location of the side airbags.
Page 71 of 421

BEFORE DRIVING
BEFORE DRIVING
Brightness control .............................................................. 2-17
Information display ............................................................. 2-18 -
Instrument cluster (Type B) (if equipped) ......................... 2-25
Speedometer ....................................................................... 2-26
Tachometer .......................................................................... 2-26
Fuel gauge ........................................................................... 2-26
Brightness control .............................................................. 2-26
Information switch
(if equipped) ......................................................................... 2-27
Information display ............................................................. 2-28
Warning and indicator lights .............................................. 2-39
Lighting control lever ......................................................... 2-55
Headlight leveling switch
(if equipped) ......................................................................... 2-65
Headlight washer switch
(if equipped) ........................................................................ 2-65
60G404 Turn signal control lever .................................................... 2-66
Keys ...................................................................................... 2-1 Hazard warning switch ....................................................... 2-67
Door locks ............................................................................ 2-2 Windshield wiper and washer lever .................................. 2-67
Keyless entry system transmitter (if equipped) ................ 2-6 Tilt steering lock lever ........................................................ 2-70
Theft deterrent alarm system (if equipped) ....................... 2-8 Horn ...................................................................................... 2-70
Theft deterrent light Heated rear window switch /
(if equipped) ........................................................................ 2-10 heated outside rearview mirror switch (if equipped) ...... 2-71
Windows ............................................................................... 2-1 o Vehicle loading .................................................................... 2-72
Mirrors .................................................................................. 2-13 Trailer towing ....................................................................... 2-72
Instrument cluster (Type A) (if equipped) ......................... 2-15
Speedometer ........................................................................ 2-16
Tachometer .......................................................................... 2-16
Fuel gauge ............................................................................ 2-16
Page 78 of 421

BEFORE DRIVING
Battery replacement If the transmitter becomes unusable, replace the battery.
To replace the battery of the transmitter:
(2)
68LM248
1) Remove the screw (1), and open the transmitter cover. 2) Remove the transmitter (2).
2-7
68LM249
(3) Lithium disc type battery: CR1616 or equivalent
3) Put the edge of a flat-bladed screwdriver in the slot of the transmitter (2) and pry it open. 4) Replace the battery (3) so its+ terminal faces "+" mark of the transmitter. 5) Close the transmitter and install it into the transmitter holder. 6) Close the transmitter cover, install and tighten the screw (1 ). 7) Check that the door locks can be operated with the transmitter. 8) Dispose of the used battery properly according to applicable rules or regulations. Do not dispose of lithium batteries with ordinary household trash.
A WARNING
Swallowing a lithium battery may cause serious internal injury. Do not allow anyone to swallow a lithium battery. Keep lithium batteries away from children and pets. If swallowed, contact a physician immediately.
NOTICE
• The transmitter is a sensitive elec)ron!c instrument. To avoid damaging ,t, do not expose it to dust or moisture or tamper with internal parts. When replacing the battery by yourself, the transmitter controller could be damaged affected by static electricity. Discharge the static electricity built up in your body by touching metal before replacing the battery.
NOTE: Used batteries must be disposed of properly according to applicable rules or regulations and must not be disposed of with ordinary household trash.
Page 86 of 421

BEFORE DRIVING
Instrument cluster (Type A) (if equipped)
1. Speedometer 2. Tachometer 3. Information display 4. Trip meter selector knob 5. Indicator selector knob 6. Warning and indicator lights
6 1
4 6 3 6 5
· 78RB20203
2-15
Page 96 of 421

BEFORE DRIVING
Instrument cluster (Type B) (if equipped)
1. Speedometer 2. Tachometer 3. Information display 4. Trip meter selector knob 5. Indicator selector knob 6. Warning and indicator lights
2
4 6
2-25
6
~~ *DID~@ +lAil+
3 6 5
78RB02098
Page 112 of 421

BEFORE DRIVING
Brake system warning light
(CD)
82K170
Three different types of operations exist depending on the vehicle's specification.
• The light comes on briefiy when the ignition switch is turned "ON". The light comes on when the parking brake is engaged with the ignition switch "ON". The light comes on under either or both of above two conditions.
The light also comes on when the fiuid in the brake fiuid reservoir falls below the specified level.
The light should go out after starting the engine and fully releasing the parking brake, if the fluid level in the brake fiuid reservoir is adequate.
The light also comes on together with the ABS warning light when the rear brake force control function (proportioning valve function) of the ABS system fails. If the brake system warning light comes on while you are driving the vehicle, it may mean that there is something wrong with
2-41
the vehicle's brake system. If this happens:
1) Pull off the road and stop carefully.
A WARNING
Remember that stopping distance may be longer, you may have to push harder on the pedal, and the pedal may go down farther than normal.
2) Test the brakes by carefully starting and stopping the vehicle on the shoulder of the road. 3) If you determine that it is safe, drive the vehicle cautiously at low speed to the nearest a SUZUKI dealer for repairs or tow the vehicle to the nearest a SUZUKI dealer for repairs.
A WARNING
If any of the following conditions occur, you should immediately ask a SUZUKI dealer to inspect the brake system. If the brake system warning light does not go out after the engine has been started and the parking brake has been fully released. If the brake system warning light does not come on when the ignition switch is turned "ON". If the brake system warning light comes on at any time during vehicle operation.
NOTE: Because the brake system is self-adjusting, the fluid level will drop as the brake pads become worn. Replenishing the brake fluid reservoir is considered normal periodic maintenance.
NOTE: Parking brake reminder buzzer A buzzer sounds intermittently to remind you to release the parking brake if you start the vehicle without releasing the parking brake. Check that the parking brake is fully released and the brake system warning light turns off.
Page 142 of 421

BEFORE DRIVING
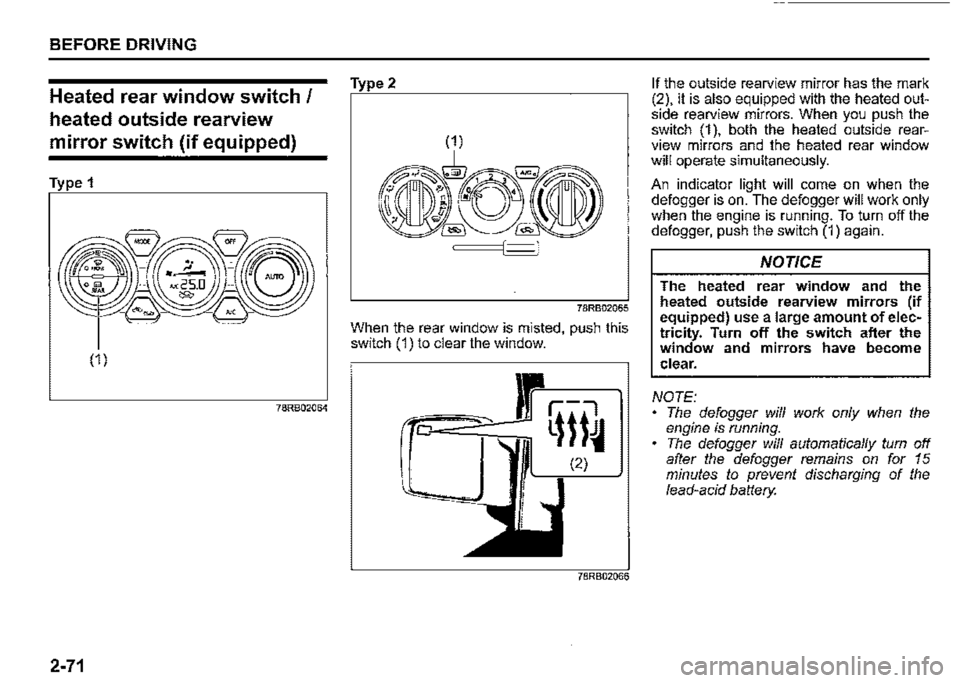
Heated rear window switch/
heated outside rearview
mirror switch (if equipped)
Type 1
(1)
78RB02064
2-71
Type2
78RB02065
When the rear window is misted, push this switch (1) to clear the window.
If the outside rearview mirror has the mark (2), it is also equipped with the heated outside rearview mirrors. When you push the switch (1 ), both the heated outside rearview mirrors and the heated rear window will operate simultaneously.
An indicator light will come on when the defogger is on. The defogger will work only when the engine is running. To turn off the defogger, push the switch (1) again.
NOTICE
The heated rear window and the heated outside rearview mirrors (if equipped) use a large amount of electricity. Turn off the switch after the window and mirrors have become clear.
NOTE: The defogger will work only when the engine is running. The defogger will automatically turn off after the defogger remains on for 15 minutes to prevent discharging of the lead-acid battery.
Page 174 of 421

OPERATING YOUR VEHICLE
Setting cruising speed
Cruise control switch
(1)
(1) Cruise switch (2) "CANCEL" switch (3) "RES +/SET-" switch
(4) Cruise indicator light (5) "SET" indicator light
3-23
52RM30190
75RM329
78R803029
(6) Cruise indicator (7) Set indicator
1) Turn on the cruise control system by pushing cruise switch (1). When the cruise indicator light (4) (type A) or cruise indicator (6) (type B) comes on, you can set cruising speed. 2) Accelerate or decelerate to the desired speed. 3) Push down the "RES +/SET -" switch (3) and turn on the "SET" indicator light (5) (type A) or set indicator (7) (type B). Take your foot off the accelerator pedal and the set speed will be maintained.
A WARNING
If the cruising speed is set by accident, you cannot decelerate or could loose control of the vehicle. This could lead to an accident, resulting in severe injury or death. Turn off the cruise control system and check that cruise indicator (6) is off when the system is not in use.
Changing speed temporarily
When the cruising speed is maintained, you can temporarily accelerate or decelerate.
To accelerate, depress the accelerator pedal. When you take your foot off the pedal, your vehicle will return to the set speed.
To decelerate, depress the brake pedal. The set speed will be canceled and "SET" indicator light (5) or set indicator (7) will go off. To resume the previously set speed, push up the "RES +/SET -" switch (3) and turn on "SET" indicator light (5) or set indicator (7) again when vehicle speed is above 40 km/h (25 mph). The vehicle will accelerate to the previously set speed and maintain its speed.