2020 SUBARU LEGACY parking brake
[x] Cancel search: parking brakePage 11 of 124

To retrieve the seat position with a button:
1. Turn the ignition switch to “ON”.
2. While the select lever is in the “P” position, press button “1” or “2”.
To set a seat position with the access key fob:
1. Make sure the select lever is in the “P” position with the parking brake on and theignition “OFF”.
2. Adjust the seat to the desired position.
3. While holding the “SET” button, press and hold the unlock button on the access key fob. A chirp sounds when the position is registered.
To retrieve the seat position with the access key fob:
1. Hold the access key fob.
2. Unlock and open the driver’s door.
Head Restraint Adjustment
Pull the head restraint up to raise it. To lower it,
push it down while pressing the release button
on the top of the seatback. Each head restraint
should be adjusted so that the center of the
head restraint is closest to the top of the
occupant’s ears. This adjustment should be
made for any seating position, front or rear,
that has a new occupant.
You can adjust the angle of the front head
restraints by tilting them forward. You will hear
a click when the restraint is locked. Pulling the
head restraint as far forward as it will go will
allow it to return to the fully upright position.
Seatbelt Adjuster
Always position the seatbelt adjuster so the
shoulder belt passes over the middle of your
shoulder without touching your neck. Pull the
adjuster out and slide it up or down. Release
the adjuster and make sure it is locked in
place.
GETTING COMFORTABLE
9
Page 25 of 124

Daytime Running Lights
The daytime running lights automatically turn on when the engine has started, the parking
brake is fully released, the light switch is in the Off, “AUTO” (if equipped) or “
”
position, and the select lever is not in the “P” position. Always turn on the headlights when
it’s dark outside by rotating the dial to the “
” or “AUTO” position.
TURN SIGNALS
Push slightly up for right lane change or fully
up for right turn signal. Push slightly down for
left lane change or fully down for left turn
signal.
WINDSHIELD WIPERS
To turn on the wipers, press the wiper control lever down one position for intermittent, two
positions for low speed, or three positions for high speed. To turn the wipers off, return the
lever to the “OFF” position. For a single wipe, move the lever up one position.
When the lever is in the intermittent position, rotate the dial to adjust the operating interval
of the wipers.
Pull the lever toward you to spray washer fluid. The washer will spray until you release the
lever, then wipe twice.
INSTRUMENT PANEL SWITCHES (LOWER LEFT)
The instrument panel contains these switches:
1 Trunk release switch
2 Illumination Brightness (p. 22)
CONTROLS
23
Page 30 of 124

ELECTRONIC PARKING BRAKE (EPB)
To apply the parking brake, pull up the parking
brake switch. The indicator light on the parking
brake switch will illuminate and “PARK” will
appear in the combination meter.
To release the parking brake manually, depress
the brake pedal and push the parking brake
switch down. To automatically release, gently
press the accelerator pedal with the select
lever in the “D” or “R” position. NOTE: All the
doors must be closed and your seatbelt must
be fastened.
Auto Vehicle Hold (AVH)
This function automatically holds your Subaru
in place when at a complete stop, such as a
traffic signal, even after you release the brake
pedal.
To turn on the Auto Vehicle Hold:1 From the Home screen select “Car
Settings” button.
2 Next, select “Auto Vehicle Hold”. The
indicator in the combination meter will
illuminate.
While your Subaru is being held by this
function, the operation indicator in the
combination meter will illuminate. The function
is canceled when you depress the accelerator
pedal or the brake pedal.
Select “Auto Vehicle Hold” again to turn it off.
The function works with the select lever in
either the “D” or “R” position.
OPERATING THE VEHICLE
28
Page 31 of 124

AUTO START–STOP SYSTEM
The Auto Start-Stop system is designed to automatically stop and restart the engine when
the vehicle is stationary for a short period of time (while waiting for a traffic light or in a
traffic jam) after the engine has warmed up. The system operates in order to reduce fuel
consumption, exhaust emissions and undesired idling noise.
System Operation
So that it can be used safely and comfortably, in addition to driver operations, the Auto
Start-Stop system is designed to constantly monitor the vehicle conditions as well as the
environment inside and outside the vehicle, in order to control stopping and restarting of
the engine.
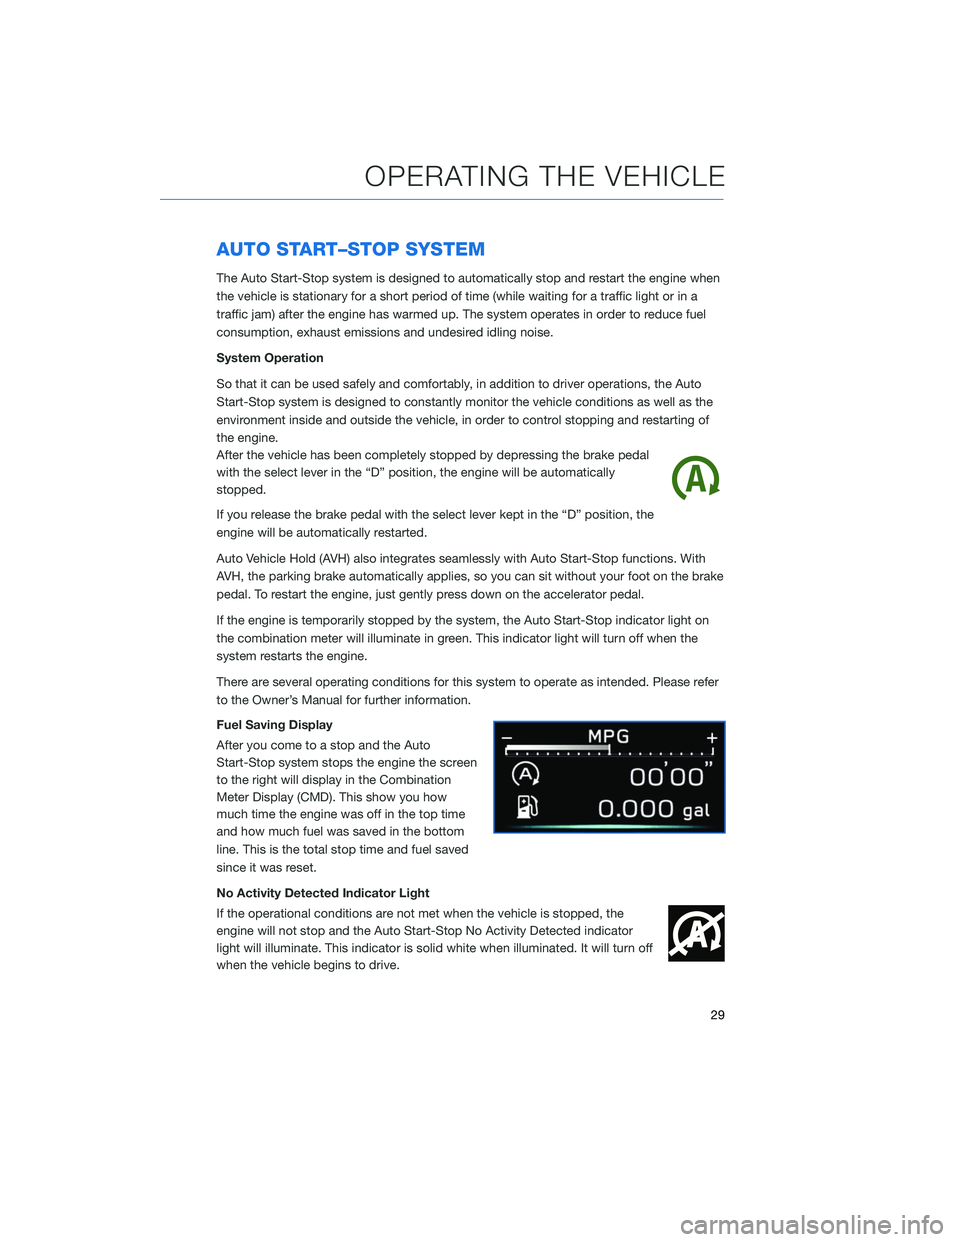
After the vehicle has been completely stopped by depressing the brake pedal
with the select lever in the “D” position, the engine will be automatically
stopped.
If you release the brake pedal with the select lever kept in the “D” position, the
engine will be automatically restarted.
Auto Vehicle Hold (AVH) also integrates seamlessly with Auto Start-Stop functions. With
AVH, the parking brake automatically applies, so you can sit without your foot on the brake
pedal. To restart the engine, just gently press down on the accelerator pedal.
If the engine is temporarily stopped by the system, the Auto Start-Stop indicator light on
the combination meter will illuminate in green. This indicator light will turn off when the
system restarts the engine.
There are several operating conditions for this system to operate as intended. Please refer
to the Owner’s Manual for further information.
Fuel Saving Display
After you come to a stop and the Auto
Start-Stop system stops the engine the screen
to the right will display in the Combination
Meter Display (CMD). This show you how
much time the engine was off in the top time
and how much fuel was saved in the bottom
line. This is the total stop time and fuel saved
since it was reset.
No Activity Detected Indicator Light
If the operational conditions are not met when the vehicle is stopped, the
engine will not stop and the Auto Start-Stop No Activity Detected indicator
light will illuminate. This indicator is solid white when illuminated. It will turn off
when the vehicle begins to drive.
OPERATING THE VEHICLE
29
Page 114 of 124

2.4L TURBO ENGINE . . . . .......39
2.5L ENGINE . . . . . . . . . . . .....38
A
ACCESSORY CONNECTIONS Power Outlets (12V) . . . . . . . . . . . 20
ADDING SHORTCUTS . . . . . . . . . . 50
ADDITIONAL RESOURCES . . . . . . . . 2
ADVANCED ADAPTIVE CRUISE CONTROL . . . . . . . . . . ......21
ANDROID AUTO Cables .................104
Compatible Models . . . . ......106
Connecting an Android Phone . . . . 104
APPLE CARPLAY Cables .................107
Compatible Models . . . . ......107
Connecting an iPhone . . . . . . . . 107
AUDIO CONTROLS . . . . . . . . . . . . 21
AUTO START–STOP SYSTEM . . . . . . 29
B
BLUETOOTH
®PAIRING
Pairing an Android Device . . . ....98
Pairing an iOS/Apple Device . . . . . 101
BUTTONS Controlling the Volume . . . . . . . . . 44
C
CHILD SAFETY LOCKS . . . . . . . . . . 34
CLIMATE CONTROL SYSTEM 11.6–Inch Automatic Climate
Control ..................14
Dual 7–Inch Automatic Climate Control
System ..................18
Heated Seats . . . . . . . . . .....19
Heated Steering Wheel . . . . . . . . 19
Rear Seat Heater . . . . . . . .....19
Remote Engine Start with Climate
Control ..................18 Ventilated Seats . . . . . . . .
....19
CLOCK Automatically . . . ...........93
Manually . . . . . . . . . . . . . . . . . 94
CREATING HOME/WORK . . . . . . . . . 70
D
DRIVER FOCUS . . ............31
DRIVING THE VEHICLE Automatic Transmission Shift Mode . 27
Paddle Shift Control Switches . ....27
E
ELECTRONIC PARKING BRAKE (EPB) Auto Vehicle Hold (AVH) . . . . . . . . 28
ENGINE OIL . . . . . . ...........40
ENGINE OIL CAPACITY . . . . . . . . . . 40
F
FINDING A DESTINATION Arrival Time/Distance . . ........74
Canceling Guidance . . . .......87
Finding a Destination By Address . . 74
Finding a Destination By POI . ....77
Guidance Screen Icons . .......84
Map View/Perspectives ........86
Map Zoom . . . . ............85
Nearest Gas Station . . . . . . . . . . 87
Route Options . . . . . . . .......79
Saving Destination as a Favorite . . . 81
Shortest/Fastest/Economic . . . . . . 80
Traffic Information . . . . . . . . ....87
FIRMWARE SOFTWARE UPDATES . . 110
FOLDING THE REAR SEATS .......33
FORWARD ..................2
FUEL .....................32
FUEL CAPACITY . .............32
FUEL FILLER LID . . . . . . . . . .....32
INDEX
112