Page 299 of 560

299
3-1. Using the air conditioning system and defogger
3
Interior features
BRZ_U
■
The defoggers can be operated when
Vehicles without a keyless access with push button start system
The engine switch is in the “ON” position.
Vehicles with a keyless access with push button start system
The push-button ignition switch is in “ON” mode.
■ The outside rear view mirror defoggers (vehicles with outside rear view
mirror defoggers)
Turning the rear window defogger on will turn the outside rear view mirror
defoggers on.
■ When continuous operation is set (vehicles with an automatic air con-
ditioning system)
During continuous operation, the defogger stops operating for 2 minutes
after every 15 minutes of continual operation. Even during the 2 minutes that
operation stops, the operating light remains illuminated. The rear window
defogger will continue to operate in this cycle until it is turned off.
■ Customization that can be configured at SUBARU dealer (vehicles with
an automatic air conditioning system)
The rear window defogger can be set to 15-minute operation or continuous
operation. (Customizable features →P. 518)
WARNING
■When the outside rear view mirror defoggers are on (vehicles with out-
side rear view mirror defoggers)
Do not touch the outside surface of the rear view mirrors, as they can
become very hot and burn you.
CAUTION
■To prevent battery discharge
Do not leave the rear window defogger on longer than necessary when the
engine is stopped.
Page 302 of 560
302
BRZ_U
3-3. Using the interior lights
Interior lights list
Interior light (→P. 303)
Engine switch light (vehicles without a keyless access with push
button start system)
Push-button ignition switch light (vehicles with a keyless access
with push button start system)
Door courtesy lights (if equipped)
Page 303 of 560

303
3-3. Using the interior lights
3
Interior features
BRZ_U
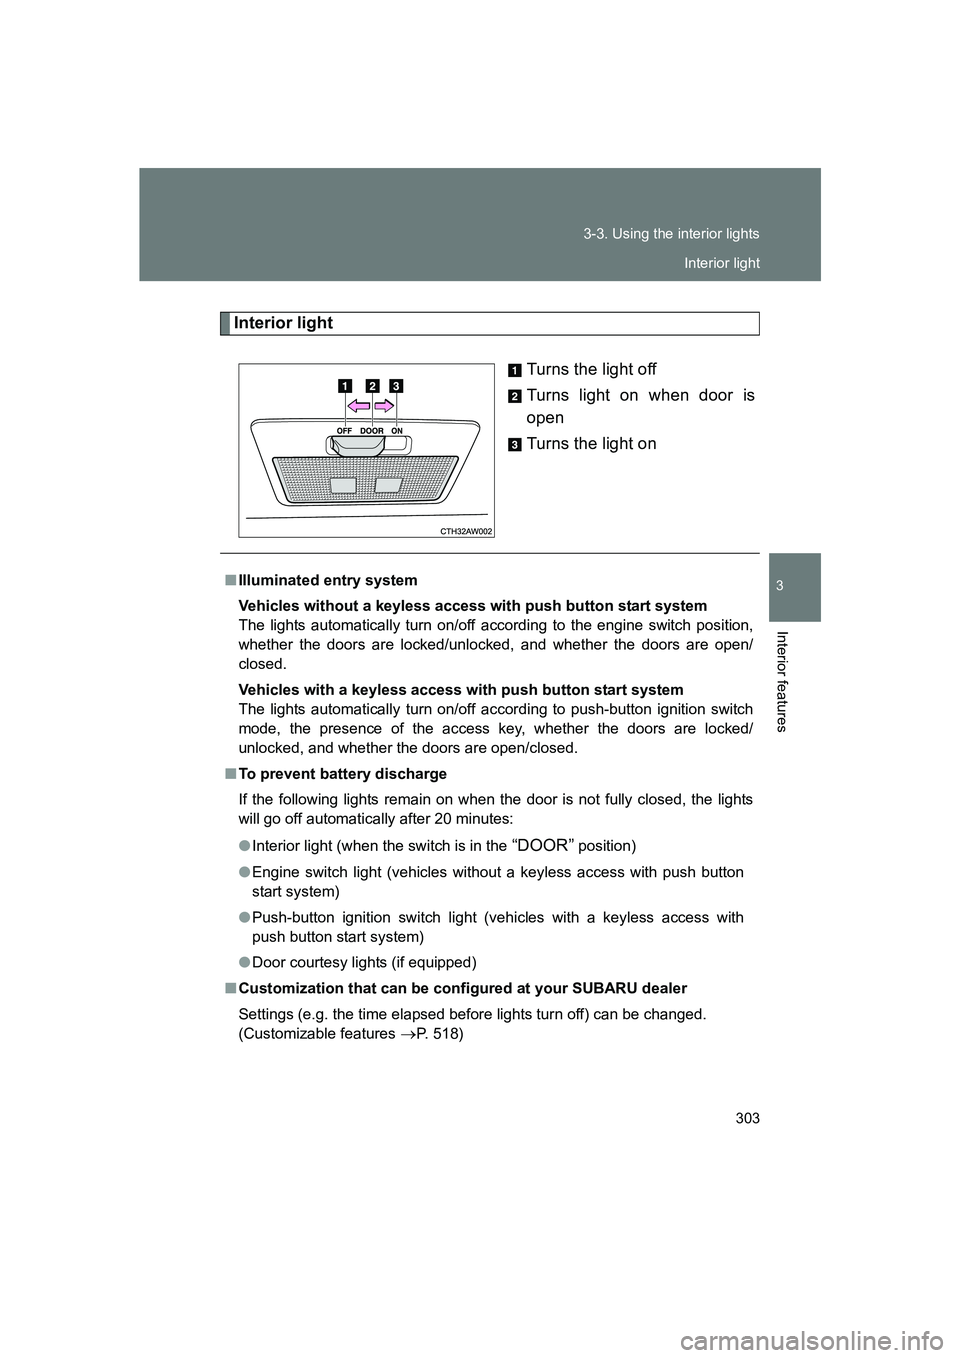
Interior light
Turns the light off
Turns light on when door is
open
Turns the light on
■Illuminated entry system
Vehicles without a keyless access with push button start system
The lights automatically turn on/off according to the engine switch position,
whether the doors are locked/unlocked, and whether the doors are open/
closed.
Vehicles with a keyless access with push button start system
The lights automatically turn on/off according to push-button ignition switch
mode, the presence of the access key, whether the doors are locked/
unlocked, and whether the doors are open/closed.
■ To prevent battery discharge
If the following lights remain on when the door is not fully closed, the lights
will go off automatically after 20 minutes:
● Interior light (when the switch is in the
“DOOR” position)
● Engine switch light (vehicles without a keyless access with push button
start system)
● Push-button ignition switch light (vehicles with a keyless access with
push button start system)
● Door courtesy lights (if equipped)
■ Customization that can be configured at your SUBARU dealer
Settings (e.g. the time elapsed before lights turn off) can be changed.
(Customizable features
→P. 518)
Interior light
Page 304 of 560
304
BRZ_U
3-4. Using the storage features
List of storage features
WARNING
■Items that should not be left in the storage spaces
Do not leave glasses, lighters or spray cans in the storage spaces, as this
may cause the following when cabin temperature becomes high:
●Glasses may be deformed by heat or cracked if they come into contact
with other stored items.
● Lighters or spray cans may explode. If they come into contact with other
stored items, the lighter may catch fire or the spray can may release gas,
causing a fire hazard.
Glove box
Bottle holders
Cup holders/console tray
Page 310 of 560
310
3-5. Other interior features
BRZ_U
Vanity mirrors
CAUTION
■To prevent battery discharge (vehicles with vanity lights)
Do not leave the vanity lights on for extended periods while the engine is off.
Open the cover to use.
Vehicles with vanity lights: The
light turns on when the cover is
opened.
Page 314 of 560
314
3-5. Other interior features
BRZ_U
Seat heaters∗
■The seat heaters can be used when
The push-button ignition switch is in “ON” mode.
■ When not in use
Turn the seat heater off. The indicator light goes off.
∗: If equipped
Press the switch to warm the
seats.
The indicator light comes on
when a seat heater is turned
on.
Rapid heating
Normal heating
Page 318 of 560
318
3-5. Other interior features
BRZ_U
HomeLink®∗
Programming HomeLink
The HomeLink compatible transceiver in your vehicle has 3 buttons
which can be programmed to operate 3 different devices. Refer to the
programming method below appropriate for the device. Indicator light
Status indicators
HomeLink buttons
∗: If equipped
The HomeLink® Wireless Control System provides a convenient way
to replace up to three hand-held radio-frequency remotes used to
activate devices such as gate operators, garage door openers, entry
door locks, security systems, even home lighting. The below steps
are generic programming instructions; for Genie and Sommer
garage door openers please go dir ectly to the HomeLink website.
Additional information and programming videos can be found at
www.HomeLink.com and www.youtube.com/HomeLinkGentex.
Page 320 of 560

320 3-5. Other interior features
BRZ_U■
Programming a New HomeLink Button
Press and release the HomeLink button that you would like to
program. The HomeLink indicator light will flash orange slowly
(if not, refer to “Erasing HomeLink Buttons” →P. 324).
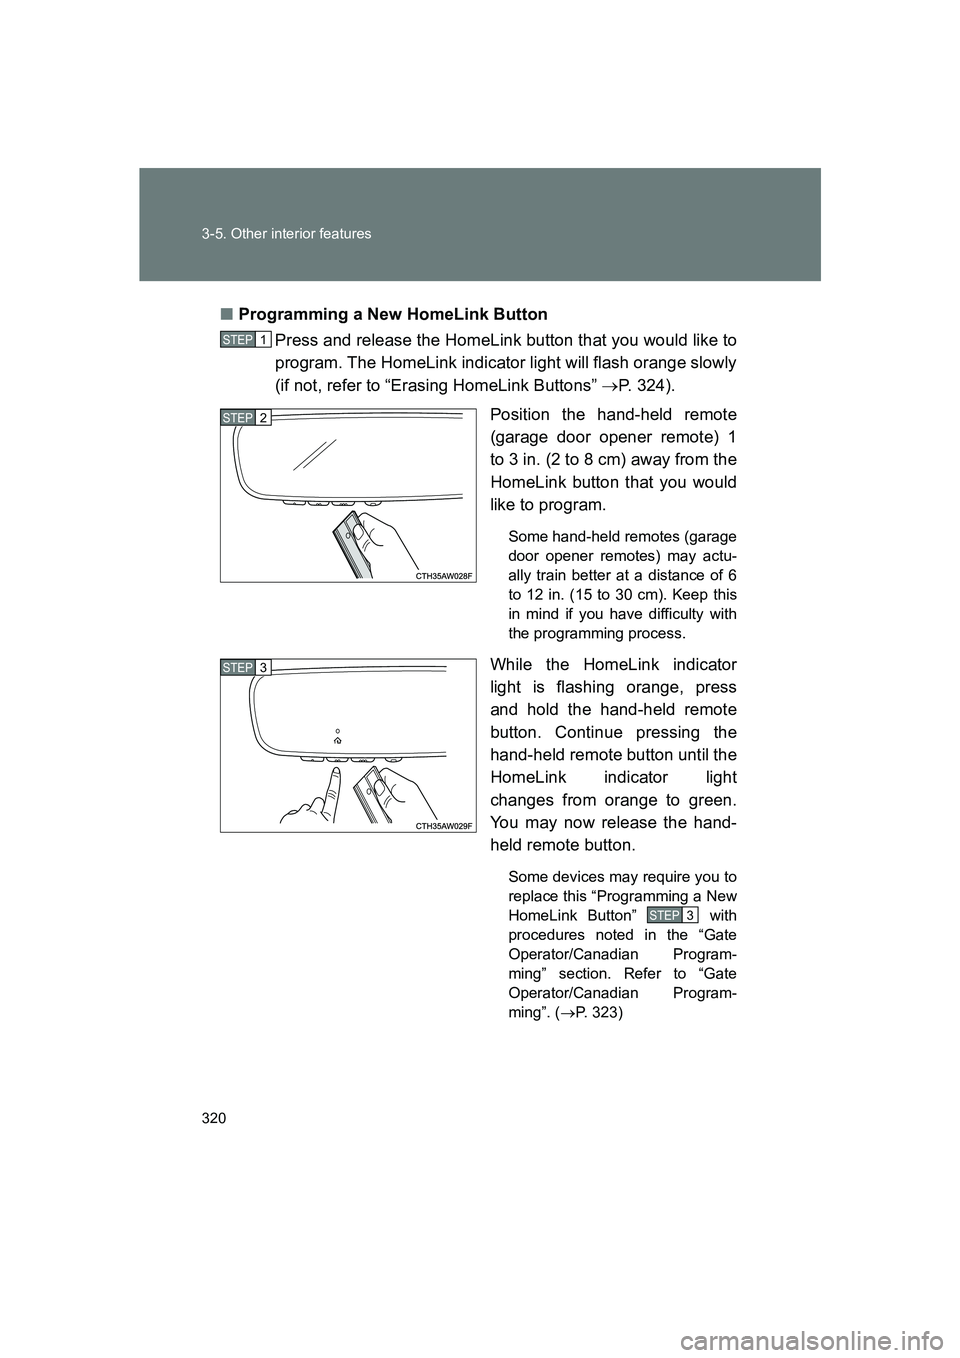
Position the hand-held remote
(garage door opener remote) 1
to 3 in. (2 to 8 cm) away from the
HomeLink button that you would
like to program.
Some hand-held remotes (garage
door opener remotes) may actu-
ally train better at a distance of 6
to 12 in. (15 to 30 cm). Keep this
in mind if you have difficulty with
the programming process.
While the HomeLink indicator
light is flashing orange, press
and hold the hand-held remote
button. Continue pressing the
hand-held remote button until the
HomeLink indicator light
changes from orange to green.
You may now release the hand-
held remote button.
Some devices may require you to
replace this “Programming a New
HomeLink Button” with
procedures noted in the “Gate
Operator/Canadian Program-
ming” section. Refer to “Gate
Operator/Canadian Program-
ming”. ( →P. 323)
STEP 1
STEP 2
STEP 3
STEP 3