Page 13 of 399
General views of the vehicle
Overview (left hand drive) Electric windows
››
› page 116
Exterior mirror adjustment ››› page 131
Control for lighting and demisting win-
dows ››› page 120
Turn signal and main beam lever
››› page 122
Cruise control ››› page 245
Warning lamps ››› page 89
Wipers and rear window wiper
››› page 129
1 2
3
4
5
6 Driver information system
››
› page 87
Infotainment system ››› page 92
,
››› page 172
Open bonnet lever ››› page 329
Fuses ››› page 61
Steering wheel adjustment ››› page 17
Hazard warning lights ››› page 125
Starter button ››› page 218
Electronic parking brake ››› page 275
Central locking ››› page 101 7
8
9
10
11
12
13
14
15
11
Page 14 of 399
General views of the vehicle
Overview (right hand drive) Infotainment system
››
› page 92
,
››› page 172
Turn signal and main beam lever
››› page 122
Cruise control ››› page 245
Warning lamps ››› page 89
Wipers and rear window wiper
››› page 129
Driver information system ››› page 87
Control for lighting and demisting win-
dows ››› page 120
1 2
3
4
5
6 Exterior mirror adjustment
››
› page 131
Electric windows ››› page 116
Open bonnet lever ››› page 329
Starter button ››› page 218
Central locking ››› page 101
Electronic parking brake ››› page 275
Hazard warning lights ››› page 125
Steering wheel adjustment ››› page 17
Fuses ››› page 61 7
8
9
10
11
12
13
14
15
12
Page 91 of 399
Instruments and warning/control lamps
Fig. 73
Left side of the multifunction steering
wheel : butt
on for driver assistance systems
(depending on versions). With the turn signal and main beam headlight
l
e
ver button, you can activate or deactivate
the driver assistance systems displayed in the
Assistance systems menu .
Activating or deactivating a driver assis-
tance system using the turn signal lever
and main beam headlight
�
Page 100 of 399

Operation
Opening and closing Set of v ehicl
e keys
Vehicle key Fig. 80
Vehicle key Fig. 81
Centre console: vehicle key socket. Key to the
››
› Fig. 80
Unlock the vehicle
1 Lock the vehicle
Unl
ock only the r
ear lid. Press the button
until all the turn signals on the vehicle
flash briefly. You have 2 minutes to open
the rear lid. Once this time has passed, it
will lock again. In addition, the lamp on
the key flashes.
Control lamp
Alarm button*. Only press in the event of
an emergency! When the alarm button is
pressed, the vehicle's sounds and the turn
signals light up for a short time. Press
again to disconnect.
With the vehicle key the vehicle may be
locked or unlocked remotely ››› page 101
.
The vehicle key includes an emitter and bat-
tery. The receiver is in the interior of the vehi-
cle. The range of the vehicle key with remote
control and new battery is several metres
around the vehicle.
If it is not possible to open or close the vehicle
using the remote control key, this should be
re-synchronised ››› page 100
or the battery
changed ››› page 100
.
Different keys belonging to the vehicle may
be used.
Control lamp on the vehicle key
When a button on the vehicle key is briefly
pressed, the indicator lamp flashes 4 ›››
Fig. 80 once briefly, but if the butt
on is
2 3
4
5 held down for a longer period it will flash sev-
er
al times, such as f
or convenience opening.
If the vehicle key control lamp does not light
up when the button is pressed, replace the
key's battery ››› page 100
.
Key socket*
Depending on the version there is a socket for
the key close to the start button ››› Fig. 81
.
Warning! Do not confuse with the location for
the emergency start ››› page 222
.
Spare key
To obtain a spare key and other vehicle keys,
the vehicle ID number is required.
Each new key contains a microchip which
must be coded with the data from the vehicle
electronic immobiliser. A vehicle key will not
work if it does not contain a microchip or the
microchip has not been encoded. This is also
true for keys which are specially cut for the
vehicle.
The vehicle keys or new spare keys can be
obtained from a SEAT Official Service, a spe-
cialised workshop or an approved key service
qualified to create this kind of key.
New keys or spare keys must be synchronised
before use ››› page 100
.
98
Page 125 of 399
Lights
WARNING
Improper or lack of use of the turn signals,
or f or
getting to deactivate them can con-
fuse other road users. This could result in a
serious accident.
�
Page 128 of 399
Operation
7. Always take the vehicle key with you when you l eav
e the vehicle.
All turn signals flash simultaneously when the
hazard warning lights are switched on. The
two turn signal turn signal lamps � � and the
turn signal lamp in the switch � will flash at
the same time. The simultaneous hazard
warning lights also work when the ignition is
switched off.
Emergency braking warning
If the vehicle brakes suddenly and continu-
ously at a speed of more than 80 km/h (50
mph), the brake light flashes several times per
second to warn the vehicles driving behind. If
you continue braking, the hazard warning
lights will come on automatically when the
vehicle comes to a standstill. They switch off
automatically when the vehicle starts to
move again. WARNING
�
Page 250 of 399
Driving
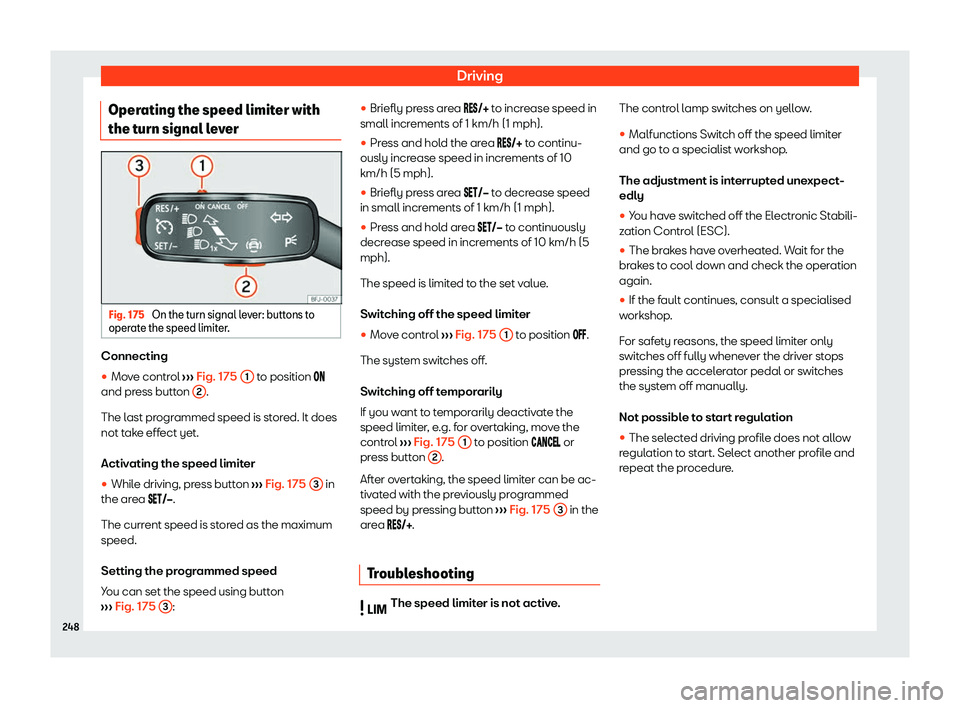
Operating the speed limiter with
the t urn signal l
everFig. 175
On the turn signal lever: buttons to
oper at
e the speed limiter. Connecting
�
Page 253 of 399

Driver assistance systems
Limitations
This syst em does not r
eact to objects that
cross transversely or to animals. The basic
limitations of the Front Assist must also be
taken into account ››› page 251
.
Turn assist Turn assist can avoid a collision with a vehicle
appr
oaching in the opposit
e direction, by
braking the vehicle itself when the intention is
to turn.
This system is active up to 15 km/h (9 mph).
Limitations
The turn-off assist function is available if you
have indicated your intention to turn by acti-
vating the turn signal, you have turned the
steering wheel and the turning path has star-
ted.
It only reacts to vehicles that are in the path
of the vehicle (not to animals, people, etc.).
The basic limitations of the Front Assist must
also be taken into account ››› page 251
. System limitations
Fig. 177
On the instrument panel display: ini-
tial syst em self
-calibration indication. Front Assist has certain limitations inherent to
the syst
em. Thus, in cert
ain circumstances,
some of the reactions may be inappropriate
from the driver's standpoint. So pay attention
in order to intervene if necessary.
The following conditions may cause the
Front Assist not to react or to do so too
late:
�
 Electric windows
››
› page 116
Exterior mirror adjustment ››› page 131
Control for lighting and demisting win-
dows ››› pag")
 Infotainment system
››
› page 92
,
››› page 172
Turn signal and main beam lever
››› page 122
Cruise control ››› pag")
. With the turn signal and main beam headlig")